
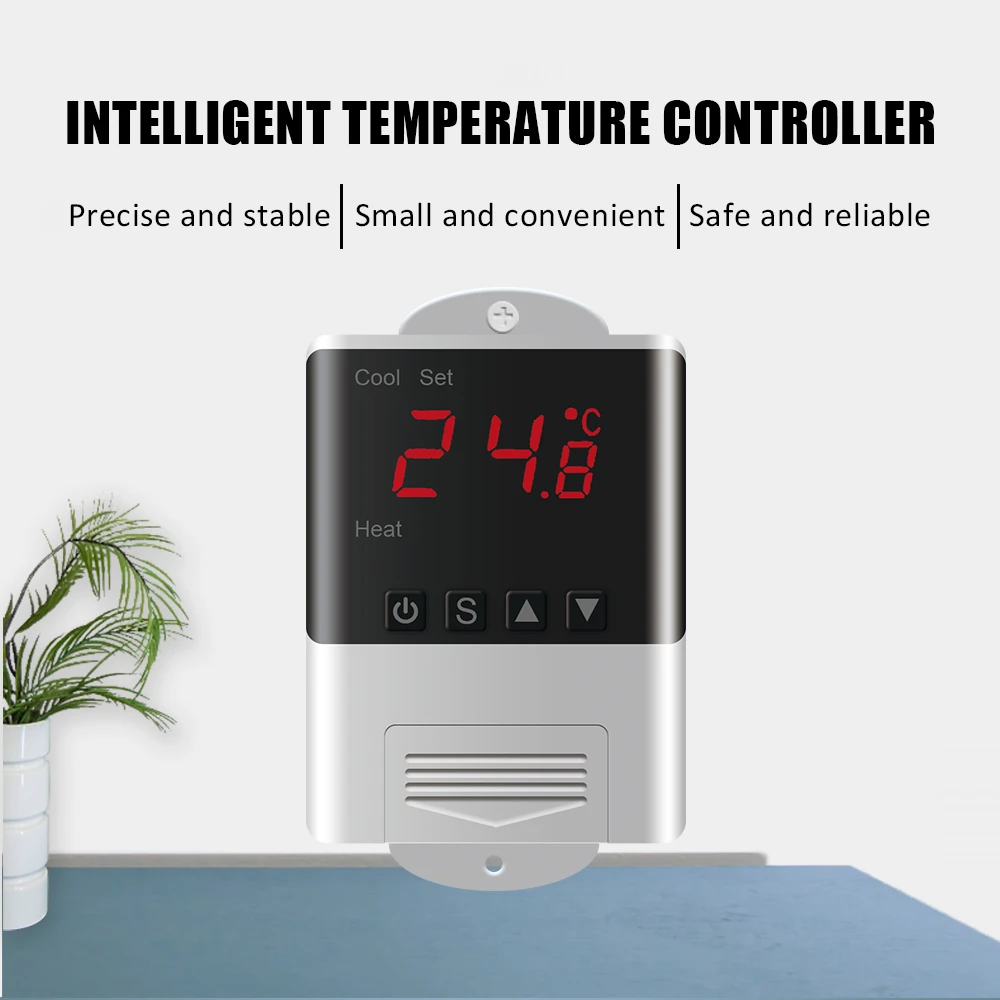
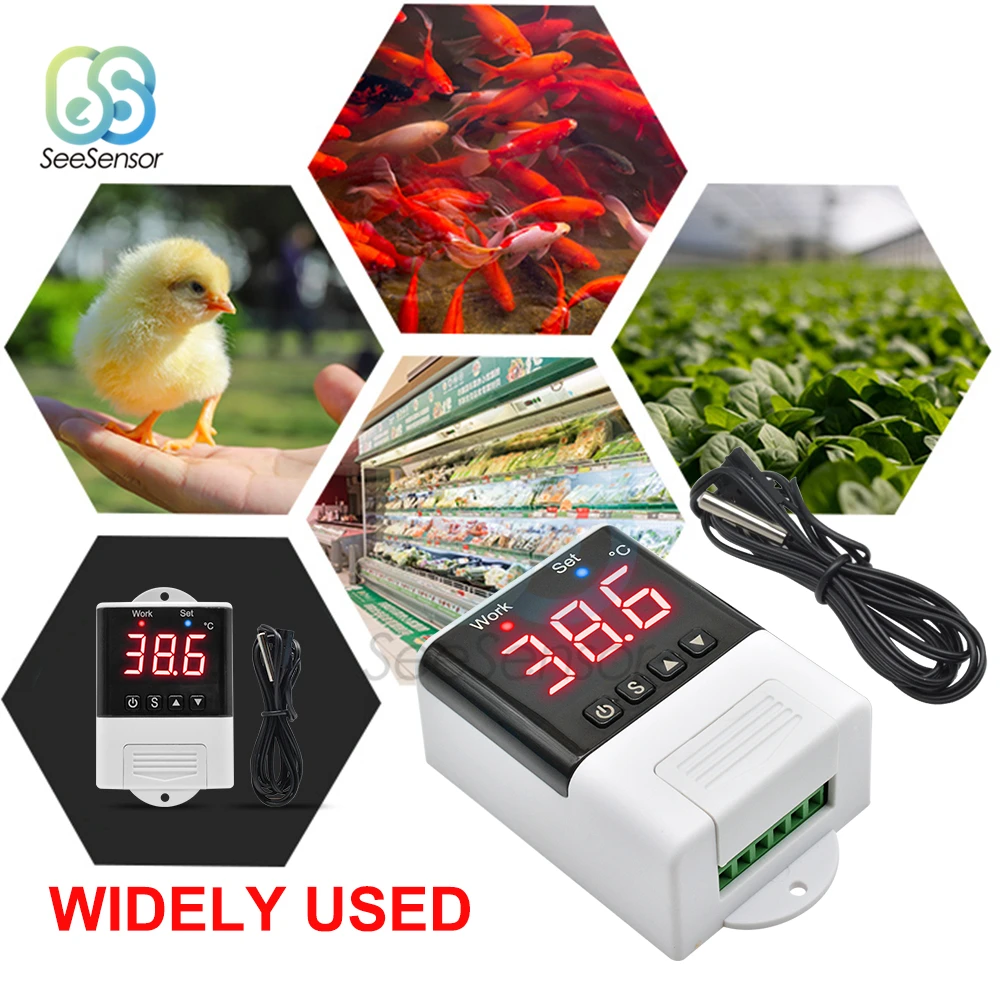
110V-220V LED Digital Temperature Controller Thermostat Thermoregulator for Incubator Heating Cooling Replace STC-1000 DTC1200


110V-220V LED Digital Temperature Controller Thermostat Thermoregulator for Incubator Heating Cooling Replace STC-1000 DTC1200
SKU:XA0022
Regular price
$13.99
![]()
- guaranteeQuality checked
- Special gift cardsSpecial gift cards
- Free return Within 60 days
- Consultancy86-0755-85201155
Description:
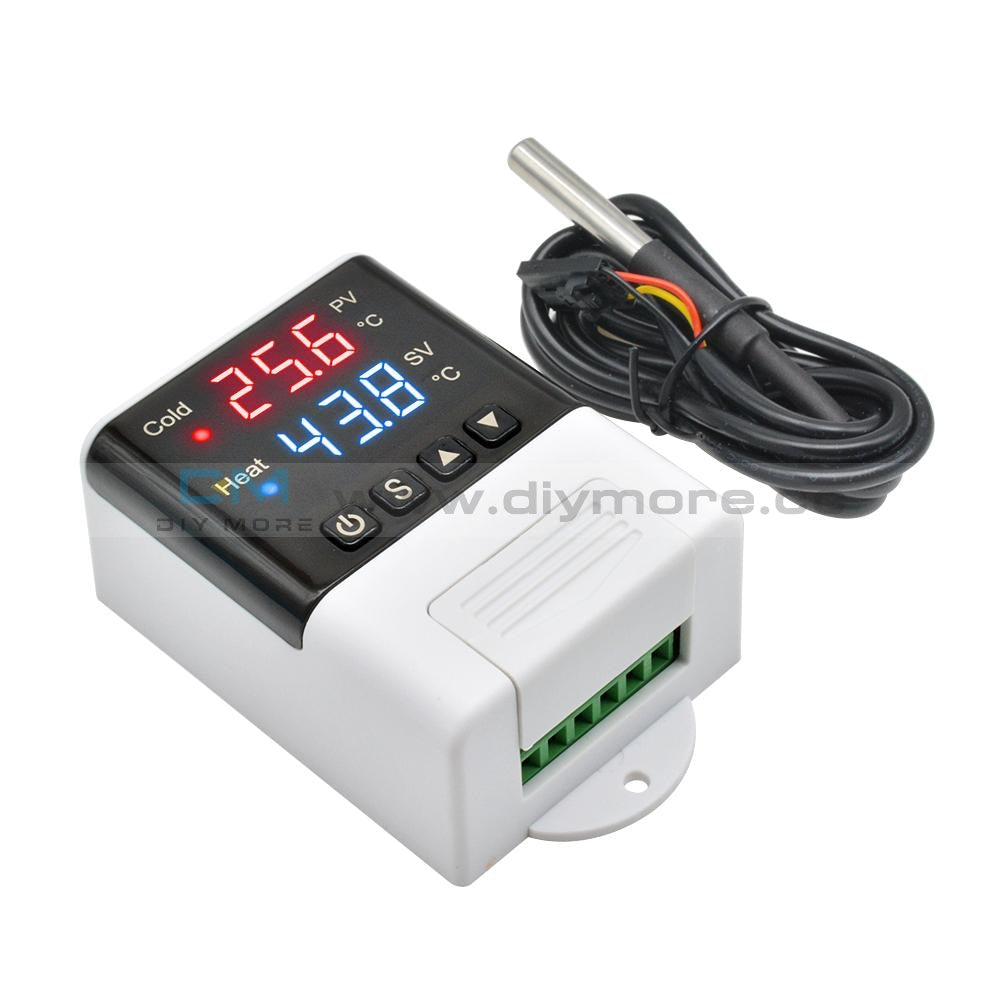
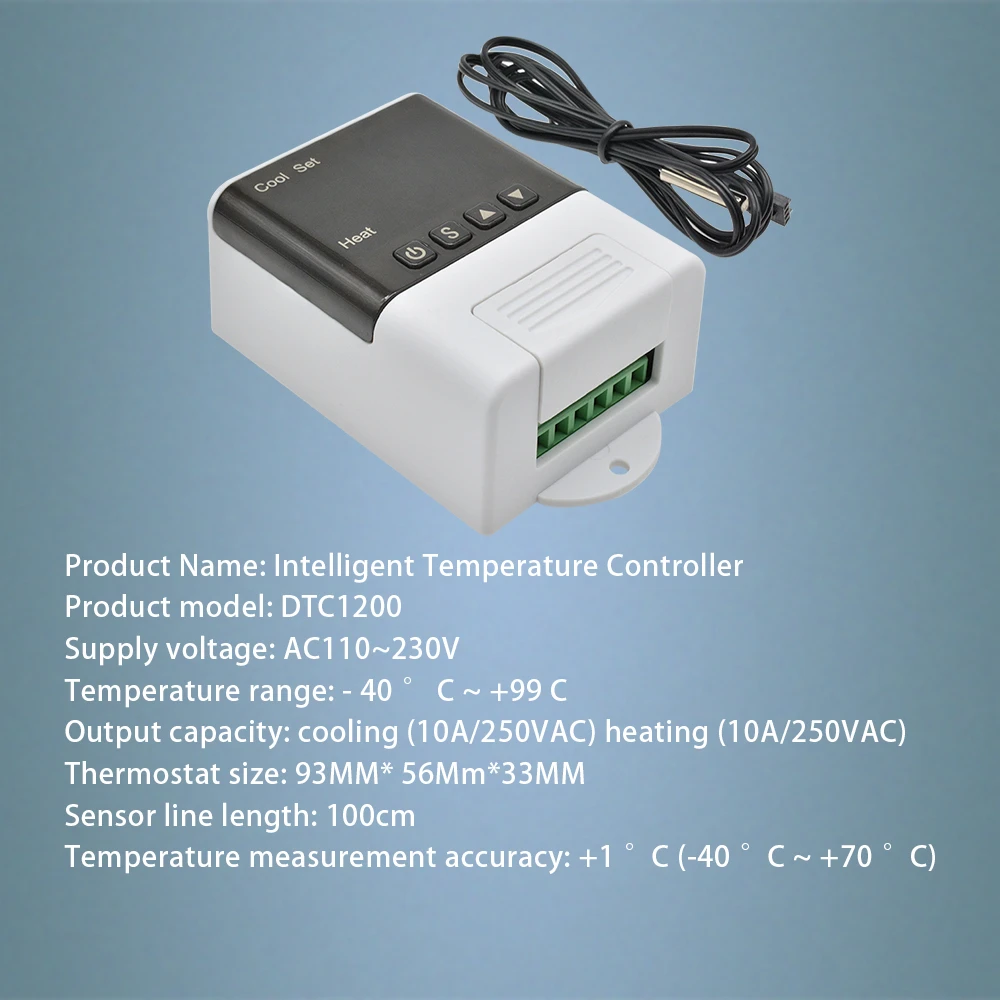
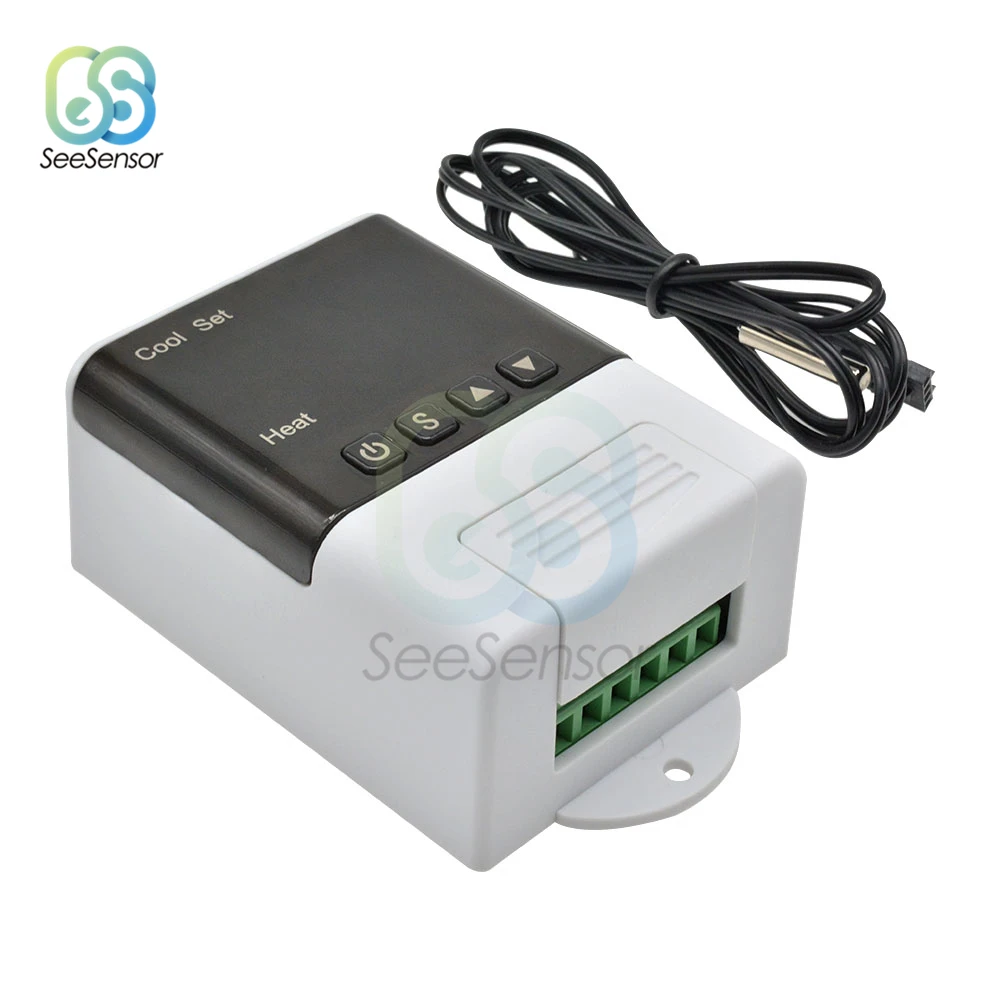
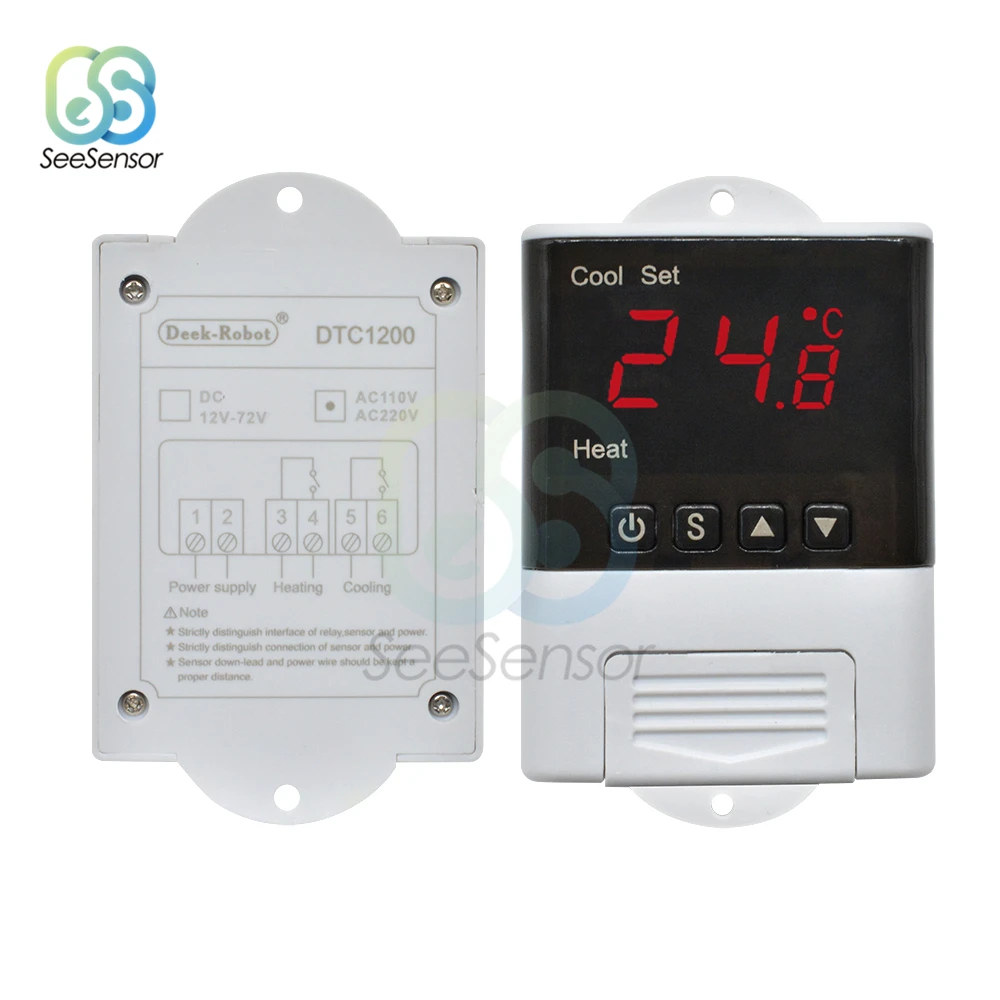
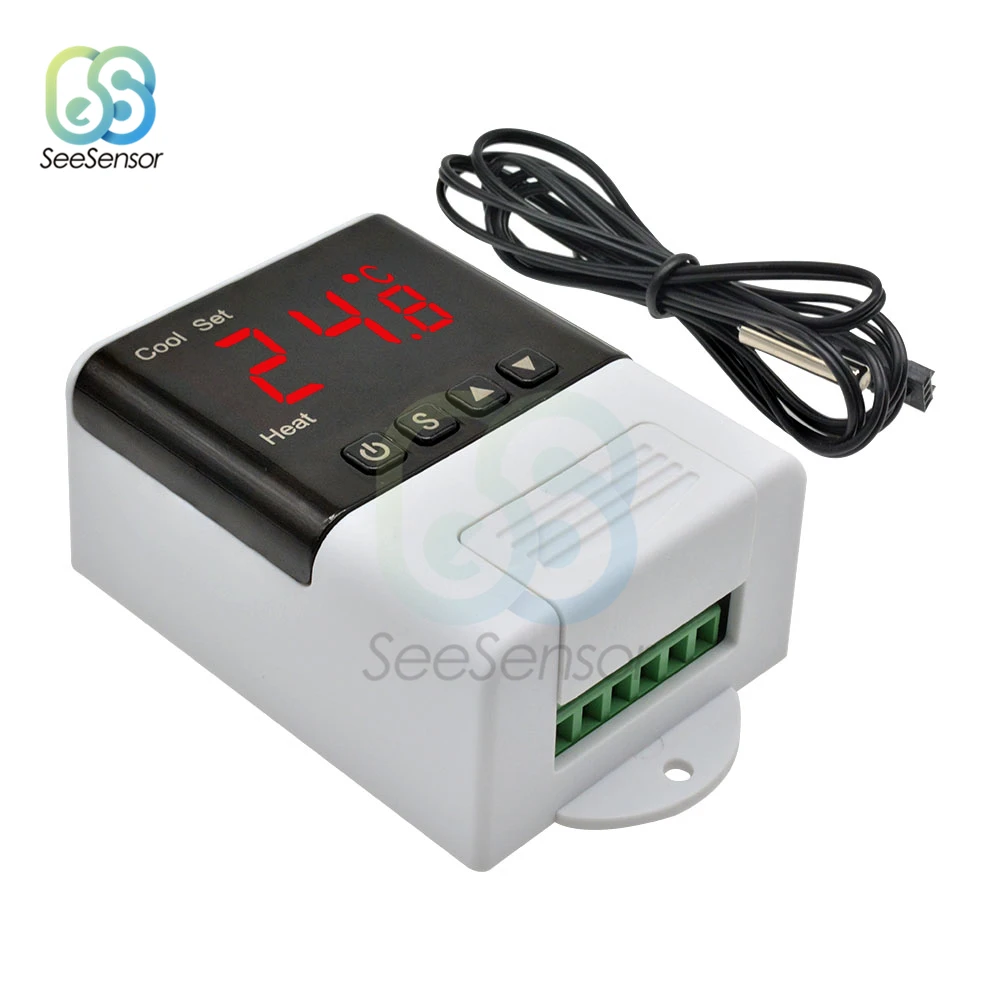
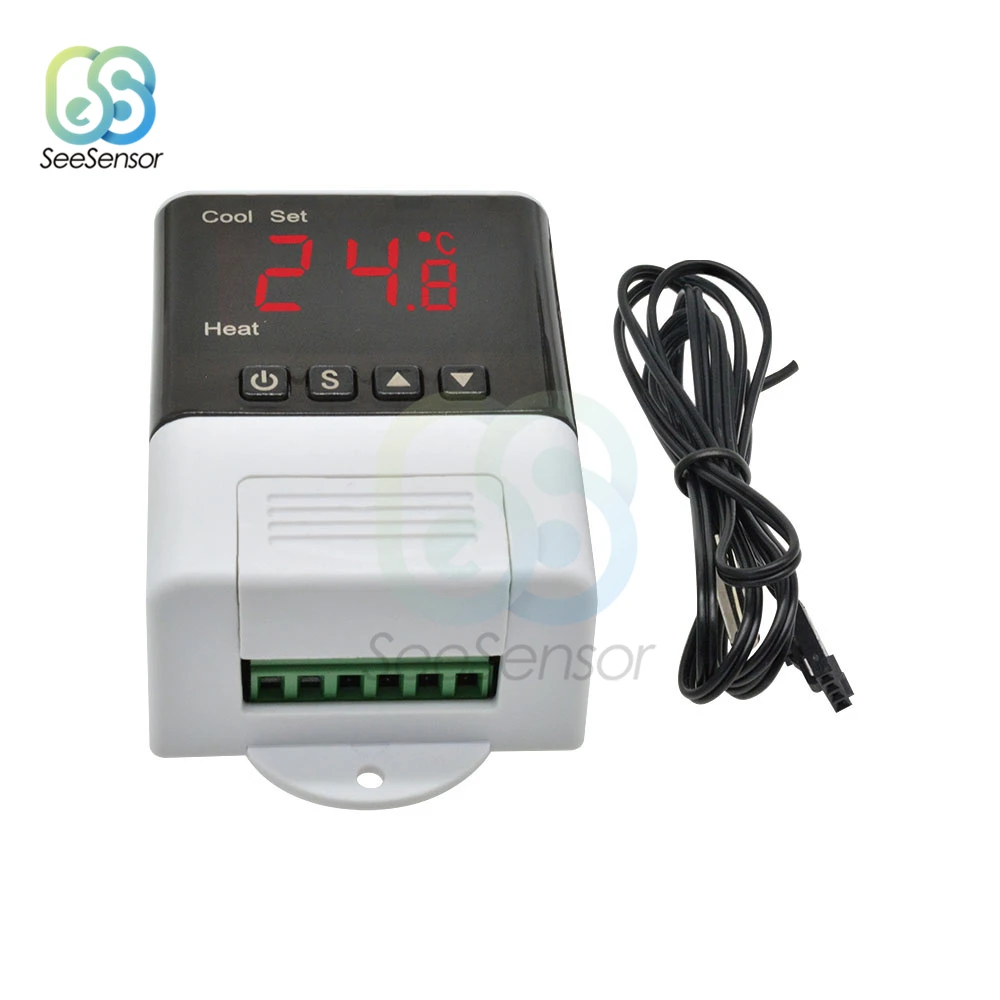
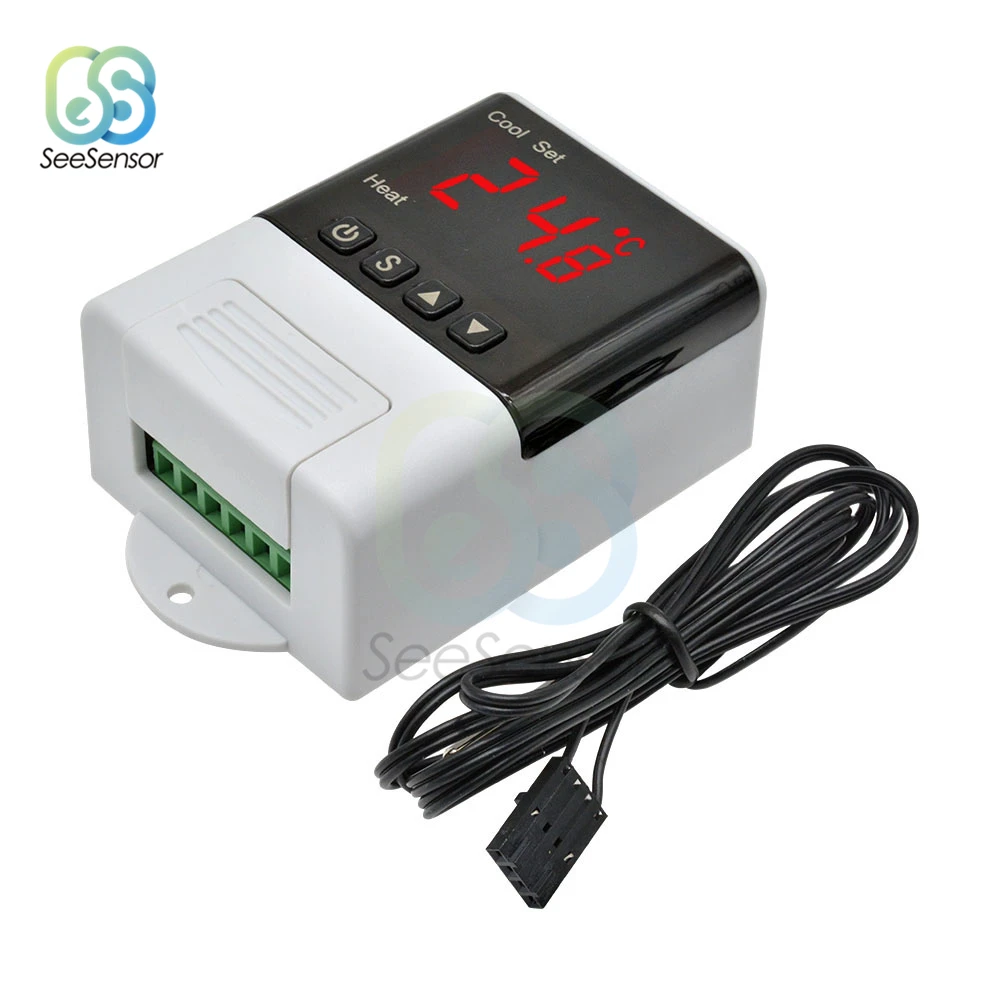
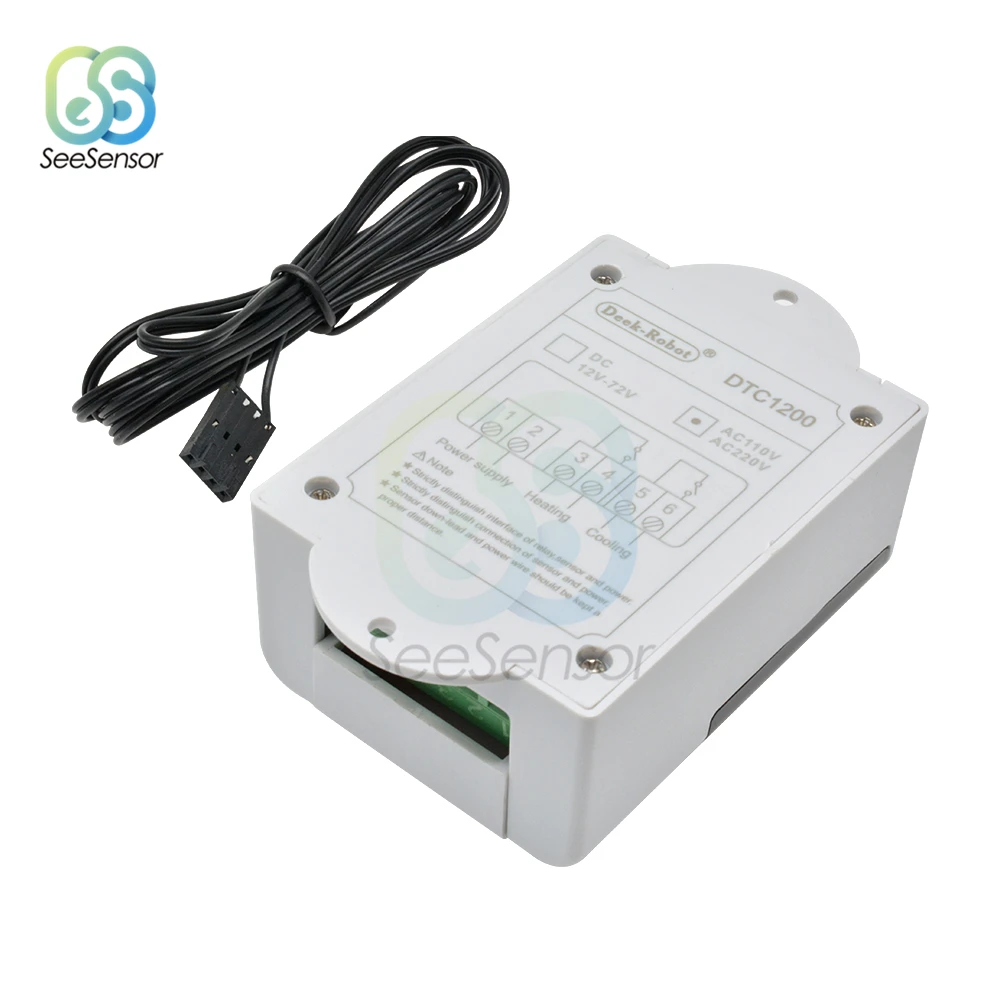
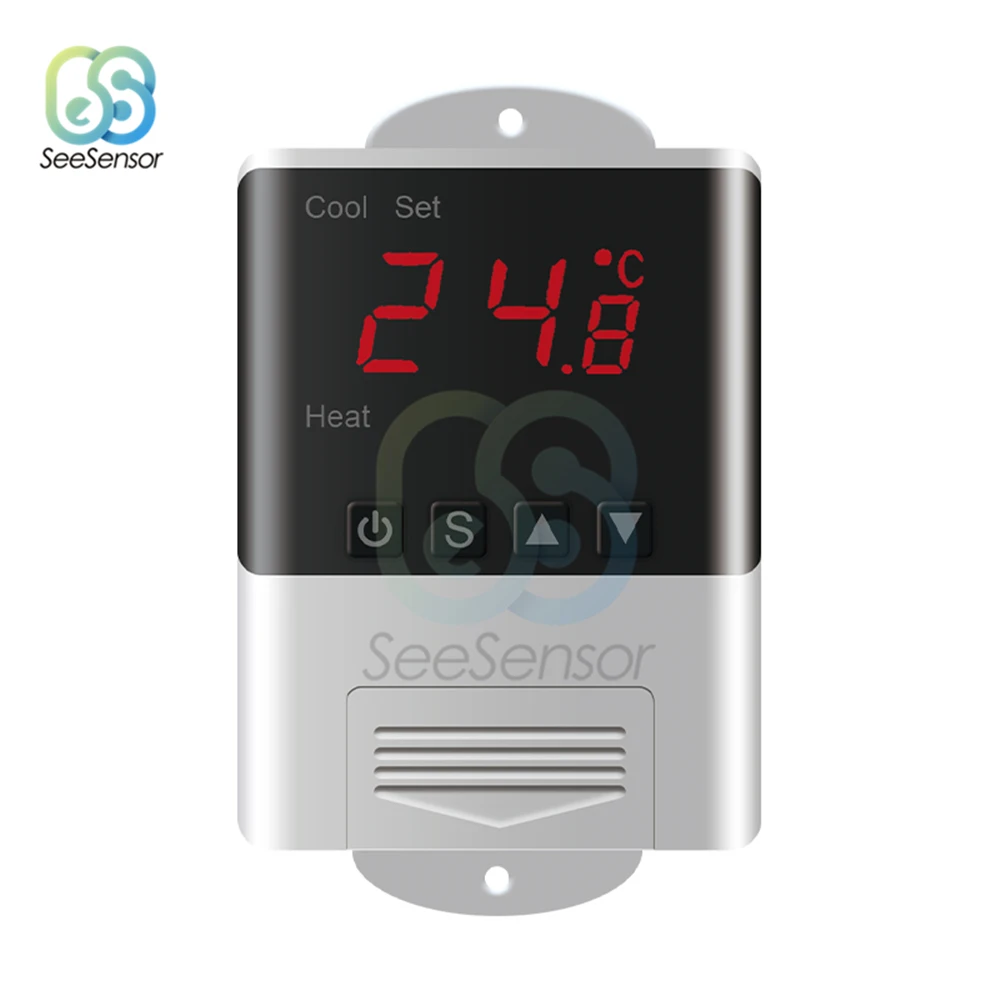
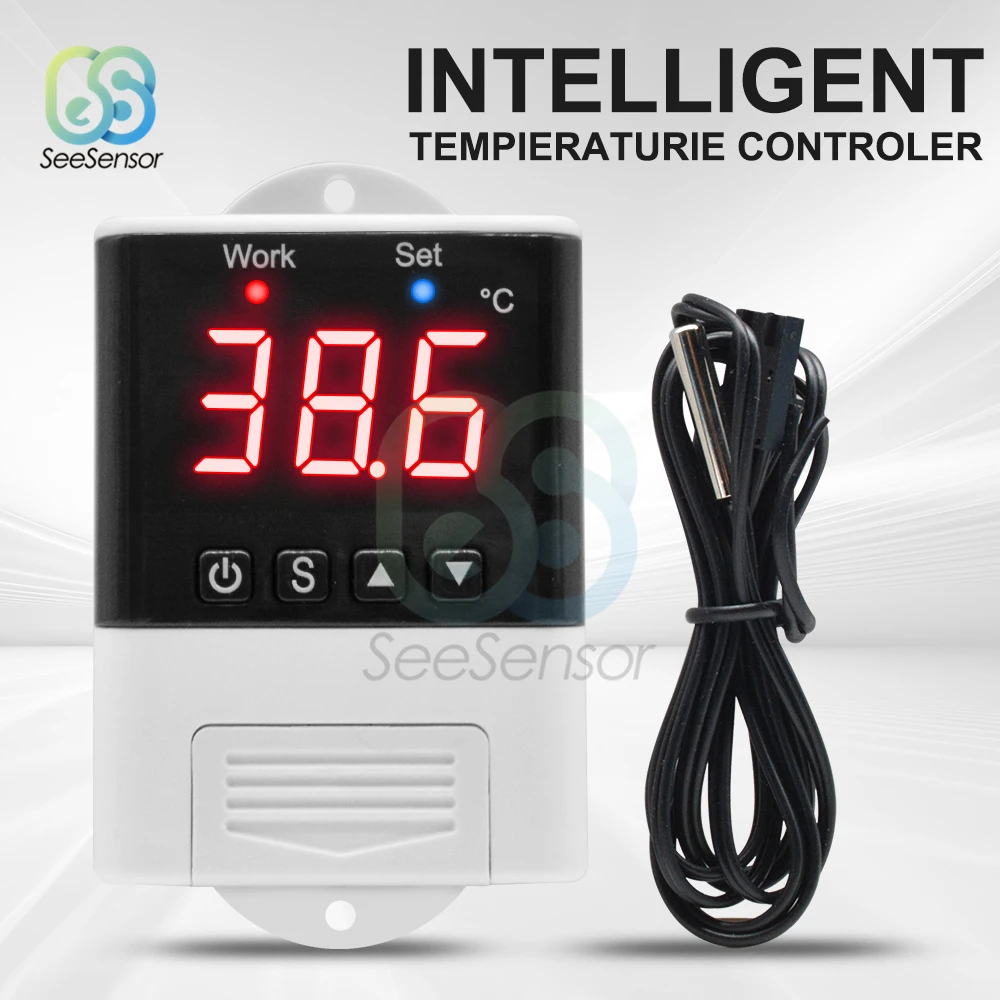
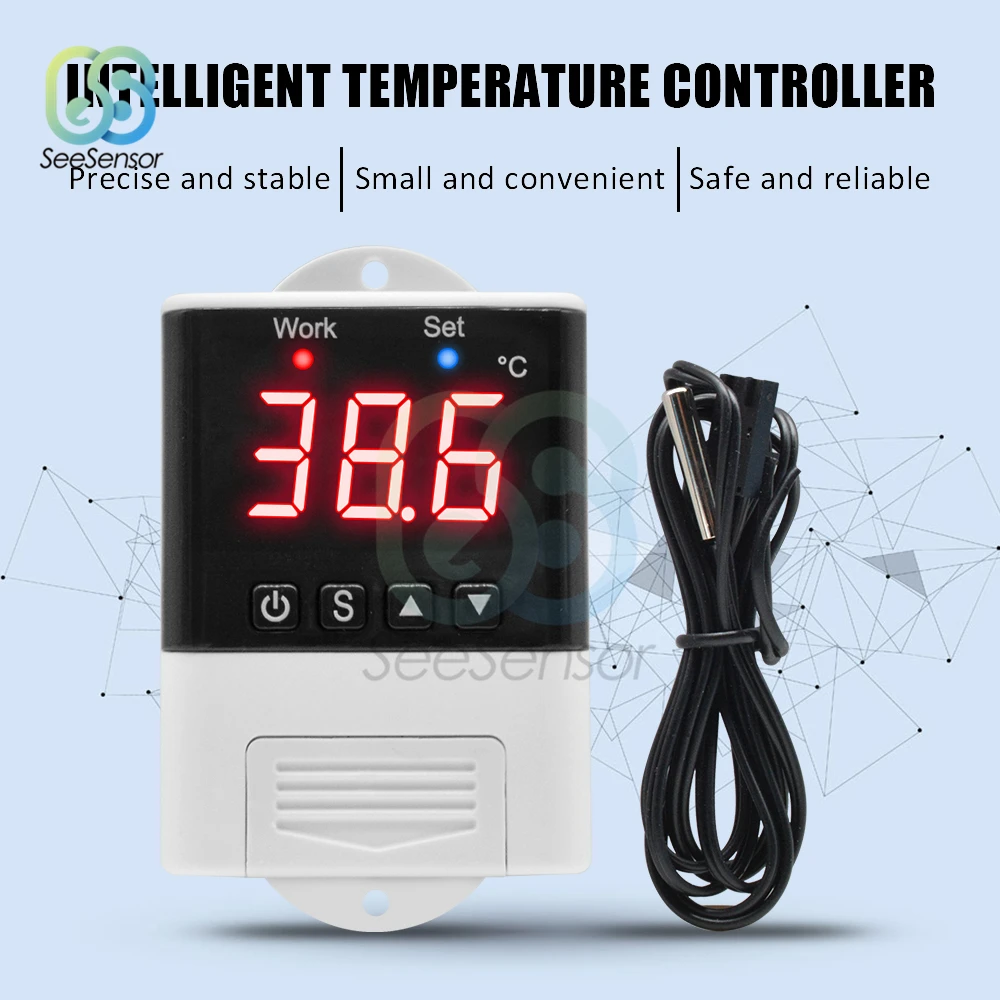
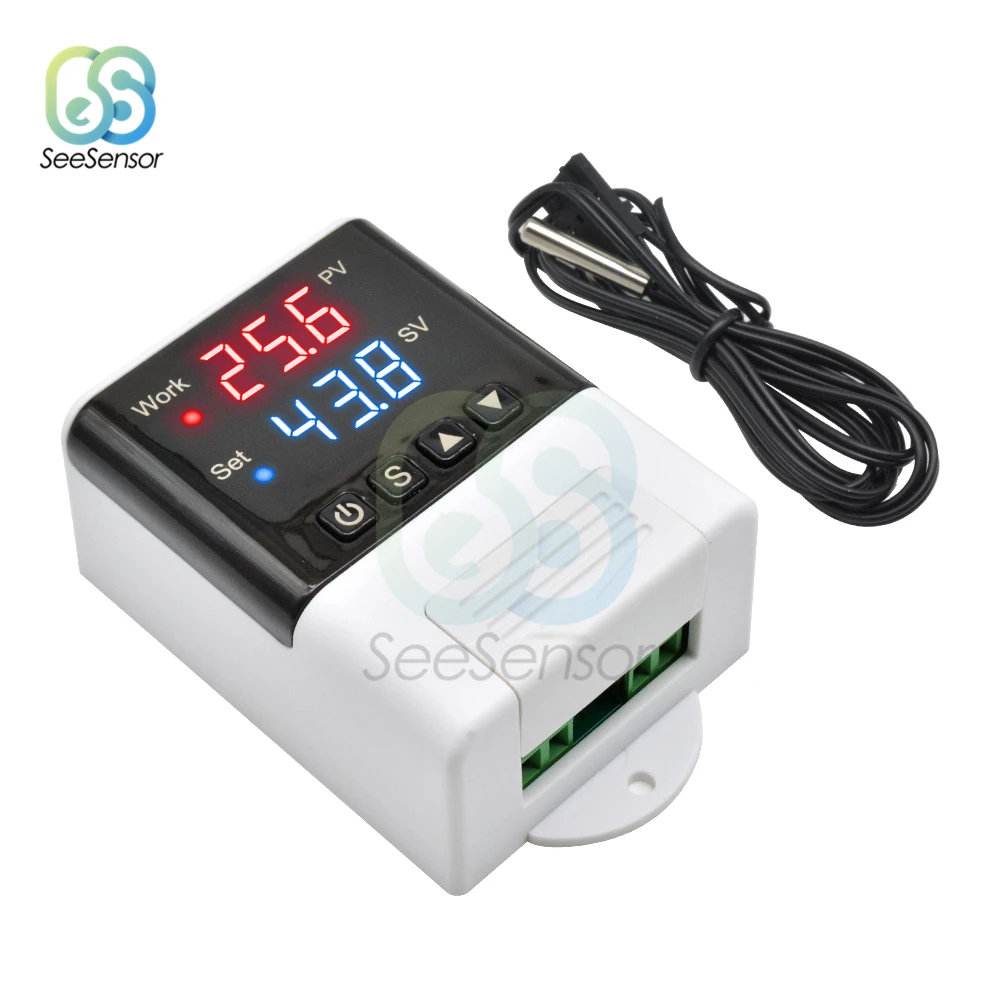
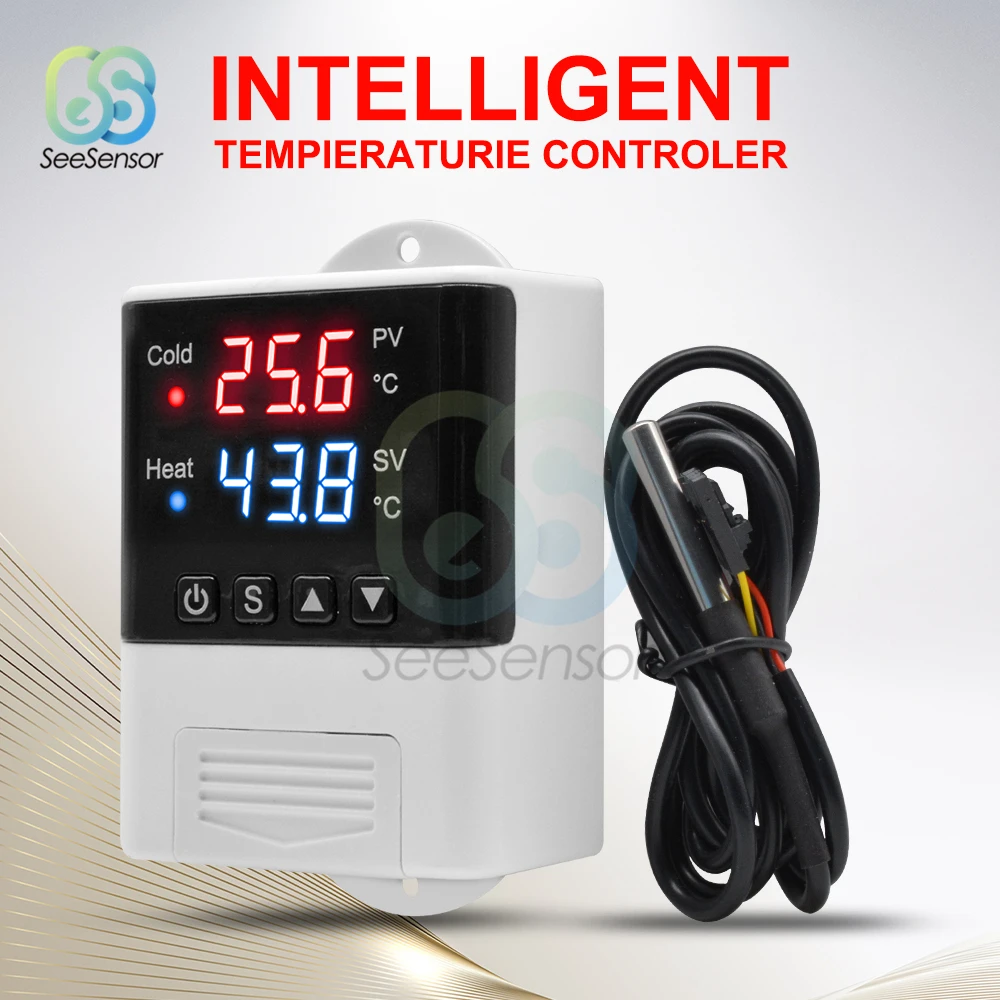
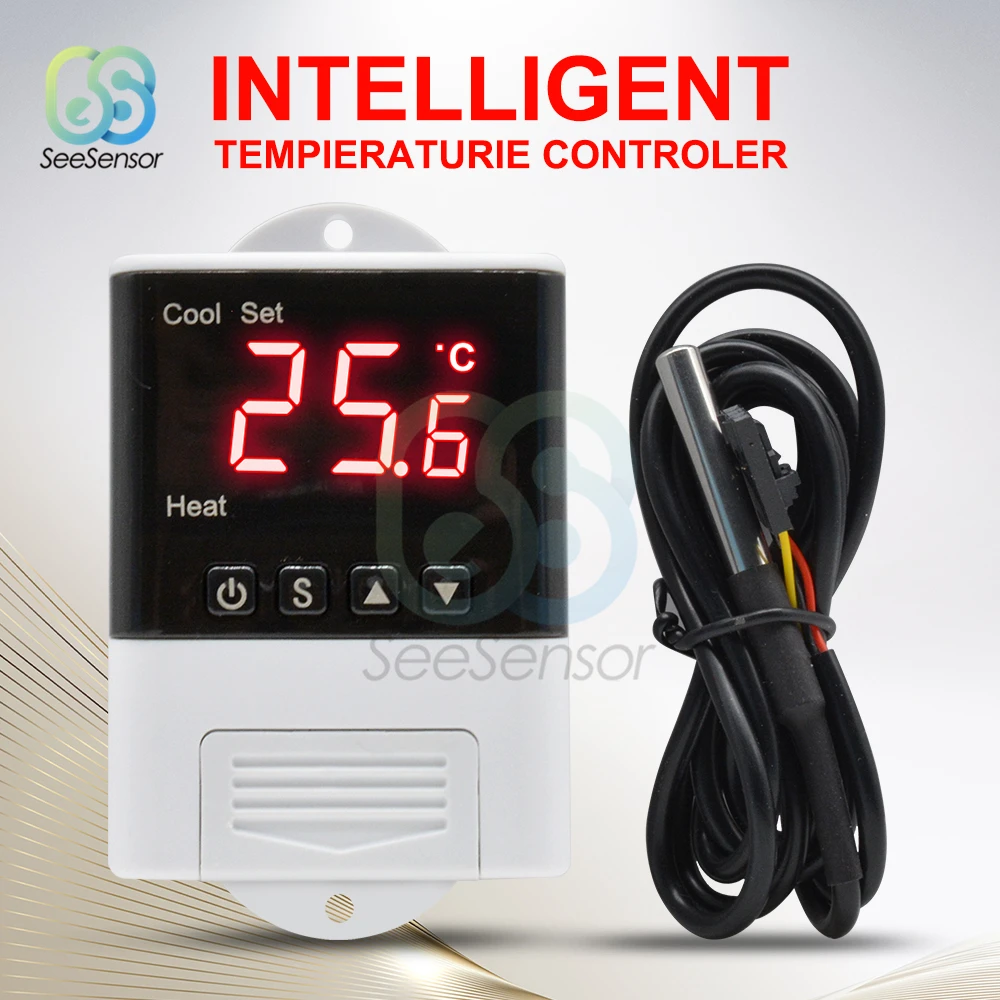
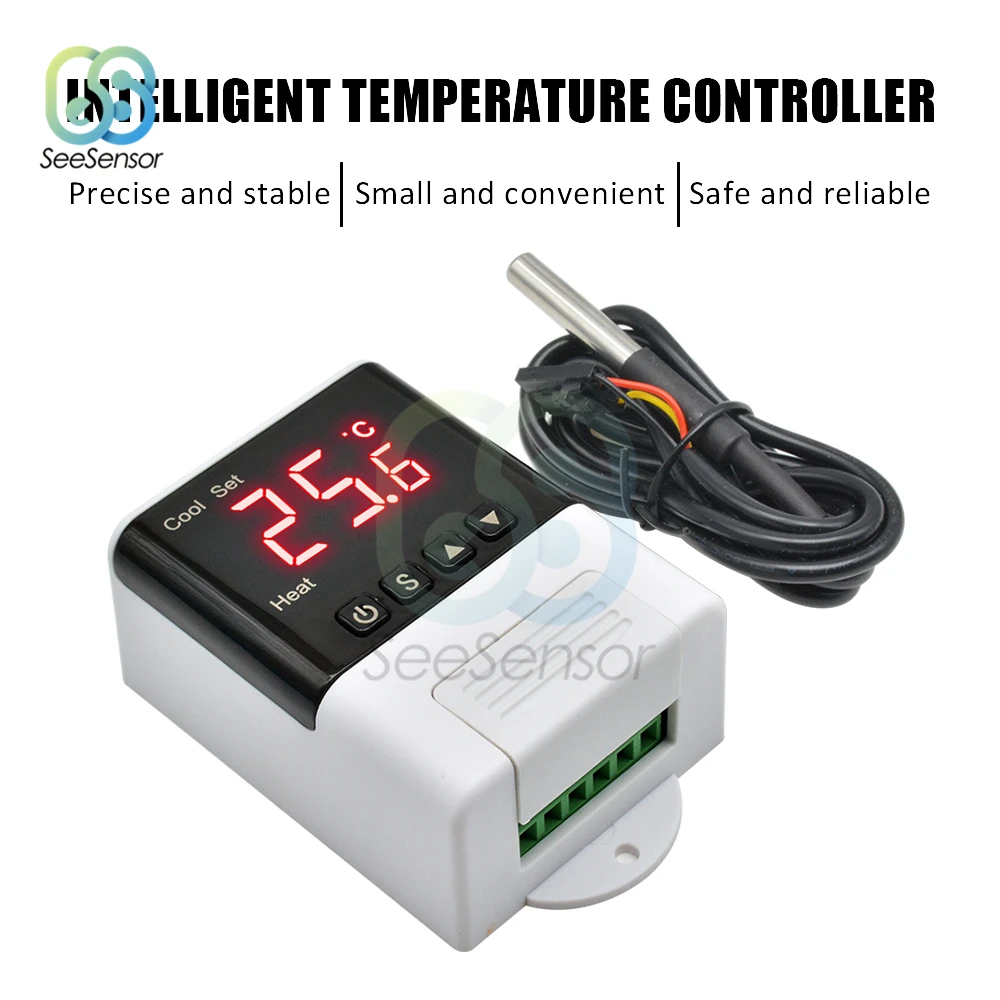
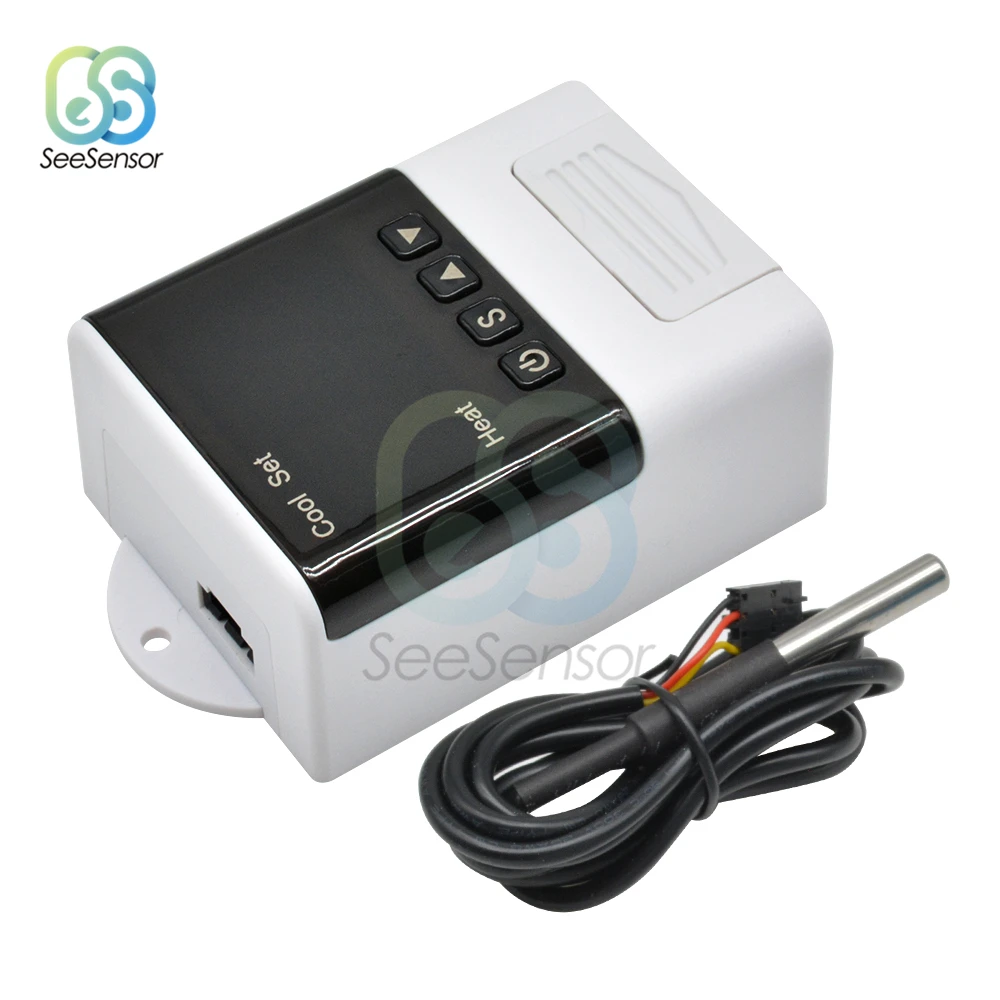
Product Name: Thermostat
Product model: DTC1200
Supply voltage: AC110~230V
Temperature range: -40°C~+99°C
Temperature measurement accuracy: ±1 °C (-40 °C ~ +70 °C)
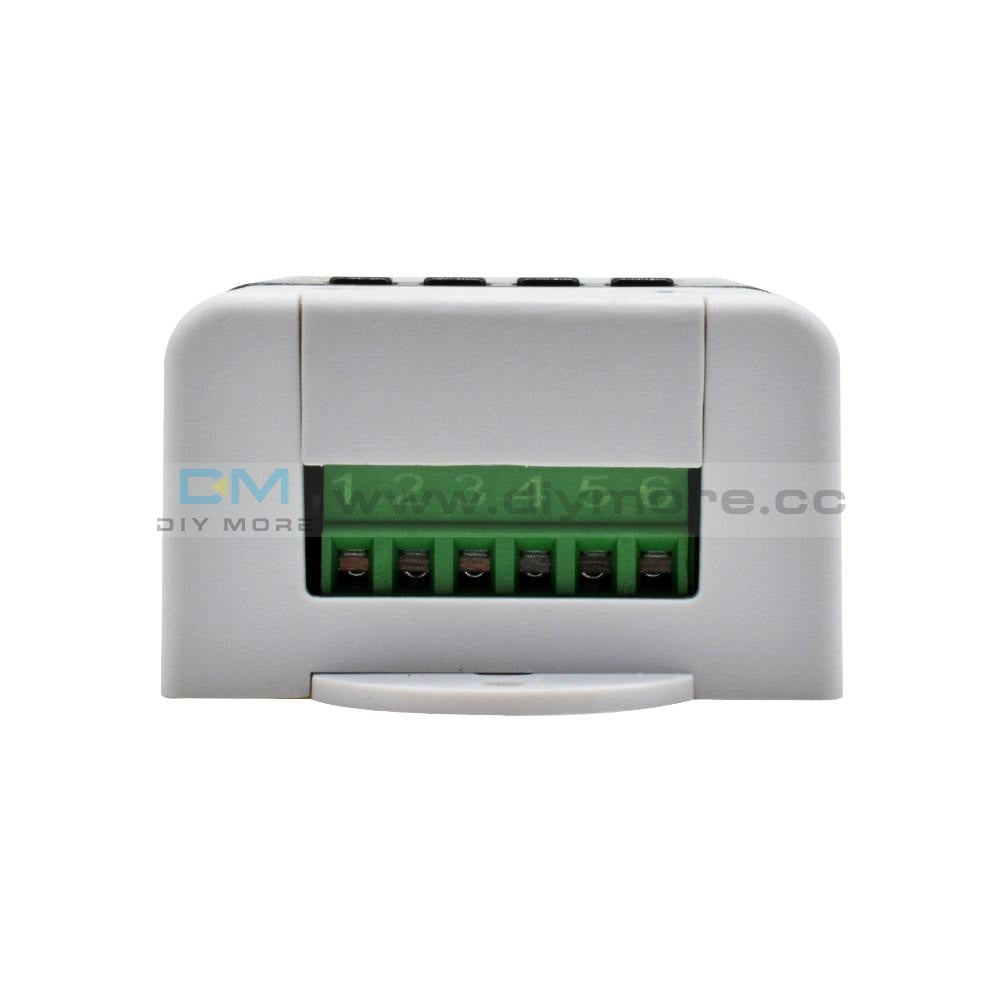
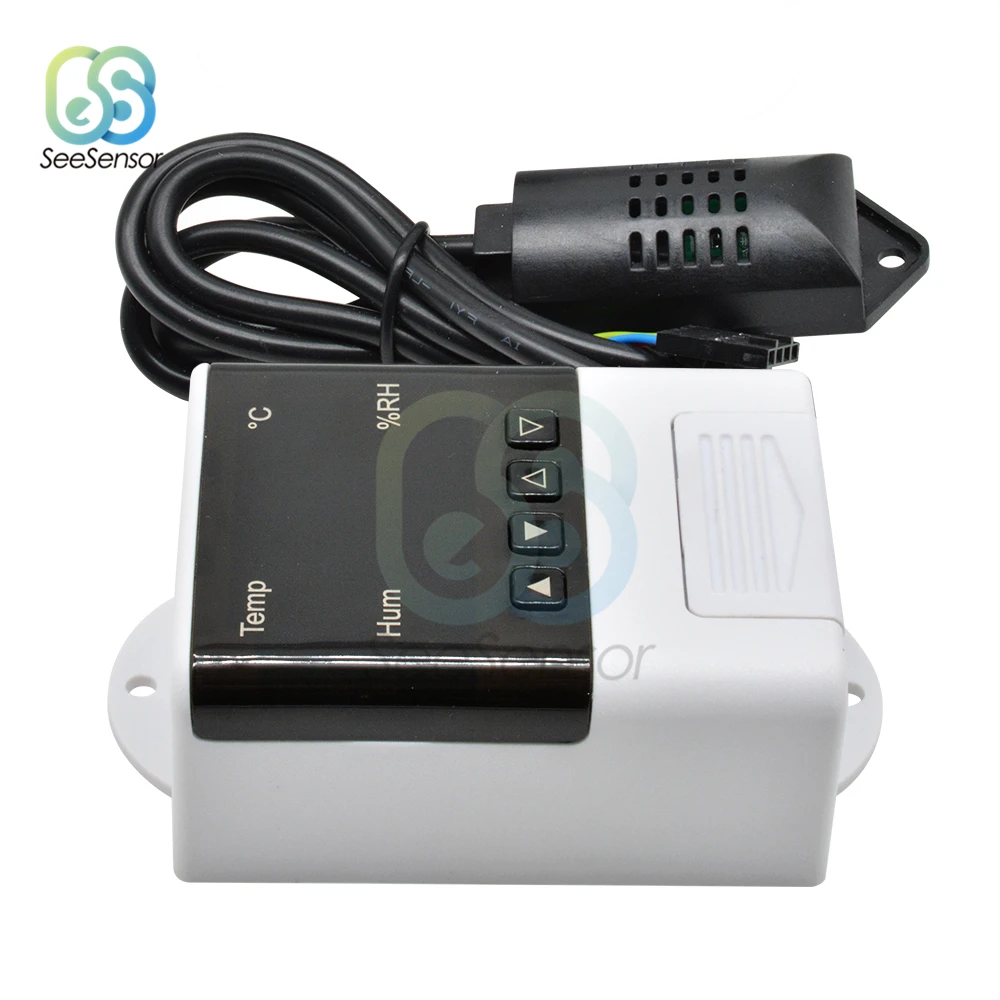
Sensor line length: 100cm
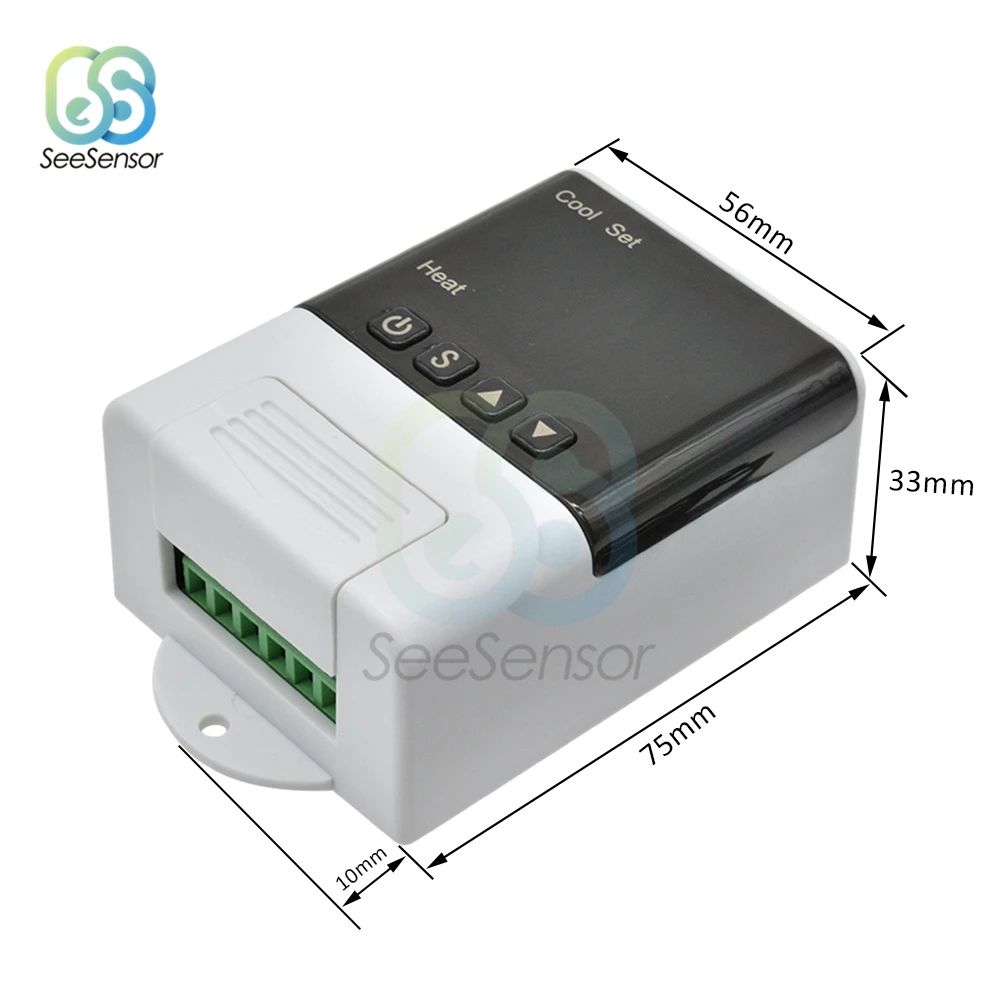
Thermostat size: 93mm*56mm*34mm
Output capacity: cooling (compressor 3A) heating (10A/250VAC)
See parameter method:
When the thermostat is working normally, press and release "▲"the key once to display the temperature setting value; press and release "▼" the key once to display the temperature difference setting value. After 3 seconds, the temperature returns to the normal display state.
Setting parameter method:
When the thermostat is working normally, press "S" key and hold the button for more than 3 seconds to enter the modified parameter mode. The “Set” indicator lights up, the digital tube displays the code “F1” of the first menu item, and press the "▲" or "▼"key to up or down the code of the menu item. Press "S" the key to display the parameter setting value of the current menu, press "S" and hold the key, then press the "▲"or "▼" key to increase or decrease the parameter setting value of the current menu; press "S" key and hold the key, and press the "▲"or "▼" key to quickly increase the speed; Or down and display the parameter settings of the current menu.
Press and hold "▲"or "▼" the key at the same time to restore the parameters to the factory settings.
Operation instructions:
1.When the thermostat is working normally, press and hold the "power button" for more than 3 seconds to turn off the thermostat. When the thermostat is off, press and hold the "power button" for more than 3 seconds to open the thermostat.
When the thermostat is working normally, the digital tube displays the current temperature measurement value, and performs automatic recognition conversion of the cooling heating operation mode.
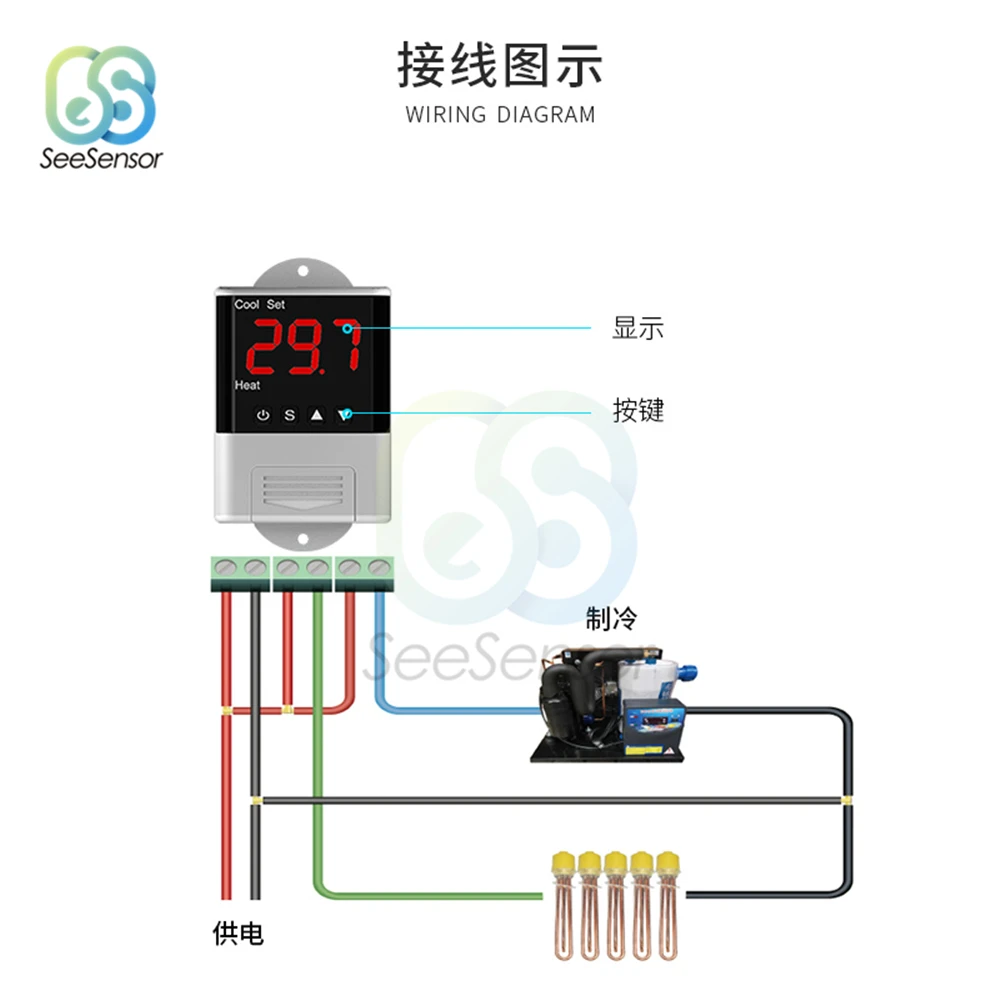
2.When the measured temperature ≥ temperature set value + temperature difference set value, enter the cooling state, the Cool indicator light is on, the cooling relay normally open contact is closed; the Cool indicator flashes, indicating that the cooling device is in the press delay protection state; when measuring the temperature ≤ temperature set value, the Cool indicator is off, and the normally open contact of the refrigeration relay is disconnected.
3.When the measured temperature ≤ temperature set value - temperature difference set value enters the heating state, the Heat indicator light is on, the heating relay normally open contact is closed; when the measured temperature ≥ temperature set value, the Heat indicator is off, the heating relay normally open contact disconnect.
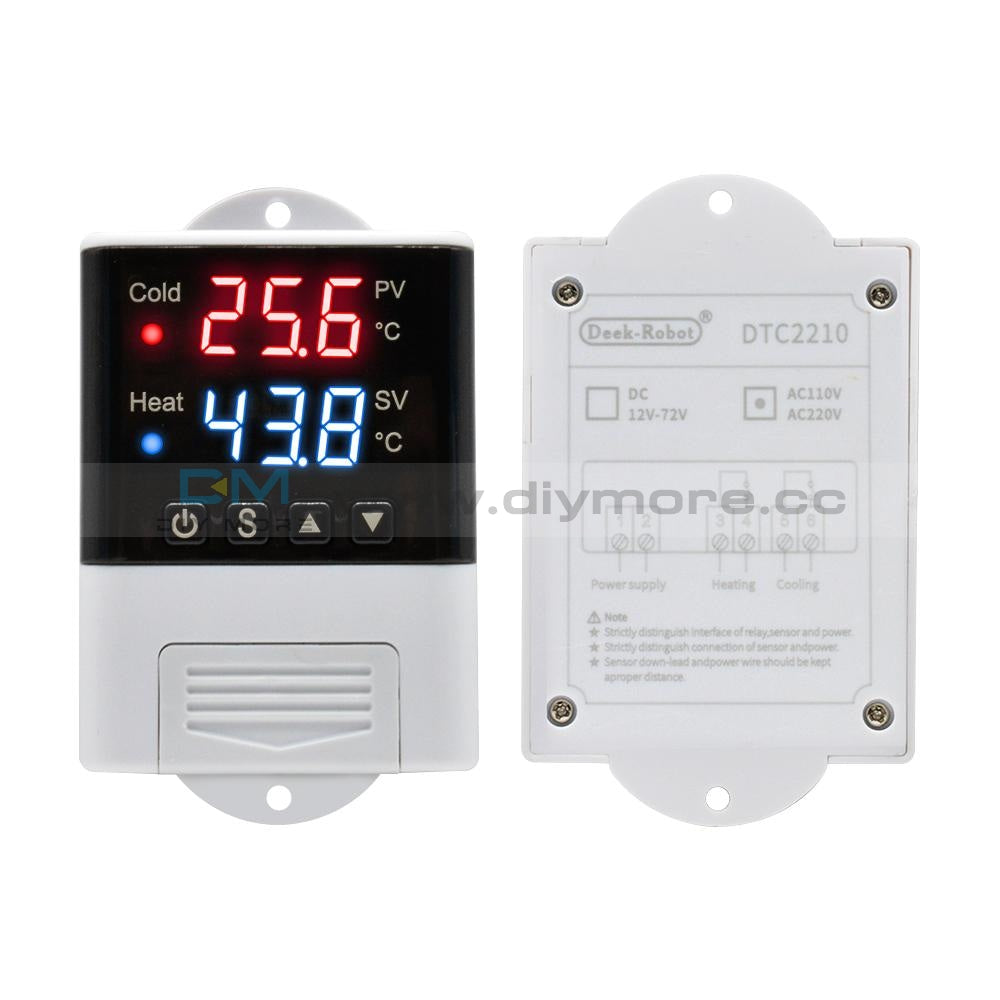
Indicator status description:
|
Indicator |
Function |
Note |
|
Cool indicator |
Light on:cooling work; Light off:cooling off; Flashing: press delay |
Cool and Heat Both indicator lights cannot be lit at the same time |
|
Heat indicator |
Bright: heating work; off: heating off |
|
|
Set indicator |
On: parameter setting status |
|
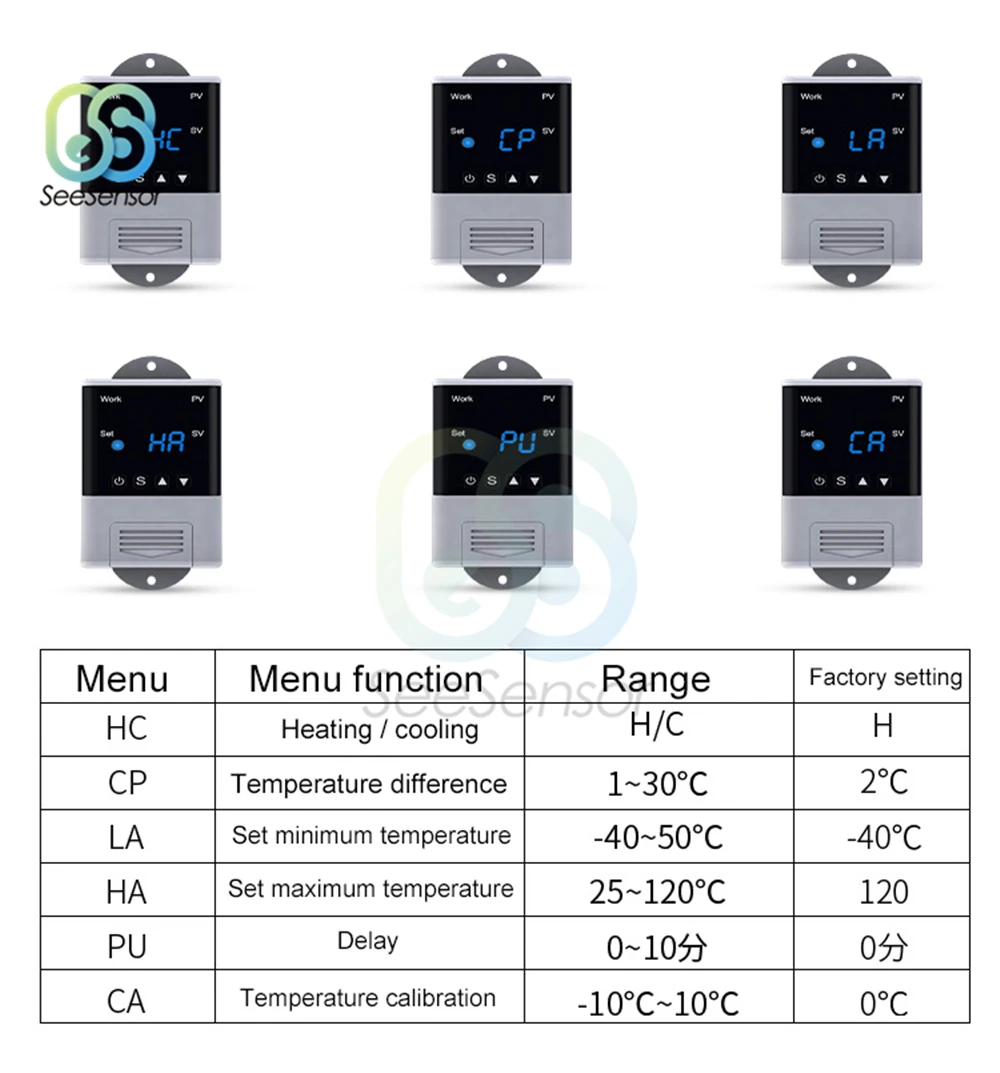
Menu function description:
|
Menu identifier |
Menu function |
Setting range |
Factory setting |
|
F1 |
Temperature setting value |
-40.0~99.9℃ |
10.0℃ |
|
F2 |
Temperature difference setting value |
0.3~10.0℃ |
0.5℃ |
|
F3 |
Press delay |
1~10 min |
3 min |
|
F4 |
Temperature correction |
-10.0~10.0℃ |
0℃ |
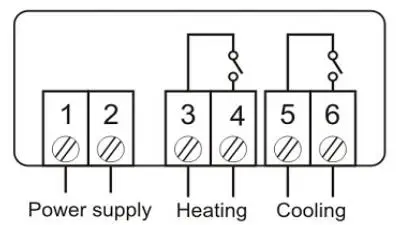
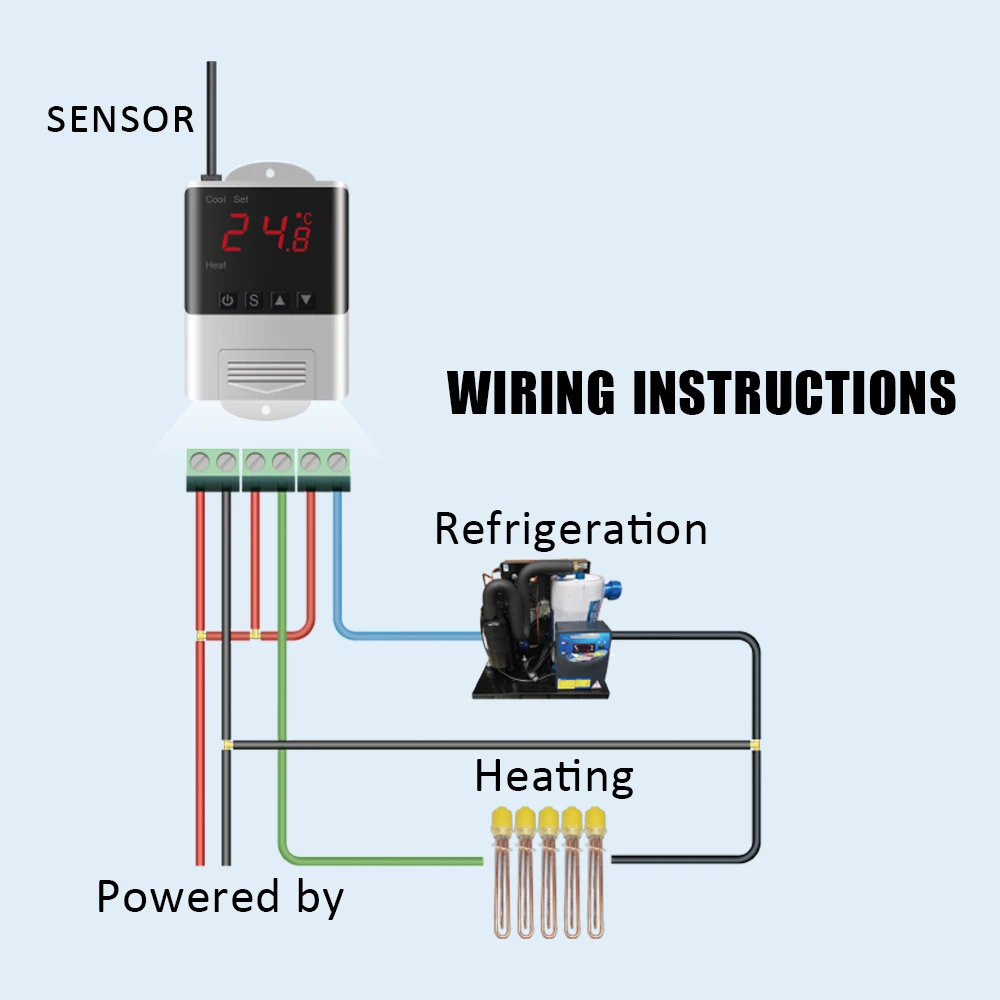
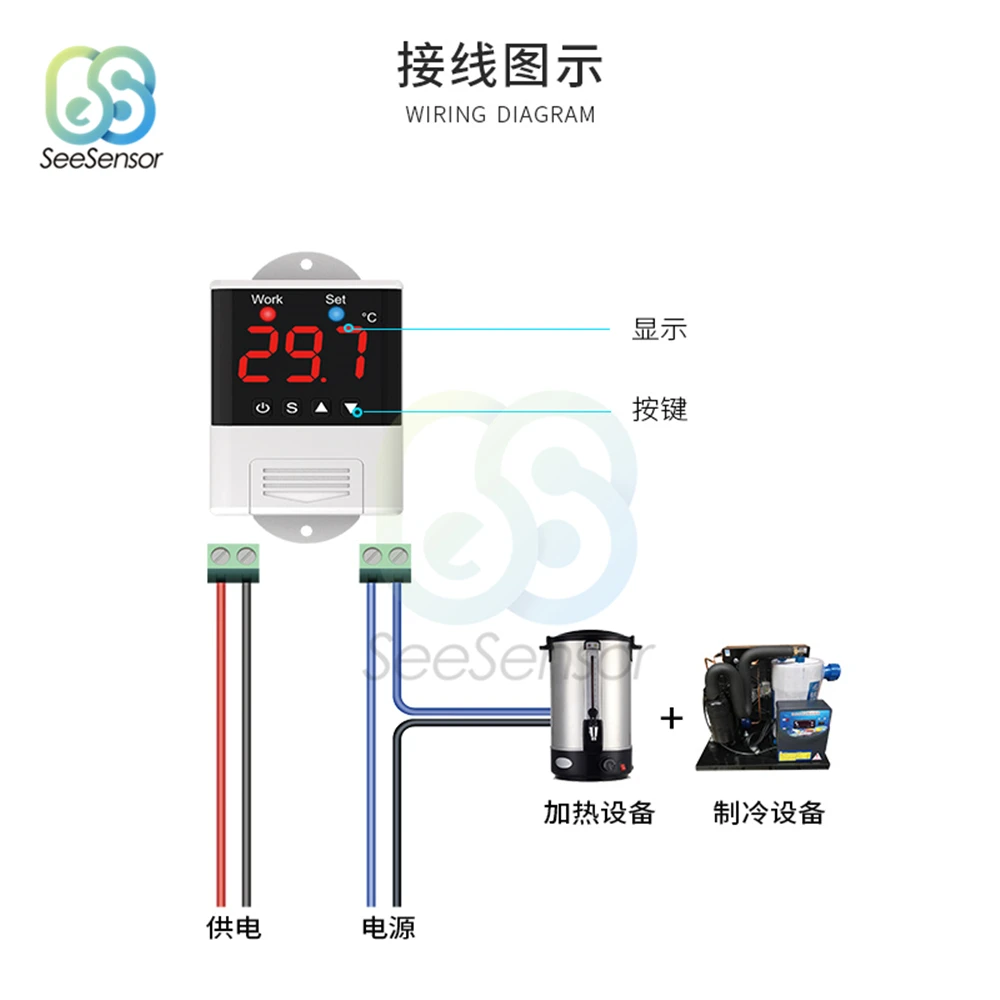
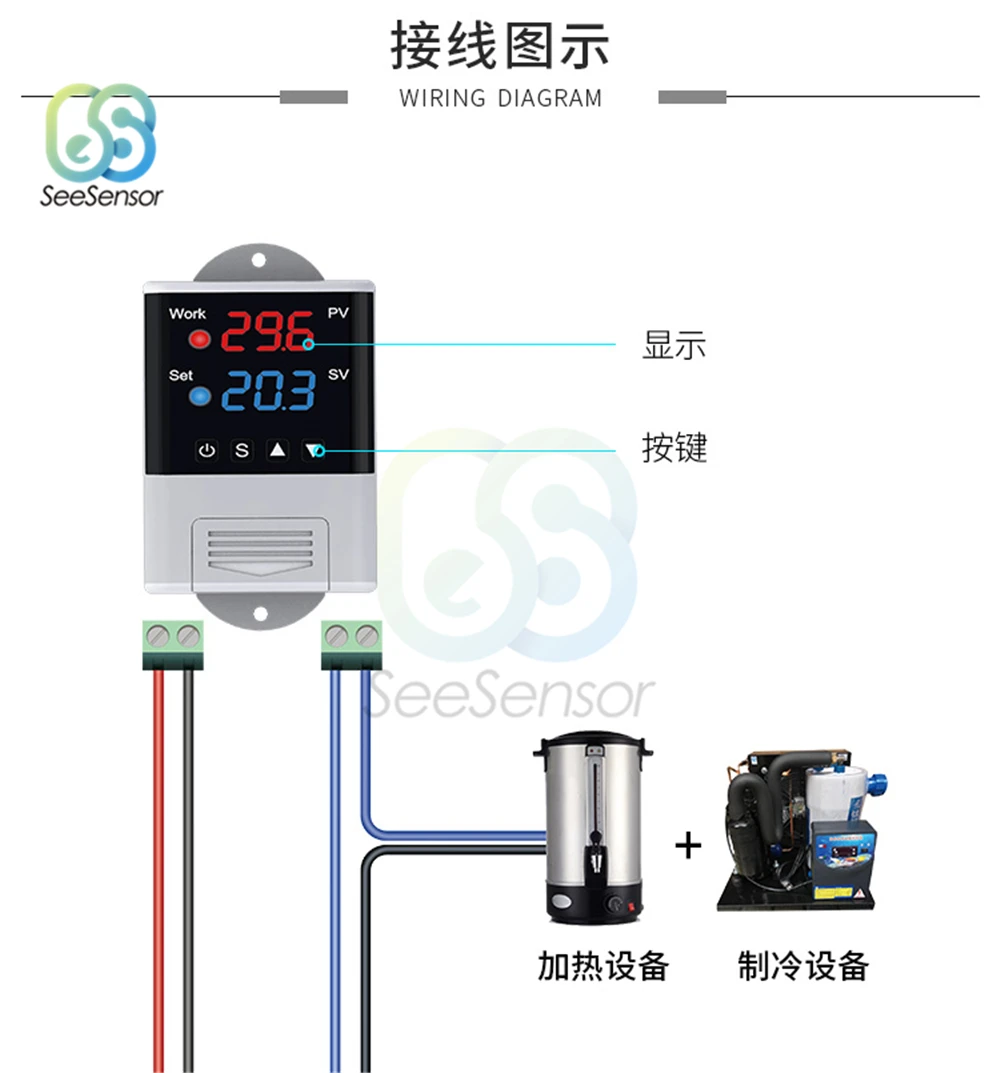
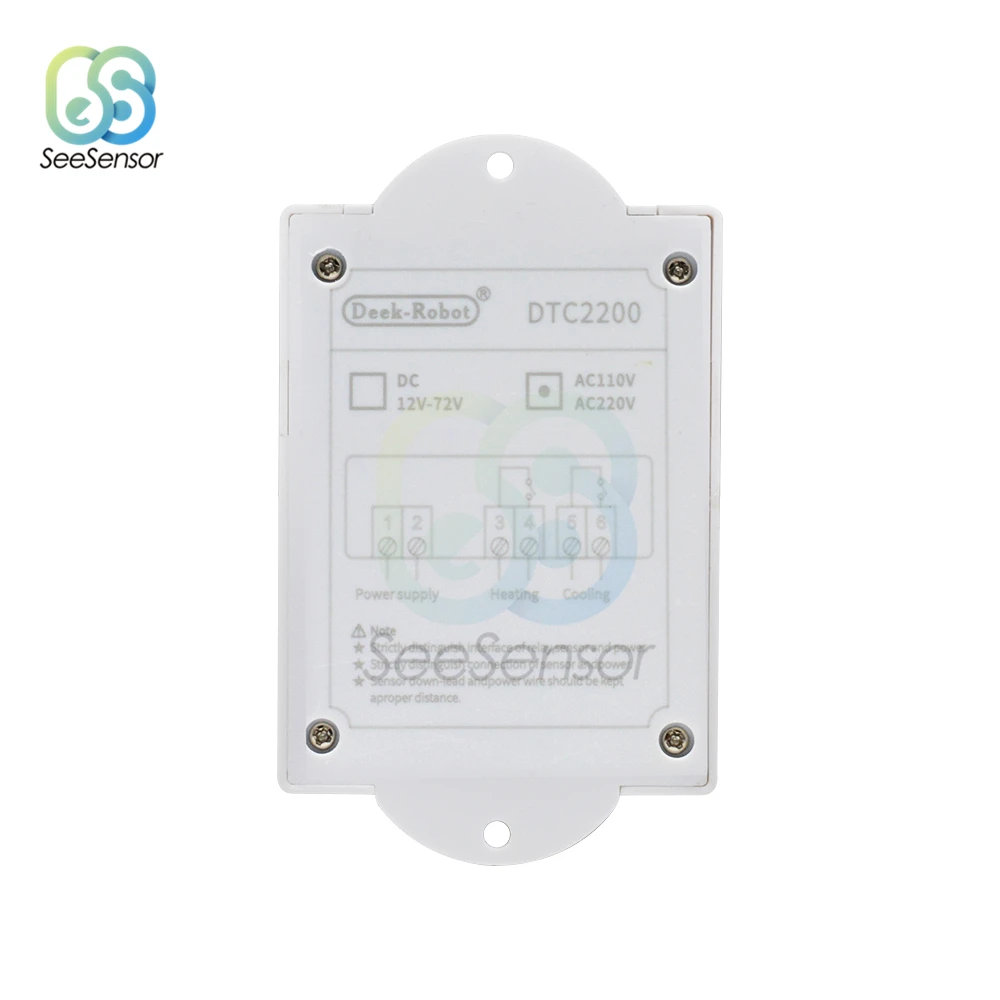
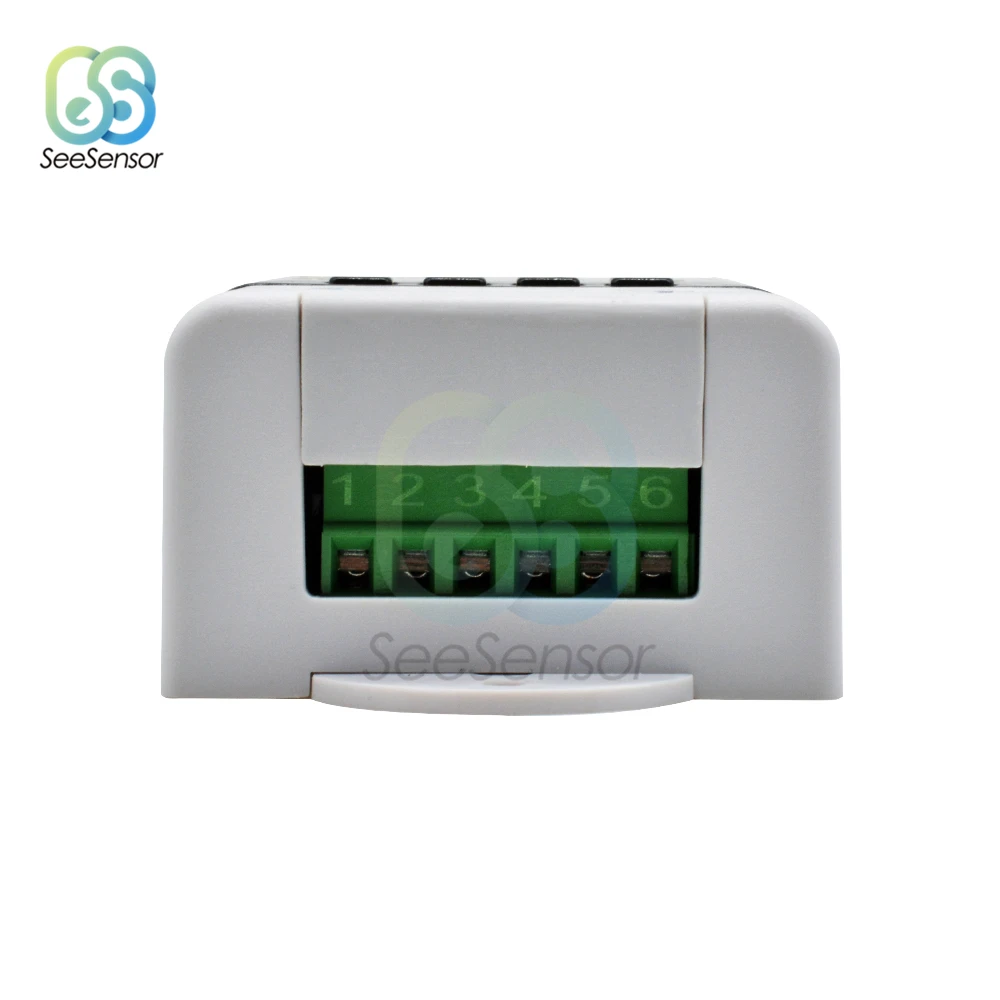
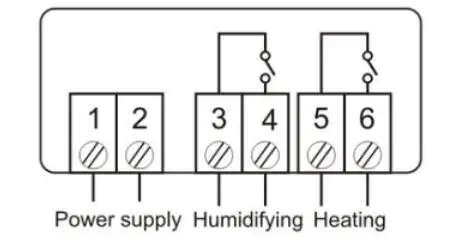
Wiring Diagram:
Repair System Data:
After the thermostat is powered on, first check whether the parameter settings are correct. If an error is detected, “Er” is displayed. Pressing any key will restore the default parameter settings and work normally. It is recommended to reset the parameters at this time.
System Code, reason and action:
Sensor fault alarm: When the temperature probe loop is short-circuited or open-circuit fault, the thermostat starts the probe fault alarm mode, closes all execution states, and the digital tube displays “EE”. After the fault is cleared, press any key to return to the normal working mode.
Over-temperature alarm: When the temperature measurement exceeds the temperature measurement range, the thermostat starts the over-temperature limit fault alarm mode, and all execution states are turned off. The digital tube displays “HH”. When the temperature returns to the normal measurement range, press any key. Return to normal working mode.
Safety rules:
☆ Danger:
1. Strictly distinguish the sensor lead, power line and output relay interface, can not be connected incorrectly, the relay can not be overloaded;
2. All wiring changes must be made with the power off.
☆ Warning:
1. This thermostat is forbidden to be used in water or excessively humid environment. It is forbidden to use in high temperature, strong electromagnetic interference and strong corrosive environment.
☆ Note:
1. The supply voltage should be consistent with the voltage marked by the thermostat and ensure the stability of the supply voltage;
2. To avoid possible interference, it is recommended that the sensor leads be at an appropriate distance from the power line.
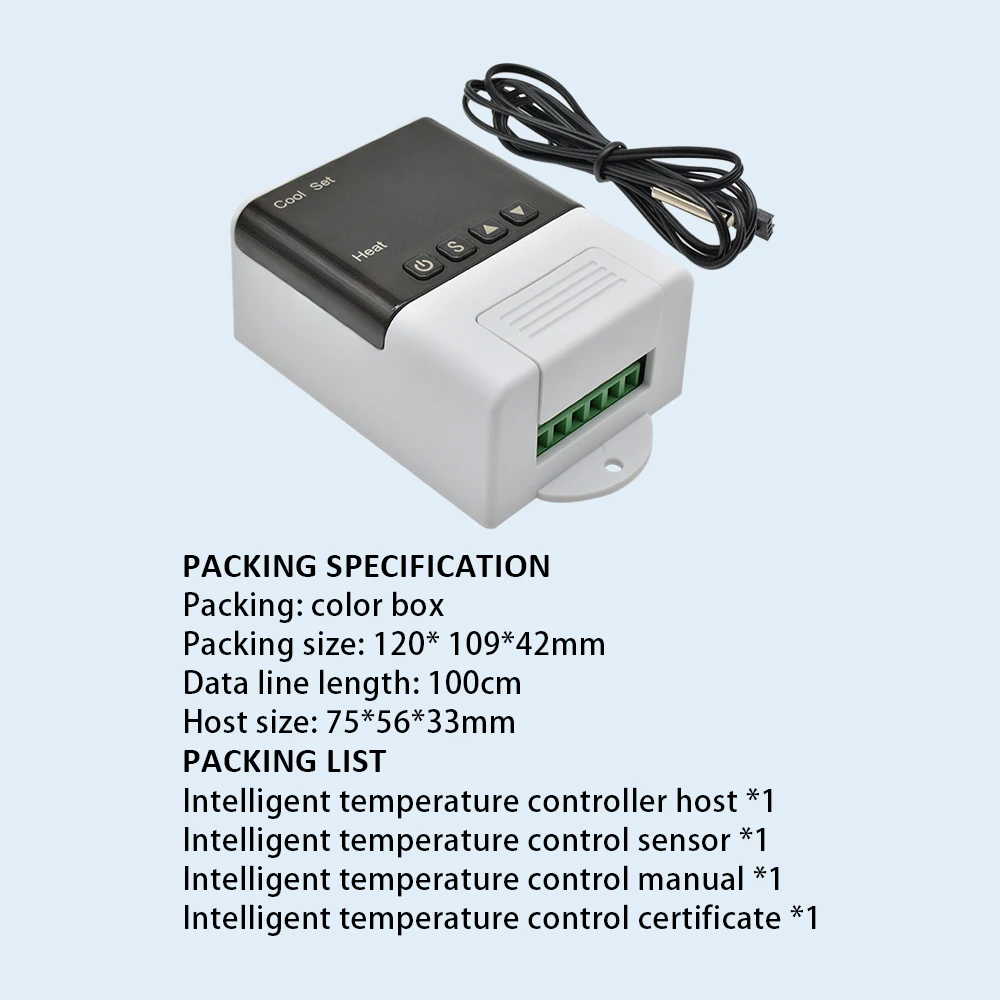
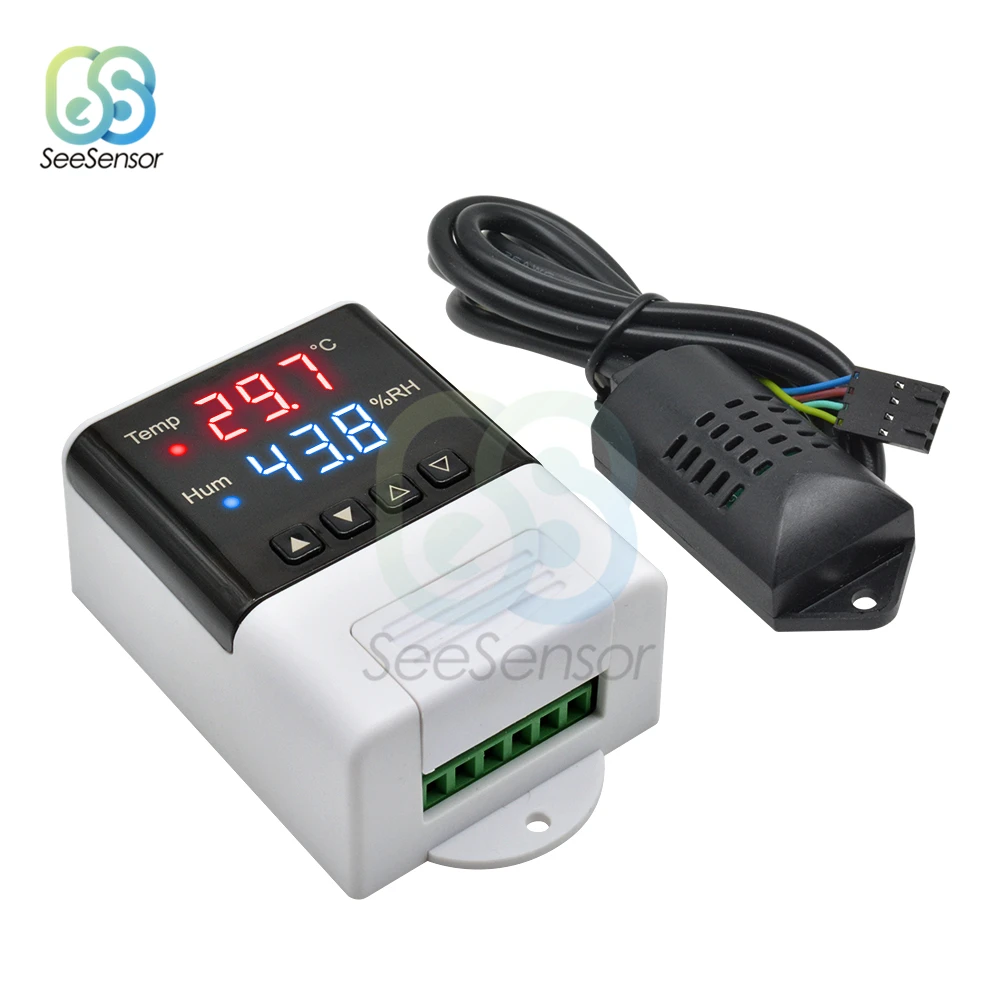
Package Included:
1 x DTC1200 Intellligent Temperature Controller
1 x Temperature sensor
1 x Instruction manual
1 x Packing box


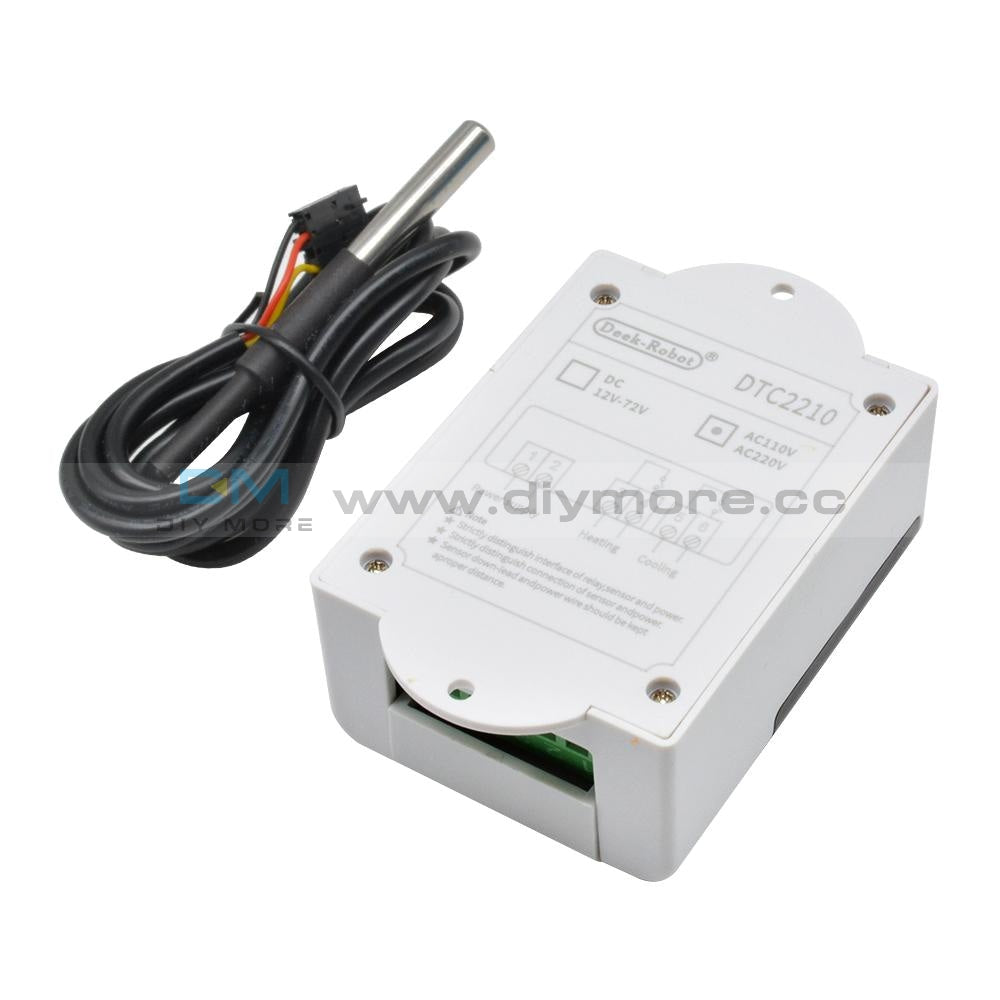
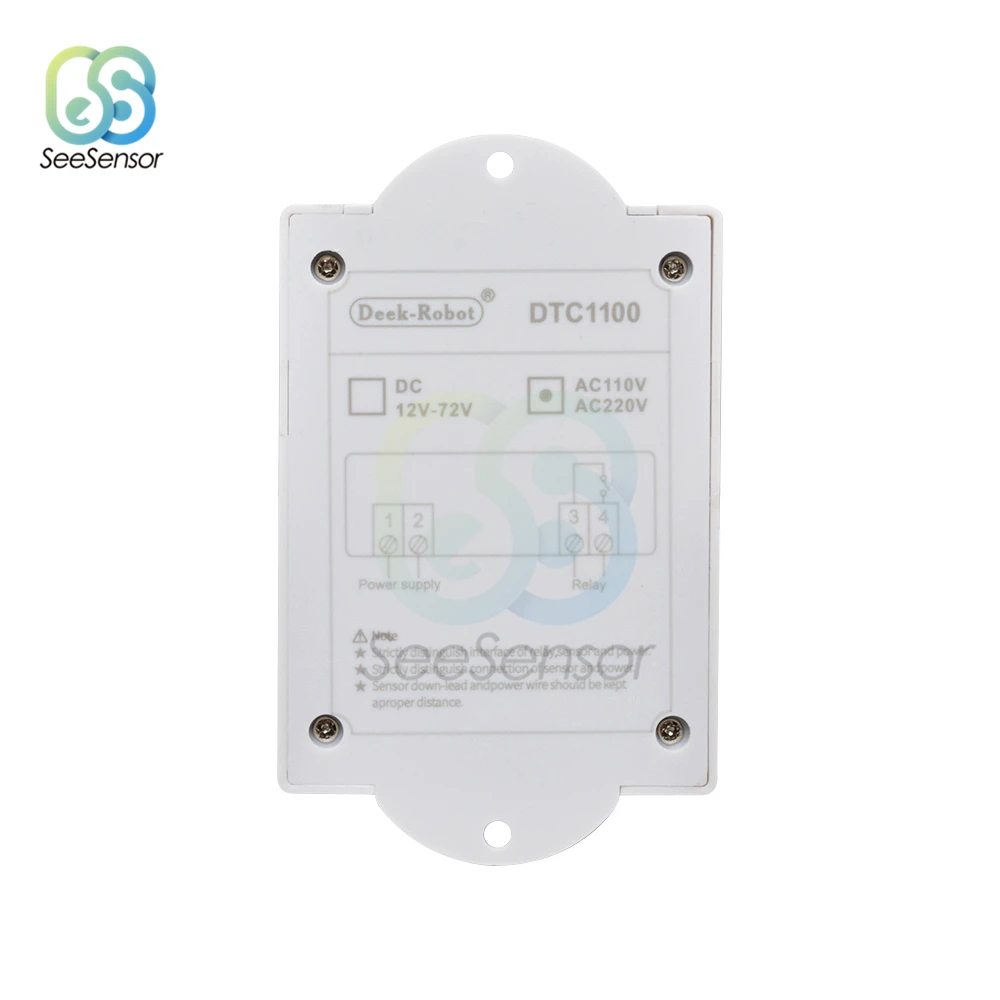
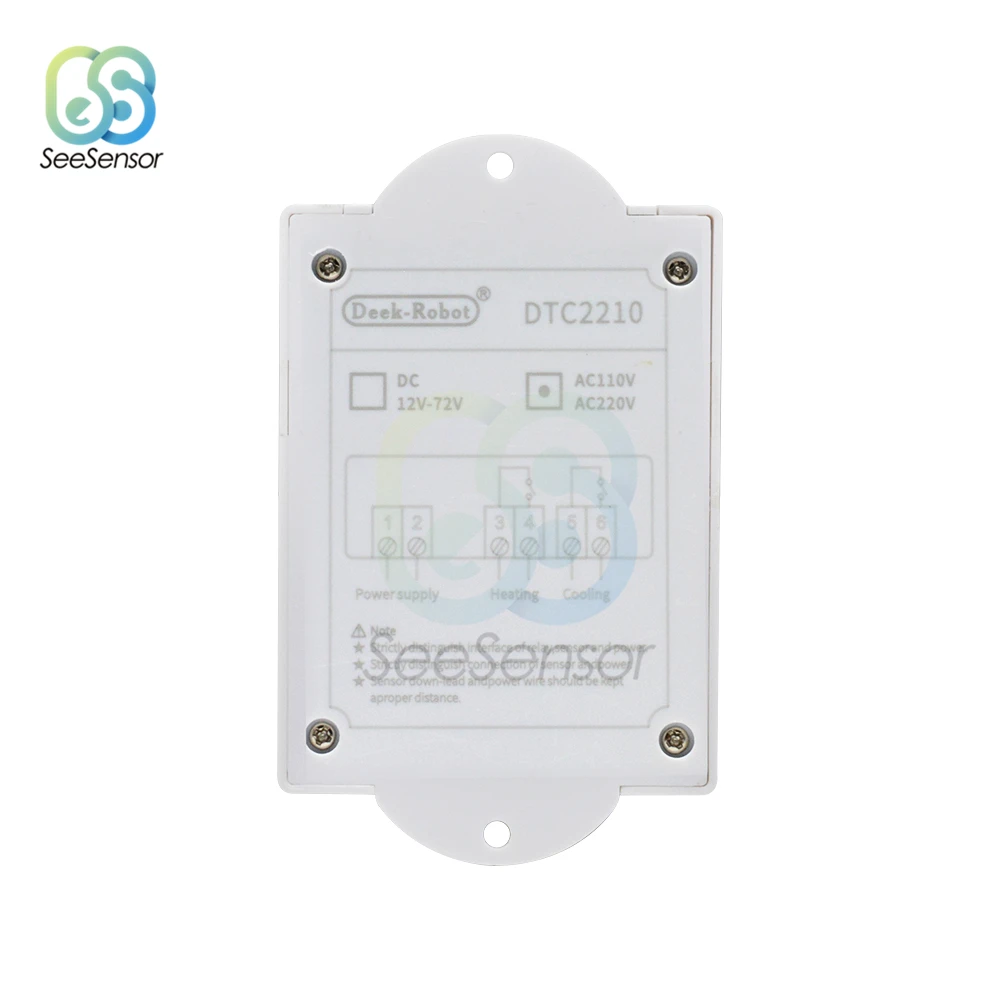
DTC1100 DTC1110 DTC2210 DTC2200 Temperature Controller
Product Name: Temperature Controller
Product Models: DTC1100; DTC1110; DTC2210; DTC2200
Power supply: AC110V-220V
Temperature range: -40°C~+99°C
Temperature measurement accuracy: ±1°C (-40 °C ~ +70 °C)
Thermostat size: 93mm*56mm*34mm
Relay contact capacity: Cool(10WC250V); Heat(10A/AC250V)


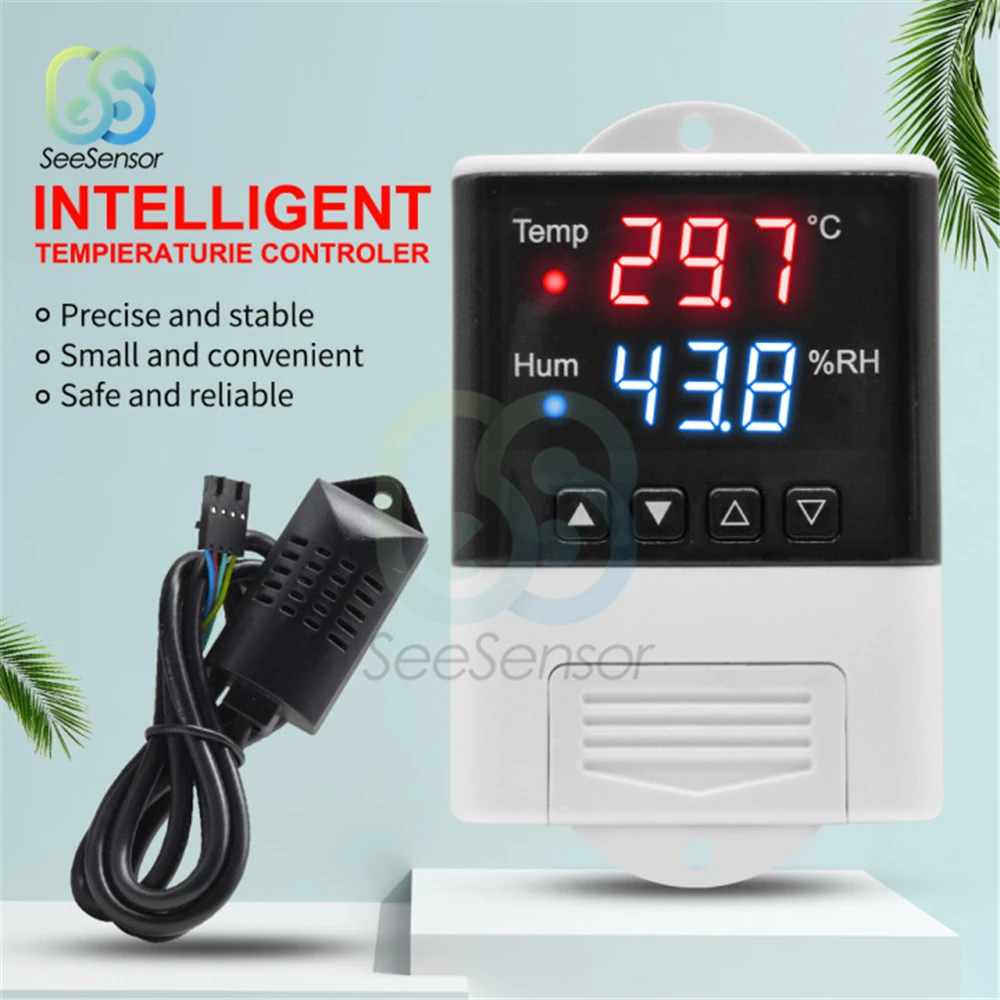
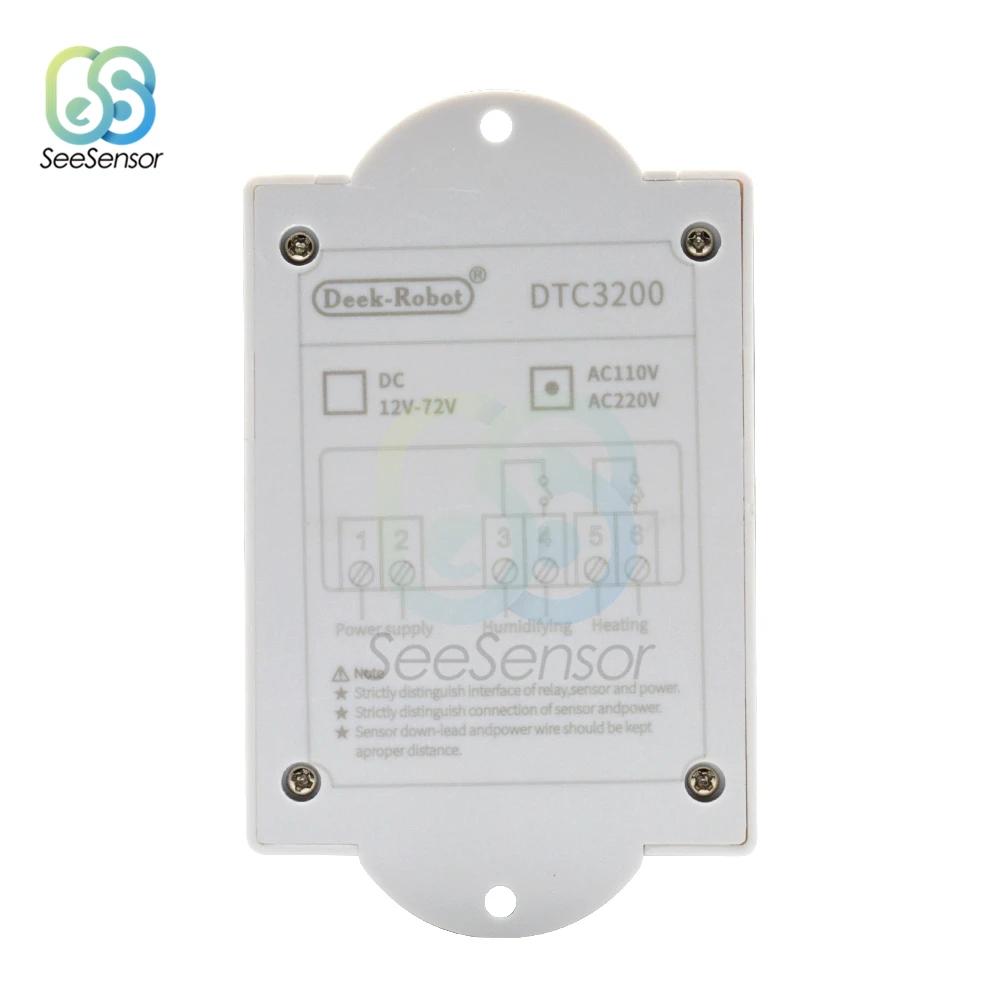
DTC3200 Temperature and Humidity Controller
Product Name: Temperature and Humidity Controller
Product Model: DTC3200
Power supply voltage: AC 110 ~ 230V
Power supply frequency: 50 / 60Hz
Temperature measurement range: -20 ~ 60 ℃
Humidity measurement range: 0% ~ 100% RH
Temperature measurement accuracy: 0.3 ℃
Humidity measurement accuracy: 3%
Output control: Relay output
Output power: MAX 10A
Setting method: start value <stop value (the program automatically determines the working mode as heating / humidification mode)
Setting method: start value> stop value (the program automatically determines the working mode to be cooling / dehumidifying mode)
Heating / cooling mode setting
Setting method: setting (starting temperature): long press the ▲ button, the starting temperature flashes, and the starting temperature value is set by the ▲ ▼ button
Setting (stop temperature): long press the ▼ button to stop the temperature flashing, set the stop temperature value by ▲ ▼ button
Heating use case: control the water heater, heating to 65 ℃ to stop, the temperature drops to 50 ℃ to start heating again
The first step: heating working mode, start temperature <stop temperature
Step 2: Press and hold the ▲ button, the starting temperature flashes, and set the starting temperature to 50 ℃ via the ▲ ▼ button
The third step: long press the ▼ button to stop the temperature flashing, set the stop temperature to 65 ℃ through the ▲ ▼ button, the setting is complete!
Refrigeration use case: use in the farm, the fan ventilation stops at 26 ℃, and the temperature rises to 30 ℃ to start ventilation again
Step 1: Refrigeration working mode, start temperature> stop temperature
Step 2: Press and hold the ▲ button, the starting temperature flashes, and set the starting temperature to 30 ℃ via the ▲ ▼ button
Step 3: Press and hold the ▼ button to stop the temperature flashing, and set the stop temperature to 26 ° C with the ▲ ▼ button. The setting is complete!
Humidification / dehumidification mode settings:
Setting (Start Humidity): Long press the △ key, the start humidity value flashes, set the start humidity value by the △ ▽ key. Set [Stop Humidity]: Long press the △ key, stop the humidity value flashing, and set the stop humidity by the △ ▽ key value.
Examples of humidification: Fresh supermarket humidification, control humidifier 50% RH to start humidification, humidification to 80% RH to stop humidification.
Setup steps:
Step 1: Press and hold the △ key for 3 seconds to start the humidity value flashing, and set the start humidity value to 50% RH.
Step 2: Press and hold the ▽ key for 3 seconds to stop the humidity value flashing, set the value to 80% RH, the setting is completed, press the button for 5 seconds without operation, and automatically return to the normal display state
Dehumidification example: workshop control exhaust dehumidification system, humidity 70% RH starts dehumidification, humidity 40% RH stops dehumidification
Setup steps:
Step 1: Press and hold the △ key for 3 seconds to start the humidity value flashing, and set the start humidity value to 40% RH.
Step 2: Press and hold the ▽ key for 3 seconds to stop the humidity value from flashing, set the value to 70% RH, the setting is completed, press the button for 5 seconds without operation, and automatically return to the normal display state
Temperature correction:
Simultaneously press the ▲ ▼ key for 3 seconds to start the temperature digit flashing, and use the ▲ ▼ key to set the start temperature correction value; after the setting is completed, press the button for 5 seconds without operation, and automatically return to the normal display state.
Humidity correction:
Simultaneously press the △ ▽ key for 3 seconds to start the humidity digit flashing, and set the humidity correction value by the △ ▽ key; after the setting is completed, press the button for 5 seconds without operation, and it will automatically return to the normal display state.
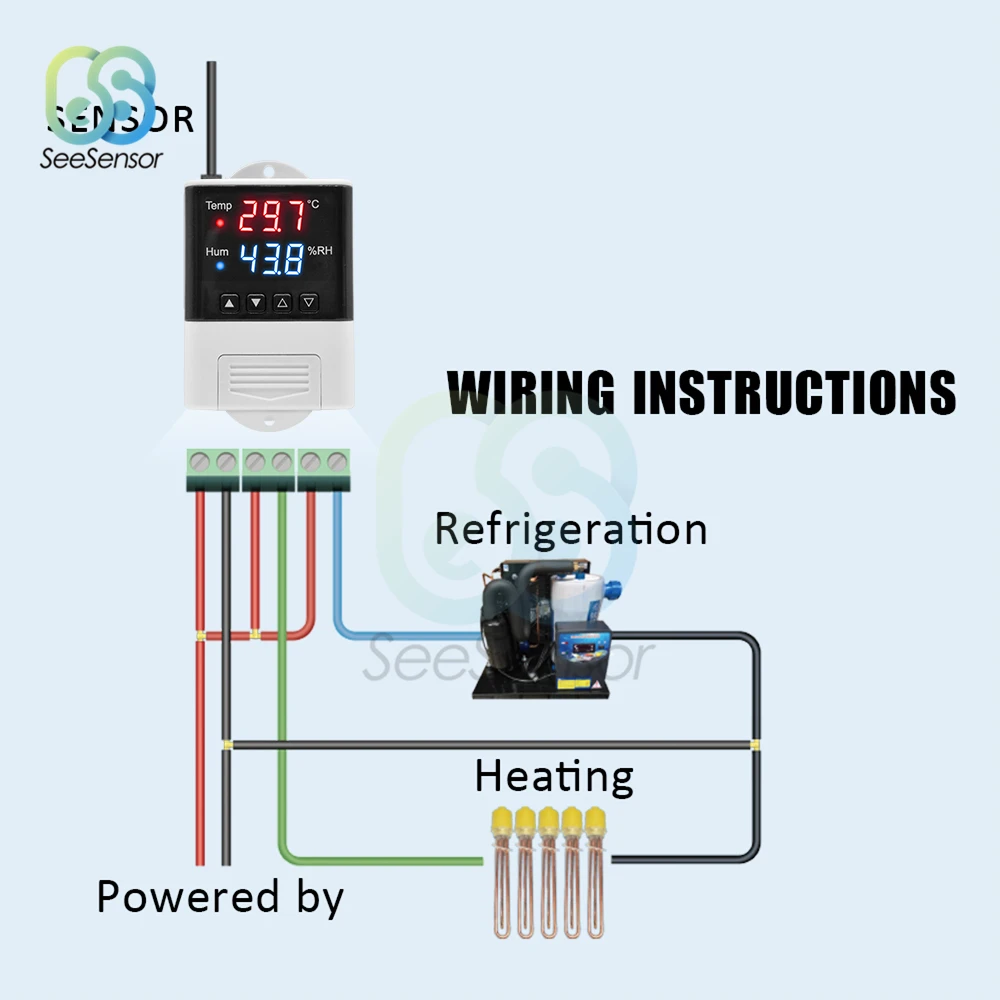
Wiring instructions:
※ If the temperature and humidity display LLL, please confirm whether the wiring of the SHT20 digital temperature and humidity sensor is correct and whether there is poor contact, you can try to reconnect the wiring.


Purchasing & Delivery
Before you make your purchase, it’s helpful to know the measurements of the area you plan to place the furniture. You should also measure any doorways and hallways through which the furniture will pass to get to its final destination.Picking up at the store
Shopify Shop requires that all products are properly inspected BEFORE you take it home to insure there are no surprises. Our team is happy to open all packages and will assist in the inspection process. We will then reseal packages for safe transport. We encourage all customers to bring furniture pads or blankets to protect the items during transport as well as rope or tie downs. Shopify Shop will not be responsible for damage that occurs after leaving the store or during transit. It is the purchaser’s responsibility to make sure the correct items are picked up and in good condition.Delivery
Customers are able to pick the next available delivery day that best fits their schedule. However, to route stops as efficiently as possible, Shopify Shop will provide the time frame. Customers will not be able to choose a time. You will be notified in advance of your scheduled time frame. Please make sure that a responsible adult (18 years or older) will be home at that time.In preparation for your delivery, please remove existing furniture, pictures, mirrors, accessories, etc. to prevent damages. Also insure that the area where you would like your furniture placed is clear of any old furniture and any other items that may obstruct the passageway of the delivery team. Shopify Shop will deliver, assemble, and set-up your new furniture purchase and remove all packing materials from your home. Our delivery crews are not permitted to move your existing furniture or other household items. Delivery personnel will attempt to deliver the purchased items in a safe and controlled manner but will not attempt to place furniture if they feel it will result in damage to the product or your home. Delivery personnel are unable to remove doors, hoist furniture or carry furniture up more than 3 flights of stairs. An elevator must be available for deliveries to the 4th floor and above.
Other Customers also buy:
-
 Translation missing: en.products.product.regular_price $5.99{"id":4616159920199,"title":"110V-220V LED Digital Temperature Controller Thermostat Thermoregulator for Incubator Heating Cooling Replace STC-1000 DTC1200","handle":"110v-220v-led-digital-temperature-controller-thermostat-thermoregulator-for-incubator-heating-cooling-replace-stc-1000-dtc1200","description":"\u003cdiv\u003e\u003cstrong\u003e\u003cspan\u003eDescription:\u003c\/span\u003e\u003c\/strong\u003e\u003c\/div\u003e\n\u003cdiv\u003e \u003c\/div\u003e\n\u003cdiv\u003e\n\u003cdiv\u003e\u003cspan\u003eProduct Name: Thermostat\u003c\/span\u003e\u003c\/div\u003e\n\u003cdiv\u003e\u003cspan\u003eProduct model: DTC1200\u003c\/span\u003e\u003c\/div\u003e\n\u003cdiv data-spm-anchor-id=\"a2g0o.detail.1000023.i0.766b67b1vR7Vg3\"\u003e\u003cspan\u003eSupply voltage: AC110~230V\u003c\/span\u003e\u003c\/div\u003e\n\u003cdiv data-spm-anchor-id=\"a2g0o.detail.1000023.i1.766b67b1vR7Vg3\"\u003e\u003cspan\u003eTemperature range: -40°C~+99°C\u003c\/span\u003e\u003c\/div\u003e\n\u003cdiv\u003e\u003cspan\u003eTemperature measurement accuracy: ±1 °C (-40 °C ~ +70 °C)\u003c\/span\u003e\u003c\/div\u003e\n\u003cdiv data-spm-anchor-id=\"a2g0o.detail.1000023.i2.766b67b1vR7Vg3\"\u003e\u003cspan\u003eSensor line length: 100cm\u003c\/span\u003e\u003c\/div\u003e\n\u003cdiv data-spm-anchor-id=\"a2g0o.detail.1000023.i3.766b67b1vR7Vg3\"\u003e\u003cspan\u003eThermostat size: 93mm*56mm*34mm\u003c\/span\u003e\u003c\/div\u003e\n\u003cdiv\u003e\u003cspan\u003eOutput capacity: cooling (compressor 3A) heating (10A\/250VAC)\u003c\/span\u003e\u003c\/div\u003e\n\u003cdiv\u003e \u003c\/div\u003e\n\u003cdiv\u003e\u003cspan\u003eSee parameter method:\u003c\/span\u003e\u003c\/div\u003e\n\u003cdiv\u003e \u003c\/div\u003e\n\u003cdiv\u003e\u003cspan\u003eWhen the thermostat is working normally, press and release \"▲\"the key once to display the temperature setting value; press and release \"▼\" the key once to display the temperature difference setting value. After 3 seconds, the temperature returns to the normal display state.\u003c\/span\u003e\u003c\/div\u003e\n\u003cdiv\u003e \u003c\/div\u003e\n\u003cdiv\u003e\u003cspan\u003eSetting parameter method:\u003c\/span\u003e\u003c\/div\u003e\n\u003cdiv\u003e \u003c\/div\u003e\n\u003cdiv\u003e\u003cspan\u003eWhen the thermostat is working normally, press \"S\" key and hold the button for more than 3 seconds to enter the modified parameter mode. The “Set” indicator lights up, the digital tube displays the code “F1” of the first menu item, and press the \"▲\" or \"▼\"key to up or down the code of the menu item. Press \"S\" the key to display the parameter setting value of the current menu, press \"S\" and hold the key, then press the \"▲\"or \"▼\" key to increase or decrease the parameter setting value of the current menu; press \"S\" key and hold the key, and press the \"▲\"or \"▼\" key to quickly increase the speed; Or down and display the parameter settings of the current menu.\u003c\/span\u003e\u003c\/div\u003e\n\u003cdiv\u003e\u003cspan\u003ePress and hold \"▲\"or \"▼\" the key at the same time to restore the parameters to the factory settings.\u003c\/span\u003e\u003c\/div\u003e\n\u003cdiv\u003e \u003c\/div\u003e\n\u003cdiv\u003e\u003cspan\u003eOperation instructions:\u003c\/span\u003e\u003c\/div\u003e\n\u003cdiv\u003e \u003c\/div\u003e\n\u003cdiv\u003e\u003cspan\u003e1.When the thermostat is working normally, press and hold the \"power button\" for more than 3 seconds to turn off the thermostat. When the thermostat is off, press and hold the \"power button\" for more than 3 seconds to open the thermostat.\u003c\/span\u003e\u003c\/div\u003e\n\u003cdiv\u003e\u003cspan\u003eWhen the thermostat is working normally, the digital tube displays the current temperature measurement value, and performs automatic recognition conversion of the cooling heating operation mode.\u003c\/span\u003e\u003c\/div\u003e\n\u003cdiv\u003e\u003cspan\u003e2.When the measured temperature ≥ temperature set value + temperature difference set value, enter the cooling state, the Cool indicator light is on, the cooling relay normally open contact is closed; the Cool indicator flashes, indicating that the cooling device is in the press delay protection state; when measuring the temperature ≤ temperature set value, the Cool indicator is off, and the normally open contact of the refrigeration relay is disconnected.\u003c\/span\u003e\u003c\/div\u003e\n\u003cdiv\u003e\u003cspan\u003e3.When the measured temperature ≤ temperature set value - temperature difference set value enters the heating state, the Heat indicator light is on, the heating relay normally open contact is closed; when the measured temperature ≥ temperature set value, the Heat indicator is off, the heating relay normally open contact disconnect.\u003c\/span\u003e\u003c\/div\u003e\n\u003cdiv\u003e \u003c\/div\u003e\n\u003cdiv data-spm-anchor-id=\"a2g0o.detail.1000023.i1.17566478417y5U\"\u003e\n\u003cp data-spm-anchor-id=\"a2g0o.detail.1000023.i0.17566478417y5U\"\u003e\u003cspan\u003eIndicator status description:\u003c\/span\u003e\u003c\/p\u003e\n\u003ctable border=\"1\" cellspacing=\"0\"\u003e\n\u003ctbody\u003e\n\u003ctr\u003e\n\u003ctd\u003e\n\u003cp align=\"center\"\u003e\u003cspan\u003eIndicator\u003c\/span\u003e\u003c\/p\u003e\n\u003c\/td\u003e\n\u003ctd\u003e\n\u003cp align=\"center\"\u003e\u003cspan\u003eFunction\u003c\/span\u003e\u003c\/p\u003e\n\u003c\/td\u003e\n\u003ctd\u003e\n\u003cp align=\"center\" data-spm-anchor-id=\"a2g0o.detail.1000023.i10.17566478417y5U\"\u003e\u003cspan\u003eNote\u003c\/span\u003e\u003c\/p\u003e\n\u003c\/td\u003e\n\u003c\/tr\u003e\n\u003ctr\u003e\n\u003ctd\u003e\n\u003cp align=\"center\" data-spm-anchor-id=\"a2g0o.detail.1000023.i4.17566478417y5U\"\u003e\u003cspan\u003eCool indicator\u003c\/span\u003e\u003c\/p\u003e\n\u003c\/td\u003e\n\u003ctd\u003e\n\u003cp align=\"center\" data-spm-anchor-id=\"a2g0o.detail.1000023.i5.17566478417y5U\"\u003e\u003cspan\u003eLight on:cooling work;\u003c\/span\u003e\u003c\/p\u003e\n\u003cp align=\"center\"\u003e\u003cspan\u003e Light off:cooling off;\u003c\/span\u003e\u003c\/p\u003e\n\u003cp align=\"center\"\u003e\u003cspan\u003eFlashing: press delay\u003c\/span\u003e\u003c\/p\u003e\n\u003c\/td\u003e\n\u003ctd rowspan=\"2\"\u003e\n\u003cp align=\"center\" data-spm-anchor-id=\"a2g0o.detail.1000023.i11.17566478417y5U\"\u003e\u003cspan\u003eCool and Heat Both indicator lights cannot be lit at the same time\u003c\/span\u003e\u003c\/p\u003e\n\u003c\/td\u003e\n\u003c\/tr\u003e\n\u003ctr\u003e\n\u003ctd\u003e\n\u003cp align=\"center\" data-spm-anchor-id=\"a2g0o.detail.1000023.i6.17566478417y5U\"\u003e\u003cspan\u003eHeat indicator\u003c\/span\u003e\u003c\/p\u003e\n\u003c\/td\u003e\n\u003ctd\u003e\n\u003cp align=\"center\" data-spm-anchor-id=\"a2g0o.detail.1000023.i7.17566478417y5U\"\u003e\u003cspan\u003eBright: heating work;\u003c\/span\u003e\u003c\/p\u003e\n\u003cp align=\"center\"\u003e\u003cspan\u003eoff: heating off\u003c\/span\u003e\u003c\/p\u003e\n\u003c\/td\u003e\n\u003c\/tr\u003e\n\u003ctr\u003e\n\u003ctd\u003e\n\u003cp align=\"center\" data-spm-anchor-id=\"a2g0o.detail.1000023.i8.17566478417y5U\"\u003e\u003cspan\u003eSet indicator\u003c\/span\u003e\u003c\/p\u003e\n\u003c\/td\u003e\n\u003ctd\u003e\n\u003cp align=\"center\" data-spm-anchor-id=\"a2g0o.detail.1000023.i9.17566478417y5U\"\u003e\u003cspan\u003eOn: parameter setting status\u003c\/span\u003e\u003c\/p\u003e\n\u003c\/td\u003e\n\u003ctd\u003e\n\u003cp align=\"center\"\u003e \u003c\/p\u003e\n\u003c\/td\u003e\n\u003c\/tr\u003e\n\u003c\/tbody\u003e\n\u003c\/table\u003e\n\u003cp\u003e \u003c\/p\u003e\n\u003cp\u003e\u003cspan\u003eMenu function description:\u003c\/span\u003e\u003c\/p\u003e\n\u003ctable border=\"1\" cellspacing=\"0\"\u003e\n\u003ctbody\u003e\n\u003ctr\u003e\n\u003ctd\u003e\n\u003cp align=\"center\" data-spm-anchor-id=\"a2g0o.detail.1000023.i13.17566478417y5U\"\u003e\u003cspan\u003eMenu identifier\u003c\/span\u003e\u003c\/p\u003e\n\u003c\/td\u003e\n\u003ctd\u003e\n\u003cp align=\"center\" data-spm-anchor-id=\"a2g0o.detail.1000023.i16.17566478417y5U\"\u003e\u003cspan\u003eMenu function\u003c\/span\u003e\u003c\/p\u003e\n\u003c\/td\u003e\n\u003ctd\u003e\n\u003cp align=\"center\" data-spm-anchor-id=\"a2g0o.detail.1000023.i17.17566478417y5U\"\u003e\u003cspan\u003eSetting range\u003c\/span\u003e\u003c\/p\u003e\n\u003c\/td\u003e\n\u003ctd\u003e\n\u003cp align=\"center\" data-spm-anchor-id=\"a2g0o.detail.1000023.i18.17566478417y5U\"\u003e\u003cspan\u003eFactory setting\u003c\/span\u003e\u003c\/p\u003e\n\u003c\/td\u003e\n\u003c\/tr\u003e\n\u003ctr\u003e\n\u003ctd\u003e\n\u003cp align=\"center\" data-spm-anchor-id=\"a2g0o.detail.1000023.i12.17566478417y5U\"\u003e\u003cspan\u003eF1\u003c\/span\u003e\u003c\/p\u003e\n\u003c\/td\u003e\n\u003ctd\u003e\n\u003cp align=\"center\" data-spm-anchor-id=\"a2g0o.detail.1000023.i14.17566478417y5U\"\u003e\u003cspan\u003eTemperature setting value\u003c\/span\u003e\u003c\/p\u003e\n\u003c\/td\u003e\n\u003ctd\u003e\n\u003cp align=\"center\" data-spm-anchor-id=\"a2g0o.detail.1000023.i15.17566478417y5U\"\u003e\u003cspan\u003e-40.0~99.9℃\u003c\/span\u003e\u003c\/p\u003e\n\u003c\/td\u003e\n\u003ctd\u003e\n\u003cp align=\"center\" data-spm-anchor-id=\"a2g0o.detail.1000023.i19.17566478417y5U\"\u003e\u003cspan\u003e10.0℃\u003c\/span\u003e\u003c\/p\u003e\n\u003c\/td\u003e\n\u003c\/tr\u003e\n\u003ctr\u003e\n\u003ctd\u003e\n\u003cp align=\"center\" data-spm-anchor-id=\"a2g0o.detail.1000023.i20.17566478417y5U\"\u003e\u003cspan\u003eF2\u003c\/span\u003e\u003c\/p\u003e\n\u003c\/td\u003e\n\u003ctd\u003e\n\u003cp align=\"center\" data-spm-anchor-id=\"a2g0o.detail.1000023.i21.17566478417y5U\"\u003e\u003cspan\u003eTemperature difference setting value\u003c\/span\u003e\u003c\/p\u003e\n\u003c\/td\u003e\n\u003ctd\u003e\n\u003cp align=\"center\" data-spm-anchor-id=\"a2g0o.detail.1000023.i22.17566478417y5U\"\u003e\u003cspan\u003e0.3~10.0℃\u003c\/span\u003e\u003c\/p\u003e\n\u003c\/td\u003e\n\u003ctd\u003e\n\u003cp align=\"center\" data-spm-anchor-id=\"a2g0o.detail.1000023.i23.17566478417y5U\"\u003e\u003cspan\u003e0.5℃\u003c\/span\u003e\u003c\/p\u003e\n\u003c\/td\u003e\n\u003c\/tr\u003e\n\u003ctr\u003e\n\u003ctd\u003e\n\u003cp align=\"center\" data-spm-anchor-id=\"a2g0o.detail.1000023.i24.17566478417y5U\"\u003e\u003cspan\u003eF3\u003c\/span\u003e\u003c\/p\u003e\n\u003c\/td\u003e\n\u003ctd\u003e\n\u003cp align=\"center\" data-spm-anchor-id=\"a2g0o.detail.1000023.i25.17566478417y5U\"\u003e\u003cspan\u003ePress delay\u003c\/span\u003e\u003c\/p\u003e\n\u003c\/td\u003e\n\u003ctd\u003e\n\u003cp align=\"center\" data-spm-anchor-id=\"a2g0o.detail.1000023.i26.17566478417y5U\"\u003e\u003cspan\u003e1~10 min\u003c\/span\u003e\u003c\/p\u003e\n\u003c\/td\u003e\n\u003ctd\u003e\n\u003cp align=\"center\" data-spm-anchor-id=\"a2g0o.detail.1000023.i27.17566478417y5U\"\u003e\u003cspan\u003e3 min\u003c\/span\u003e\u003c\/p\u003e\n\u003c\/td\u003e\n\u003c\/tr\u003e\n\u003ctr\u003e\n\u003ctd data-spm-anchor-id=\"a2g0o.detail.1000023.i28.17566478417y5U\"\u003e\n\u003cp align=\"center\"\u003e\u003cspan\u003eF4\u003c\/span\u003e\u003c\/p\u003e\n\u003c\/td\u003e\n\u003ctd\u003e\n\u003cp align=\"center\" data-spm-anchor-id=\"a2g0o.detail.1000023.i29.17566478417y5U\"\u003e\u003cspan\u003eTemperature correction\u003c\/span\u003e\u003c\/p\u003e\n\u003c\/td\u003e\n\u003ctd\u003e\n\u003cp align=\"center\" data-spm-anchor-id=\"a2g0o.detail.1000023.i30.17566478417y5U\"\u003e\u003cspan\u003e-10.0~10.0℃\u003c\/span\u003e\u003c\/p\u003e\n\u003c\/td\u003e\n\u003ctd\u003e\n\u003cp align=\"center\" data-spm-anchor-id=\"a2g0o.detail.1000023.i31.17566478417y5U\"\u003e\u003cspan\u003e0℃\u003c\/span\u003e\u003c\/p\u003e\n\u003c\/td\u003e\n\u003c\/tr\u003e\n\u003c\/tbody\u003e\n\u003c\/table\u003e\n\u003cp\u003e \u003c\/p\u003e\n\u003cp\u003e\u003cspan\u003eWiring Diagram:\u003c\/span\u003e\u003c\/p\u003e\n\u003cp\u003e\u003cspan\u003e\u003cimg alt=\"图片1\" src=\"https:\/\/ae01.alicdn.com\/kf\/H001eadcd3b8e49109ce4fd472825de6dW.jpg\"\u003e\u003c\/span\u003e\u003c\/p\u003e\n\u003cp\u003e \u003c\/p\u003e\n\u003cdiv\u003e\n\u003cdiv\u003e \u003c\/div\u003e\n\u003cdiv\u003e\u003cspan\u003eRepair System Data:\u003c\/span\u003e\u003c\/div\u003e\n\u003cdiv\u003e \u003c\/div\u003e\n\u003cdiv\u003e\u003cspan\u003eAfter the thermostat is powered on, first check whether the parameter settings are correct. If an error is detected, “Er” is displayed. Pressing any key will restore the default parameter settings and work normally. It is recommended to reset the parameters at this time.\u003c\/span\u003e\u003c\/div\u003e\n\u003cdiv\u003e \u003c\/div\u003e\n\u003cdiv\u003e\u003cspan\u003eSystem Code, reason and action:\u003c\/span\u003e\u003c\/div\u003e\n\u003cdiv\u003e \u003c\/div\u003e\n\u003cdiv\u003e\u003cspan\u003eSensor fault alarm: When the temperature probe loop is short-circuited or open-circuit fault, the thermostat starts the probe fault alarm mode, closes all execution states, and the digital tube displays “EE”. After the fault is cleared, press any key to return to the normal working mode.\u003c\/span\u003e\u003c\/div\u003e\n\u003cdiv\u003e\u003cspan\u003eOver-temperature alarm: When the temperature measurement exceeds the temperature measurement range, the thermostat starts the over-temperature limit fault alarm mode, and all execution states are turned off. The digital tube displays “HH”. When the temperature returns to the normal measurement range, press any key. Return to normal working mode.\u003c\/span\u003e\u003c\/div\u003e\n\u003cdiv\u003e \u003c\/div\u003e\n\u003cdiv\u003e\u003cspan\u003eSafety rules:\u003c\/span\u003e\u003c\/div\u003e\n\u003cdiv\u003e \u003c\/div\u003e\n\u003cdiv\u003e\u003cspan\u003e☆ Danger:\u003c\/span\u003e\u003c\/div\u003e\n\u003cdiv\u003e\u003cspan\u003e1. Strictly distinguish the sensor lead, power line and output relay interface, can not be connected incorrectly, the relay can not be overloaded;\u003c\/span\u003e\u003c\/div\u003e\n\u003cdiv\u003e\u003cspan\u003e2. All wiring changes must be made with the power off.\u003c\/span\u003e\u003c\/div\u003e\n\u003cdiv\u003e\u003cspan\u003e☆ Warning:\u003c\/span\u003e\u003c\/div\u003e\n\u003cdiv\u003e\u003cspan\u003e1. This thermostat is forbidden to be used in water or excessively humid environment. It is forbidden to use in high temperature, strong electromagnetic interference and strong corrosive environment.\u003c\/span\u003e\u003c\/div\u003e\n\u003cdiv\u003e\u003cspan\u003e☆ Note:\u003c\/span\u003e\u003c\/div\u003e\n\u003cdiv\u003e\u003cspan\u003e1. The supply voltage should be consistent with the voltage marked by the thermostat and ensure the stability of the supply voltage;\u003c\/span\u003e\u003c\/div\u003e\n\u003cdiv\u003e\u003cspan\u003e2. To avoid possible interference, it is recommended that the sensor leads be at an appropriate distance from the power line.\u003c\/span\u003e\u003c\/div\u003e\n\u003cdiv\u003e \u003c\/div\u003e\n\u003cdiv\u003e \u003c\/div\u003e\n\u003cdiv\u003e\u003cstrong\u003e\u003cspan\u003ePackage Included:\u003c\/span\u003e\u003c\/strong\u003e\u003c\/div\u003e\n\u003cdiv\u003e \u003c\/div\u003e\n\u003cdiv\u003e\u003cspan\u003e1 x DTC1200 Intellligent Temperature Controller\u003c\/span\u003e\u003c\/div\u003e\n\u003cdiv\u003e\u003cspan\u003e1 x Temperature sensor\u003c\/span\u003e\u003c\/div\u003e\n\u003cdiv\u003e\u003cspan\u003e1 x Instruction manual\u003c\/span\u003e\u003c\/div\u003e\n\u003cdiv\u003e\u003cspan\u003e1 x Packing box\u003c\/span\u003e\u003c\/div\u003e\n\u003cdiv\u003e\u003cspan\u003e\u003c\/span\u003e\u003c\/div\u003e\n\u003c\/div\u003e\n\u003c\/div\u003e\n\u003c\/div\u003e\n\u003cdiv\u003e\n\u003cp\u003e\u003cimg alt=\"pictures2\" src=\"https:\/\/ae01.alicdn.com\/kf\/H48e07ca430b143a1bd6390f007d70893r.jpg\"\u003e\u003c\/p\u003e\n\u003cp\u003e\u003cimg alt=\"XA0008 (3)\" src=\"https:\/\/ae01.alicdn.com\/kf\/H909cdc0df9ef48b2909767f61c05f908Y.jpg\"\u003e\u003cimg alt=\"XA0008 (4)\" src=\"https:\/\/ae01.alicdn.com\/kf\/He57b51af913d453bb4631f7f71fac13e1.jpg\"\u003e\u003cimg alt=\"XA0008 (5)\" src=\"https:\/\/ae01.alicdn.com\/kf\/H1d793d42fd7945cba1d4202db1861873q.jpg\"\u003e\u003cimg alt=\"XA0008 (24)\" src=\"https:\/\/ae01.alicdn.com\/kf\/Hddf60c92d3bf47e7a4377478d2ae0f4c0.jpg\"\u003e\u003cimg alt=\"XA0008 (7)\" src=\"https:\/\/ae01.alicdn.com\/kf\/H81eb27e7121545b799fea5521905e3c7U.jpg\"\u003e\u003cimg alt=\"XA0008 (6)\" src=\"https:\/\/ae01.alicdn.com\/kf\/H9b1a57d5932b47359fe4cb26b4df8221z.jpg\"\u003e\u003cimg alt=\"XA0008 (1)\" src=\"https:\/\/ae01.alicdn.com\/kf\/H3b043d774f204356b0278e4786d01f14k.jpg\"\u003e\u003cimg alt=\"XA0008 (9)\" src=\"https:\/\/ae01.alicdn.com\/kf\/H97fb15979930424092f839c9a8a3830fK.jpg\"\u003e\u003cimg alt=\"XA0008 (10)\" src=\"https:\/\/ae01.alicdn.com\/kf\/H6e4b81a56f9949e385541d0be905a572G.jpg\"\u003e\u003cimg alt=\"XA0008 (11)\" src=\"https:\/\/ae01.alicdn.com\/kf\/Hd0829f171f2f41bdb34c36cff898940cl.jpg\"\u003e\u003cimg alt=\"XA0008 (12)\" src=\"https:\/\/ae01.alicdn.com\/kf\/Hc210386716324310a4aa3248b0a8a09dp.jpg\"\u003e\u003cimg alt=\"XA0008 (19)\" src=\"https:\/\/ae01.alicdn.com\/kf\/H2743991dcfaf488b936cea38071fdc22l.jpg\"\u003e\u003cimg alt=\"XA0008 (21)\" src=\"https:\/\/ae01.alicdn.com\/kf\/H5d8b10d76d27477aa6d4f2e96f92b18fw.jpg\"\u003e\u003c\/p\u003e\n\u003c\/div\u003e\n\u003cp\u003e \u003c\/p\u003e\n\u003cp\u003e \u003c\/p\u003e\n\u003cp\u003e\u003cspan\u003e\u003cstrong\u003eDTC1100 DTC1110 DTC2210 DTC2200 Temperature Controller\u003c\/strong\u003e\u003c\/span\u003e\u003c\/p\u003e\n\u003cdiv\u003e\u003cspan\u003eProduct Name: Temperature Controller \u003c\/span\u003e\u003c\/div\u003e\n\u003cdiv\u003e\u003cspan\u003eProduct Models: DTC1100; DTC1110; DTC2210; DTC2200 \u003c\/span\u003e\u003c\/div\u003e\n\u003cdiv\u003e\u003cspan\u003ePower supply: AC110V-220V\u003c\/span\u003e\u003c\/div\u003e\n\u003cdiv\u003e\u003cspan\u003eTemperature range: -40°C~+99°C\u003c\/span\u003e\u003c\/div\u003e\n\u003cdiv\u003e\u003cspan\u003eTemperature measurement accuracy: ±1°C (-40 °C ~ +70 °C)\u003c\/span\u003e\u003c\/div\u003e\n\u003cdiv\u003e\u003cspan\u003eThermostat size: 93mm*56mm*34mm\u003c\/span\u003e\u003c\/div\u003e\n\u003cdiv\u003e\u003cspan\u003eRelay contact capacity: Cool(10WC250V); Heat(10A\/AC250V)\u003c\/span\u003e\u003c\/div\u003e\n\u003cdiv\u003e \u003c\/div\u003e\n\u003cdiv\u003e\u003cspan\u003e\u003cimg alt=\"1 (1)\" src=\"https:\/\/ae01.alicdn.com\/kf\/H55d10cb072154207bcdd46dd1dafbc8fh.jpg\"\u003e\u003cimg alt=\"1 (4)\" src=\"https:\/\/ae01.alicdn.com\/kf\/H2f4f0f7cfec445b58c5e00fbdd8435872.jpg\"\u003e\u003cimg alt=\"1 (2)\" src=\"https:\/\/ae01.alicdn.com\/kf\/Hdaf8974533f04094ac13d6f88bd4a970o.jpg\"\u003e\u003cimg alt=\"接线图 (1)\" src=\"https:\/\/ae01.alicdn.com\/kf\/Ha2a95c321166465591f5af870fd231bfp.jpg\"\u003e\u003cimg alt=\"1 (13)\" src=\"https:\/\/ae01.alicdn.com\/kf\/He9464c5ea5c24e168157faff9566d0ecj.jpg\"\u003e\u003cimg alt=\"1 (18)\" src=\"https:\/\/ae01.alicdn.com\/kf\/H44dfe2dd19c14a14bdd1e3d351e03a4bE.jpg\"\u003e\u003cimg alt=\"01 (1)\" src=\"https:\/\/ae01.alicdn.com\/kf\/Ha529d255334543f68affa9a95cb27f16o.jpg\"\u003e\u003cimg alt=\"4\" src=\"https:\/\/ae01.alicdn.com\/kf\/H312943e7f91e4b709b5d642e25598a6a5.jpg\"\u003e\u003cimg alt=\"15\" src=\"https:\/\/ae01.alicdn.com\/kf\/Hb93149fbec8e4329a4c090147de3983fq.jpg\"\u003e\u003cimg alt=\"接线图 (1)\" src=\"https:\/\/ae01.alicdn.com\/kf\/H0e9b53e72d594dde8c46be7d94b346b9b.jpg\"\u003e\u003cimg alt=\"10\" src=\"https:\/\/ae01.alicdn.com\/kf\/Ha4ae55d77d754955bc11801c20abde77F.jpg\"\u003e\u003cimg alt=\"16\" src=\"https:\/\/ae01.alicdn.com\/kf\/H516b5c2e4e7140f5952500c8e005c7b6t.jpg\"\u003e\u003cimg alt=\"1 (1)\" src=\"https:\/\/ae01.alicdn.com\/kf\/H72183dd8d1fc4fe4b6deb8b28ee279cby.jpg\"\u003e\u003cimg alt=\"1 (3)\" src=\"https:\/\/ae01.alicdn.com\/kf\/H1c848b67f8704717802fa010419962b0m.jpg\"\u003e\u003cimg alt=\"1 (4)\" src=\"https:\/\/ae01.alicdn.com\/kf\/H5f22b2bb585948da837a0df46163a52ea.jpg\"\u003e\u003cimg alt=\"1 (8)\" src=\"https:\/\/ae01.alicdn.com\/kf\/Hb0db99a5e1424609a10aea7486f295ab5.jpg\"\u003e\u003cimg alt=\"1 (17)\" src=\"https:\/\/ae01.alicdn.com\/kf\/Hfb6298937ee7447fb751dd6aa5b96549O.jpg\"\u003e\u003cimg alt=\"1 (19)\" src=\"https:\/\/ae01.alicdn.com\/kf\/Hbf41fac7ac3a42fdb90f17b8ff0d308d2.jpg\"\u003e\u003cimg alt=\"1 (20)\" src=\"https:\/\/ae01.alicdn.com\/kf\/H4a3c5770430945089241d33dafef31fcm.jpg\"\u003e\u003cimg alt=\"1 (1)\" src=\"https:\/\/ae01.alicdn.com\/kf\/Hc39891a3e23d41b5968309454950c8bcI.jpg\"\u003e\u003cimg alt=\"1 (2)\" src=\"https:\/\/ae01.alicdn.com\/kf\/H4522829b7e6e44dc9603abf7792e0647G.jpg\"\u003e\u003cimg alt=\"接线图\" src=\"https:\/\/ae01.alicdn.com\/kf\/Hfe019fff700840c6ad7f4ba4869ef0eaq.jpg\"\u003e\u003cimg alt=\"1 (12)\" src=\"https:\/\/ae01.alicdn.com\/kf\/H1ddb9da69f8b4b6eb775e093490116feg.jpg\"\u003e\u003cimg alt=\"1 (18)\" src=\"https:\/\/ae01.alicdn.com\/kf\/H42755cdfd6174fe3b72473d7592b07fdr.jpg\"\u003e\u003cimg alt=\"1 (20)\" src=\"https:\/\/ae01.alicdn.com\/kf\/H2350b4b9bf9b48a78676cfa40085604fK.jpg\"\u003e\u003cimg alt=\"1 (21)\" src=\"https:\/\/ae01.alicdn.com\/kf\/H62b80cb1bda24ed8841e2f13742847a8d.jpg\"\u003e\u003c\/span\u003e\u003c\/div\u003e\n\u003cdiv\u003e \u003c\/div\u003e\n\u003cdiv\u003e \u003c\/div\u003e\n\u003cdiv\u003e \u003c\/div\u003e\n\u003cdiv\u003e \u003c\/div\u003e\n\u003cdiv\u003e\u003cspan\u003eDTC3200 Temperature and Humidity Controller\u003c\/span\u003e\u003c\/div\u003e\n\u003cdiv\u003e \u003c\/div\u003e\n\u003cdiv\u003e\u003cspan\u003eProduct Name: Temperature and Humidity Controller\u003c\/span\u003e\u003c\/div\u003e\n\u003cdiv\u003e\u003cspan\u003eProduct Model: DTC3200\u003c\/span\u003e\u003c\/div\u003e\n\u003cdiv\u003e\u003cspan\u003ePower supply voltage: AC 110 ~ 230V\u003c\/span\u003e\u003c\/div\u003e\n\u003cdiv\u003e\u003cspan\u003ePower supply frequency: 50 \/ 60Hz\u003c\/span\u003e\u003c\/div\u003e\n\u003cdiv\u003e\u003cspan\u003eTemperature measurement range: -20 ~ 60 ℃\u003c\/span\u003e\u003c\/div\u003e\n\u003cdiv\u003e\u003cspan\u003eHumidity measurement range: 0% ~ 100% RH\u003c\/span\u003e\u003c\/div\u003e\n\u003cdiv\u003e\u003cspan\u003eTemperature measurement accuracy: 0.3 ℃\u003c\/span\u003e\u003c\/div\u003e\n\u003cdiv\u003e\u003cspan\u003eHumidity measurement accuracy: 3%\u003c\/span\u003e\u003c\/div\u003e\n\u003cdiv\u003e\u003cspan\u003eOutput control: Relay output\u003c\/span\u003e\u003c\/div\u003e\n\u003cdiv\u003e\u003cspan\u003eOutput power: MAX 10A\u003c\/span\u003e\u003c\/div\u003e\n\u003cdiv\u003e \u003c\/div\u003e\n\u003cdiv\u003e\u003cspan\u003eSetting method: start value \u0026lt;stop value (the program automatically determines the working mode as heating \/ humidification mode)\u003c\/span\u003e\u003c\/div\u003e\n\u003cdiv\u003e\u003cspan\u003eSetting method: start value\u0026gt; stop value (the program automatically determines the working mode to be cooling \/ dehumidifying mode)\u003c\/span\u003e\u003c\/div\u003e\n\u003cdiv\u003e\u003cspan\u003eHeating \/ cooling mode setting\u003c\/span\u003e\u003c\/div\u003e\n\u003cdiv\u003e\u003cspan\u003eSetting method: setting (starting temperature): long press the ▲ button, the starting temperature flashes, and the starting temperature value is set by the ▲ ▼ button\u003c\/span\u003e\u003c\/div\u003e\n\u003cdiv\u003e\u003cspan\u003eSetting (stop temperature): long press the ▼ button to stop the temperature flashing, set the stop temperature value by ▲ ▼ button\u003c\/span\u003e\u003c\/div\u003e\n\u003cdiv\u003e \u003c\/div\u003e\n\u003cdiv\u003e\u003cspan\u003eHeating use case: control the water heater, heating to 65 ℃ to stop, the temperature drops to 50 ℃ to start heating again\u003c\/span\u003e\u003c\/div\u003e\n\u003cdiv\u003e\u003cspan\u003eThe first step: heating working mode, start temperature \u0026lt;stop temperature\u003c\/span\u003e\u003c\/div\u003e\n\u003cdiv\u003e\u003cspan\u003eStep 2: Press and hold the ▲ button, the starting temperature flashes, and set the starting temperature to 50 ℃ via the ▲ ▼ button\u003c\/span\u003e\u003c\/div\u003e\n\u003cdiv\u003e\u003cspan\u003eThe third step: long press the ▼ button to stop the temperature flashing, set the stop temperature to 65 ℃ through the ▲ ▼ button, the setting is complete!\u003c\/span\u003e\u003c\/div\u003e\n\u003cdiv\u003e\u003cspan\u003eRefrigeration use case: use in the farm, the fan ventilation stops at 26 ℃, and the temperature rises to 30 ℃ to start ventilation again\u003c\/span\u003e\u003c\/div\u003e\n\u003cdiv\u003e\u003cspan\u003eStep 1: Refrigeration working mode, start temperature\u0026gt; stop temperature\u003c\/span\u003e\u003c\/div\u003e\n\u003cdiv\u003e\u003cspan\u003eStep 2: Press and hold the ▲ button, the starting temperature flashes, and set the starting temperature to 30 ℃ via the ▲ ▼ button\u003c\/span\u003e\u003c\/div\u003e\n\u003cdiv\u003e\u003cspan\u003eStep 3: Press and hold the ▼ button to stop the temperature flashing, and set the stop temperature to 26 ° C with the ▲ ▼ button. The setting is complete!\u003c\/span\u003e\u003c\/div\u003e\n\u003cdiv\u003e \u003c\/div\u003e\n\u003cdiv\u003e\u003cspan\u003eHumidification \/ dehumidification mode settings:\u003c\/span\u003e\u003c\/div\u003e\n\u003cdiv\u003e\u003cspan\u003eSetting (Start Humidity): Long press the △ key, the start humidity value flashes, set the start humidity value by the △ ▽ key. Set [Stop Humidity]: Long press the △ key, stop the humidity value flashing, and set the stop humidity by the △ ▽ key value.\u003c\/span\u003e\u003c\/div\u003e\n\u003cdiv\u003e \u003c\/div\u003e\n\u003cdiv\u003e\u003cspan\u003eExamples of humidification: Fresh supermarket humidification, control humidifier 50% RH to start humidification, humidification to 80% RH to stop humidification.\u003c\/span\u003e\u003c\/div\u003e\n\u003cdiv\u003e \u003c\/div\u003e\n\u003cdiv\u003e\u003cspan\u003eSetup steps:\u003c\/span\u003e\u003c\/div\u003e\n\u003cdiv\u003e\u003cspan\u003e Step 1: Press and hold the △ key for 3 seconds to start the humidity value flashing, and set the start humidity value to 50% RH.\u003c\/span\u003e\u003c\/div\u003e\n\u003cdiv\u003e\u003cspan\u003e Step 2: Press and hold the ▽ key for 3 seconds to stop the humidity value flashing, set the value to 80% RH, the setting is completed, press the button for 5 seconds without operation, and automatically return to the normal display state\u003c\/span\u003e\u003c\/div\u003e\n\u003cdiv\u003e \u003c\/div\u003e\n\u003cdiv\u003e\u003cspan\u003eDehumidification example: workshop control exhaust dehumidification system, humidity 70% RH starts dehumidification, humidity 40% RH stops dehumidification\u003c\/span\u003e\u003c\/div\u003e\n\u003cdiv\u003e \u003c\/div\u003e\n\u003cdiv\u003e\u003cspan\u003eSetup steps:\u003c\/span\u003e\u003c\/div\u003e\n\u003cdiv\u003e\u003cspan\u003e Step 1: Press and hold the △ key for 3 seconds to start the humidity value flashing, and set the start humidity value to 40% RH.\u003c\/span\u003e\u003c\/div\u003e\n\u003cdiv\u003e\u003cspan\u003e Step 2: Press and hold the ▽ key for 3 seconds to stop the humidity value from flashing, set the value to 70% RH, the setting is completed, press the button for 5 seconds without operation, and automatically return to the normal display state\u003c\/span\u003e\u003c\/div\u003e\n\u003cdiv\u003e \u003c\/div\u003e\n\u003cdiv\u003e \u003c\/div\u003e\n\u003cdiv\u003e\u003cspan\u003eTemperature correction:\u003c\/span\u003e\u003c\/div\u003e\n\u003cdiv\u003e\u003cspan\u003eSimultaneously press the ▲ ▼ key for 3 seconds to start the temperature digit flashing, and use the ▲ ▼ key to set the start temperature correction value; after the setting is completed, press the button for 5 seconds without operation, and automatically return to the normal display state.\u003c\/span\u003e\u003c\/div\u003e\n\u003cdiv\u003e \u003c\/div\u003e\n\u003cdiv\u003e\u003cspan\u003eHumidity correction:\u003c\/span\u003e\u003c\/div\u003e\n\u003cdiv\u003e\u003cspan\u003eSimultaneously press the △ ▽ key for 3 seconds to start the humidity digit flashing, and set the humidity correction value by the △ ▽ key; after the setting is completed, press the button for 5 seconds without operation, and it will automatically return to the normal display state.\u003c\/span\u003e\u003c\/div\u003e\n\u003cdiv\u003e \u003c\/div\u003e\n\u003cdiv\u003e\u003cspan\u003eWiring instructions:\u003c\/span\u003e\u003c\/div\u003e\n\u003cdiv\u003e \u003c\/div\u003e\n\u003cdiv\u003e \u003cimg alt=\"11\" src=\"https:\/\/ae01.alicdn.com\/kf\/H818f4241e00c4a4383e69801a2e9fd69R.jpg\"\u003e\n\u003c\/div\u003e\n\u003cdiv\u003e \u003c\/div\u003e\n\u003cdiv\u003e \u003c\/div\u003e\n\u003cdiv\u003e\u003cspan\u003e※ If the temperature and humidity display LLL, please confirm whether the wiring of the SHT20 digital temperature and humidity sensor is correct and whether there is poor contact, you can try to reconnect the wiring.\u003c\/span\u003e\u003c\/div\u003e\n\u003cdiv\u003e \u003c\/div\u003e\n\u003cdiv\u003e\n\u003cimg alt=\"1(23)\" src=\"https:\/\/ae01.alicdn.com\/kf\/H12eb95c3e0d2444c96477c9c4e96c5e2r.jpg\"\u003e\u003cimg alt=\"1 (2)\" src=\"https:\/\/ae01.alicdn.com\/kf\/H4aec1fa943784e678b9d5a13ef92c840u.jpg\"\u003e\u003cimg alt=\"1 (9)\" src=\"https:\/\/ae01.alicdn.com\/kf\/H62f61e0071094feb8e4b5a95452126815.jpg\"\u003e\u003cimg alt=\"1 (15)\" src=\"https:\/\/ae01.alicdn.com\/kf\/H3015a4e6d81f490b9020dca461f7694bX.jpg\"\u003e\u003cimg alt=\"1 (18)\" src=\"https:\/\/ae01.alicdn.com\/kf\/He260f2df36064fe2af5530c7a561437ed.jpg\"\u003e\u003cimg alt=\"1 (20)\" src=\"https:\/\/ae01.alicdn.com\/kf\/He00db8acc649445db0f1f4fce6df2bf95.jpg\"\u003e\u003cimg alt=\"1 (22)\" src=\"https:\/\/ae01.alicdn.com\/kf\/H5e7b7c932bd44e159fcc998c54110021C.jpg\"\u003e\u003cimg alt=\"1 (4)\" src=\"https:\/\/ae01.alicdn.com\/kf\/H31b481ef695c453d88993756e902f3dec.jpg\"\u003e\u003cimg alt=\"1 (3)\" src=\"https:\/\/ae01.alicdn.com\/kf\/H72f864579840411fa481222392614398v.jpg\"\u003e\n\u003c\/div\u003e","published_at":"2020-05-04T20:03:25+08:00","created_at":"2020-05-04T20:20:56+08:00","vendor":"diymore","type":"Thermostat","tags":[],"price":1399,"price_min":1399,"price_max":1399,"available":true,"price_varies":false,"compare_at_price":null,"compare_at_price_min":0,"compare_at_price_max":0,"compare_at_price_varies":false,"variants":[{"id":32174110441543,"title":"AC 110V-220V DTC2210 Dual display","option1":"AC 110V-220V DTC2210 Dual display","option2":null,"option3":null,"sku":"XA0022","requires_shipping":true,"taxable":true,"featured_image":null,"available":true,"name":"110V-220V LED Digital Temperature Controller Thermostat Thermoregulator for Incubator Heating Cooling Replace STC-1000 DTC1200 - AC 110V-220V DTC2210 Dual display","public_title":"AC 110V-220V DTC2210 Dual display","options":["AC 110V-220V DTC2210 Dual display"],"price":1399,"weight":0,"compare_at_price":null,"inventory_management":"shopify","barcode":"","requires_selling_plan":false,"selling_plan_allocations":[],"quantity_rule":{"min":1,"max":null,"increment":1}},{"id":32174110474311,"title":"AC 110V-220V DTC1100 Dual display","option1":"AC 110V-220V DTC1100 Dual display","option2":null,"option3":null,"sku":"XA0021","requires_shipping":true,"taxable":true,"featured_image":null,"available":true,"name":"110V-220V LED Digital Temperature Controller Thermostat Thermoregulator for Incubator Heating Cooling Replace STC-1000 DTC1200 - AC 110V-220V DTC1100 Dual display","public_title":"AC 110V-220V DTC1100 Dual display","options":["AC 110V-220V DTC1100 Dual display"],"price":1399,"weight":0,"compare_at_price":null,"inventory_management":"shopify","barcode":"","requires_selling_plan":false,"selling_plan_allocations":[],"quantity_rule":{"min":1,"max":null,"increment":1}},{"id":32174110539847,"title":"AC 110V-220V DTC3200 Dual display","option1":"AC 110V-220V DTC3200 Dual display","option2":null,"option3":null,"sku":"XA0024","requires_shipping":true,"taxable":true,"featured_image":null,"available":true,"name":"110V-220V LED Digital Temperature Controller Thermostat Thermoregulator for Incubator Heating Cooling Replace STC-1000 DTC1200 - AC 110V-220V DTC3200 Dual display","public_title":"AC 110V-220V DTC3200 Dual display","options":["AC 110V-220V DTC3200 Dual display"],"price":1399,"weight":0,"compare_at_price":null,"inventory_management":"shopify","barcode":"","requires_selling_plan":false,"selling_plan_allocations":[],"quantity_rule":{"min":1,"max":null,"increment":1}},{"id":32174110572615,"title":"AC 110V-220V DTC1100","option1":"AC 110V-220V DTC1100","option2":null,"option3":null,"sku":"XA0020","requires_shipping":true,"taxable":true,"featured_image":null,"available":true,"name":"110V-220V LED Digital Temperature Controller Thermostat Thermoregulator for Incubator Heating Cooling Replace STC-1000 DTC1200 - AC 110V-220V DTC1100","public_title":"AC 110V-220V DTC1100","options":["AC 110V-220V DTC1100"],"price":1399,"weight":0,"compare_at_price":null,"inventory_management":"shopify","barcode":"","requires_selling_plan":false,"selling_plan_allocations":[],"quantity_rule":{"min":1,"max":null,"increment":1}},{"id":32174110605383,"title":"AC 110V-220V DTC2200","option1":"AC 110V-220V DTC2200","option2":null,"option3":null,"sku":"XA0023","requires_shipping":true,"taxable":true,"featured_image":null,"available":true,"name":"110V-220V LED Digital Temperature Controller Thermostat Thermoregulator for Incubator Heating Cooling Replace STC-1000 DTC1200 - AC 110V-220V DTC2200","public_title":"AC 110V-220V DTC2200","options":["AC 110V-220V DTC2200"],"price":1399,"weight":0,"compare_at_price":null,"inventory_management":"shopify","barcode":"","requires_selling_plan":false,"selling_plan_allocations":[],"quantity_rule":{"min":1,"max":null,"increment":1}},{"id":32174110638151,"title":"AC 110V-220V DTC1200","option1":"AC 110V-220V DTC1200","option2":null,"option3":null,"sku":"XA0008","requires_shipping":true,"taxable":true,"featured_image":null,"available":true,"name":"110V-220V LED Digital Temperature Controller Thermostat Thermoregulator for Incubator Heating Cooling Replace STC-1000 DTC1200 - AC 110V-220V DTC1200","public_title":"AC 110V-220V DTC1200","options":["AC 110V-220V DTC1200"],"price":1399,"weight":0,"compare_at_price":null,"inventory_management":"shopify","barcode":"","requires_selling_plan":false,"selling_plan_allocations":[],"quantity_rule":{"min":1,"max":null,"increment":1}}],"images":["\/\/www.diymore.cc\/cdn\/shop\/products\/1_1_423.jpg?v=1588701927","\/\/www.diymore.cc\/cdn\/shop\/products\/1_8_460.jpg?v=1588701927","\/\/www.diymore.cc\/cdn\/shop\/products\/1_9_135.jpg?v=1588701927","\/\/www.diymore.cc\/cdn\/shop\/products\/1_16_853.jpg?v=1588701927","\/\/www.diymore.cc\/cdn\/shop\/products\/1_18_816.jpg?v=1588701927","\/\/www.diymore.cc\/cdn\/shop\/products\/1_19_930.jpg?v=1588701927"],"featured_image":"\/\/www.diymore.cc\/cdn\/shop\/products\/1_1_423.jpg?v=1588701927","options":["Type"],"media":[{"alt":"110V-220V Led Digital Temperature Controller Thermostat Thermoregulator For Incubator Heating","id":6682595557447,"position":1,"preview_image":{"aspect_ratio":1.0,"height":1000,"width":1000,"src":"\/\/www.diymore.cc\/cdn\/shop\/products\/1_1_423.jpg?v=1588701927"},"aspect_ratio":1.0,"height":1000,"media_type":"image","src":"\/\/www.diymore.cc\/cdn\/shop\/products\/1_1_423.jpg?v=1588701927","width":1000},{"alt":"110V-220V Led Digital Temperature Controller Thermostat Thermoregulator For Incubator Heating","id":6682596311111,"position":2,"preview_image":{"aspect_ratio":1.0,"height":1000,"width":1000,"src":"\/\/www.diymore.cc\/cdn\/shop\/products\/1_8_460.jpg?v=1588701927"},"aspect_ratio":1.0,"height":1000,"media_type":"image","src":"\/\/www.diymore.cc\/cdn\/shop\/products\/1_8_460.jpg?v=1588701927","width":1000},{"alt":"110V-220V Led Digital Temperature Controller Thermostat Thermoregulator For Incubator Heating","id":6682596606023,"position":3,"preview_image":{"aspect_ratio":1.0,"height":1000,"width":1000,"src":"\/\/www.diymore.cc\/cdn\/shop\/products\/1_9_135.jpg?v=1588701927"},"aspect_ratio":1.0,"height":1000,"media_type":"image","src":"\/\/www.diymore.cc\/cdn\/shop\/products\/1_9_135.jpg?v=1588701927","width":1000},{"alt":"110V-220V Led Digital Temperature Controller Thermostat Thermoregulator For Incubator Heating","id":6682597326919,"position":4,"preview_image":{"aspect_ratio":1.0,"height":1000,"width":1000,"src":"\/\/www.diymore.cc\/cdn\/shop\/products\/1_16_853.jpg?v=1588701927"},"aspect_ratio":1.0,"height":1000,"media_type":"image","src":"\/\/www.diymore.cc\/cdn\/shop\/products\/1_16_853.jpg?v=1588701927","width":1000},{"alt":"110V-220V Led Digital Temperature Controller Thermostat Thermoregulator For Incubator Heating","id":6682597687367,"position":5,"preview_image":{"aspect_ratio":1.0,"height":1000,"width":1000,"src":"\/\/www.diymore.cc\/cdn\/shop\/products\/1_18_816.jpg?v=1588701927"},"aspect_ratio":1.0,"height":1000,"media_type":"image","src":"\/\/www.diymore.cc\/cdn\/shop\/products\/1_18_816.jpg?v=1588701927","width":1000},{"alt":"110V-220V Led Digital Temperature Controller Thermostat Thermoregulator For Incubator Heating","id":6682598015047,"position":6,"preview_image":{"aspect_ratio":1.0,"height":1000,"width":1000,"src":"\/\/www.diymore.cc\/cdn\/shop\/products\/1_19_930.jpg?v=1588701927"},"aspect_ratio":1.0,"height":1000,"media_type":"image","src":"\/\/www.diymore.cc\/cdn\/shop\/products\/1_19_930.jpg?v=1588701927","width":1000}],"requires_selling_plan":false,"selling_plan_groups":[],"content":"\u003cdiv\u003e\u003cstrong\u003e\u003cspan\u003eDescription:\u003c\/span\u003e\u003c\/strong\u003e\u003c\/div\u003e\n\u003cdiv\u003e \u003c\/div\u003e\n\u003cdiv\u003e\n\u003cdiv\u003e\u003cspan\u003eProduct Name: Thermostat\u003c\/span\u003e\u003c\/div\u003e\n\u003cdiv\u003e\u003cspan\u003eProduct model: DTC1200\u003c\/span\u003e\u003c\/div\u003e\n\u003cdiv data-spm-anchor-id=\"a2g0o.detail.1000023.i0.766b67b1vR7Vg3\"\u003e\u003cspan\u003eSupply voltage: AC110~230V\u003c\/span\u003e\u003c\/div\u003e\n\u003cdiv data-spm-anchor-id=\"a2g0o.detail.1000023.i1.766b67b1vR7Vg3\"\u003e\u003cspan\u003eTemperature range: -40°C~+99°C\u003c\/span\u003e\u003c\/div\u003e\n\u003cdiv\u003e\u003cspan\u003eTemperature measurement accuracy: ±1 °C (-40 °C ~ +70 °C)\u003c\/span\u003e\u003c\/div\u003e\n\u003cdiv data-spm-anchor-id=\"a2g0o.detail.1000023.i2.766b67b1vR7Vg3\"\u003e\u003cspan\u003eSensor line length: 100cm\u003c\/span\u003e\u003c\/div\u003e\n\u003cdiv data-spm-anchor-id=\"a2g0o.detail.1000023.i3.766b67b1vR7Vg3\"\u003e\u003cspan\u003eThermostat size: 93mm*56mm*34mm\u003c\/span\u003e\u003c\/div\u003e\n\u003cdiv\u003e\u003cspan\u003eOutput capacity: cooling (compressor 3A) heating (10A\/250VAC)\u003c\/span\u003e\u003c\/div\u003e\n\u003cdiv\u003e \u003c\/div\u003e\n\u003cdiv\u003e\u003cspan\u003eSee parameter method:\u003c\/span\u003e\u003c\/div\u003e\n\u003cdiv\u003e \u003c\/div\u003e\n\u003cdiv\u003e\u003cspan\u003eWhen the thermostat is working normally, press and release \"▲\"the key once to display the temperature setting value; press and release \"▼\" the key once to display the temperature difference setting value. After 3 seconds, the temperature returns to the normal display state.\u003c\/span\u003e\u003c\/div\u003e\n\u003cdiv\u003e \u003c\/div\u003e\n\u003cdiv\u003e\u003cspan\u003eSetting parameter method:\u003c\/span\u003e\u003c\/div\u003e\n\u003cdiv\u003e \u003c\/div\u003e\n\u003cdiv\u003e\u003cspan\u003eWhen the thermostat is working normally, press \"S\" key and hold the button for more than 3 seconds to enter the modified parameter mode. The “Set” indicator lights up, the digital tube displays the code “F1” of the first menu item, and press the \"▲\" or \"▼\"key to up or down the code of the menu item. Press \"S\" the key to display the parameter setting value of the current menu, press \"S\" and hold the key, then press the \"▲\"or \"▼\" key to increase or decrease the parameter setting value of the current menu; press \"S\" key and hold the key, and press the \"▲\"or \"▼\" key to quickly increase the speed; Or down and display the parameter settings of the current menu.\u003c\/span\u003e\u003c\/div\u003e\n\u003cdiv\u003e\u003cspan\u003ePress and hold \"▲\"or \"▼\" the key at the same time to restore the parameters to the factory settings.\u003c\/span\u003e\u003c\/div\u003e\n\u003cdiv\u003e \u003c\/div\u003e\n\u003cdiv\u003e\u003cspan\u003eOperation instructions:\u003c\/span\u003e\u003c\/div\u003e\n\u003cdiv\u003e \u003c\/div\u003e\n\u003cdiv\u003e\u003cspan\u003e1.When the thermostat is working normally, press and hold the \"power button\" for more than 3 seconds to turn off the thermostat. When the thermostat is off, press and hold the \"power button\" for more than 3 seconds to open the thermostat.\u003c\/span\u003e\u003c\/div\u003e\n\u003cdiv\u003e\u003cspan\u003eWhen the thermostat is working normally, the digital tube displays the current temperature measurement value, and performs automatic recognition conversion of the cooling heating operation mode.\u003c\/span\u003e\u003c\/div\u003e\n\u003cdiv\u003e\u003cspan\u003e2.When the measured temperature ≥ temperature set value + temperature difference set value, enter the cooling state, the Cool indicator light is on, the cooling relay normally open contact is closed; the Cool indicator flashes, indicating that the cooling device is in the press delay protection state; when measuring the temperature ≤ temperature set value, the Cool indicator is off, and the normally open contact of the refrigeration relay is disconnected.\u003c\/span\u003e\u003c\/div\u003e\n\u003cdiv\u003e\u003cspan\u003e3.When the measured temperature ≤ temperature set value - temperature difference set value enters the heating state, the Heat indicator light is on, the heating relay normally open contact is closed; when the measured temperature ≥ temperature set value, the Heat indicator is off, the heating relay normally open contact disconnect.\u003c\/span\u003e\u003c\/div\u003e\n\u003cdiv\u003e \u003c\/div\u003e\n\u003cdiv data-spm-anchor-id=\"a2g0o.detail.1000023.i1.17566478417y5U\"\u003e\n\u003cp data-spm-anchor-id=\"a2g0o.detail.1000023.i0.17566478417y5U\"\u003e\u003cspan\u003eIndicator status description:\u003c\/span\u003e\u003c\/p\u003e\n\u003ctable border=\"1\" cellspacing=\"0\"\u003e\n\u003ctbody\u003e\n\u003ctr\u003e\n\u003ctd\u003e\n\u003cp align=\"center\"\u003e\u003cspan\u003eIndicator\u003c\/span\u003e\u003c\/p\u003e\n\u003c\/td\u003e\n\u003ctd\u003e\n\u003cp align=\"center\"\u003e\u003cspan\u003eFunction\u003c\/span\u003e\u003c\/p\u003e\n\u003c\/td\u003e\n\u003ctd\u003e\n\u003cp align=\"center\" data-spm-anchor-id=\"a2g0o.detail.1000023.i10.17566478417y5U\"\u003e\u003cspan\u003eNote\u003c\/span\u003e\u003c\/p\u003e\n\u003c\/td\u003e\n\u003c\/tr\u003e\n\u003ctr\u003e\n\u003ctd\u003e\n\u003cp align=\"center\" data-spm-anchor-id=\"a2g0o.detail.1000023.i4.17566478417y5U\"\u003e\u003cspan\u003eCool indicator\u003c\/span\u003e\u003c\/p\u003e\n\u003c\/td\u003e\n\u003ctd\u003e\n\u003cp align=\"center\" data-spm-anchor-id=\"a2g0o.detail.1000023.i5.17566478417y5U\"\u003e\u003cspan\u003eLight on:cooling work;\u003c\/span\u003e\u003c\/p\u003e\n\u003cp align=\"center\"\u003e\u003cspan\u003e Light off:cooling off;\u003c\/span\u003e\u003c\/p\u003e\n\u003cp align=\"center\"\u003e\u003cspan\u003eFlashing: press delay\u003c\/span\u003e\u003c\/p\u003e\n\u003c\/td\u003e\n\u003ctd rowspan=\"2\"\u003e\n\u003cp align=\"center\" data-spm-anchor-id=\"a2g0o.detail.1000023.i11.17566478417y5U\"\u003e\u003cspan\u003eCool and Heat Both indicator lights cannot be lit at the same time\u003c\/span\u003e\u003c\/p\u003e\n\u003c\/td\u003e\n\u003c\/tr\u003e\n\u003ctr\u003e\n\u003ctd\u003e\n\u003cp align=\"center\" data-spm-anchor-id=\"a2g0o.detail.1000023.i6.17566478417y5U\"\u003e\u003cspan\u003eHeat indicator\u003c\/span\u003e\u003c\/p\u003e\n\u003c\/td\u003e\n\u003ctd\u003e\n\u003cp align=\"center\" data-spm-anchor-id=\"a2g0o.detail.1000023.i7.17566478417y5U\"\u003e\u003cspan\u003eBright: heating work;\u003c\/span\u003e\u003c\/p\u003e\n\u003cp align=\"center\"\u003e\u003cspan\u003eoff: heating off\u003c\/span\u003e\u003c\/p\u003e\n\u003c\/td\u003e\n\u003c\/tr\u003e\n\u003ctr\u003e\n\u003ctd\u003e\n\u003cp align=\"center\" data-spm-anchor-id=\"a2g0o.detail.1000023.i8.17566478417y5U\"\u003e\u003cspan\u003eSet indicator\u003c\/span\u003e\u003c\/p\u003e\n\u003c\/td\u003e\n\u003ctd\u003e\n\u003cp align=\"center\" data-spm-anchor-id=\"a2g0o.detail.1000023.i9.17566478417y5U\"\u003e\u003cspan\u003eOn: parameter setting status\u003c\/span\u003e\u003c\/p\u003e\n\u003c\/td\u003e\n\u003ctd\u003e\n\u003cp align=\"center\"\u003e \u003c\/p\u003e\n\u003c\/td\u003e\n\u003c\/tr\u003e\n\u003c\/tbody\u003e\n\u003c\/table\u003e\n\u003cp\u003e \u003c\/p\u003e\n\u003cp\u003e\u003cspan\u003eMenu function description:\u003c\/span\u003e\u003c\/p\u003e\n\u003ctable border=\"1\" cellspacing=\"0\"\u003e\n\u003ctbody\u003e\n\u003ctr\u003e\n\u003ctd\u003e\n\u003cp align=\"center\" data-spm-anchor-id=\"a2g0o.detail.1000023.i13.17566478417y5U\"\u003e\u003cspan\u003eMenu identifier\u003c\/span\u003e\u003c\/p\u003e\n\u003c\/td\u003e\n\u003ctd\u003e\n\u003cp align=\"center\" data-spm-anchor-id=\"a2g0o.detail.1000023.i16.17566478417y5U\"\u003e\u003cspan\u003eMenu function\u003c\/span\u003e\u003c\/p\u003e\n\u003c\/td\u003e\n\u003ctd\u003e\n\u003cp align=\"center\" data-spm-anchor-id=\"a2g0o.detail.1000023.i17.17566478417y5U\"\u003e\u003cspan\u003eSetting range\u003c\/span\u003e\u003c\/p\u003e\n\u003c\/td\u003e\n\u003ctd\u003e\n\u003cp align=\"center\" data-spm-anchor-id=\"a2g0o.detail.1000023.i18.17566478417y5U\"\u003e\u003cspan\u003eFactory setting\u003c\/span\u003e\u003c\/p\u003e\n\u003c\/td\u003e\n\u003c\/tr\u003e\n\u003ctr\u003e\n\u003ctd\u003e\n\u003cp align=\"center\" data-spm-anchor-id=\"a2g0o.detail.1000023.i12.17566478417y5U\"\u003e\u003cspan\u003eF1\u003c\/span\u003e\u003c\/p\u003e\n\u003c\/td\u003e\n\u003ctd\u003e\n\u003cp align=\"center\" data-spm-anchor-id=\"a2g0o.detail.1000023.i14.17566478417y5U\"\u003e\u003cspan\u003eTemperature setting value\u003c\/span\u003e\u003c\/p\u003e\n\u003c\/td\u003e\n\u003ctd\u003e\n\u003cp align=\"center\" data-spm-anchor-id=\"a2g0o.detail.1000023.i15.17566478417y5U\"\u003e\u003cspan\u003e-40.0~99.9℃\u003c\/span\u003e\u003c\/p\u003e\n\u003c\/td\u003e\n\u003ctd\u003e\n\u003cp align=\"center\" data-spm-anchor-id=\"a2g0o.detail.1000023.i19.17566478417y5U\"\u003e\u003cspan\u003e10.0℃\u003c\/span\u003e\u003c\/p\u003e\n\u003c\/td\u003e\n\u003c\/tr\u003e\n\u003ctr\u003e\n\u003ctd\u003e\n\u003cp align=\"center\" data-spm-anchor-id=\"a2g0o.detail.1000023.i20.17566478417y5U\"\u003e\u003cspan\u003eF2\u003c\/span\u003e\u003c\/p\u003e\n\u003c\/td\u003e\n\u003ctd\u003e\n\u003cp align=\"center\" data-spm-anchor-id=\"a2g0o.detail.1000023.i21.17566478417y5U\"\u003e\u003cspan\u003eTemperature difference setting value\u003c\/span\u003e\u003c\/p\u003e\n\u003c\/td\u003e\n\u003ctd\u003e\n\u003cp align=\"center\" data-spm-anchor-id=\"a2g0o.detail.1000023.i22.17566478417y5U\"\u003e\u003cspan\u003e0.3~10.0℃\u003c\/span\u003e\u003c\/p\u003e\n\u003c\/td\u003e\n\u003ctd\u003e\n\u003cp align=\"center\" data-spm-anchor-id=\"a2g0o.detail.1000023.i23.17566478417y5U\"\u003e\u003cspan\u003e0.5℃\u003c\/span\u003e\u003c\/p\u003e\n\u003c\/td\u003e\n\u003c\/tr\u003e\n\u003ctr\u003e\n\u003ctd\u003e\n\u003cp align=\"center\" data-spm-anchor-id=\"a2g0o.detail.1000023.i24.17566478417y5U\"\u003e\u003cspan\u003eF3\u003c\/span\u003e\u003c\/p\u003e\n\u003c\/td\u003e\n\u003ctd\u003e\n\u003cp align=\"center\" data-spm-anchor-id=\"a2g0o.detail.1000023.i25.17566478417y5U\"\u003e\u003cspan\u003ePress delay\u003c\/span\u003e\u003c\/p\u003e\n\u003c\/td\u003e\n\u003ctd\u003e\n\u003cp align=\"center\" data-spm-anchor-id=\"a2g0o.detail.1000023.i26.17566478417y5U\"\u003e\u003cspan\u003e1~10 min\u003c\/span\u003e\u003c\/p\u003e\n\u003c\/td\u003e\n\u003ctd\u003e\n\u003cp align=\"center\" data-spm-anchor-id=\"a2g0o.detail.1000023.i27.17566478417y5U\"\u003e\u003cspan\u003e3 min\u003c\/span\u003e\u003c\/p\u003e\n\u003c\/td\u003e\n\u003c\/tr\u003e\n\u003ctr\u003e\n\u003ctd data-spm-anchor-id=\"a2g0o.detail.1000023.i28.17566478417y5U\"\u003e\n\u003cp align=\"center\"\u003e\u003cspan\u003eF4\u003c\/span\u003e\u003c\/p\u003e\n\u003c\/td\u003e\n\u003ctd\u003e\n\u003cp align=\"center\" data-spm-anchor-id=\"a2g0o.detail.1000023.i29.17566478417y5U\"\u003e\u003cspan\u003eTemperature correction\u003c\/span\u003e\u003c\/p\u003e\n\u003c\/td\u003e\n\u003ctd\u003e\n\u003cp align=\"center\" data-spm-anchor-id=\"a2g0o.detail.1000023.i30.17566478417y5U\"\u003e\u003cspan\u003e-10.0~10.0℃\u003c\/span\u003e\u003c\/p\u003e\n\u003c\/td\u003e\n\u003ctd\u003e\n\u003cp align=\"center\" data-spm-anchor-id=\"a2g0o.detail.1000023.i31.17566478417y5U\"\u003e\u003cspan\u003e0℃\u003c\/span\u003e\u003c\/p\u003e\n\u003c\/td\u003e\n\u003c\/tr\u003e\n\u003c\/tbody\u003e\n\u003c\/table\u003e\n\u003cp\u003e \u003c\/p\u003e\n\u003cp\u003e\u003cspan\u003eWiring Diagram:\u003c\/span\u003e\u003c\/p\u003e\n\u003cp\u003e\u003cspan\u003e\u003cimg alt=\"图片1\" src=\"https:\/\/ae01.alicdn.com\/kf\/H001eadcd3b8e49109ce4fd472825de6dW.jpg\"\u003e\u003c\/span\u003e\u003c\/p\u003e\n\u003cp\u003e \u003c\/p\u003e\n\u003cdiv\u003e\n\u003cdiv\u003e \u003c\/div\u003e\n\u003cdiv\u003e\u003cspan\u003eRepair System Data:\u003c\/span\u003e\u003c\/div\u003e\n\u003cdiv\u003e \u003c\/div\u003e\n\u003cdiv\u003e\u003cspan\u003eAfter the thermostat is powered on, first check whether the parameter settings are correct. If an error is detected, “Er” is displayed. Pressing any key will restore the default parameter settings and work normally. It is recommended to reset the parameters at this time.\u003c\/span\u003e\u003c\/div\u003e\n\u003cdiv\u003e \u003c\/div\u003e\n\u003cdiv\u003e\u003cspan\u003eSystem Code, reason and action:\u003c\/span\u003e\u003c\/div\u003e\n\u003cdiv\u003e \u003c\/div\u003e\n\u003cdiv\u003e\u003cspan\u003eSensor fault alarm: When the temperature probe loop is short-circuited or open-circuit fault, the thermostat starts the probe fault alarm mode, closes all execution states, and the digital tube displays “EE”. After the fault is cleared, press any key to return to the normal working mode.\u003c\/span\u003e\u003c\/div\u003e\n\u003cdiv\u003e\u003cspan\u003eOver-temperature alarm: When the temperature measurement exceeds the temperature measurement range, the thermostat starts the over-temperature limit fault alarm mode, and all execution states are turned off. The digital tube displays “HH”. When the temperature returns to the normal measurement range, press any key. Return to normal working mode.\u003c\/span\u003e\u003c\/div\u003e\n\u003cdiv\u003e \u003c\/div\u003e\n\u003cdiv\u003e\u003cspan\u003eSafety rules:\u003c\/span\u003e\u003c\/div\u003e\n\u003cdiv\u003e \u003c\/div\u003e\n\u003cdiv\u003e\u003cspan\u003e☆ Danger:\u003c\/span\u003e\u003c\/div\u003e\n\u003cdiv\u003e\u003cspan\u003e1. Strictly distinguish the sensor lead, power line and output relay interface, can not be connected incorrectly, the relay can not be overloaded;\u003c\/span\u003e\u003c\/div\u003e\n\u003cdiv\u003e\u003cspan\u003e2. All wiring changes must be made with the power off.\u003c\/span\u003e\u003c\/div\u003e\n\u003cdiv\u003e\u003cspan\u003e☆ Warning:\u003c\/span\u003e\u003c\/div\u003e\n\u003cdiv\u003e\u003cspan\u003e1. This thermostat is forbidden to be used in water or excessively humid environment. It is forbidden to use in high temperature, strong electromagnetic interference and strong corrosive environment.\u003c\/span\u003e\u003c\/div\u003e\n\u003cdiv\u003e\u003cspan\u003e☆ Note:\u003c\/span\u003e\u003c\/div\u003e\n\u003cdiv\u003e\u003cspan\u003e1. The supply voltage should be consistent with the voltage marked by the thermostat and ensure the stability of the supply voltage;\u003c\/span\u003e\u003c\/div\u003e\n\u003cdiv\u003e\u003cspan\u003e2. To avoid possible interference, it is recommended that the sensor leads be at an appropriate distance from the power line.\u003c\/span\u003e\u003c\/div\u003e\n\u003cdiv\u003e \u003c\/div\u003e\n\u003cdiv\u003e \u003c\/div\u003e\n\u003cdiv\u003e\u003cstrong\u003e\u003cspan\u003ePackage Included:\u003c\/span\u003e\u003c\/strong\u003e\u003c\/div\u003e\n\u003cdiv\u003e \u003c\/div\u003e\n\u003cdiv\u003e\u003cspan\u003e1 x DTC1200 Intellligent Temperature Controller\u003c\/span\u003e\u003c\/div\u003e\n\u003cdiv\u003e\u003cspan\u003e1 x Temperature sensor\u003c\/span\u003e\u003c\/div\u003e\n\u003cdiv\u003e\u003cspan\u003e1 x Instruction manual\u003c\/span\u003e\u003c\/div\u003e\n\u003cdiv\u003e\u003cspan\u003e1 x Packing box\u003c\/span\u003e\u003c\/div\u003e\n\u003cdiv\u003e\u003cspan\u003e\u003c\/span\u003e\u003c\/div\u003e\n\u003c\/div\u003e\n\u003c\/div\u003e\n\u003c\/div\u003e\n\u003cdiv\u003e\n\u003cp\u003e\u003cimg alt=\"pictures2\" src=\"https:\/\/ae01.alicdn.com\/kf\/H48e07ca430b143a1bd6390f007d70893r.jpg\"\u003e\u003c\/p\u003e\n\u003cp\u003e\u003cimg alt=\"XA0008 (3)\" src=\"https:\/\/ae01.alicdn.com\/kf\/H909cdc0df9ef48b2909767f61c05f908Y.jpg\"\u003e\u003cimg alt=\"XA0008 (4)\" src=\"https:\/\/ae01.alicdn.com\/kf\/He57b51af913d453bb4631f7f71fac13e1.jpg\"\u003e\u003cimg alt=\"XA0008 (5)\" src=\"https:\/\/ae01.alicdn.com\/kf\/H1d793d42fd7945cba1d4202db1861873q.jpg\"\u003e\u003cimg alt=\"XA0008 (24)\" src=\"https:\/\/ae01.alicdn.com\/kf\/Hddf60c92d3bf47e7a4377478d2ae0f4c0.jpg\"\u003e\u003cimg alt=\"XA0008 (7)\" src=\"https:\/\/ae01.alicdn.com\/kf\/H81eb27e7121545b799fea5521905e3c7U.jpg\"\u003e\u003cimg alt=\"XA0008 (6)\" src=\"https:\/\/ae01.alicdn.com\/kf\/H9b1a57d5932b47359fe4cb26b4df8221z.jpg\"\u003e\u003cimg alt=\"XA0008 (1)\" src=\"https:\/\/ae01.alicdn.com\/kf\/H3b043d774f204356b0278e4786d01f14k.jpg\"\u003e\u003cimg alt=\"XA0008 (9)\" src=\"https:\/\/ae01.alicdn.com\/kf\/H97fb15979930424092f839c9a8a3830fK.jpg\"\u003e\u003cimg alt=\"XA0008 (10)\" src=\"https:\/\/ae01.alicdn.com\/kf\/H6e4b81a56f9949e385541d0be905a572G.jpg\"\u003e\u003cimg alt=\"XA0008 (11)\" src=\"https:\/\/ae01.alicdn.com\/kf\/Hd0829f171f2f41bdb34c36cff898940cl.jpg\"\u003e\u003cimg alt=\"XA0008 (12)\" src=\"https:\/\/ae01.alicdn.com\/kf\/Hc210386716324310a4aa3248b0a8a09dp.jpg\"\u003e\u003cimg alt=\"XA0008 (19)\" src=\"https:\/\/ae01.alicdn.com\/kf\/H2743991dcfaf488b936cea38071fdc22l.jpg\"\u003e\u003cimg alt=\"XA0008 (21)\" src=\"https:\/\/ae01.alicdn.com\/kf\/H5d8b10d76d27477aa6d4f2e96f92b18fw.jpg\"\u003e\u003c\/p\u003e\n\u003c\/div\u003e\n\u003cp\u003e \u003c\/p\u003e\n\u003cp\u003e \u003c\/p\u003e\n\u003cp\u003e\u003cspan\u003e\u003cstrong\u003eDTC1100 DTC1110 DTC2210 DTC2200 Temperature Controller\u003c\/strong\u003e\u003c\/span\u003e\u003c\/p\u003e\n\u003cdiv\u003e\u003cspan\u003eProduct Name: Temperature Controller \u003c\/span\u003e\u003c\/div\u003e\n\u003cdiv\u003e\u003cspan\u003eProduct Models: DTC1100; DTC1110; DTC2210; DTC2200 \u003c\/span\u003e\u003c\/div\u003e\n\u003cdiv\u003e\u003cspan\u003ePower supply: AC110V-220V\u003c\/span\u003e\u003c\/div\u003e\n\u003cdiv\u003e\u003cspan\u003eTemperature range: -40°C~+99°C\u003c\/span\u003e\u003c\/div\u003e\n\u003cdiv\u003e\u003cspan\u003eTemperature measurement accuracy: ±1°C (-40 °C ~ +70 °C)\u003c\/span\u003e\u003c\/div\u003e\n\u003cdiv\u003e\u003cspan\u003eThermostat size: 93mm*56mm*34mm\u003c\/span\u003e\u003c\/div\u003e\n\u003cdiv\u003e\u003cspan\u003eRelay contact capacity: Cool(10WC250V); Heat(10A\/AC250V)\u003c\/span\u003e\u003c\/div\u003e\n\u003cdiv\u003e \u003c\/div\u003e\n\u003cdiv\u003e\u003cspan\u003e\u003cimg alt=\"1 (1)\" src=\"https:\/\/ae01.alicdn.com\/kf\/H55d10cb072154207bcdd46dd1dafbc8fh.jpg\"\u003e\u003cimg alt=\"1 (4)\" src=\"https:\/\/ae01.alicdn.com\/kf\/H2f4f0f7cfec445b58c5e00fbdd8435872.jpg\"\u003e\u003cimg alt=\"1 (2)\" src=\"https:\/\/ae01.alicdn.com\/kf\/Hdaf8974533f04094ac13d6f88bd4a970o.jpg\"\u003e\u003cimg alt=\"接线图 (1)\" src=\"https:\/\/ae01.alicdn.com\/kf\/Ha2a95c321166465591f5af870fd231bfp.jpg\"\u003e\u003cimg alt=\"1 (13)\" src=\"https:\/\/ae01.alicdn.com\/kf\/He9464c5ea5c24e168157faff9566d0ecj.jpg\"\u003e\u003cimg alt=\"1 (18)\" src=\"https:\/\/ae01.alicdn.com\/kf\/H44dfe2dd19c14a14bdd1e3d351e03a4bE.jpg\"\u003e\u003cimg alt=\"01 (1)\" src=\"https:\/\/ae01.alicdn.com\/kf\/Ha529d255334543f68affa9a95cb27f16o.jpg\"\u003e\u003cimg alt=\"4\" src=\"https:\/\/ae01.alicdn.com\/kf\/H312943e7f91e4b709b5d642e25598a6a5.jpg\"\u003e\u003cimg alt=\"15\" src=\"https:\/\/ae01.alicdn.com\/kf\/Hb93149fbec8e4329a4c090147de3983fq.jpg\"\u003e\u003cimg alt=\"接线图 (1)\" src=\"https:\/\/ae01.alicdn.com\/kf\/H0e9b53e72d594dde8c46be7d94b346b9b.jpg\"\u003e\u003cimg alt=\"10\" src=\"https:\/\/ae01.alicdn.com\/kf\/Ha4ae55d77d754955bc11801c20abde77F.jpg\"\u003e\u003cimg alt=\"16\" src=\"https:\/\/ae01.alicdn.com\/kf\/H516b5c2e4e7140f5952500c8e005c7b6t.jpg\"\u003e\u003cimg alt=\"1 (1)\" src=\"https:\/\/ae01.alicdn.com\/kf\/H72183dd8d1fc4fe4b6deb8b28ee279cby.jpg\"\u003e\u003cimg alt=\"1 (3)\" src=\"https:\/\/ae01.alicdn.com\/kf\/H1c848b67f8704717802fa010419962b0m.jpg\"\u003e\u003cimg alt=\"1 (4)\" src=\"https:\/\/ae01.alicdn.com\/kf\/H5f22b2bb585948da837a0df46163a52ea.jpg\"\u003e\u003cimg alt=\"1 (8)\" src=\"https:\/\/ae01.alicdn.com\/kf\/Hb0db99a5e1424609a10aea7486f295ab5.jpg\"\u003e\u003cimg alt=\"1 (17)\" src=\"https:\/\/ae01.alicdn.com\/kf\/Hfb6298937ee7447fb751dd6aa5b96549O.jpg\"\u003e\u003cimg alt=\"1 (19)\" src=\"https:\/\/ae01.alicdn.com\/kf\/Hbf41fac7ac3a42fdb90f17b8ff0d308d2.jpg\"\u003e\u003cimg alt=\"1 (20)\" src=\"https:\/\/ae01.alicdn.com\/kf\/H4a3c5770430945089241d33dafef31fcm.jpg\"\u003e\u003cimg alt=\"1 (1)\" src=\"https:\/\/ae01.alicdn.com\/kf\/Hc39891a3e23d41b5968309454950c8bcI.jpg\"\u003e\u003cimg alt=\"1 (2)\" src=\"https:\/\/ae01.alicdn.com\/kf\/H4522829b7e6e44dc9603abf7792e0647G.jpg\"\u003e\u003cimg alt=\"接线图\" src=\"https:\/\/ae01.alicdn.com\/kf\/Hfe019fff700840c6ad7f4ba4869ef0eaq.jpg\"\u003e\u003cimg alt=\"1 (12)\" src=\"https:\/\/ae01.alicdn.com\/kf\/H1ddb9da69f8b4b6eb775e093490116feg.jpg\"\u003e\u003cimg alt=\"1 (18)\" src=\"https:\/\/ae01.alicdn.com\/kf\/H42755cdfd6174fe3b72473d7592b07fdr.jpg\"\u003e\u003cimg alt=\"1 (20)\" src=\"https:\/\/ae01.alicdn.com\/kf\/H2350b4b9bf9b48a78676cfa40085604fK.jpg\"\u003e\u003cimg alt=\"1 (21)\" src=\"https:\/\/ae01.alicdn.com\/kf\/H62b80cb1bda24ed8841e2f13742847a8d.jpg\"\u003e\u003c\/span\u003e\u003c\/div\u003e\n\u003cdiv\u003e \u003c\/div\u003e\n\u003cdiv\u003e \u003c\/div\u003e\n\u003cdiv\u003e \u003c\/div\u003e\n\u003cdiv\u003e \u003c\/div\u003e\n\u003cdiv\u003e\u003cspan\u003eDTC3200 Temperature and Humidity Controller\u003c\/span\u003e\u003c\/div\u003e\n\u003cdiv\u003e \u003c\/div\u003e\n\u003cdiv\u003e\u003cspan\u003eProduct Name: Temperature and Humidity Controller\u003c\/span\u003e\u003c\/div\u003e\n\u003cdiv\u003e\u003cspan\u003eProduct Model: DTC3200\u003c\/span\u003e\u003c\/div\u003e\n\u003cdiv\u003e\u003cspan\u003ePower supply voltage: AC 110 ~ 230V\u003c\/span\u003e\u003c\/div\u003e\n\u003cdiv\u003e\u003cspan\u003ePower supply frequency: 50 \/ 60Hz\u003c\/span\u003e\u003c\/div\u003e\n\u003cdiv\u003e\u003cspan\u003eTemperature measurement range: -20 ~ 60 ℃\u003c\/span\u003e\u003c\/div\u003e\n\u003cdiv\u003e\u003cspan\u003eHumidity measurement range: 0% ~ 100% RH\u003c\/span\u003e\u003c\/div\u003e\n\u003cdiv\u003e\u003cspan\u003eTemperature measurement accuracy: 0.3 ℃\u003c\/span\u003e\u003c\/div\u003e\n\u003cdiv\u003e\u003cspan\u003eHumidity measurement accuracy: 3%\u003c\/span\u003e\u003c\/div\u003e\n\u003cdiv\u003e\u003cspan\u003eOutput control: Relay output\u003c\/span\u003e\u003c\/div\u003e\n\u003cdiv\u003e\u003cspan\u003eOutput power: MAX 10A\u003c\/span\u003e\u003c\/div\u003e\n\u003cdiv\u003e \u003c\/div\u003e\n\u003cdiv\u003e\u003cspan\u003eSetting method: start value \u0026lt;stop value (the program automatically determines the working mode as heating \/ humidification mode)\u003c\/span\u003e\u003c\/div\u003e\n\u003cdiv\u003e\u003cspan\u003eSetting method: start value\u0026gt; stop value (the program automatically determines the working mode to be cooling \/ dehumidifying mode)\u003c\/span\u003e\u003c\/div\u003e\n\u003cdiv\u003e\u003cspan\u003eHeating \/ cooling mode setting\u003c\/span\u003e\u003c\/div\u003e\n\u003cdiv\u003e\u003cspan\u003eSetting method: setting (starting temperature): long press the ▲ button, the starting temperature flashes, and the starting temperature value is set by the ▲ ▼ button\u003c\/span\u003e\u003c\/div\u003e\n\u003cdiv\u003e\u003cspan\u003eSetting (stop temperature): long press the ▼ button to stop the temperature flashing, set the stop temperature value by ▲ ▼ button\u003c\/span\u003e\u003c\/div\u003e\n\u003cdiv\u003e \u003c\/div\u003e\n\u003cdiv\u003e\u003cspan\u003eHeating use case: control the water heater, heating to 65 ℃ to stop, the temperature drops to 50 ℃ to start heating again\u003c\/span\u003e\u003c\/div\u003e\n\u003cdiv\u003e\u003cspan\u003eThe first step: heating working mode, start temperature \u0026lt;stop temperature\u003c\/span\u003e\u003c\/div\u003e\n\u003cdiv\u003e\u003cspan\u003eStep 2: Press and hold the ▲ button, the starting temperature flashes, and set the starting temperature to 50 ℃ via the ▲ ▼ button\u003c\/span\u003e\u003c\/div\u003e\n\u003cdiv\u003e\u003cspan\u003eThe third step: long press the ▼ button to stop the temperature flashing, set the stop temperature to 65 ℃ through the ▲ ▼ button, the setting is complete!\u003c\/span\u003e\u003c\/div\u003e\n\u003cdiv\u003e\u003cspan\u003eRefrigeration use case: use in the farm, the fan ventilation stops at 26 ℃, and the temperature rises to 30 ℃ to start ventilation again\u003c\/span\u003e\u003c\/div\u003e\n\u003cdiv\u003e\u003cspan\u003eStep 1: Refrigeration working mode, start temperature\u0026gt; stop temperature\u003c\/span\u003e\u003c\/div\u003e\n\u003cdiv\u003e\u003cspan\u003eStep 2: Press and hold the ▲ button, the starting temperature flashes, and set the starting temperature to 30 ℃ via the ▲ ▼ button\u003c\/span\u003e\u003c\/div\u003e\n\u003cdiv\u003e\u003cspan\u003eStep 3: Press and hold the ▼ button to stop the temperature flashing, and set the stop temperature to 26 ° C with the ▲ ▼ button. The setting is complete!\u003c\/span\u003e\u003c\/div\u003e\n\u003cdiv\u003e \u003c\/div\u003e\n\u003cdiv\u003e\u003cspan\u003eHumidification \/ dehumidification mode settings:\u003c\/span\u003e\u003c\/div\u003e\n\u003cdiv\u003e\u003cspan\u003eSetting (Start Humidity): Long press the △ key, the start humidity value flashes, set the start humidity value by the △ ▽ key. Set [Stop Humidity]: Long press the △ key, stop the humidity value flashing, and set the stop humidity by the △ ▽ key value.\u003c\/span\u003e\u003c\/div\u003e\n\u003cdiv\u003e \u003c\/div\u003e\n\u003cdiv\u003e\u003cspan\u003eExamples of humidification: Fresh supermarket humidification, control humidifier 50% RH to start humidification, humidification to 80% RH to stop humidification.\u003c\/span\u003e\u003c\/div\u003e\n\u003cdiv\u003e \u003c\/div\u003e\n\u003cdiv\u003e\u003cspan\u003eSetup steps:\u003c\/span\u003e\u003c\/div\u003e\n\u003cdiv\u003e\u003cspan\u003e Step 1: Press and hold the △ key for 3 seconds to start the humidity value flashing, and set the start humidity value to 50% RH.\u003c\/span\u003e\u003c\/div\u003e\n\u003cdiv\u003e\u003cspan\u003e Step 2: Press and hold the ▽ key for 3 seconds to stop the humidity value flashing, set the value to 80% RH, the setting is completed, press the button for 5 seconds without operation, and automatically return to the normal display state\u003c\/span\u003e\u003c\/div\u003e\n\u003cdiv\u003e \u003c\/div\u003e\n\u003cdiv\u003e\u003cspan\u003eDehumidification example: workshop control exhaust dehumidification system, humidity 70% RH starts dehumidification, humidity 40% RH stops dehumidification\u003c\/span\u003e\u003c\/div\u003e\n\u003cdiv\u003e \u003c\/div\u003e\n\u003cdiv\u003e\u003cspan\u003eSetup steps:\u003c\/span\u003e\u003c\/div\u003e\n\u003cdiv\u003e\u003cspan\u003e Step 1: Press and hold the △ key for 3 seconds to start the humidity value flashing, and set the start humidity value to 40% RH.\u003c\/span\u003e\u003c\/div\u003e\n\u003cdiv\u003e\u003cspan\u003e Step 2: Press and hold the ▽ key for 3 seconds to stop the humidity value from flashing, set the value to 70% RH, the setting is completed, press the button for 5 seconds without operation, and automatically return to the normal display state\u003c\/span\u003e\u003c\/div\u003e\n\u003cdiv\u003e \u003c\/div\u003e\n\u003cdiv\u003e \u003c\/div\u003e\n\u003cdiv\u003e\u003cspan\u003eTemperature correction:\u003c\/span\u003e\u003c\/div\u003e\n\u003cdiv\u003e\u003cspan\u003eSimultaneously press the ▲ ▼ key for 3 seconds to start the temperature digit flashing, and use the ▲ ▼ key to set the start temperature correction value; after the setting is completed, press the button for 5 seconds without operation, and automatically return to the normal display state.\u003c\/span\u003e\u003c\/div\u003e\n\u003cdiv\u003e \u003c\/div\u003e\n\u003cdiv\u003e\u003cspan\u003eHumidity correction:\u003c\/span\u003e\u003c\/div\u003e\n\u003cdiv\u003e\u003cspan\u003eSimultaneously press the △ ▽ key for 3 seconds to start the humidity digit flashing, and set the humidity correction value by the △ ▽ key; after the setting is completed, press the button for 5 seconds without operation, and it will automatically return to the normal display state.\u003c\/span\u003e\u003c\/div\u003e\n\u003cdiv\u003e \u003c\/div\u003e\n\u003cdiv\u003e\u003cspan\u003eWiring instructions:\u003c\/span\u003e\u003c\/div\u003e\n\u003cdiv\u003e \u003c\/div\u003e\n\u003cdiv\u003e \u003cimg alt=\"11\" src=\"https:\/\/ae01.alicdn.com\/kf\/H818f4241e00c4a4383e69801a2e9fd69R.jpg\"\u003e\n\u003c\/div\u003e\n\u003cdiv\u003e \u003c\/div\u003e\n\u003cdiv\u003e \u003c\/div\u003e\n\u003cdiv\u003e\u003cspan\u003e※ If the temperature and humidity display LLL, please confirm whether the wiring of the SHT20 digital temperature and humidity sensor is correct and whether there is poor contact, you can try to reconnect the wiring.\u003c\/span\u003e\u003c\/div\u003e\n\u003cdiv\u003e \u003c\/div\u003e\n\u003cdiv\u003e\n\u003cimg alt=\"1(23)\" src=\"https:\/\/ae01.alicdn.com\/kf\/H12eb95c3e0d2444c96477c9c4e96c5e2r.jpg\"\u003e\u003cimg alt=\"1 (2)\" src=\"https:\/\/ae01.alicdn.com\/kf\/H4aec1fa943784e678b9d5a13ef92c840u.jpg\"\u003e\u003cimg alt=\"1 (9)\" src=\"https:\/\/ae01.alicdn.com\/kf\/H62f61e0071094feb8e4b5a95452126815.jpg\"\u003e\u003cimg alt=\"1 (15)\" src=\"https:\/\/ae01.alicdn.com\/kf\/H3015a4e6d81f490b9020dca461f7694bX.jpg\"\u003e\u003cimg alt=\"1 (18)\" src=\"https:\/\/ae01.alicdn.com\/kf\/He260f2df36064fe2af5530c7a561437ed.jpg\"\u003e\u003cimg alt=\"1 (20)\" src=\"https:\/\/ae01.alicdn.com\/kf\/He00db8acc649445db0f1f4fce6df2bf95.jpg\"\u003e\u003cimg alt=\"1 (22)\" src=\"https:\/\/ae01.alicdn.com\/kf\/H5e7b7c932bd44e159fcc998c54110021C.jpg\"\u003e\u003cimg alt=\"1 (4)\" src=\"https:\/\/ae01.alicdn.com\/kf\/H31b481ef695c453d88993756e902f3dec.jpg\"\u003e\u003cimg alt=\"1 (3)\" src=\"https:\/\/ae01.alicdn.com\/kf\/H72f864579840411fa481222392614398v.jpg\"\u003e\n\u003c\/div\u003e"}
 -
 Translation missing: en.products.product.regular_price $7.99{"id":4616159920199,"title":"110V-220V LED Digital Temperature Controller Thermostat Thermoregulator for Incubator Heating Cooling Replace STC-1000 DTC1200","handle":"110v-220v-led-digital-temperature-controller-thermostat-thermoregulator-for-incubator-heating-cooling-replace-stc-1000-dtc1200","description":"\u003cdiv\u003e\u003cstrong\u003e\u003cspan\u003eDescription:\u003c\/span\u003e\u003c\/strong\u003e\u003c\/div\u003e\n\u003cdiv\u003e \u003c\/div\u003e\n\u003cdiv\u003e\n\u003cdiv\u003e\u003cspan\u003eProduct Name: Thermostat\u003c\/span\u003e\u003c\/div\u003e\n\u003cdiv\u003e\u003cspan\u003eProduct model: DTC1200\u003c\/span\u003e\u003c\/div\u003e\n\u003cdiv data-spm-anchor-id=\"a2g0o.detail.1000023.i0.766b67b1vR7Vg3\"\u003e\u003cspan\u003eSupply voltage: AC110~230V\u003c\/span\u003e\u003c\/div\u003e\n\u003cdiv data-spm-anchor-id=\"a2g0o.detail.1000023.i1.766b67b1vR7Vg3\"\u003e\u003cspan\u003eTemperature range: -40°C~+99°C\u003c\/span\u003e\u003c\/div\u003e\n\u003cdiv\u003e\u003cspan\u003eTemperature measurement accuracy: ±1 °C (-40 °C ~ +70 °C)\u003c\/span\u003e\u003c\/div\u003e\n\u003cdiv data-spm-anchor-id=\"a2g0o.detail.1000023.i2.766b67b1vR7Vg3\"\u003e\u003cspan\u003eSensor line length: 100cm\u003c\/span\u003e\u003c\/div\u003e\n\u003cdiv data-spm-anchor-id=\"a2g0o.detail.1000023.i3.766b67b1vR7Vg3\"\u003e\u003cspan\u003eThermostat size: 93mm*56mm*34mm\u003c\/span\u003e\u003c\/div\u003e\n\u003cdiv\u003e\u003cspan\u003eOutput capacity: cooling (compressor 3A) heating (10A\/250VAC)\u003c\/span\u003e\u003c\/div\u003e\n\u003cdiv\u003e \u003c\/div\u003e\n\u003cdiv\u003e\u003cspan\u003eSee parameter method:\u003c\/span\u003e\u003c\/div\u003e\n\u003cdiv\u003e \u003c\/div\u003e\n\u003cdiv\u003e\u003cspan\u003eWhen the thermostat is working normally, press and release \"▲\"the key once to display the temperature setting value; press and release \"▼\" the key once to display the temperature difference setting value. After 3 seconds, the temperature returns to the normal display state.\u003c\/span\u003e\u003c\/div\u003e\n\u003cdiv\u003e \u003c\/div\u003e\n\u003cdiv\u003e\u003cspan\u003eSetting parameter method:\u003c\/span\u003e\u003c\/div\u003e\n\u003cdiv\u003e \u003c\/div\u003e\n\u003cdiv\u003e\u003cspan\u003eWhen the thermostat is working normally, press \"S\" key and hold the button for more than 3 seconds to enter the modified parameter mode. The “Set” indicator lights up, the digital tube displays the code “F1” of the first menu item, and press the \"▲\" or \"▼\"key to up or down the code of the menu item. Press \"S\" the key to display the parameter setting value of the current menu, press \"S\" and hold the key, then press the \"▲\"or \"▼\" key to increase or decrease the parameter setting value of the current menu; press \"S\" key and hold the key, and press the \"▲\"or \"▼\" key to quickly increase the speed; Or down and display the parameter settings of the current menu.\u003c\/span\u003e\u003c\/div\u003e\n\u003cdiv\u003e\u003cspan\u003ePress and hold \"▲\"or \"▼\" the key at the same time to restore the parameters to the factory settings.\u003c\/span\u003e\u003c\/div\u003e\n\u003cdiv\u003e \u003c\/div\u003e\n\u003cdiv\u003e\u003cspan\u003eOperation instructions:\u003c\/span\u003e\u003c\/div\u003e\n\u003cdiv\u003e \u003c\/div\u003e\n\u003cdiv\u003e\u003cspan\u003e1.When the thermostat is working normally, press and hold the \"power button\" for more than 3 seconds to turn off the thermostat. When the thermostat is off, press and hold the \"power button\" for more than 3 seconds to open the thermostat.\u003c\/span\u003e\u003c\/div\u003e\n\u003cdiv\u003e\u003cspan\u003eWhen the thermostat is working normally, the digital tube displays the current temperature measurement value, and performs automatic recognition conversion of the cooling heating operation mode.\u003c\/span\u003e\u003c\/div\u003e\n\u003cdiv\u003e\u003cspan\u003e2.When the measured temperature ≥ temperature set value + temperature difference set value, enter the cooling state, the Cool indicator light is on, the cooling relay normally open contact is closed; the Cool indicator flashes, indicating that the cooling device is in the press delay protection state; when measuring the temperature ≤ temperature set value, the Cool indicator is off, and the normally open contact of the refrigeration relay is disconnected.\u003c\/span\u003e\u003c\/div\u003e\n\u003cdiv\u003e\u003cspan\u003e3.When the measured temperature ≤ temperature set value - temperature difference set value enters the heating state, the Heat indicator light is on, the heating relay normally open contact is closed; when the measured temperature ≥ temperature set value, the Heat indicator is off, the heating relay normally open contact disconnect.\u003c\/span\u003e\u003c\/div\u003e\n\u003cdiv\u003e \u003c\/div\u003e\n\u003cdiv data-spm-anchor-id=\"a2g0o.detail.1000023.i1.17566478417y5U\"\u003e\n\u003cp data-spm-anchor-id=\"a2g0o.detail.1000023.i0.17566478417y5U\"\u003e\u003cspan\u003eIndicator status description:\u003c\/span\u003e\u003c\/p\u003e\n\u003ctable border=\"1\" cellspacing=\"0\"\u003e\n\u003ctbody\u003e\n\u003ctr\u003e\n\u003ctd\u003e\n\u003cp align=\"center\"\u003e\u003cspan\u003eIndicator\u003c\/span\u003e\u003c\/p\u003e\n\u003c\/td\u003e\n\u003ctd\u003e\n\u003cp align=\"center\"\u003e\u003cspan\u003eFunction\u003c\/span\u003e\u003c\/p\u003e\n\u003c\/td\u003e\n\u003ctd\u003e\n\u003cp align=\"center\" data-spm-anchor-id=\"a2g0o.detail.1000023.i10.17566478417y5U\"\u003e\u003cspan\u003eNote\u003c\/span\u003e\u003c\/p\u003e\n\u003c\/td\u003e\n\u003c\/tr\u003e\n\u003ctr\u003e\n\u003ctd\u003e\n\u003cp align=\"center\" data-spm-anchor-id=\"a2g0o.detail.1000023.i4.17566478417y5U\"\u003e\u003cspan\u003eCool indicator\u003c\/span\u003e\u003c\/p\u003e\n\u003c\/td\u003e\n\u003ctd\u003e\n\u003cp align=\"center\" data-spm-anchor-id=\"a2g0o.detail.1000023.i5.17566478417y5U\"\u003e\u003cspan\u003eLight on:cooling work;\u003c\/span\u003e\u003c\/p\u003e\n\u003cp align=\"center\"\u003e\u003cspan\u003e Light off:cooling off;\u003c\/span\u003e\u003c\/p\u003e\n\u003cp align=\"center\"\u003e\u003cspan\u003eFlashing: press delay\u003c\/span\u003e\u003c\/p\u003e\n\u003c\/td\u003e\n\u003ctd rowspan=\"2\"\u003e\n\u003cp align=\"center\" data-spm-anchor-id=\"a2g0o.detail.1000023.i11.17566478417y5U\"\u003e\u003cspan\u003eCool and Heat Both indicator lights cannot be lit at the same time\u003c\/span\u003e\u003c\/p\u003e\n\u003c\/td\u003e\n\u003c\/tr\u003e\n\u003ctr\u003e\n\u003ctd\u003e\n\u003cp align=\"center\" data-spm-anchor-id=\"a2g0o.detail.1000023.i6.17566478417y5U\"\u003e\u003cspan\u003eHeat indicator\u003c\/span\u003e\u003c\/p\u003e\n\u003c\/td\u003e\n\u003ctd\u003e\n\u003cp align=\"center\" data-spm-anchor-id=\"a2g0o.detail.1000023.i7.17566478417y5U\"\u003e\u003cspan\u003eBright: heating work;\u003c\/span\u003e\u003c\/p\u003e\n\u003cp align=\"center\"\u003e\u003cspan\u003eoff: heating off\u003c\/span\u003e\u003c\/p\u003e\n\u003c\/td\u003e\n\u003c\/tr\u003e\n\u003ctr\u003e\n\u003ctd\u003e\n\u003cp align=\"center\" data-spm-anchor-id=\"a2g0o.detail.1000023.i8.17566478417y5U\"\u003e\u003cspan\u003eSet indicator\u003c\/span\u003e\u003c\/p\u003e\n\u003c\/td\u003e\n\u003ctd\u003e\n\u003cp align=\"center\" data-spm-anchor-id=\"a2g0o.detail.1000023.i9.17566478417y5U\"\u003e\u003cspan\u003eOn: parameter setting status\u003c\/span\u003e\u003c\/p\u003e\n\u003c\/td\u003e\n\u003ctd\u003e\n\u003cp align=\"center\"\u003e \u003c\/p\u003e\n\u003c\/td\u003e\n\u003c\/tr\u003e\n\u003c\/tbody\u003e\n\u003c\/table\u003e\n\u003cp\u003e \u003c\/p\u003e\n\u003cp\u003e\u003cspan\u003eMenu function description:\u003c\/span\u003e\u003c\/p\u003e\n\u003ctable border=\"1\" cellspacing=\"0\"\u003e\n\u003ctbody\u003e\n\u003ctr\u003e\n\u003ctd\u003e\n\u003cp align=\"center\" data-spm-anchor-id=\"a2g0o.detail.1000023.i13.17566478417y5U\"\u003e\u003cspan\u003eMenu identifier\u003c\/span\u003e\u003c\/p\u003e\n\u003c\/td\u003e\n\u003ctd\u003e\n\u003cp align=\"center\" data-spm-anchor-id=\"a2g0o.detail.1000023.i16.17566478417y5U\"\u003e\u003cspan\u003eMenu function\u003c\/span\u003e\u003c\/p\u003e\n\u003c\/td\u003e\n\u003ctd\u003e\n\u003cp align=\"center\" data-spm-anchor-id=\"a2g0o.detail.1000023.i17.17566478417y5U\"\u003e\u003cspan\u003eSetting range\u003c\/span\u003e\u003c\/p\u003e\n\u003c\/td\u003e\n\u003ctd\u003e\n\u003cp align=\"center\" data-spm-anchor-id=\"a2g0o.detail.1000023.i18.17566478417y5U\"\u003e\u003cspan\u003eFactory setting\u003c\/span\u003e\u003c\/p\u003e\n\u003c\/td\u003e\n\u003c\/tr\u003e\n\u003ctr\u003e\n\u003ctd\u003e\n\u003cp align=\"center\" data-spm-anchor-id=\"a2g0o.detail.1000023.i12.17566478417y5U\"\u003e\u003cspan\u003eF1\u003c\/span\u003e\u003c\/p\u003e\n\u003c\/td\u003e\n\u003ctd\u003e\n\u003cp align=\"center\" data-spm-anchor-id=\"a2g0o.detail.1000023.i14.17566478417y5U\"\u003e\u003cspan\u003eTemperature setting value\u003c\/span\u003e\u003c\/p\u003e\n\u003c\/td\u003e\n\u003ctd\u003e\n\u003cp align=\"center\" data-spm-anchor-id=\"a2g0o.detail.1000023.i15.17566478417y5U\"\u003e\u003cspan\u003e-40.0~99.9℃\u003c\/span\u003e\u003c\/p\u003e\n\u003c\/td\u003e\n\u003ctd\u003e\n\u003cp align=\"center\" data-spm-anchor-id=\"a2g0o.detail.1000023.i19.17566478417y5U\"\u003e\u003cspan\u003e10.0℃\u003c\/span\u003e\u003c\/p\u003e\n\u003c\/td\u003e\n\u003c\/tr\u003e\n\u003ctr\u003e\n\u003ctd\u003e\n\u003cp align=\"center\" data-spm-anchor-id=\"a2g0o.detail.1000023.i20.17566478417y5U\"\u003e\u003cspan\u003eF2\u003c\/span\u003e\u003c\/p\u003e\n\u003c\/td\u003e\n\u003ctd\u003e\n\u003cp align=\"center\" data-spm-anchor-id=\"a2g0o.detail.1000023.i21.17566478417y5U\"\u003e\u003cspan\u003eTemperature difference setting value\u003c\/span\u003e\u003c\/p\u003e\n\u003c\/td\u003e\n\u003ctd\u003e\n\u003cp align=\"center\" data-spm-anchor-id=\"a2g0o.detail.1000023.i22.17566478417y5U\"\u003e\u003cspan\u003e0.3~10.0℃\u003c\/span\u003e\u003c\/p\u003e\n\u003c\/td\u003e\n\u003ctd\u003e\n\u003cp align=\"center\" data-spm-anchor-id=\"a2g0o.detail.1000023.i23.17566478417y5U\"\u003e\u003cspan\u003e0.5℃\u003c\/span\u003e\u003c\/p\u003e\n\u003c\/td\u003e\n\u003c\/tr\u003e\n\u003ctr\u003e\n\u003ctd\u003e\n\u003cp align=\"center\" data-spm-anchor-id=\"a2g0o.detail.1000023.i24.17566478417y5U\"\u003e\u003cspan\u003eF3\u003c\/span\u003e\u003c\/p\u003e\n\u003c\/td\u003e\n\u003ctd\u003e\n\u003cp align=\"center\" data-spm-anchor-id=\"a2g0o.detail.1000023.i25.17566478417y5U\"\u003e\u003cspan\u003ePress delay\u003c\/span\u003e\u003c\/p\u003e\n\u003c\/td\u003e\n\u003ctd\u003e\n\u003cp align=\"center\" data-spm-anchor-id=\"a2g0o.detail.1000023.i26.17566478417y5U\"\u003e\u003cspan\u003e1~10 min\u003c\/span\u003e\u003c\/p\u003e\n\u003c\/td\u003e\n\u003ctd\u003e\n\u003cp align=\"center\" data-spm-anchor-id=\"a2g0o.detail.1000023.i27.17566478417y5U\"\u003e\u003cspan\u003e3 min\u003c\/span\u003e\u003c\/p\u003e\n\u003c\/td\u003e\n\u003c\/tr\u003e\n\u003ctr\u003e\n\u003ctd data-spm-anchor-id=\"a2g0o.detail.1000023.i28.17566478417y5U\"\u003e\n\u003cp align=\"center\"\u003e\u003cspan\u003eF4\u003c\/span\u003e\u003c\/p\u003e\n\u003c\/td\u003e\n\u003ctd\u003e\n\u003cp align=\"center\" data-spm-anchor-id=\"a2g0o.detail.1000023.i29.17566478417y5U\"\u003e\u003cspan\u003eTemperature correction\u003c\/span\u003e\u003c\/p\u003e\n\u003c\/td\u003e\n\u003ctd\u003e\n\u003cp align=\"center\" data-spm-anchor-id=\"a2g0o.detail.1000023.i30.17566478417y5U\"\u003e\u003cspan\u003e-10.0~10.0℃\u003c\/span\u003e\u003c\/p\u003e\n\u003c\/td\u003e\n\u003ctd\u003e\n\u003cp align=\"center\" data-spm-anchor-id=\"a2g0o.detail.1000023.i31.17566478417y5U\"\u003e\u003cspan\u003e0℃\u003c\/span\u003e\u003c\/p\u003e\n\u003c\/td\u003e\n\u003c\/tr\u003e\n\u003c\/tbody\u003e\n\u003c\/table\u003e\n\u003cp\u003e \u003c\/p\u003e\n\u003cp\u003e\u003cspan\u003eWiring Diagram:\u003c\/span\u003e\u003c\/p\u003e\n\u003cp\u003e\u003cspan\u003e\u003cimg alt=\"图片1\" src=\"https:\/\/ae01.alicdn.com\/kf\/H001eadcd3b8e49109ce4fd472825de6dW.jpg\"\u003e\u003c\/span\u003e\u003c\/p\u003e\n\u003cp\u003e \u003c\/p\u003e\n\u003cdiv\u003e\n\u003cdiv\u003e \u003c\/div\u003e\n\u003cdiv\u003e\u003cspan\u003eRepair System Data:\u003c\/span\u003e\u003c\/div\u003e\n\u003cdiv\u003e \u003c\/div\u003e\n\u003cdiv\u003e\u003cspan\u003eAfter the thermostat is powered on, first check whether the parameter settings are correct. If an error is detected, “Er” is displayed. Pressing any key will restore the default parameter settings and work normally. It is recommended to reset the parameters at this time.\u003c\/span\u003e\u003c\/div\u003e\n\u003cdiv\u003e \u003c\/div\u003e\n\u003cdiv\u003e\u003cspan\u003eSystem Code, reason and action:\u003c\/span\u003e\u003c\/div\u003e\n\u003cdiv\u003e \u003c\/div\u003e\n\u003cdiv\u003e\u003cspan\u003eSensor fault alarm: When the temperature probe loop is short-circuited or open-circuit fault, the thermostat starts the probe fault alarm mode, closes all execution states, and the digital tube displays “EE”. After the fault is cleared, press any key to return to the normal working mode.\u003c\/span\u003e\u003c\/div\u003e\n\u003cdiv\u003e\u003cspan\u003eOver-temperature alarm: When the temperature measurement exceeds the temperature measurement range, the thermostat starts the over-temperature limit fault alarm mode, and all execution states are turned off. The digital tube displays “HH”. When the temperature returns to the normal measurement range, press any key. Return to normal working mode.\u003c\/span\u003e\u003c\/div\u003e\n\u003cdiv\u003e \u003c\/div\u003e\n\u003cdiv\u003e\u003cspan\u003eSafety rules:\u003c\/span\u003e\u003c\/div\u003e\n\u003cdiv\u003e \u003c\/div\u003e\n\u003cdiv\u003e\u003cspan\u003e☆ Danger:\u003c\/span\u003e\u003c\/div\u003e\n\u003cdiv\u003e\u003cspan\u003e1. Strictly distinguish the sensor lead, power line and output relay interface, can not be connected incorrectly, the relay can not be overloaded;\u003c\/span\u003e\u003c\/div\u003e\n\u003cdiv\u003e\u003cspan\u003e2. All wiring changes must be made with the power off.\u003c\/span\u003e\u003c\/div\u003e\n\u003cdiv\u003e\u003cspan\u003e☆ Warning:\u003c\/span\u003e\u003c\/div\u003e\n\u003cdiv\u003e\u003cspan\u003e1. This thermostat is forbidden to be used in water or excessively humid environment. It is forbidden to use in high temperature, strong electromagnetic interference and strong corrosive environment.\u003c\/span\u003e\u003c\/div\u003e\n\u003cdiv\u003e\u003cspan\u003e☆ Note:\u003c\/span\u003e\u003c\/div\u003e\n\u003cdiv\u003e\u003cspan\u003e1. The supply voltage should be consistent with the voltage marked by the thermostat and ensure the stability of the supply voltage;\u003c\/span\u003e\u003c\/div\u003e\n\u003cdiv\u003e\u003cspan\u003e2. To avoid possible interference, it is recommended that the sensor leads be at an appropriate distance from the power line.\u003c\/span\u003e\u003c\/div\u003e\n\u003cdiv\u003e \u003c\/div\u003e\n\u003cdiv\u003e \u003c\/div\u003e\n\u003cdiv\u003e\u003cstrong\u003e\u003cspan\u003ePackage Included:\u003c\/span\u003e\u003c\/strong\u003e\u003c\/div\u003e\n\u003cdiv\u003e \u003c\/div\u003e\n\u003cdiv\u003e\u003cspan\u003e1 x DTC1200 Intellligent Temperature Controller\u003c\/span\u003e\u003c\/div\u003e\n\u003cdiv\u003e\u003cspan\u003e1 x Temperature sensor\u003c\/span\u003e\u003c\/div\u003e\n\u003cdiv\u003e\u003cspan\u003e1 x Instruction manual\u003c\/span\u003e\u003c\/div\u003e\n\u003cdiv\u003e\u003cspan\u003e1 x Packing box\u003c\/span\u003e\u003c\/div\u003e\n\u003cdiv\u003e\u003cspan\u003e\u003c\/span\u003e\u003c\/div\u003e\n\u003c\/div\u003e\n\u003c\/div\u003e\n\u003c\/div\u003e\n\u003cdiv\u003e\n\u003cp\u003e\u003cimg alt=\"pictures2\" src=\"https:\/\/ae01.alicdn.com\/kf\/H48e07ca430b143a1bd6390f007d70893r.jpg\"\u003e\u003c\/p\u003e\n\u003cp\u003e\u003cimg alt=\"XA0008 (3)\" src=\"https:\/\/ae01.alicdn.com\/kf\/H909cdc0df9ef48b2909767f61c05f908Y.jpg\"\u003e\u003cimg alt=\"XA0008 (4)\" src=\"https:\/\/ae01.alicdn.com\/kf\/He57b51af913d453bb4631f7f71fac13e1.jpg\"\u003e\u003cimg alt=\"XA0008 (5)\" src=\"https:\/\/ae01.alicdn.com\/kf\/H1d793d42fd7945cba1d4202db1861873q.jpg\"\u003e\u003cimg alt=\"XA0008 (24)\" src=\"https:\/\/ae01.alicdn.com\/kf\/Hddf60c92d3bf47e7a4377478d2ae0f4c0.jpg\"\u003e\u003cimg alt=\"XA0008 (7)\" src=\"https:\/\/ae01.alicdn.com\/kf\/H81eb27e7121545b799fea5521905e3c7U.jpg\"\u003e\u003cimg alt=\"XA0008 (6)\" src=\"https:\/\/ae01.alicdn.com\/kf\/H9b1a57d5932b47359fe4cb26b4df8221z.jpg\"\u003e\u003cimg alt=\"XA0008 (1)\" src=\"https:\/\/ae01.alicdn.com\/kf\/H3b043d774f204356b0278e4786d01f14k.jpg\"\u003e\u003cimg alt=\"XA0008 (9)\" src=\"https:\/\/ae01.alicdn.com\/kf\/H97fb15979930424092f839c9a8a3830fK.jpg\"\u003e\u003cimg alt=\"XA0008 (10)\" src=\"https:\/\/ae01.alicdn.com\/kf\/H6e4b81a56f9949e385541d0be905a572G.jpg\"\u003e\u003cimg alt=\"XA0008 (11)\" src=\"https:\/\/ae01.alicdn.com\/kf\/Hd0829f171f2f41bdb34c36cff898940cl.jpg\"\u003e\u003cimg alt=\"XA0008 (12)\" src=\"https:\/\/ae01.alicdn.com\/kf\/Hc210386716324310a4aa3248b0a8a09dp.jpg\"\u003e\u003cimg alt=\"XA0008 (19)\" src=\"https:\/\/ae01.alicdn.com\/kf\/H2743991dcfaf488b936cea38071fdc22l.jpg\"\u003e\u003cimg alt=\"XA0008 (21)\" src=\"https:\/\/ae01.alicdn.com\/kf\/H5d8b10d76d27477aa6d4f2e96f92b18fw.jpg\"\u003e\u003c\/p\u003e\n\u003c\/div\u003e\n\u003cp\u003e \u003c\/p\u003e\n\u003cp\u003e \u003c\/p\u003e\n\u003cp\u003e\u003cspan\u003e\u003cstrong\u003eDTC1100 DTC1110 DTC2210 DTC2200 Temperature Controller\u003c\/strong\u003e\u003c\/span\u003e\u003c\/p\u003e\n\u003cdiv\u003e\u003cspan\u003eProduct Name: Temperature Controller \u003c\/span\u003e\u003c\/div\u003e\n\u003cdiv\u003e\u003cspan\u003eProduct Models: DTC1100; DTC1110; DTC2210; DTC2200 \u003c\/span\u003e\u003c\/div\u003e\n\u003cdiv\u003e\u003cspan\u003ePower supply: AC110V-220V\u003c\/span\u003e\u003c\/div\u003e\n\u003cdiv\u003e\u003cspan\u003eTemperature range: -40°C~+99°C\u003c\/span\u003e\u003c\/div\u003e\n\u003cdiv\u003e\u003cspan\u003eTemperature measurement accuracy: ±1°C (-40 °C ~ +70 °C)\u003c\/span\u003e\u003c\/div\u003e\n\u003cdiv\u003e\u003cspan\u003eThermostat size: 93mm*56mm*34mm\u003c\/span\u003e\u003c\/div\u003e\n\u003cdiv\u003e\u003cspan\u003eRelay contact capacity: Cool(10WC250V); Heat(10A\/AC250V)\u003c\/span\u003e\u003c\/div\u003e\n\u003cdiv\u003e \u003c\/div\u003e\n\u003cdiv\u003e\u003cspan\u003e\u003cimg alt=\"1 (1)\" src=\"https:\/\/ae01.alicdn.com\/kf\/H55d10cb072154207bcdd46dd1dafbc8fh.jpg\"\u003e\u003cimg alt=\"1 (4)\" src=\"https:\/\/ae01.alicdn.com\/kf\/H2f4f0f7cfec445b58c5e00fbdd8435872.jpg\"\u003e\u003cimg alt=\"1 (2)\" src=\"https:\/\/ae01.alicdn.com\/kf\/Hdaf8974533f04094ac13d6f88bd4a970o.jpg\"\u003e\u003cimg alt=\"接线图 (1)\" src=\"https:\/\/ae01.alicdn.com\/kf\/Ha2a95c321166465591f5af870fd231bfp.jpg\"\u003e\u003cimg alt=\"1 (13)\" src=\"https:\/\/ae01.alicdn.com\/kf\/He9464c5ea5c24e168157faff9566d0ecj.jpg\"\u003e\u003cimg alt=\"1 (18)\" src=\"https:\/\/ae01.alicdn.com\/kf\/H44dfe2dd19c14a14bdd1e3d351e03a4bE.jpg\"\u003e\u003cimg alt=\"01 (1)\" src=\"https:\/\/ae01.alicdn.com\/kf\/Ha529d255334543f68affa9a95cb27f16o.jpg\"\u003e\u003cimg alt=\"4\" src=\"https:\/\/ae01.alicdn.com\/kf\/H312943e7f91e4b709b5d642e25598a6a5.jpg\"\u003e\u003cimg alt=\"15\" src=\"https:\/\/ae01.alicdn.com\/kf\/Hb93149fbec8e4329a4c090147de3983fq.jpg\"\u003e\u003cimg alt=\"接线图 (1)\" src=\"https:\/\/ae01.alicdn.com\/kf\/H0e9b53e72d594dde8c46be7d94b346b9b.jpg\"\u003e\u003cimg alt=\"10\" src=\"https:\/\/ae01.alicdn.com\/kf\/Ha4ae55d77d754955bc11801c20abde77F.jpg\"\u003e\u003cimg alt=\"16\" src=\"https:\/\/ae01.alicdn.com\/kf\/H516b5c2e4e7140f5952500c8e005c7b6t.jpg\"\u003e\u003cimg alt=\"1 (1)\" src=\"https:\/\/ae01.alicdn.com\/kf\/H72183dd8d1fc4fe4b6deb8b28ee279cby.jpg\"\u003e\u003cimg alt=\"1 (3)\" src=\"https:\/\/ae01.alicdn.com\/kf\/H1c848b67f8704717802fa010419962b0m.jpg\"\u003e\u003cimg alt=\"1 (4)\" src=\"https:\/\/ae01.alicdn.com\/kf\/H5f22b2bb585948da837a0df46163a52ea.jpg\"\u003e\u003cimg alt=\"1 (8)\" src=\"https:\/\/ae01.alicdn.com\/kf\/Hb0db99a5e1424609a10aea7486f295ab5.jpg\"\u003e\u003cimg alt=\"1 (17)\" src=\"https:\/\/ae01.alicdn.com\/kf\/Hfb6298937ee7447fb751dd6aa5b96549O.jpg\"\u003e\u003cimg alt=\"1 (19)\" src=\"https:\/\/ae01.alicdn.com\/kf\/Hbf41fac7ac3a42fdb90f17b8ff0d308d2.jpg\"\u003e\u003cimg alt=\"1 (20)\" src=\"https:\/\/ae01.alicdn.com\/kf\/H4a3c5770430945089241d33dafef31fcm.jpg\"\u003e\u003cimg alt=\"1 (1)\" src=\"https:\/\/ae01.alicdn.com\/kf\/Hc39891a3e23d41b5968309454950c8bcI.jpg\"\u003e\u003cimg alt=\"1 (2)\" src=\"https:\/\/ae01.alicdn.com\/kf\/H4522829b7e6e44dc9603abf7792e0647G.jpg\"\u003e\u003cimg alt=\"接线图\" src=\"https:\/\/ae01.alicdn.com\/kf\/Hfe019fff700840c6ad7f4ba4869ef0eaq.jpg\"\u003e\u003cimg alt=\"1 (12)\" src=\"https:\/\/ae01.alicdn.com\/kf\/H1ddb9da69f8b4b6eb775e093490116feg.jpg\"\u003e\u003cimg alt=\"1 (18)\" src=\"https:\/\/ae01.alicdn.com\/kf\/H42755cdfd6174fe3b72473d7592b07fdr.jpg\"\u003e\u003cimg alt=\"1 (20)\" src=\"https:\/\/ae01.alicdn.com\/kf\/H2350b4b9bf9b48a78676cfa40085604fK.jpg\"\u003e\u003cimg alt=\"1 (21)\" src=\"https:\/\/ae01.alicdn.com\/kf\/H62b80cb1bda24ed8841e2f13742847a8d.jpg\"\u003e\u003c\/span\u003e\u003c\/div\u003e\n\u003cdiv\u003e \u003c\/div\u003e\n\u003cdiv\u003e \u003c\/div\u003e\n\u003cdiv\u003e \u003c\/div\u003e\n\u003cdiv\u003e \u003c\/div\u003e\n\u003cdiv\u003e\u003cspan\u003eDTC3200 Temperature and Humidity Controller\u003c\/span\u003e\u003c\/div\u003e\n\u003cdiv\u003e \u003c\/div\u003e\n\u003cdiv\u003e\u003cspan\u003eProduct Name: Temperature and Humidity Controller\u003c\/span\u003e\u003c\/div\u003e\n\u003cdiv\u003e\u003cspan\u003eProduct Model: DTC3200\u003c\/span\u003e\u003c\/div\u003e\n\u003cdiv\u003e\u003cspan\u003ePower supply voltage: AC 110 ~ 230V\u003c\/span\u003e\u003c\/div\u003e\n\u003cdiv\u003e\u003cspan\u003ePower supply frequency: 50 \/ 60Hz\u003c\/span\u003e\u003c\/div\u003e\n\u003cdiv\u003e\u003cspan\u003eTemperature measurement range: -20 ~ 60 ℃\u003c\/span\u003e\u003c\/div\u003e\n\u003cdiv\u003e\u003cspan\u003eHumidity measurement range: 0% ~ 100% RH\u003c\/span\u003e\u003c\/div\u003e\n\u003cdiv\u003e\u003cspan\u003eTemperature measurement accuracy: 0.3 ℃\u003c\/span\u003e\u003c\/div\u003e\n\u003cdiv\u003e\u003cspan\u003eHumidity measurement accuracy: 3%\u003c\/span\u003e\u003c\/div\u003e\n\u003cdiv\u003e\u003cspan\u003eOutput control: Relay output\u003c\/span\u003e\u003c\/div\u003e\n\u003cdiv\u003e\u003cspan\u003eOutput power: MAX 10A\u003c\/span\u003e\u003c\/div\u003e\n\u003cdiv\u003e \u003c\/div\u003e\n\u003cdiv\u003e\u003cspan\u003eSetting method: start value \u0026lt;stop value (the program automatically determines the working mode as heating \/ humidification mode)\u003c\/span\u003e\u003c\/div\u003e\n\u003cdiv\u003e\u003cspan\u003eSetting method: start value\u0026gt; stop value (the program automatically determines the working mode to be cooling \/ dehumidifying mode)\u003c\/span\u003e\u003c\/div\u003e\n\u003cdiv\u003e\u003cspan\u003eHeating \/ cooling mode setting\u003c\/span\u003e\u003c\/div\u003e\n\u003cdiv\u003e\u003cspan\u003eSetting method: setting (starting temperature): long press the ▲ button, the starting temperature flashes, and the starting temperature value is set by the ▲ ▼ button\u003c\/span\u003e\u003c\/div\u003e\n\u003cdiv\u003e\u003cspan\u003eSetting (stop temperature): long press the ▼ button to stop the temperature flashing, set the stop temperature value by ▲ ▼ button\u003c\/span\u003e\u003c\/div\u003e\n\u003cdiv\u003e \u003c\/div\u003e\n\u003cdiv\u003e\u003cspan\u003eHeating use case: control the water heater, heating to 65 ℃ to stop, the temperature drops to 50 ℃ to start heating again\u003c\/span\u003e\u003c\/div\u003e\n\u003cdiv\u003e\u003cspan\u003eThe first step: heating working mode, start temperature \u0026lt;stop temperature\u003c\/span\u003e\u003c\/div\u003e\n\u003cdiv\u003e\u003cspan\u003eStep 2: Press and hold the ▲ button, the starting temperature flashes, and set the starting temperature to 50 ℃ via the ▲ ▼ button\u003c\/span\u003e\u003c\/div\u003e\n\u003cdiv\u003e\u003cspan\u003eThe third step: long press the ▼ button to stop the temperature flashing, set the stop temperature to 65 ℃ through the ▲ ▼ button, the setting is complete!\u003c\/span\u003e\u003c\/div\u003e\n\u003cdiv\u003e\u003cspan\u003eRefrigeration use case: use in the farm, the fan ventilation stops at 26 ℃, and the temperature rises to 30 ℃ to start ventilation again\u003c\/span\u003e\u003c\/div\u003e\n\u003cdiv\u003e\u003cspan\u003eStep 1: Refrigeration working mode, start temperature\u0026gt; stop temperature\u003c\/span\u003e\u003c\/div\u003e\n\u003cdiv\u003e\u003cspan\u003eStep 2: Press and hold the ▲ button, the starting temperature flashes, and set the starting temperature to 30 ℃ via the ▲ ▼ button\u003c\/span\u003e\u003c\/div\u003e\n\u003cdiv\u003e\u003cspan\u003eStep 3: Press and hold the ▼ button to stop the temperature flashing, and set the stop temperature to 26 ° C with the ▲ ▼ button. The setting is complete!\u003c\/span\u003e\u003c\/div\u003e\n\u003cdiv\u003e \u003c\/div\u003e\n\u003cdiv\u003e\u003cspan\u003eHumidification \/ dehumidification mode settings:\u003c\/span\u003e\u003c\/div\u003e\n\u003cdiv\u003e\u003cspan\u003eSetting (Start Humidity): Long press the △ key, the start humidity value flashes, set the start humidity value by the △ ▽ key. Set [Stop Humidity]: Long press the △ key, stop the humidity value flashing, and set the stop humidity by the △ ▽ key value.\u003c\/span\u003e\u003c\/div\u003e\n\u003cdiv\u003e \u003c\/div\u003e\n\u003cdiv\u003e\u003cspan\u003eExamples of humidification: Fresh supermarket humidification, control humidifier 50% RH to start humidification, humidification to 80% RH to stop humidification.\u003c\/span\u003e\u003c\/div\u003e\n\u003cdiv\u003e \u003c\/div\u003e\n\u003cdiv\u003e\u003cspan\u003eSetup steps:\u003c\/span\u003e\u003c\/div\u003e\n\u003cdiv\u003e\u003cspan\u003e Step 1: Press and hold the △ key for 3 seconds to start the humidity value flashing, and set the start humidity value to 50% RH.\u003c\/span\u003e\u003c\/div\u003e\n\u003cdiv\u003e\u003cspan\u003e Step 2: Press and hold the ▽ key for 3 seconds to stop the humidity value flashing, set the value to 80% RH, the setting is completed, press the button for 5 seconds without operation, and automatically return to the normal display state\u003c\/span\u003e\u003c\/div\u003e\n\u003cdiv\u003e \u003c\/div\u003e\n\u003cdiv\u003e\u003cspan\u003eDehumidification example: workshop control exhaust dehumidification system, humidity 70% RH starts dehumidification, humidity 40% RH stops dehumidification\u003c\/span\u003e\u003c\/div\u003e\n\u003cdiv\u003e \u003c\/div\u003e\n\u003cdiv\u003e\u003cspan\u003eSetup steps:\u003c\/span\u003e\u003c\/div\u003e\n\u003cdiv\u003e\u003cspan\u003e Step 1: Press and hold the △ key for 3 seconds to start the humidity value flashing, and set the start humidity value to 40% RH.\u003c\/span\u003e\u003c\/div\u003e\n\u003cdiv\u003e\u003cspan\u003e Step 2: Press and hold the ▽ key for 3 seconds to stop the humidity value from flashing, set the value to 70% RH, the setting is completed, press the button for 5 seconds without operation, and automatically return to the normal display state\u003c\/span\u003e\u003c\/div\u003e\n\u003cdiv\u003e \u003c\/div\u003e\n\u003cdiv\u003e \u003c\/div\u003e\n\u003cdiv\u003e\u003cspan\u003eTemperature correction:\u003c\/span\u003e\u003c\/div\u003e\n\u003cdiv\u003e\u003cspan\u003eSimultaneously press the ▲ ▼ key for 3 seconds to start the temperature digit flashing, and use the ▲ ▼ key to set the start temperature correction value; after the setting is completed, press the button for 5 seconds without operation, and automatically return to the normal display state.\u003c\/span\u003e\u003c\/div\u003e\n\u003cdiv\u003e \u003c\/div\u003e\n\u003cdiv\u003e\u003cspan\u003eHumidity correction:\u003c\/span\u003e\u003c\/div\u003e\n\u003cdiv\u003e\u003cspan\u003eSimultaneously press the △ ▽ key for 3 seconds to start the humidity digit flashing, and set the humidity correction value by the △ ▽ key; after the setting is completed, press the button for 5 seconds without operation, and it will automatically return to the normal display state.\u003c\/span\u003e\u003c\/div\u003e\n\u003cdiv\u003e \u003c\/div\u003e\n\u003cdiv\u003e\u003cspan\u003eWiring instructions:\u003c\/span\u003e\u003c\/div\u003e\n\u003cdiv\u003e \u003c\/div\u003e\n\u003cdiv\u003e \u003cimg alt=\"11\" src=\"https:\/\/ae01.alicdn.com\/kf\/H818f4241e00c4a4383e69801a2e9fd69R.jpg\"\u003e\n\u003c\/div\u003e\n\u003cdiv\u003e \u003c\/div\u003e\n\u003cdiv\u003e \u003c\/div\u003e\n\u003cdiv\u003e\u003cspan\u003e※ If the temperature and humidity display LLL, please confirm whether the wiring of the SHT20 digital temperature and humidity sensor is correct and whether there is poor contact, you can try to reconnect the wiring.\u003c\/span\u003e\u003c\/div\u003e\n\u003cdiv\u003e \u003c\/div\u003e\n\u003cdiv\u003e\n\u003cimg alt=\"1(23)\" src=\"https:\/\/ae01.alicdn.com\/kf\/H12eb95c3e0d2444c96477c9c4e96c5e2r.jpg\"\u003e\u003cimg alt=\"1 (2)\" src=\"https:\/\/ae01.alicdn.com\/kf\/H4aec1fa943784e678b9d5a13ef92c840u.jpg\"\u003e\u003cimg alt=\"1 (9)\" src=\"https:\/\/ae01.alicdn.com\/kf\/H62f61e0071094feb8e4b5a95452126815.jpg\"\u003e\u003cimg alt=\"1 (15)\" src=\"https:\/\/ae01.alicdn.com\/kf\/H3015a4e6d81f490b9020dca461f7694bX.jpg\"\u003e\u003cimg alt=\"1 (18)\" src=\"https:\/\/ae01.alicdn.com\/kf\/He260f2df36064fe2af5530c7a561437ed.jpg\"\u003e\u003cimg alt=\"1 (20)\" src=\"https:\/\/ae01.alicdn.com\/kf\/He00db8acc649445db0f1f4fce6df2bf95.jpg\"\u003e\u003cimg alt=\"1 (22)\" src=\"https:\/\/ae01.alicdn.com\/kf\/H5e7b7c932bd44e159fcc998c54110021C.jpg\"\u003e\u003cimg alt=\"1 (4)\" src=\"https:\/\/ae01.alicdn.com\/kf\/H31b481ef695c453d88993756e902f3dec.jpg\"\u003e\u003cimg alt=\"1 (3)\" src=\"https:\/\/ae01.alicdn.com\/kf\/H72f864579840411fa481222392614398v.jpg\"\u003e\n\u003c\/div\u003e","published_at":"2020-05-04T20:03:25+08:00","created_at":"2020-05-04T20:20:56+08:00","vendor":"diymore","type":"Thermostat","tags":[],"price":1399,"price_min":1399,"price_max":1399,"available":true,"price_varies":false,"compare_at_price":null,"compare_at_price_min":0,"compare_at_price_max":0,"compare_at_price_varies":false,"variants":[{"id":32174110441543,"title":"AC 110V-220V DTC2210 Dual display","option1":"AC 110V-220V DTC2210 Dual display","option2":null,"option3":null,"sku":"XA0022","requires_shipping":true,"taxable":true,"featured_image":null,"available":true,"name":"110V-220V LED Digital Temperature Controller Thermostat Thermoregulator for Incubator Heating Cooling Replace STC-1000 DTC1200 - AC 110V-220V DTC2210 Dual display","public_title":"AC 110V-220V DTC2210 Dual display","options":["AC 110V-220V DTC2210 Dual display"],"price":1399,"weight":0,"compare_at_price":null,"inventory_management":"shopify","barcode":"","requires_selling_plan":false,"selling_plan_allocations":[],"quantity_rule":{"min":1,"max":null,"increment":1}},{"id":32174110474311,"title":"AC 110V-220V DTC1100 Dual display","option1":"AC 110V-220V DTC1100 Dual display","option2":null,"option3":null,"sku":"XA0021","requires_shipping":true,"taxable":true,"featured_image":null,"available":true,"name":"110V-220V LED Digital Temperature Controller Thermostat Thermoregulator for Incubator Heating Cooling Replace STC-1000 DTC1200 - AC 110V-220V DTC1100 Dual display","public_title":"AC 110V-220V DTC1100 Dual display","options":["AC 110V-220V DTC1100 Dual display"],"price":1399,"weight":0,"compare_at_price":null,"inventory_management":"shopify","barcode":"","requires_selling_plan":false,"selling_plan_allocations":[],"quantity_rule":{"min":1,"max":null,"increment":1}},{"id":32174110539847,"title":"AC 110V-220V DTC3200 Dual display","option1":"AC 110V-220V DTC3200 Dual display","option2":null,"option3":null,"sku":"XA0024","requires_shipping":true,"taxable":true,"featured_image":null,"available":true,"name":"110V-220V LED Digital Temperature Controller Thermostat Thermoregulator for Incubator Heating Cooling Replace STC-1000 DTC1200 - AC 110V-220V DTC3200 Dual display","public_title":"AC 110V-220V DTC3200 Dual display","options":["AC 110V-220V DTC3200 Dual display"],"price":1399,"weight":0,"compare_at_price":null,"inventory_management":"shopify","barcode":"","requires_selling_plan":false,"selling_plan_allocations":[],"quantity_rule":{"min":1,"max":null,"increment":1}},{"id":32174110572615,"title":"AC 110V-220V DTC1100","option1":"AC 110V-220V DTC1100","option2":null,"option3":null,"sku":"XA0020","requires_shipping":true,"taxable":true,"featured_image":null,"available":true,"name":"110V-220V LED Digital Temperature Controller Thermostat Thermoregulator for Incubator Heating Cooling Replace STC-1000 DTC1200 - AC 110V-220V DTC1100","public_title":"AC 110V-220V DTC1100","options":["AC 110V-220V DTC1100"],"price":1399,"weight":0,"compare_at_price":null,"inventory_management":"shopify","barcode":"","requires_selling_plan":false,"selling_plan_allocations":[],"quantity_rule":{"min":1,"max":null,"increment":1}},{"id":32174110605383,"title":"AC 110V-220V DTC2200","option1":"AC 110V-220V DTC2200","option2":null,"option3":null,"sku":"XA0023","requires_shipping":true,"taxable":true,"featured_image":null,"available":true,"name":"110V-220V LED Digital Temperature Controller Thermostat Thermoregulator for Incubator Heating Cooling Replace STC-1000 DTC1200 - AC 110V-220V DTC2200","public_title":"AC 110V-220V DTC2200","options":["AC 110V-220V DTC2200"],"price":1399,"weight":0,"compare_at_price":null,"inventory_management":"shopify","barcode":"","requires_selling_plan":false,"selling_plan_allocations":[],"quantity_rule":{"min":1,"max":null,"increment":1}},{"id":32174110638151,"title":"AC 110V-220V DTC1200","option1":"AC 110V-220V DTC1200","option2":null,"option3":null,"sku":"XA0008","requires_shipping":true,"taxable":true,"featured_image":null,"available":true,"name":"110V-220V LED Digital Temperature Controller Thermostat Thermoregulator for Incubator Heating Cooling Replace STC-1000 DTC1200 - AC 110V-220V DTC1200","public_title":"AC 110V-220V DTC1200","options":["AC 110V-220V DTC1200"],"price":1399,"weight":0,"compare_at_price":null,"inventory_management":"shopify","barcode":"","requires_selling_plan":false,"selling_plan_allocations":[],"quantity_rule":{"min":1,"max":null,"increment":1}}],"images":["\/\/www.diymore.cc\/cdn\/shop\/products\/1_1_423.jpg?v=1588701927","\/\/www.diymore.cc\/cdn\/shop\/products\/1_8_460.jpg?v=1588701927","\/\/www.diymore.cc\/cdn\/shop\/products\/1_9_135.jpg?v=1588701927","\/\/www.diymore.cc\/cdn\/shop\/products\/1_16_853.jpg?v=1588701927","\/\/www.diymore.cc\/cdn\/shop\/products\/1_18_816.jpg?v=1588701927","\/\/www.diymore.cc\/cdn\/shop\/products\/1_19_930.jpg?v=1588701927"],"featured_image":"\/\/www.diymore.cc\/cdn\/shop\/products\/1_1_423.jpg?v=1588701927","options":["Type"],"media":[{"alt":"110V-220V Led Digital Temperature Controller Thermostat Thermoregulator For Incubator Heating","id":6682595557447,"position":1,"preview_image":{"aspect_ratio":1.0,"height":1000,"width":1000,"src":"\/\/www.diymore.cc\/cdn\/shop\/products\/1_1_423.jpg?v=1588701927"},"aspect_ratio":1.0,"height":1000,"media_type":"image","src":"\/\/www.diymore.cc\/cdn\/shop\/products\/1_1_423.jpg?v=1588701927","width":1000},{"alt":"110V-220V Led Digital Temperature Controller Thermostat Thermoregulator For Incubator Heating","id":6682596311111,"position":2,"preview_image":{"aspect_ratio":1.0,"height":1000,"width":1000,"src":"\/\/www.diymore.cc\/cdn\/shop\/products\/1_8_460.jpg?v=1588701927"},"aspect_ratio":1.0,"height":1000,"media_type":"image","src":"\/\/www.diymore.cc\/cdn\/shop\/products\/1_8_460.jpg?v=1588701927","width":1000},{"alt":"110V-220V Led Digital Temperature Controller Thermostat Thermoregulator For Incubator Heating","id":6682596606023,"position":3,"preview_image":{"aspect_ratio":1.0,"height":1000,"width":1000,"src":"\/\/www.diymore.cc\/cdn\/shop\/products\/1_9_135.jpg?v=1588701927"},"aspect_ratio":1.0,"height":1000,"media_type":"image","src":"\/\/www.diymore.cc\/cdn\/shop\/products\/1_9_135.jpg?v=1588701927","width":1000},{"alt":"110V-220V Led Digital Temperature Controller Thermostat Thermoregulator For Incubator Heating","id":6682597326919,"position":4,"preview_image":{"aspect_ratio":1.0,"height":1000,"width":1000,"src":"\/\/www.diymore.cc\/cdn\/shop\/products\/1_16_853.jpg?v=1588701927"},"aspect_ratio":1.0,"height":1000,"media_type":"image","src":"\/\/www.diymore.cc\/cdn\/shop\/products\/1_16_853.jpg?v=1588701927","width":1000},{"alt":"110V-220V Led Digital Temperature Controller Thermostat Thermoregulator For Incubator Heating","id":6682597687367,"position":5,"preview_image":{"aspect_ratio":1.0,"height":1000,"width":1000,"src":"\/\/www.diymore.cc\/cdn\/shop\/products\/1_18_816.jpg?v=1588701927"},"aspect_ratio":1.0,"height":1000,"media_type":"image","src":"\/\/www.diymore.cc\/cdn\/shop\/products\/1_18_816.jpg?v=1588701927","width":1000},{"alt":"110V-220V Led Digital Temperature Controller Thermostat Thermoregulator For Incubator Heating","id":6682598015047,"position":6,"preview_image":{"aspect_ratio":1.0,"height":1000,"width":1000,"src":"\/\/www.diymore.cc\/cdn\/shop\/products\/1_19_930.jpg?v=1588701927"},"aspect_ratio":1.0,"height":1000,"media_type":"image","src":"\/\/www.diymore.cc\/cdn\/shop\/products\/1_19_930.jpg?v=1588701927","width":1000}],"requires_selling_plan":false,"selling_plan_groups":[],"content":"\u003cdiv\u003e\u003cstrong\u003e\u003cspan\u003eDescription:\u003c\/span\u003e\u003c\/strong\u003e\u003c\/div\u003e\n\u003cdiv\u003e \u003c\/div\u003e\n\u003cdiv\u003e\n\u003cdiv\u003e\u003cspan\u003eProduct Name: Thermostat\u003c\/span\u003e\u003c\/div\u003e\n\u003cdiv\u003e\u003cspan\u003eProduct model: DTC1200\u003c\/span\u003e\u003c\/div\u003e\n\u003cdiv data-spm-anchor-id=\"a2g0o.detail.1000023.i0.766b67b1vR7Vg3\"\u003e\u003cspan\u003eSupply voltage: AC110~230V\u003c\/span\u003e\u003c\/div\u003e\n\u003cdiv data-spm-anchor-id=\"a2g0o.detail.1000023.i1.766b67b1vR7Vg3\"\u003e\u003cspan\u003eTemperature range: -40°C~+99°C\u003c\/span\u003e\u003c\/div\u003e\n\u003cdiv\u003e\u003cspan\u003eTemperature measurement accuracy: ±1 °C (-40 °C ~ +70 °C)\u003c\/span\u003e\u003c\/div\u003e\n\u003cdiv data-spm-anchor-id=\"a2g0o.detail.1000023.i2.766b67b1vR7Vg3\"\u003e\u003cspan\u003eSensor line length: 100cm\u003c\/span\u003e\u003c\/div\u003e\n\u003cdiv data-spm-anchor-id=\"a2g0o.detail.1000023.i3.766b67b1vR7Vg3\"\u003e\u003cspan\u003eThermostat size: 93mm*56mm*34mm\u003c\/span\u003e\u003c\/div\u003e\n\u003cdiv\u003e\u003cspan\u003eOutput capacity: cooling (compressor 3A) heating (10A\/250VAC)\u003c\/span\u003e\u003c\/div\u003e\n\u003cdiv\u003e \u003c\/div\u003e\n\u003cdiv\u003e\u003cspan\u003eSee parameter method:\u003c\/span\u003e\u003c\/div\u003e\n\u003cdiv\u003e \u003c\/div\u003e\n\u003cdiv\u003e\u003cspan\u003eWhen the thermostat is working normally, press and release \"▲\"the key once to display the temperature setting value; press and release \"▼\" the key once to display the temperature difference setting value. After 3 seconds, the temperature returns to the normal display state.\u003c\/span\u003e\u003c\/div\u003e\n\u003cdiv\u003e \u003c\/div\u003e\n\u003cdiv\u003e\u003cspan\u003eSetting parameter method:\u003c\/span\u003e\u003c\/div\u003e\n\u003cdiv\u003e \u003c\/div\u003e\n\u003cdiv\u003e\u003cspan\u003eWhen the thermostat is working normally, press \"S\" key and hold the button for more than 3 seconds to enter the modified parameter mode. The “Set” indicator lights up, the digital tube displays the code “F1” of the first menu item, and press the \"▲\" or \"▼\"key to up or down the code of the menu item. Press \"S\" the key to display the parameter setting value of the current menu, press \"S\" and hold the key, then press the \"▲\"or \"▼\" key to increase or decrease the parameter setting value of the current menu; press \"S\" key and hold the key, and press the \"▲\"or \"▼\" key to quickly increase the speed; Or down and display the parameter settings of the current menu.\u003c\/span\u003e\u003c\/div\u003e\n\u003cdiv\u003e\u003cspan\u003ePress and hold \"▲\"or \"▼\" the key at the same time to restore the parameters to the factory settings.\u003c\/span\u003e\u003c\/div\u003e\n\u003cdiv\u003e \u003c\/div\u003e\n\u003cdiv\u003e\u003cspan\u003eOperation instructions:\u003c\/span\u003e\u003c\/div\u003e\n\u003cdiv\u003e \u003c\/div\u003e\n\u003cdiv\u003e\u003cspan\u003e1.When the thermostat is working normally, press and hold the \"power button\" for more than 3 seconds to turn off the thermostat. When the thermostat is off, press and hold the \"power button\" for more than 3 seconds to open the thermostat.\u003c\/span\u003e\u003c\/div\u003e\n\u003cdiv\u003e\u003cspan\u003eWhen the thermostat is working normally, the digital tube displays the current temperature measurement value, and performs automatic recognition conversion of the cooling heating operation mode.\u003c\/span\u003e\u003c\/div\u003e\n\u003cdiv\u003e\u003cspan\u003e2.When the measured temperature ≥ temperature set value + temperature difference set value, enter the cooling state, the Cool indicator light is on, the cooling relay normally open contact is closed; the Cool indicator flashes, indicating that the cooling device is in the press delay protection state; when measuring the temperature ≤ temperature set value, the Cool indicator is off, and the normally open contact of the refrigeration relay is disconnected.\u003c\/span\u003e\u003c\/div\u003e\n\u003cdiv\u003e\u003cspan\u003e3.When the measured temperature ≤ temperature set value - temperature difference set value enters the heating state, the Heat indicator light is on, the heating relay normally open contact is closed; when the measured temperature ≥ temperature set value, the Heat indicator is off, the heating relay normally open contact disconnect.\u003c\/span\u003e\u003c\/div\u003e\n\u003cdiv\u003e \u003c\/div\u003e\n\u003cdiv data-spm-anchor-id=\"a2g0o.detail.1000023.i1.17566478417y5U\"\u003e\n\u003cp data-spm-anchor-id=\"a2g0o.detail.1000023.i0.17566478417y5U\"\u003e\u003cspan\u003eIndicator status description:\u003c\/span\u003e\u003c\/p\u003e\n\u003ctable border=\"1\" cellspacing=\"0\"\u003e\n\u003ctbody\u003e\n\u003ctr\u003e\n\u003ctd\u003e\n\u003cp align=\"center\"\u003e\u003cspan\u003eIndicator\u003c\/span\u003e\u003c\/p\u003e\n\u003c\/td\u003e\n\u003ctd\u003e\n\u003cp align=\"center\"\u003e\u003cspan\u003eFunction\u003c\/span\u003e\u003c\/p\u003e\n\u003c\/td\u003e\n\u003ctd\u003e\n\u003cp align=\"center\" data-spm-anchor-id=\"a2g0o.detail.1000023.i10.17566478417y5U\"\u003e\u003cspan\u003eNote\u003c\/span\u003e\u003c\/p\u003e\n\u003c\/td\u003e\n\u003c\/tr\u003e\n\u003ctr\u003e\n\u003ctd\u003e\n\u003cp align=\"center\" data-spm-anchor-id=\"a2g0o.detail.1000023.i4.17566478417y5U\"\u003e\u003cspan\u003eCool indicator\u003c\/span\u003e\u003c\/p\u003e\n\u003c\/td\u003e\n\u003ctd\u003e\n\u003cp align=\"center\" data-spm-anchor-id=\"a2g0o.detail.1000023.i5.17566478417y5U\"\u003e\u003cspan\u003eLight on:cooling work;\u003c\/span\u003e\u003c\/p\u003e\n\u003cp align=\"center\"\u003e\u003cspan\u003e Light off:cooling off;\u003c\/span\u003e\u003c\/p\u003e\n\u003cp align=\"center\"\u003e\u003cspan\u003eFlashing: press delay\u003c\/span\u003e\u003c\/p\u003e\n\u003c\/td\u003e\n\u003ctd rowspan=\"2\"\u003e\n\u003cp align=\"center\" data-spm-anchor-id=\"a2g0o.detail.1000023.i11.17566478417y5U\"\u003e\u003cspan\u003eCool and Heat Both indicator lights cannot be lit at the same time\u003c\/span\u003e\u003c\/p\u003e\n\u003c\/td\u003e\n\u003c\/tr\u003e\n\u003ctr\u003e\n\u003ctd\u003e\n\u003cp align=\"center\" data-spm-anchor-id=\"a2g0o.detail.1000023.i6.17566478417y5U\"\u003e\u003cspan\u003eHeat indicator\u003c\/span\u003e\u003c\/p\u003e\n\u003c\/td\u003e\n\u003ctd\u003e\n\u003cp align=\"center\" data-spm-anchor-id=\"a2g0o.detail.1000023.i7.17566478417y5U\"\u003e\u003cspan\u003eBright: heating work;\u003c\/span\u003e\u003c\/p\u003e\n\u003cp align=\"center\"\u003e\u003cspan\u003eoff: heating off\u003c\/span\u003e\u003c\/p\u003e\n\u003c\/td\u003e\n\u003c\/tr\u003e\n\u003ctr\u003e\n\u003ctd\u003e\n\u003cp align=\"center\" data-spm-anchor-id=\"a2g0o.detail.1000023.i8.17566478417y5U\"\u003e\u003cspan\u003eSet indicator\u003c\/span\u003e\u003c\/p\u003e\n\u003c\/td\u003e\n\u003ctd\u003e\n\u003cp align=\"center\" data-spm-anchor-id=\"a2g0o.detail.1000023.i9.17566478417y5U\"\u003e\u003cspan\u003eOn: parameter setting status\u003c\/span\u003e\u003c\/p\u003e\n\u003c\/td\u003e\n\u003ctd\u003e\n\u003cp align=\"center\"\u003e \u003c\/p\u003e\n\u003c\/td\u003e\n\u003c\/tr\u003e\n\u003c\/tbody\u003e\n\u003c\/table\u003e\n\u003cp\u003e \u003c\/p\u003e\n\u003cp\u003e\u003cspan\u003eMenu function description:\u003c\/span\u003e\u003c\/p\u003e\n\u003ctable border=\"1\" cellspacing=\"0\"\u003e\n\u003ctbody\u003e\n\u003ctr\u003e\n\u003ctd\u003e\n\u003cp align=\"center\" data-spm-anchor-id=\"a2g0o.detail.1000023.i13.17566478417y5U\"\u003e\u003cspan\u003eMenu identifier\u003c\/span\u003e\u003c\/p\u003e\n\u003c\/td\u003e\n\u003ctd\u003e\n\u003cp align=\"center\" data-spm-anchor-id=\"a2g0o.detail.1000023.i16.17566478417y5U\"\u003e\u003cspan\u003eMenu function\u003c\/span\u003e\u003c\/p\u003e\n\u003c\/td\u003e\n\u003ctd\u003e\n\u003cp align=\"center\" data-spm-anchor-id=\"a2g0o.detail.1000023.i17.17566478417y5U\"\u003e\u003cspan\u003eSetting range\u003c\/span\u003e\u003c\/p\u003e\n\u003c\/td\u003e\n\u003ctd\u003e\n\u003cp align=\"center\" data-spm-anchor-id=\"a2g0o.detail.1000023.i18.17566478417y5U\"\u003e\u003cspan\u003eFactory setting\u003c\/span\u003e\u003c\/p\u003e\n\u003c\/td\u003e\n\u003c\/tr\u003e\n\u003ctr\u003e\n\u003ctd\u003e\n\u003cp align=\"center\" data-spm-anchor-id=\"a2g0o.detail.1000023.i12.17566478417y5U\"\u003e\u003cspan\u003eF1\u003c\/span\u003e\u003c\/p\u003e\n\u003c\/td\u003e\n\u003ctd\u003e\n\u003cp align=\"center\" data-spm-anchor-id=\"a2g0o.detail.1000023.i14.17566478417y5U\"\u003e\u003cspan\u003eTemperature setting value\u003c\/span\u003e\u003c\/p\u003e\n\u003c\/td\u003e\n\u003ctd\u003e\n\u003cp align=\"center\" data-spm-anchor-id=\"a2g0o.detail.1000023.i15.17566478417y5U\"\u003e\u003cspan\u003e-40.0~99.9℃\u003c\/span\u003e\u003c\/p\u003e\n\u003c\/td\u003e\n\u003ctd\u003e\n\u003cp align=\"center\" data-spm-anchor-id=\"a2g0o.detail.1000023.i19.17566478417y5U\"\u003e\u003cspan\u003e10.0℃\u003c\/span\u003e\u003c\/p\u003e\n\u003c\/td\u003e\n\u003c\/tr\u003e\n\u003ctr\u003e\n\u003ctd\u003e\n\u003cp align=\"center\" data-spm-anchor-id=\"a2g0o.detail.1000023.i20.17566478417y5U\"\u003e\u003cspan\u003eF2\u003c\/span\u003e\u003c\/p\u003e\n\u003c\/td\u003e\n\u003ctd\u003e\n\u003cp align=\"center\" data-spm-anchor-id=\"a2g0o.detail.1000023.i21.17566478417y5U\"\u003e\u003cspan\u003eTemperature difference setting value\u003c\/span\u003e\u003c\/p\u003e\n\u003c\/td\u003e\n\u003ctd\u003e\n\u003cp align=\"center\" data-spm-anchor-id=\"a2g0o.detail.1000023.i22.17566478417y5U\"\u003e\u003cspan\u003e0.3~10.0℃\u003c\/span\u003e\u003c\/p\u003e\n\u003c\/td\u003e\n\u003ctd\u003e\n\u003cp align=\"center\" data-spm-anchor-id=\"a2g0o.detail.1000023.i23.17566478417y5U\"\u003e\u003cspan\u003e0.5℃\u003c\/span\u003e\u003c\/p\u003e\n\u003c\/td\u003e\n\u003c\/tr\u003e\n\u003ctr\u003e\n\u003ctd\u003e\n\u003cp align=\"center\" data-spm-anchor-id=\"a2g0o.detail.1000023.i24.17566478417y5U\"\u003e\u003cspan\u003eF3\u003c\/span\u003e\u003c\/p\u003e\n\u003c\/td\u003e\n\u003ctd\u003e\n\u003cp align=\"center\" data-spm-anchor-id=\"a2g0o.detail.1000023.i25.17566478417y5U\"\u003e\u003cspan\u003ePress delay\u003c\/span\u003e\u003c\/p\u003e\n\u003c\/td\u003e\n\u003ctd\u003e\n\u003cp align=\"center\" data-spm-anchor-id=\"a2g0o.detail.1000023.i26.17566478417y5U\"\u003e\u003cspan\u003e1~10 min\u003c\/span\u003e\u003c\/p\u003e\n\u003c\/td\u003e\n\u003ctd\u003e\n\u003cp align=\"center\" data-spm-anchor-id=\"a2g0o.detail.1000023.i27.17566478417y5U\"\u003e\u003cspan\u003e3 min\u003c\/span\u003e\u003c\/p\u003e\n\u003c\/td\u003e\n\u003c\/tr\u003e\n\u003ctr\u003e\n\u003ctd data-spm-anchor-id=\"a2g0o.detail.1000023.i28.17566478417y5U\"\u003e\n\u003cp align=\"center\"\u003e\u003cspan\u003eF4\u003c\/span\u003e\u003c\/p\u003e\n\u003c\/td\u003e\n\u003ctd\u003e\n\u003cp align=\"center\" data-spm-anchor-id=\"a2g0o.detail.1000023.i29.17566478417y5U\"\u003e\u003cspan\u003eTemperature correction\u003c\/span\u003e\u003c\/p\u003e\n\u003c\/td\u003e\n\u003ctd\u003e\n\u003cp align=\"center\" data-spm-anchor-id=\"a2g0o.detail.1000023.i30.17566478417y5U\"\u003e\u003cspan\u003e-10.0~10.0℃\u003c\/span\u003e\u003c\/p\u003e\n\u003c\/td\u003e\n\u003ctd\u003e\n\u003cp align=\"center\" data-spm-anchor-id=\"a2g0o.detail.1000023.i31.17566478417y5U\"\u003e\u003cspan\u003e0℃\u003c\/span\u003e\u003c\/p\u003e\n\u003c\/td\u003e\n\u003c\/tr\u003e\n\u003c\/tbody\u003e\n\u003c\/table\u003e\n\u003cp\u003e \u003c\/p\u003e\n\u003cp\u003e\u003cspan\u003eWiring Diagram:\u003c\/span\u003e\u003c\/p\u003e\n\u003cp\u003e\u003cspan\u003e\u003cimg alt=\"图片1\" src=\"https:\/\/ae01.alicdn.com\/kf\/H001eadcd3b8e49109ce4fd472825de6dW.jpg\"\u003e\u003c\/span\u003e\u003c\/p\u003e\n\u003cp\u003e \u003c\/p\u003e\n\u003cdiv\u003e\n\u003cdiv\u003e \u003c\/div\u003e\n\u003cdiv\u003e\u003cspan\u003eRepair System Data:\u003c\/span\u003e\u003c\/div\u003e\n\u003cdiv\u003e \u003c\/div\u003e\n\u003cdiv\u003e\u003cspan\u003eAfter the thermostat is powered on, first check whether the parameter settings are correct. If an error is detected, “Er” is displayed. Pressing any key will restore the default parameter settings and work normally. It is recommended to reset the parameters at this time.\u003c\/span\u003e\u003c\/div\u003e\n\u003cdiv\u003e \u003c\/div\u003e\n\u003cdiv\u003e\u003cspan\u003eSystem Code, reason and action:\u003c\/span\u003e\u003c\/div\u003e\n\u003cdiv\u003e \u003c\/div\u003e\n\u003cdiv\u003e\u003cspan\u003eSensor fault alarm: When the temperature probe loop is short-circuited or open-circuit fault, the thermostat starts the probe fault alarm mode, closes all execution states, and the digital tube displays “EE”. After the fault is cleared, press any key to return to the normal working mode.\u003c\/span\u003e\u003c\/div\u003e\n\u003cdiv\u003e\u003cspan\u003eOver-temperature alarm: When the temperature measurement exceeds the temperature measurement range, the thermostat starts the over-temperature limit fault alarm mode, and all execution states are turned off. The digital tube displays “HH”. When the temperature returns to the normal measurement range, press any key. Return to normal working mode.\u003c\/span\u003e\u003c\/div\u003e\n\u003cdiv\u003e \u003c\/div\u003e\n\u003cdiv\u003e\u003cspan\u003eSafety rules:\u003c\/span\u003e\u003c\/div\u003e\n\u003cdiv\u003e \u003c\/div\u003e\n\u003cdiv\u003e\u003cspan\u003e☆ Danger:\u003c\/span\u003e\u003c\/div\u003e\n\u003cdiv\u003e\u003cspan\u003e1. Strictly distinguish the sensor lead, power line and output relay interface, can not be connected incorrectly, the relay can not be overloaded;\u003c\/span\u003e\u003c\/div\u003e\n\u003cdiv\u003e\u003cspan\u003e2. All wiring changes must be made with the power off.\u003c\/span\u003e\u003c\/div\u003e\n\u003cdiv\u003e\u003cspan\u003e☆ Warning:\u003c\/span\u003e\u003c\/div\u003e\n\u003cdiv\u003e\u003cspan\u003e1. This thermostat is forbidden to be used in water or excessively humid environment. It is forbidden to use in high temperature, strong electromagnetic interference and strong corrosive environment.\u003c\/span\u003e\u003c\/div\u003e\n\u003cdiv\u003e\u003cspan\u003e☆ Note:\u003c\/span\u003e\u003c\/div\u003e\n\u003cdiv\u003e\u003cspan\u003e1. The supply voltage should be consistent with the voltage marked by the thermostat and ensure the stability of the supply voltage;\u003c\/span\u003e\u003c\/div\u003e\n\u003cdiv\u003e\u003cspan\u003e2. To avoid possible interference, it is recommended that the sensor leads be at an appropriate distance from the power line.\u003c\/span\u003e\u003c\/div\u003e\n\u003cdiv\u003e \u003c\/div\u003e\n\u003cdiv\u003e \u003c\/div\u003e\n\u003cdiv\u003e\u003cstrong\u003e\u003cspan\u003ePackage Included:\u003c\/span\u003e\u003c\/strong\u003e\u003c\/div\u003e\n\u003cdiv\u003e \u003c\/div\u003e\n\u003cdiv\u003e\u003cspan\u003e1 x DTC1200 Intellligent Temperature Controller\u003c\/span\u003e\u003c\/div\u003e\n\u003cdiv\u003e\u003cspan\u003e1 x Temperature sensor\u003c\/span\u003e\u003c\/div\u003e\n\u003cdiv\u003e\u003cspan\u003e1 x Instruction manual\u003c\/span\u003e\u003c\/div\u003e\n\u003cdiv\u003e\u003cspan\u003e1 x Packing box\u003c\/span\u003e\u003c\/div\u003e\n\u003cdiv\u003e\u003cspan\u003e\u003c\/span\u003e\u003c\/div\u003e\n\u003c\/div\u003e\n\u003c\/div\u003e\n\u003c\/div\u003e\n\u003cdiv\u003e\n\u003cp\u003e\u003cimg alt=\"pictures2\" src=\"https:\/\/ae01.alicdn.com\/kf\/H48e07ca430b143a1bd6390f007d70893r.jpg\"\u003e\u003c\/p\u003e\n\u003cp\u003e\u003cimg alt=\"XA0008 (3)\" src=\"https:\/\/ae01.alicdn.com\/kf\/H909cdc0df9ef48b2909767f61c05f908Y.jpg\"\u003e\u003cimg alt=\"XA0008 (4)\" src=\"https:\/\/ae01.alicdn.com\/kf\/He57b51af913d453bb4631f7f71fac13e1.jpg\"\u003e\u003cimg alt=\"XA0008 (5)\" src=\"https:\/\/ae01.alicdn.com\/kf\/H1d793d42fd7945cba1d4202db1861873q.jpg\"\u003e\u003cimg alt=\"XA0008 (24)\" src=\"https:\/\/ae01.alicdn.com\/kf\/Hddf60c92d3bf47e7a4377478d2ae0f4c0.jpg\"\u003e\u003cimg alt=\"XA0008 (7)\" src=\"https:\/\/ae01.alicdn.com\/kf\/H81eb27e7121545b799fea5521905e3c7U.jpg\"\u003e\u003cimg alt=\"XA0008 (6)\" src=\"https:\/\/ae01.alicdn.com\/kf\/H9b1a57d5932b47359fe4cb26b4df8221z.jpg\"\u003e\u003cimg alt=\"XA0008 (1)\" src=\"https:\/\/ae01.alicdn.com\/kf\/H3b043d774f204356b0278e4786d01f14k.jpg\"\u003e\u003cimg alt=\"XA0008 (9)\" src=\"https:\/\/ae01.alicdn.com\/kf\/H97fb15979930424092f839c9a8a3830fK.jpg\"\u003e\u003cimg alt=\"XA0008 (10)\" src=\"https:\/\/ae01.alicdn.com\/kf\/H6e4b81a56f9949e385541d0be905a572G.jpg\"\u003e\u003cimg alt=\"XA0008 (11)\" src=\"https:\/\/ae01.alicdn.com\/kf\/Hd0829f171f2f41bdb34c36cff898940cl.jpg\"\u003e\u003cimg alt=\"XA0008 (12)\" src=\"https:\/\/ae01.alicdn.com\/kf\/Hc210386716324310a4aa3248b0a8a09dp.jpg\"\u003e\u003cimg alt=\"XA0008 (19)\" src=\"https:\/\/ae01.alicdn.com\/kf\/H2743991dcfaf488b936cea38071fdc22l.jpg\"\u003e\u003cimg alt=\"XA0008 (21)\" src=\"https:\/\/ae01.alicdn.com\/kf\/H5d8b10d76d27477aa6d4f2e96f92b18fw.jpg\"\u003e\u003c\/p\u003e\n\u003c\/div\u003e\n\u003cp\u003e \u003c\/p\u003e\n\u003cp\u003e \u003c\/p\u003e\n\u003cp\u003e\u003cspan\u003e\u003cstrong\u003eDTC1100 DTC1110 DTC2210 DTC2200 Temperature Controller\u003c\/strong\u003e\u003c\/span\u003e\u003c\/p\u003e\n\u003cdiv\u003e\u003cspan\u003eProduct Name: Temperature Controller \u003c\/span\u003e\u003c\/div\u003e\n\u003cdiv\u003e\u003cspan\u003eProduct Models: DTC1100; DTC1110; DTC2210; DTC2200 \u003c\/span\u003e\u003c\/div\u003e\n\u003cdiv\u003e\u003cspan\u003ePower supply: AC110V-220V\u003c\/span\u003e\u003c\/div\u003e\n\u003cdiv\u003e\u003cspan\u003eTemperature range: -40°C~+99°C\u003c\/span\u003e\u003c\/div\u003e\n\u003cdiv\u003e\u003cspan\u003eTemperature measurement accuracy: ±1°C (-40 °C ~ +70 °C)\u003c\/span\u003e\u003c\/div\u003e\n\u003cdiv\u003e\u003cspan\u003eThermostat size: 93mm*56mm*34mm\u003c\/span\u003e\u003c\/div\u003e\n\u003cdiv\u003e\u003cspan\u003eRelay contact capacity: Cool(10WC250V); Heat(10A\/AC250V)\u003c\/span\u003e\u003c\/div\u003e\n\u003cdiv\u003e \u003c\/div\u003e\n\u003cdiv\u003e\u003cspan\u003e\u003cimg alt=\"1 (1)\" src=\"https:\/\/ae01.alicdn.com\/kf\/H55d10cb072154207bcdd46dd1dafbc8fh.jpg\"\u003e\u003cimg alt=\"1 (4)\" src=\"https:\/\/ae01.alicdn.com\/kf\/H2f4f0f7cfec445b58c5e00fbdd8435872.jpg\"\u003e\u003cimg alt=\"1 (2)\" src=\"https:\/\/ae01.alicdn.com\/kf\/Hdaf8974533f04094ac13d6f88bd4a970o.jpg\"\u003e\u003cimg alt=\"接线图 (1)\" src=\"https:\/\/ae01.alicdn.com\/kf\/Ha2a95c321166465591f5af870fd231bfp.jpg\"\u003e\u003cimg alt=\"1 (13)\" src=\"https:\/\/ae01.alicdn.com\/kf\/He9464c5ea5c24e168157faff9566d0ecj.jpg\"\u003e\u003cimg alt=\"1 (18)\" src=\"https:\/\/ae01.alicdn.com\/kf\/H44dfe2dd19c14a14bdd1e3d351e03a4bE.jpg\"\u003e\u003cimg alt=\"01 (1)\" src=\"https:\/\/ae01.alicdn.com\/kf\/Ha529d255334543f68affa9a95cb27f16o.jpg\"\u003e\u003cimg alt=\"4\" src=\"https:\/\/ae01.alicdn.com\/kf\/H312943e7f91e4b709b5d642e25598a6a5.jpg\"\u003e\u003cimg alt=\"15\" src=\"https:\/\/ae01.alicdn.com\/kf\/Hb93149fbec8e4329a4c090147de3983fq.jpg\"\u003e\u003cimg alt=\"接线图 (1)\" src=\"https:\/\/ae01.alicdn.com\/kf\/H0e9b53e72d594dde8c46be7d94b346b9b.jpg\"\u003e\u003cimg alt=\"10\" src=\"https:\/\/ae01.alicdn.com\/kf\/Ha4ae55d77d754955bc11801c20abde77F.jpg\"\u003e\u003cimg alt=\"16\" src=\"https:\/\/ae01.alicdn.com\/kf\/H516b5c2e4e7140f5952500c8e005c7b6t.jpg\"\u003e\u003cimg alt=\"1 (1)\" src=\"https:\/\/ae01.alicdn.com\/kf\/H72183dd8d1fc4fe4b6deb8b28ee279cby.jpg\"\u003e\u003cimg alt=\"1 (3)\" src=\"https:\/\/ae01.alicdn.com\/kf\/H1c848b67f8704717802fa010419962b0m.jpg\"\u003e\u003cimg alt=\"1 (4)\" src=\"https:\/\/ae01.alicdn.com\/kf\/H5f22b2bb585948da837a0df46163a52ea.jpg\"\u003e\u003cimg alt=\"1 (8)\" src=\"https:\/\/ae01.alicdn.com\/kf\/Hb0db99a5e1424609a10aea7486f295ab5.jpg\"\u003e\u003cimg alt=\"1 (17)\" src=\"https:\/\/ae01.alicdn.com\/kf\/Hfb6298937ee7447fb751dd6aa5b96549O.jpg\"\u003e\u003cimg alt=\"1 (19)\" src=\"https:\/\/ae01.alicdn.com\/kf\/Hbf41fac7ac3a42fdb90f17b8ff0d308d2.jpg\"\u003e\u003cimg alt=\"1 (20)\" src=\"https:\/\/ae01.alicdn.com\/kf\/H4a3c5770430945089241d33dafef31fcm.jpg\"\u003e\u003cimg alt=\"1 (1)\" src=\"https:\/\/ae01.alicdn.com\/kf\/Hc39891a3e23d41b5968309454950c8bcI.jpg\"\u003e\u003cimg alt=\"1 (2)\" src=\"https:\/\/ae01.alicdn.com\/kf\/H4522829b7e6e44dc9603abf7792e0647G.jpg\"\u003e\u003cimg alt=\"接线图\" src=\"https:\/\/ae01.alicdn.com\/kf\/Hfe019fff700840c6ad7f4ba4869ef0eaq.jpg\"\u003e\u003cimg alt=\"1 (12)\" src=\"https:\/\/ae01.alicdn.com\/kf\/H1ddb9da69f8b4b6eb775e093490116feg.jpg\"\u003e\u003cimg alt=\"1 (18)\" src=\"https:\/\/ae01.alicdn.com\/kf\/H42755cdfd6174fe3b72473d7592b07fdr.jpg\"\u003e\u003cimg alt=\"1 (20)\" src=\"https:\/\/ae01.alicdn.com\/kf\/H2350b4b9bf9b48a78676cfa40085604fK.jpg\"\u003e\u003cimg alt=\"1 (21)\" src=\"https:\/\/ae01.alicdn.com\/kf\/H62b80cb1bda24ed8841e2f13742847a8d.jpg\"\u003e\u003c\/span\u003e\u003c\/div\u003e\n\u003cdiv\u003e \u003c\/div\u003e\n\u003cdiv\u003e \u003c\/div\u003e\n\u003cdiv\u003e \u003c\/div\u003e\n\u003cdiv\u003e \u003c\/div\u003e\n\u003cdiv\u003e\u003cspan\u003eDTC3200 Temperature and Humidity Controller\u003c\/span\u003e\u003c\/div\u003e\n\u003cdiv\u003e \u003c\/div\u003e\n\u003cdiv\u003e\u003cspan\u003eProduct Name: Temperature and Humidity Controller\u003c\/span\u003e\u003c\/div\u003e\n\u003cdiv\u003e\u003cspan\u003eProduct Model: DTC3200\u003c\/span\u003e\u003c\/div\u003e\n\u003cdiv\u003e\u003cspan\u003ePower supply voltage: AC 110 ~ 230V\u003c\/span\u003e\u003c\/div\u003e\n\u003cdiv\u003e\u003cspan\u003ePower supply frequency: 50 \/ 60Hz\u003c\/span\u003e\u003c\/div\u003e\n\u003cdiv\u003e\u003cspan\u003eTemperature measurement range: -20 ~ 60 ℃\u003c\/span\u003e\u003c\/div\u003e\n\u003cdiv\u003e\u003cspan\u003eHumidity measurement range: 0% ~ 100% RH\u003c\/span\u003e\u003c\/div\u003e\n\u003cdiv\u003e\u003cspan\u003eTemperature measurement accuracy: 0.3 ℃\u003c\/span\u003e\u003c\/div\u003e\n\u003cdiv\u003e\u003cspan\u003eHumidity measurement accuracy: 3%\u003c\/span\u003e\u003c\/div\u003e\n\u003cdiv\u003e\u003cspan\u003eOutput control: Relay output\u003c\/span\u003e\u003c\/div\u003e\n\u003cdiv\u003e\u003cspan\u003eOutput power: MAX 10A\u003c\/span\u003e\u003c\/div\u003e\n\u003cdiv\u003e \u003c\/div\u003e\n\u003cdiv\u003e\u003cspan\u003eSetting method: start value \u0026lt;stop value (the program automatically determines the working mode as heating \/ humidification mode)\u003c\/span\u003e\u003c\/div\u003e\n\u003cdiv\u003e\u003cspan\u003eSetting method: start value\u0026gt; stop value (the program automatically determines the working mode to be cooling \/ dehumidifying mode)\u003c\/span\u003e\u003c\/div\u003e\n\u003cdiv\u003e\u003cspan\u003eHeating \/ cooling mode setting\u003c\/span\u003e\u003c\/div\u003e\n\u003cdiv\u003e\u003cspan\u003eSetting method: setting (starting temperature): long press the ▲ button, the starting temperature flashes, and the starting temperature value is set by the ▲ ▼ button\u003c\/span\u003e\u003c\/div\u003e\n\u003cdiv\u003e\u003cspan\u003eSetting (stop temperature): long press the ▼ button to stop the temperature flashing, set the stop temperature value by ▲ ▼ button\u003c\/span\u003e\u003c\/div\u003e\n\u003cdiv\u003e \u003c\/div\u003e\n\u003cdiv\u003e\u003cspan\u003eHeating use case: control the water heater, heating to 65 ℃ to stop, the temperature drops to 50 ℃ to start heating again\u003c\/span\u003e\u003c\/div\u003e\n\u003cdiv\u003e\u003cspan\u003eThe first step: heating working mode, start temperature \u0026lt;stop temperature\u003c\/span\u003e\u003c\/div\u003e\n\u003cdiv\u003e\u003cspan\u003eStep 2: Press and hold the ▲ button, the starting temperature flashes, and set the starting temperature to 50 ℃ via the ▲ ▼ button\u003c\/span\u003e\u003c\/div\u003e\n\u003cdiv\u003e\u003cspan\u003eThe third step: long press the ▼ button to stop the temperature flashing, set the stop temperature to 65 ℃ through the ▲ ▼ button, the setting is complete!\u003c\/span\u003e\u003c\/div\u003e\n\u003cdiv\u003e\u003cspan\u003eRefrigeration use case: use in the farm, the fan ventilation stops at 26 ℃, and the temperature rises to 30 ℃ to start ventilation again\u003c\/span\u003e\u003c\/div\u003e\n\u003cdiv\u003e\u003cspan\u003eStep 1: Refrigeration working mode, start temperature\u0026gt; stop temperature\u003c\/span\u003e\u003c\/div\u003e\n\u003cdiv\u003e\u003cspan\u003eStep 2: Press and hold the ▲ button, the starting temperature flashes, and set the starting temperature to 30 ℃ via the ▲ ▼ button\u003c\/span\u003e\u003c\/div\u003e\n\u003cdiv\u003e\u003cspan\u003eStep 3: Press and hold the ▼ button to stop the temperature flashing, and set the stop temperature to 26 ° C with the ▲ ▼ button. The setting is complete!\u003c\/span\u003e\u003c\/div\u003e\n\u003cdiv\u003e \u003c\/div\u003e\n\u003cdiv\u003e\u003cspan\u003eHumidification \/ dehumidification mode settings:\u003c\/span\u003e\u003c\/div\u003e\n\u003cdiv\u003e\u003cspan\u003eSetting (Start Humidity): Long press the △ key, the start humidity value flashes, set the start humidity value by the △ ▽ key. Set [Stop Humidity]: Long press the △ key, stop the humidity value flashing, and set the stop humidity by the △ ▽ key value.\u003c\/span\u003e\u003c\/div\u003e\n\u003cdiv\u003e \u003c\/div\u003e\n\u003cdiv\u003e\u003cspan\u003eExamples of humidification: Fresh supermarket humidification, control humidifier 50% RH to start humidification, humidification to 80% RH to stop humidification.\u003c\/span\u003e\u003c\/div\u003e\n\u003cdiv\u003e \u003c\/div\u003e\n\u003cdiv\u003e\u003cspan\u003eSetup steps:\u003c\/span\u003e\u003c\/div\u003e\n\u003cdiv\u003e\u003cspan\u003e Step 1: Press and hold the △ key for 3 seconds to start the humidity value flashing, and set the start humidity value to 50% RH.\u003c\/span\u003e\u003c\/div\u003e\n\u003cdiv\u003e\u003cspan\u003e Step 2: Press and hold the ▽ key for 3 seconds to stop the humidity value flashing, set the value to 80% RH, the setting is completed, press the button for 5 seconds without operation, and automatically return to the normal display state\u003c\/span\u003e\u003c\/div\u003e\n\u003cdiv\u003e \u003c\/div\u003e\n\u003cdiv\u003e\u003cspan\u003eDehumidification example: workshop control exhaust dehumidification system, humidity 70% RH starts dehumidification, humidity 40% RH stops dehumidification\u003c\/span\u003e\u003c\/div\u003e\n\u003cdiv\u003e \u003c\/div\u003e\n\u003cdiv\u003e\u003cspan\u003eSetup steps:\u003c\/span\u003e\u003c\/div\u003e\n\u003cdiv\u003e\u003cspan\u003e Step 1: Press and hold the △ key for 3 seconds to start the humidity value flashing, and set the start humidity value to 40% RH.\u003c\/span\u003e\u003c\/div\u003e\n\u003cdiv\u003e\u003cspan\u003e Step 2: Press and hold the ▽ key for 3 seconds to stop the humidity value from flashing, set the value to 70% RH, the setting is completed, press the button for 5 seconds without operation, and automatically return to the normal display state\u003c\/span\u003e\u003c\/div\u003e\n\u003cdiv\u003e \u003c\/div\u003e\n\u003cdiv\u003e \u003c\/div\u003e\n\u003cdiv\u003e\u003cspan\u003eTemperature correction:\u003c\/span\u003e\u003c\/div\u003e\n\u003cdiv\u003e\u003cspan\u003eSimultaneously press the ▲ ▼ key for 3 seconds to start the temperature digit flashing, and use the ▲ ▼ key to set the start temperature correction value; after the setting is completed, press the button for 5 seconds without operation, and automatically return to the normal display state.\u003c\/span\u003e\u003c\/div\u003e\n\u003cdiv\u003e \u003c\/div\u003e\n\u003cdiv\u003e\u003cspan\u003eHumidity correction:\u003c\/span\u003e\u003c\/div\u003e\n\u003cdiv\u003e\u003cspan\u003eSimultaneously press the △ ▽ key for 3 seconds to start the humidity digit flashing, and set the humidity correction value by the △ ▽ key; after the setting is completed, press the button for 5 seconds without operation, and it will automatically return to the normal display state.\u003c\/span\u003e\u003c\/div\u003e\n\u003cdiv\u003e \u003c\/div\u003e\n\u003cdiv\u003e\u003cspan\u003eWiring instructions:\u003c\/span\u003e\u003c\/div\u003e\n\u003cdiv\u003e \u003c\/div\u003e\n\u003cdiv\u003e \u003cimg alt=\"11\" src=\"https:\/\/ae01.alicdn.com\/kf\/H818f4241e00c4a4383e69801a2e9fd69R.jpg\"\u003e\n\u003c\/div\u003e\n\u003cdiv\u003e \u003c\/div\u003e\n\u003cdiv\u003e \u003c\/div\u003e\n\u003cdiv\u003e\u003cspan\u003e※ If the temperature and humidity display LLL, please confirm whether the wiring of the SHT20 digital temperature and humidity sensor is correct and whether there is poor contact, you can try to reconnect the wiring.\u003c\/span\u003e\u003c\/div\u003e\n\u003cdiv\u003e \u003c\/div\u003e\n\u003cdiv\u003e\n\u003cimg alt=\"1(23)\" src=\"https:\/\/ae01.alicdn.com\/kf\/H12eb95c3e0d2444c96477c9c4e96c5e2r.jpg\"\u003e\u003cimg alt=\"1 (2)\" src=\"https:\/\/ae01.alicdn.com\/kf\/H4aec1fa943784e678b9d5a13ef92c840u.jpg\"\u003e\u003cimg alt=\"1 (9)\" src=\"https:\/\/ae01.alicdn.com\/kf\/H62f61e0071094feb8e4b5a95452126815.jpg\"\u003e\u003cimg alt=\"1 (15)\" src=\"https:\/\/ae01.alicdn.com\/kf\/H3015a4e6d81f490b9020dca461f7694bX.jpg\"\u003e\u003cimg alt=\"1 (18)\" src=\"https:\/\/ae01.alicdn.com\/kf\/He260f2df36064fe2af5530c7a561437ed.jpg\"\u003e\u003cimg alt=\"1 (20)\" src=\"https:\/\/ae01.alicdn.com\/kf\/He00db8acc649445db0f1f4fce6df2bf95.jpg\"\u003e\u003cimg alt=\"1 (22)\" src=\"https:\/\/ae01.alicdn.com\/kf\/H5e7b7c932bd44e159fcc998c54110021C.jpg\"\u003e\u003cimg alt=\"1 (4)\" src=\"https:\/\/ae01.alicdn.com\/kf\/H31b481ef695c453d88993756e902f3dec.jpg\"\u003e\u003cimg alt=\"1 (3)\" src=\"https:\/\/ae01.alicdn.com\/kf\/H72f864579840411fa481222392614398v.jpg\"\u003e\n\u003c\/div\u003e"}
 -
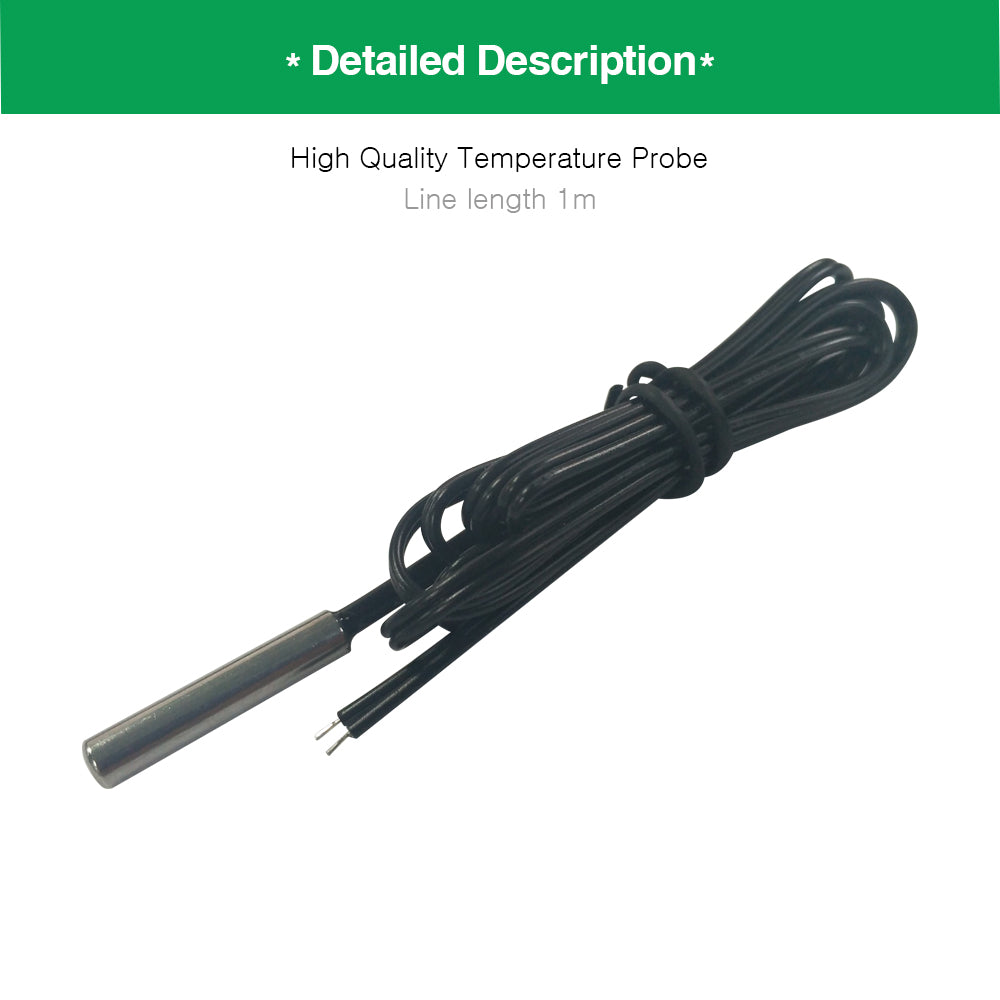
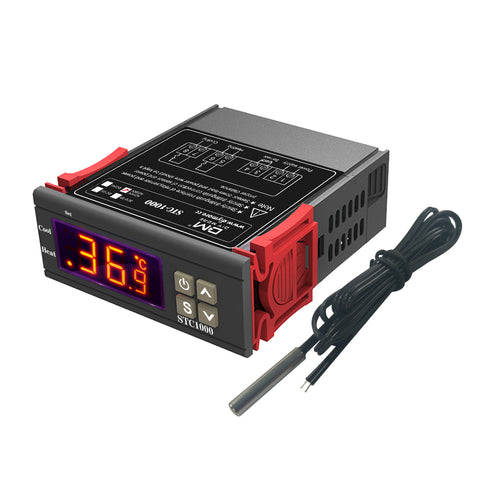 Translation missing: en.products.product.regular_price $10.99{"id":4616159920199,"title":"110V-220V LED Digital Temperature Controller Thermostat Thermoregulator for Incubator Heating Cooling Replace STC-1000 DTC1200","handle":"110v-220v-led-digital-temperature-controller-thermostat-thermoregulator-for-incubator-heating-cooling-replace-stc-1000-dtc1200","description":"\u003cdiv\u003e\u003cstrong\u003e\u003cspan\u003eDescription:\u003c\/span\u003e\u003c\/strong\u003e\u003c\/div\u003e\n\u003cdiv\u003e \u003c\/div\u003e\n\u003cdiv\u003e\n\u003cdiv\u003e\u003cspan\u003eProduct Name: Thermostat\u003c\/span\u003e\u003c\/div\u003e\n\u003cdiv\u003e\u003cspan\u003eProduct model: DTC1200\u003c\/span\u003e\u003c\/div\u003e\n\u003cdiv data-spm-anchor-id=\"a2g0o.detail.1000023.i0.766b67b1vR7Vg3\"\u003e\u003cspan\u003eSupply voltage: AC110~230V\u003c\/span\u003e\u003c\/div\u003e\n\u003cdiv data-spm-anchor-id=\"a2g0o.detail.1000023.i1.766b67b1vR7Vg3\"\u003e\u003cspan\u003eTemperature range: -40°C~+99°C\u003c\/span\u003e\u003c\/div\u003e\n\u003cdiv\u003e\u003cspan\u003eTemperature measurement accuracy: ±1 °C (-40 °C ~ +70 °C)\u003c\/span\u003e\u003c\/div\u003e\n\u003cdiv data-spm-anchor-id=\"a2g0o.detail.1000023.i2.766b67b1vR7Vg3\"\u003e\u003cspan\u003eSensor line length: 100cm\u003c\/span\u003e\u003c\/div\u003e\n\u003cdiv data-spm-anchor-id=\"a2g0o.detail.1000023.i3.766b67b1vR7Vg3\"\u003e\u003cspan\u003eThermostat size: 93mm*56mm*34mm\u003c\/span\u003e\u003c\/div\u003e\n\u003cdiv\u003e\u003cspan\u003eOutput capacity: cooling (compressor 3A) heating (10A\/250VAC)\u003c\/span\u003e\u003c\/div\u003e\n\u003cdiv\u003e \u003c\/div\u003e\n\u003cdiv\u003e\u003cspan\u003eSee parameter method:\u003c\/span\u003e\u003c\/div\u003e\n\u003cdiv\u003e \u003c\/div\u003e\n\u003cdiv\u003e\u003cspan\u003eWhen the thermostat is working normally, press and release \"▲\"the key once to display the temperature setting value; press and release \"▼\" the key once to display the temperature difference setting value. After 3 seconds, the temperature returns to the normal display state.\u003c\/span\u003e\u003c\/div\u003e\n\u003cdiv\u003e \u003c\/div\u003e\n\u003cdiv\u003e\u003cspan\u003eSetting parameter method:\u003c\/span\u003e\u003c\/div\u003e\n\u003cdiv\u003e \u003c\/div\u003e\n\u003cdiv\u003e\u003cspan\u003eWhen the thermostat is working normally, press \"S\" key and hold the button for more than 3 seconds to enter the modified parameter mode. The “Set” indicator lights up, the digital tube displays the code “F1” of the first menu item, and press the \"▲\" or \"▼\"key to up or down the code of the menu item. Press \"S\" the key to display the parameter setting value of the current menu, press \"S\" and hold the key, then press the \"▲\"or \"▼\" key to increase or decrease the parameter setting value of the current menu; press \"S\" key and hold the key, and press the \"▲\"or \"▼\" key to quickly increase the speed; Or down and display the parameter settings of the current menu.\u003c\/span\u003e\u003c\/div\u003e\n\u003cdiv\u003e\u003cspan\u003ePress and hold \"▲\"or \"▼\" the key at the same time to restore the parameters to the factory settings.\u003c\/span\u003e\u003c\/div\u003e\n\u003cdiv\u003e \u003c\/div\u003e\n\u003cdiv\u003e\u003cspan\u003eOperation instructions:\u003c\/span\u003e\u003c\/div\u003e\n\u003cdiv\u003e \u003c\/div\u003e\n\u003cdiv\u003e\u003cspan\u003e1.When the thermostat is working normally, press and hold the \"power button\" for more than 3 seconds to turn off the thermostat. When the thermostat is off, press and hold the \"power button\" for more than 3 seconds to open the thermostat.\u003c\/span\u003e\u003c\/div\u003e\n\u003cdiv\u003e\u003cspan\u003eWhen the thermostat is working normally, the digital tube displays the current temperature measurement value, and performs automatic recognition conversion of the cooling heating operation mode.\u003c\/span\u003e\u003c\/div\u003e\n\u003cdiv\u003e\u003cspan\u003e2.When the measured temperature ≥ temperature set value + temperature difference set value, enter the cooling state, the Cool indicator light is on, the cooling relay normally open contact is closed; the Cool indicator flashes, indicating that the cooling device is in the press delay protection state; when measuring the temperature ≤ temperature set value, the Cool indicator is off, and the normally open contact of the refrigeration relay is disconnected.\u003c\/span\u003e\u003c\/div\u003e\n\u003cdiv\u003e\u003cspan\u003e3.When the measured temperature ≤ temperature set value - temperature difference set value enters the heating state, the Heat indicator light is on, the heating relay normally open contact is closed; when the measured temperature ≥ temperature set value, the Heat indicator is off, the heating relay normally open contact disconnect.\u003c\/span\u003e\u003c\/div\u003e\n\u003cdiv\u003e \u003c\/div\u003e\n\u003cdiv data-spm-anchor-id=\"a2g0o.detail.1000023.i1.17566478417y5U\"\u003e\n\u003cp data-spm-anchor-id=\"a2g0o.detail.1000023.i0.17566478417y5U\"\u003e\u003cspan\u003eIndicator status description:\u003c\/span\u003e\u003c\/p\u003e\n\u003ctable border=\"1\" cellspacing=\"0\"\u003e\n\u003ctbody\u003e\n\u003ctr\u003e\n\u003ctd\u003e\n\u003cp align=\"center\"\u003e\u003cspan\u003eIndicator\u003c\/span\u003e\u003c\/p\u003e\n\u003c\/td\u003e\n\u003ctd\u003e\n\u003cp align=\"center\"\u003e\u003cspan\u003eFunction\u003c\/span\u003e\u003c\/p\u003e\n\u003c\/td\u003e\n\u003ctd\u003e\n\u003cp align=\"center\" data-spm-anchor-id=\"a2g0o.detail.1000023.i10.17566478417y5U\"\u003e\u003cspan\u003eNote\u003c\/span\u003e\u003c\/p\u003e\n\u003c\/td\u003e\n\u003c\/tr\u003e\n\u003ctr\u003e\n\u003ctd\u003e\n\u003cp align=\"center\" data-spm-anchor-id=\"a2g0o.detail.1000023.i4.17566478417y5U\"\u003e\u003cspan\u003eCool indicator\u003c\/span\u003e\u003c\/p\u003e\n\u003c\/td\u003e\n\u003ctd\u003e\n\u003cp align=\"center\" data-spm-anchor-id=\"a2g0o.detail.1000023.i5.17566478417y5U\"\u003e\u003cspan\u003eLight on:cooling work;\u003c\/span\u003e\u003c\/p\u003e\n\u003cp align=\"center\"\u003e\u003cspan\u003e Light off:cooling off;\u003c\/span\u003e\u003c\/p\u003e\n\u003cp align=\"center\"\u003e\u003cspan\u003eFlashing: press delay\u003c\/span\u003e\u003c\/p\u003e\n\u003c\/td\u003e\n\u003ctd rowspan=\"2\"\u003e\n\u003cp align=\"center\" data-spm-anchor-id=\"a2g0o.detail.1000023.i11.17566478417y5U\"\u003e\u003cspan\u003eCool and Heat Both indicator lights cannot be lit at the same time\u003c\/span\u003e\u003c\/p\u003e\n\u003c\/td\u003e\n\u003c\/tr\u003e\n\u003ctr\u003e\n\u003ctd\u003e\n\u003cp align=\"center\" data-spm-anchor-id=\"a2g0o.detail.1000023.i6.17566478417y5U\"\u003e\u003cspan\u003eHeat indicator\u003c\/span\u003e\u003c\/p\u003e\n\u003c\/td\u003e\n\u003ctd\u003e\n\u003cp align=\"center\" data-spm-anchor-id=\"a2g0o.detail.1000023.i7.17566478417y5U\"\u003e\u003cspan\u003eBright: heating work;\u003c\/span\u003e\u003c\/p\u003e\n\u003cp align=\"center\"\u003e\u003cspan\u003eoff: heating off\u003c\/span\u003e\u003c\/p\u003e\n\u003c\/td\u003e\n\u003c\/tr\u003e\n\u003ctr\u003e\n\u003ctd\u003e\n\u003cp align=\"center\" data-spm-anchor-id=\"a2g0o.detail.1000023.i8.17566478417y5U\"\u003e\u003cspan\u003eSet indicator\u003c\/span\u003e\u003c\/p\u003e\n\u003c\/td\u003e\n\u003ctd\u003e\n\u003cp align=\"center\" data-spm-anchor-id=\"a2g0o.detail.1000023.i9.17566478417y5U\"\u003e\u003cspan\u003eOn: parameter setting status\u003c\/span\u003e\u003c\/p\u003e\n\u003c\/td\u003e\n\u003ctd\u003e\n\u003cp align=\"center\"\u003e \u003c\/p\u003e\n\u003c\/td\u003e\n\u003c\/tr\u003e\n\u003c\/tbody\u003e\n\u003c\/table\u003e\n\u003cp\u003e \u003c\/p\u003e\n\u003cp\u003e\u003cspan\u003eMenu function description:\u003c\/span\u003e\u003c\/p\u003e\n\u003ctable border=\"1\" cellspacing=\"0\"\u003e\n\u003ctbody\u003e\n\u003ctr\u003e\n\u003ctd\u003e\n\u003cp align=\"center\" data-spm-anchor-id=\"a2g0o.detail.1000023.i13.17566478417y5U\"\u003e\u003cspan\u003eMenu identifier\u003c\/span\u003e\u003c\/p\u003e\n\u003c\/td\u003e\n\u003ctd\u003e\n\u003cp align=\"center\" data-spm-anchor-id=\"a2g0o.detail.1000023.i16.17566478417y5U\"\u003e\u003cspan\u003eMenu function\u003c\/span\u003e\u003c\/p\u003e\n\u003c\/td\u003e\n\u003ctd\u003e\n\u003cp align=\"center\" data-spm-anchor-id=\"a2g0o.detail.1000023.i17.17566478417y5U\"\u003e\u003cspan\u003eSetting range\u003c\/span\u003e\u003c\/p\u003e\n\u003c\/td\u003e\n\u003ctd\u003e\n\u003cp align=\"center\" data-spm-anchor-id=\"a2g0o.detail.1000023.i18.17566478417y5U\"\u003e\u003cspan\u003eFactory setting\u003c\/span\u003e\u003c\/p\u003e\n\u003c\/td\u003e\n\u003c\/tr\u003e\n\u003ctr\u003e\n\u003ctd\u003e\n\u003cp align=\"center\" data-spm-anchor-id=\"a2g0o.detail.1000023.i12.17566478417y5U\"\u003e\u003cspan\u003eF1\u003c\/span\u003e\u003c\/p\u003e\n\u003c\/td\u003e\n\u003ctd\u003e\n\u003cp align=\"center\" data-spm-anchor-id=\"a2g0o.detail.1000023.i14.17566478417y5U\"\u003e\u003cspan\u003eTemperature setting value\u003c\/span\u003e\u003c\/p\u003e\n\u003c\/td\u003e\n\u003ctd\u003e\n\u003cp align=\"center\" data-spm-anchor-id=\"a2g0o.detail.1000023.i15.17566478417y5U\"\u003e\u003cspan\u003e-40.0~99.9℃\u003c\/span\u003e\u003c\/p\u003e\n\u003c\/td\u003e\n\u003ctd\u003e\n\u003cp align=\"center\" data-spm-anchor-id=\"a2g0o.detail.1000023.i19.17566478417y5U\"\u003e\u003cspan\u003e10.0℃\u003c\/span\u003e\u003c\/p\u003e\n\u003c\/td\u003e\n\u003c\/tr\u003e\n\u003ctr\u003e\n\u003ctd\u003e\n\u003cp align=\"center\" data-spm-anchor-id=\"a2g0o.detail.1000023.i20.17566478417y5U\"\u003e\u003cspan\u003eF2\u003c\/span\u003e\u003c\/p\u003e\n\u003c\/td\u003e\n\u003ctd\u003e\n\u003cp align=\"center\" data-spm-anchor-id=\"a2g0o.detail.1000023.i21.17566478417y5U\"\u003e\u003cspan\u003eTemperature difference setting value\u003c\/span\u003e\u003c\/p\u003e\n\u003c\/td\u003e\n\u003ctd\u003e\n\u003cp align=\"center\" data-spm-anchor-id=\"a2g0o.detail.1000023.i22.17566478417y5U\"\u003e\u003cspan\u003e0.3~10.0℃\u003c\/span\u003e\u003c\/p\u003e\n\u003c\/td\u003e\n\u003ctd\u003e\n\u003cp align=\"center\" data-spm-anchor-id=\"a2g0o.detail.1000023.i23.17566478417y5U\"\u003e\u003cspan\u003e0.5℃\u003c\/span\u003e\u003c\/p\u003e\n\u003c\/td\u003e\n\u003c\/tr\u003e\n\u003ctr\u003e\n\u003ctd\u003e\n\u003cp align=\"center\" data-spm-anchor-id=\"a2g0o.detail.1000023.i24.17566478417y5U\"\u003e\u003cspan\u003eF3\u003c\/span\u003e\u003c\/p\u003e\n\u003c\/td\u003e\n\u003ctd\u003e\n\u003cp align=\"center\" data-spm-anchor-id=\"a2g0o.detail.1000023.i25.17566478417y5U\"\u003e\u003cspan\u003ePress delay\u003c\/span\u003e\u003c\/p\u003e\n\u003c\/td\u003e\n\u003ctd\u003e\n\u003cp align=\"center\" data-spm-anchor-id=\"a2g0o.detail.1000023.i26.17566478417y5U\"\u003e\u003cspan\u003e1~10 min\u003c\/span\u003e\u003c\/p\u003e\n\u003c\/td\u003e\n\u003ctd\u003e\n\u003cp align=\"center\" data-spm-anchor-id=\"a2g0o.detail.1000023.i27.17566478417y5U\"\u003e\u003cspan\u003e3 min\u003c\/span\u003e\u003c\/p\u003e\n\u003c\/td\u003e\n\u003c\/tr\u003e\n\u003ctr\u003e\n\u003ctd data-spm-anchor-id=\"a2g0o.detail.1000023.i28.17566478417y5U\"\u003e\n\u003cp align=\"center\"\u003e\u003cspan\u003eF4\u003c\/span\u003e\u003c\/p\u003e\n\u003c\/td\u003e\n\u003ctd\u003e\n\u003cp align=\"center\" data-spm-anchor-id=\"a2g0o.detail.1000023.i29.17566478417y5U\"\u003e\u003cspan\u003eTemperature correction\u003c\/span\u003e\u003c\/p\u003e\n\u003c\/td\u003e\n\u003ctd\u003e\n\u003cp align=\"center\" data-spm-anchor-id=\"a2g0o.detail.1000023.i30.17566478417y5U\"\u003e\u003cspan\u003e-10.0~10.0℃\u003c\/span\u003e\u003c\/p\u003e\n\u003c\/td\u003e\n\u003ctd\u003e\n\u003cp align=\"center\" data-spm-anchor-id=\"a2g0o.detail.1000023.i31.17566478417y5U\"\u003e\u003cspan\u003e0℃\u003c\/span\u003e\u003c\/p\u003e\n\u003c\/td\u003e\n\u003c\/tr\u003e\n\u003c\/tbody\u003e\n\u003c\/table\u003e\n\u003cp\u003e \u003c\/p\u003e\n\u003cp\u003e\u003cspan\u003eWiring Diagram:\u003c\/span\u003e\u003c\/p\u003e\n\u003cp\u003e\u003cspan\u003e\u003cimg alt=\"图片1\" src=\"https:\/\/ae01.alicdn.com\/kf\/H001eadcd3b8e49109ce4fd472825de6dW.jpg\"\u003e\u003c\/span\u003e\u003c\/p\u003e\n\u003cp\u003e \u003c\/p\u003e\n\u003cdiv\u003e\n\u003cdiv\u003e \u003c\/div\u003e\n\u003cdiv\u003e\u003cspan\u003eRepair System Data:\u003c\/span\u003e\u003c\/div\u003e\n\u003cdiv\u003e \u003c\/div\u003e\n\u003cdiv\u003e\u003cspan\u003eAfter the thermostat is powered on, first check whether the parameter settings are correct. If an error is detected, “Er” is displayed. Pressing any key will restore the default parameter settings and work normally. It is recommended to reset the parameters at this time.\u003c\/span\u003e\u003c\/div\u003e\n\u003cdiv\u003e \u003c\/div\u003e\n\u003cdiv\u003e\u003cspan\u003eSystem Code, reason and action:\u003c\/span\u003e\u003c\/div\u003e\n\u003cdiv\u003e \u003c\/div\u003e\n\u003cdiv\u003e\u003cspan\u003eSensor fault alarm: When the temperature probe loop is short-circuited or open-circuit fault, the thermostat starts the probe fault alarm mode, closes all execution states, and the digital tube displays “EE”. After the fault is cleared, press any key to return to the normal working mode.\u003c\/span\u003e\u003c\/div\u003e\n\u003cdiv\u003e\u003cspan\u003eOver-temperature alarm: When the temperature measurement exceeds the temperature measurement range, the thermostat starts the over-temperature limit fault alarm mode, and all execution states are turned off. The digital tube displays “HH”. When the temperature returns to the normal measurement range, press any key. Return to normal working mode.\u003c\/span\u003e\u003c\/div\u003e\n\u003cdiv\u003e \u003c\/div\u003e\n\u003cdiv\u003e\u003cspan\u003eSafety rules:\u003c\/span\u003e\u003c\/div\u003e\n\u003cdiv\u003e \u003c\/div\u003e\n\u003cdiv\u003e\u003cspan\u003e☆ Danger:\u003c\/span\u003e\u003c\/div\u003e\n\u003cdiv\u003e\u003cspan\u003e1. Strictly distinguish the sensor lead, power line and output relay interface, can not be connected incorrectly, the relay can not be overloaded;\u003c\/span\u003e\u003c\/div\u003e\n\u003cdiv\u003e\u003cspan\u003e2. All wiring changes must be made with the power off.\u003c\/span\u003e\u003c\/div\u003e\n\u003cdiv\u003e\u003cspan\u003e☆ Warning:\u003c\/span\u003e\u003c\/div\u003e\n\u003cdiv\u003e\u003cspan\u003e1. This thermostat is forbidden to be used in water or excessively humid environment. It is forbidden to use in high temperature, strong electromagnetic interference and strong corrosive environment.\u003c\/span\u003e\u003c\/div\u003e\n\u003cdiv\u003e\u003cspan\u003e☆ Note:\u003c\/span\u003e\u003c\/div\u003e\n\u003cdiv\u003e\u003cspan\u003e1. The supply voltage should be consistent with the voltage marked by the thermostat and ensure the stability of the supply voltage;\u003c\/span\u003e\u003c\/div\u003e\n\u003cdiv\u003e\u003cspan\u003e2. To avoid possible interference, it is recommended that the sensor leads be at an appropriate distance from the power line.\u003c\/span\u003e\u003c\/div\u003e\n\u003cdiv\u003e \u003c\/div\u003e\n\u003cdiv\u003e \u003c\/div\u003e\n\u003cdiv\u003e\u003cstrong\u003e\u003cspan\u003ePackage Included:\u003c\/span\u003e\u003c\/strong\u003e\u003c\/div\u003e\n\u003cdiv\u003e \u003c\/div\u003e\n\u003cdiv\u003e\u003cspan\u003e1 x DTC1200 Intellligent Temperature Controller\u003c\/span\u003e\u003c\/div\u003e\n\u003cdiv\u003e\u003cspan\u003e1 x Temperature sensor\u003c\/span\u003e\u003c\/div\u003e\n\u003cdiv\u003e\u003cspan\u003e1 x Instruction manual\u003c\/span\u003e\u003c\/div\u003e\n\u003cdiv\u003e\u003cspan\u003e1 x Packing box\u003c\/span\u003e\u003c\/div\u003e\n\u003cdiv\u003e\u003cspan\u003e\u003c\/span\u003e\u003c\/div\u003e\n\u003c\/div\u003e\n\u003c\/div\u003e\n\u003c\/div\u003e\n\u003cdiv\u003e\n\u003cp\u003e\u003cimg alt=\"pictures2\" src=\"https:\/\/ae01.alicdn.com\/kf\/H48e07ca430b143a1bd6390f007d70893r.jpg\"\u003e\u003c\/p\u003e\n\u003cp\u003e\u003cimg alt=\"XA0008 (3)\" src=\"https:\/\/ae01.alicdn.com\/kf\/H909cdc0df9ef48b2909767f61c05f908Y.jpg\"\u003e\u003cimg alt=\"XA0008 (4)\" src=\"https:\/\/ae01.alicdn.com\/kf\/He57b51af913d453bb4631f7f71fac13e1.jpg\"\u003e\u003cimg alt=\"XA0008 (5)\" src=\"https:\/\/ae01.alicdn.com\/kf\/H1d793d42fd7945cba1d4202db1861873q.jpg\"\u003e\u003cimg alt=\"XA0008 (24)\" src=\"https:\/\/ae01.alicdn.com\/kf\/Hddf60c92d3bf47e7a4377478d2ae0f4c0.jpg\"\u003e\u003cimg alt=\"XA0008 (7)\" src=\"https:\/\/ae01.alicdn.com\/kf\/H81eb27e7121545b799fea5521905e3c7U.jpg\"\u003e\u003cimg alt=\"XA0008 (6)\" src=\"https:\/\/ae01.alicdn.com\/kf\/H9b1a57d5932b47359fe4cb26b4df8221z.jpg\"\u003e\u003cimg alt=\"XA0008 (1)\" src=\"https:\/\/ae01.alicdn.com\/kf\/H3b043d774f204356b0278e4786d01f14k.jpg\"\u003e\u003cimg alt=\"XA0008 (9)\" src=\"https:\/\/ae01.alicdn.com\/kf\/H97fb15979930424092f839c9a8a3830fK.jpg\"\u003e\u003cimg alt=\"XA0008 (10)\" src=\"https:\/\/ae01.alicdn.com\/kf\/H6e4b81a56f9949e385541d0be905a572G.jpg\"\u003e\u003cimg alt=\"XA0008 (11)\" src=\"https:\/\/ae01.alicdn.com\/kf\/Hd0829f171f2f41bdb34c36cff898940cl.jpg\"\u003e\u003cimg alt=\"XA0008 (12)\" src=\"https:\/\/ae01.alicdn.com\/kf\/Hc210386716324310a4aa3248b0a8a09dp.jpg\"\u003e\u003cimg alt=\"XA0008 (19)\" src=\"https:\/\/ae01.alicdn.com\/kf\/H2743991dcfaf488b936cea38071fdc22l.jpg\"\u003e\u003cimg alt=\"XA0008 (21)\" src=\"https:\/\/ae01.alicdn.com\/kf\/H5d8b10d76d27477aa6d4f2e96f92b18fw.jpg\"\u003e\u003c\/p\u003e\n\u003c\/div\u003e\n\u003cp\u003e \u003c\/p\u003e\n\u003cp\u003e \u003c\/p\u003e\n\u003cp\u003e\u003cspan\u003e\u003cstrong\u003eDTC1100 DTC1110 DTC2210 DTC2200 Temperature Controller\u003c\/strong\u003e\u003c\/span\u003e\u003c\/p\u003e\n\u003cdiv\u003e\u003cspan\u003eProduct Name: Temperature Controller \u003c\/span\u003e\u003c\/div\u003e\n\u003cdiv\u003e\u003cspan\u003eProduct Models: DTC1100; DTC1110; DTC2210; DTC2200 \u003c\/span\u003e\u003c\/div\u003e\n\u003cdiv\u003e\u003cspan\u003ePower supply: AC110V-220V\u003c\/span\u003e\u003c\/div\u003e\n\u003cdiv\u003e\u003cspan\u003eTemperature range: -40°C~+99°C\u003c\/span\u003e\u003c\/div\u003e\n\u003cdiv\u003e\u003cspan\u003eTemperature measurement accuracy: ±1°C (-40 °C ~ +70 °C)\u003c\/span\u003e\u003c\/div\u003e\n\u003cdiv\u003e\u003cspan\u003eThermostat size: 93mm*56mm*34mm\u003c\/span\u003e\u003c\/div\u003e\n\u003cdiv\u003e\u003cspan\u003eRelay contact capacity: Cool(10WC250V); Heat(10A\/AC250V)\u003c\/span\u003e\u003c\/div\u003e\n\u003cdiv\u003e \u003c\/div\u003e\n\u003cdiv\u003e\u003cspan\u003e\u003cimg alt=\"1 (1)\" src=\"https:\/\/ae01.alicdn.com\/kf\/H55d10cb072154207bcdd46dd1dafbc8fh.jpg\"\u003e\u003cimg alt=\"1 (4)\" src=\"https:\/\/ae01.alicdn.com\/kf\/H2f4f0f7cfec445b58c5e00fbdd8435872.jpg\"\u003e\u003cimg alt=\"1 (2)\" src=\"https:\/\/ae01.alicdn.com\/kf\/Hdaf8974533f04094ac13d6f88bd4a970o.jpg\"\u003e\u003cimg alt=\"接线图 (1)\" src=\"https:\/\/ae01.alicdn.com\/kf\/Ha2a95c321166465591f5af870fd231bfp.jpg\"\u003e\u003cimg alt=\"1 (13)\" src=\"https:\/\/ae01.alicdn.com\/kf\/He9464c5ea5c24e168157faff9566d0ecj.jpg\"\u003e\u003cimg alt=\"1 (18)\" src=\"https:\/\/ae01.alicdn.com\/kf\/H44dfe2dd19c14a14bdd1e3d351e03a4bE.jpg\"\u003e\u003cimg alt=\"01 (1)\" src=\"https:\/\/ae01.alicdn.com\/kf\/Ha529d255334543f68affa9a95cb27f16o.jpg\"\u003e\u003cimg alt=\"4\" src=\"https:\/\/ae01.alicdn.com\/kf\/H312943e7f91e4b709b5d642e25598a6a5.jpg\"\u003e\u003cimg alt=\"15\" src=\"https:\/\/ae01.alicdn.com\/kf\/Hb93149fbec8e4329a4c090147de3983fq.jpg\"\u003e\u003cimg alt=\"接线图 (1)\" src=\"https:\/\/ae01.alicdn.com\/kf\/H0e9b53e72d594dde8c46be7d94b346b9b.jpg\"\u003e\u003cimg alt=\"10\" src=\"https:\/\/ae01.alicdn.com\/kf\/Ha4ae55d77d754955bc11801c20abde77F.jpg\"\u003e\u003cimg alt=\"16\" src=\"https:\/\/ae01.alicdn.com\/kf\/H516b5c2e4e7140f5952500c8e005c7b6t.jpg\"\u003e\u003cimg alt=\"1 (1)\" src=\"https:\/\/ae01.alicdn.com\/kf\/H72183dd8d1fc4fe4b6deb8b28ee279cby.jpg\"\u003e\u003cimg alt=\"1 (3)\" src=\"https:\/\/ae01.alicdn.com\/kf\/H1c848b67f8704717802fa010419962b0m.jpg\"\u003e\u003cimg alt=\"1 (4)\" src=\"https:\/\/ae01.alicdn.com\/kf\/H5f22b2bb585948da837a0df46163a52ea.jpg\"\u003e\u003cimg alt=\"1 (8)\" src=\"https:\/\/ae01.alicdn.com\/kf\/Hb0db99a5e1424609a10aea7486f295ab5.jpg\"\u003e\u003cimg alt=\"1 (17)\" src=\"https:\/\/ae01.alicdn.com\/kf\/Hfb6298937ee7447fb751dd6aa5b96549O.jpg\"\u003e\u003cimg alt=\"1 (19)\" src=\"https:\/\/ae01.alicdn.com\/kf\/Hbf41fac7ac3a42fdb90f17b8ff0d308d2.jpg\"\u003e\u003cimg alt=\"1 (20)\" src=\"https:\/\/ae01.alicdn.com\/kf\/H4a3c5770430945089241d33dafef31fcm.jpg\"\u003e\u003cimg alt=\"1 (1)\" src=\"https:\/\/ae01.alicdn.com\/kf\/Hc39891a3e23d41b5968309454950c8bcI.jpg\"\u003e\u003cimg alt=\"1 (2)\" src=\"https:\/\/ae01.alicdn.com\/kf\/H4522829b7e6e44dc9603abf7792e0647G.jpg\"\u003e\u003cimg alt=\"接线图\" src=\"https:\/\/ae01.alicdn.com\/kf\/Hfe019fff700840c6ad7f4ba4869ef0eaq.jpg\"\u003e\u003cimg alt=\"1 (12)\" src=\"https:\/\/ae01.alicdn.com\/kf\/H1ddb9da69f8b4b6eb775e093490116feg.jpg\"\u003e\u003cimg alt=\"1 (18)\" src=\"https:\/\/ae01.alicdn.com\/kf\/H42755cdfd6174fe3b72473d7592b07fdr.jpg\"\u003e\u003cimg alt=\"1 (20)\" src=\"https:\/\/ae01.alicdn.com\/kf\/H2350b4b9bf9b48a78676cfa40085604fK.jpg\"\u003e\u003cimg alt=\"1 (21)\" src=\"https:\/\/ae01.alicdn.com\/kf\/H62b80cb1bda24ed8841e2f13742847a8d.jpg\"\u003e\u003c\/span\u003e\u003c\/div\u003e\n\u003cdiv\u003e \u003c\/div\u003e\n\u003cdiv\u003e \u003c\/div\u003e\n\u003cdiv\u003e \u003c\/div\u003e\n\u003cdiv\u003e \u003c\/div\u003e\n\u003cdiv\u003e\u003cspan\u003eDTC3200 Temperature and Humidity Controller\u003c\/span\u003e\u003c\/div\u003e\n\u003cdiv\u003e \u003c\/div\u003e\n\u003cdiv\u003e\u003cspan\u003eProduct Name: Temperature and Humidity Controller\u003c\/span\u003e\u003c\/div\u003e\n\u003cdiv\u003e\u003cspan\u003eProduct Model: DTC3200\u003c\/span\u003e\u003c\/div\u003e\n\u003cdiv\u003e\u003cspan\u003ePower supply voltage: AC 110 ~ 230V\u003c\/span\u003e\u003c\/div\u003e\n\u003cdiv\u003e\u003cspan\u003ePower supply frequency: 50 \/ 60Hz\u003c\/span\u003e\u003c\/div\u003e\n\u003cdiv\u003e\u003cspan\u003eTemperature measurement range: -20 ~ 60 ℃\u003c\/span\u003e\u003c\/div\u003e\n\u003cdiv\u003e\u003cspan\u003eHumidity measurement range: 0% ~ 100% RH\u003c\/span\u003e\u003c\/div\u003e\n\u003cdiv\u003e\u003cspan\u003eTemperature measurement accuracy: 0.3 ℃\u003c\/span\u003e\u003c\/div\u003e\n\u003cdiv\u003e\u003cspan\u003eHumidity measurement accuracy: 3%\u003c\/span\u003e\u003c\/div\u003e\n\u003cdiv\u003e\u003cspan\u003eOutput control: Relay output\u003c\/span\u003e\u003c\/div\u003e\n\u003cdiv\u003e\u003cspan\u003eOutput power: MAX 10A\u003c\/span\u003e\u003c\/div\u003e\n\u003cdiv\u003e \u003c\/div\u003e\n\u003cdiv\u003e\u003cspan\u003eSetting method: start value \u0026lt;stop value (the program automatically determines the working mode as heating \/ humidification mode)\u003c\/span\u003e\u003c\/div\u003e\n\u003cdiv\u003e\u003cspan\u003eSetting method: start value\u0026gt; stop value (the program automatically determines the working mode to be cooling \/ dehumidifying mode)\u003c\/span\u003e\u003c\/div\u003e\n\u003cdiv\u003e\u003cspan\u003eHeating \/ cooling mode setting\u003c\/span\u003e\u003c\/div\u003e\n\u003cdiv\u003e\u003cspan\u003eSetting method: setting (starting temperature): long press the ▲ button, the starting temperature flashes, and the starting temperature value is set by the ▲ ▼ button\u003c\/span\u003e\u003c\/div\u003e\n\u003cdiv\u003e\u003cspan\u003eSetting (stop temperature): long press the ▼ button to stop the temperature flashing, set the stop temperature value by ▲ ▼ button\u003c\/span\u003e\u003c\/div\u003e\n\u003cdiv\u003e \u003c\/div\u003e\n\u003cdiv\u003e\u003cspan\u003eHeating use case: control the water heater, heating to 65 ℃ to stop, the temperature drops to 50 ℃ to start heating again\u003c\/span\u003e\u003c\/div\u003e\n\u003cdiv\u003e\u003cspan\u003eThe first step: heating working mode, start temperature \u0026lt;stop temperature\u003c\/span\u003e\u003c\/div\u003e\n\u003cdiv\u003e\u003cspan\u003eStep 2: Press and hold the ▲ button, the starting temperature flashes, and set the starting temperature to 50 ℃ via the ▲ ▼ button\u003c\/span\u003e\u003c\/div\u003e\n\u003cdiv\u003e\u003cspan\u003eThe third step: long press the ▼ button to stop the temperature flashing, set the stop temperature to 65 ℃ through the ▲ ▼ button, the setting is complete!\u003c\/span\u003e\u003c\/div\u003e\n\u003cdiv\u003e\u003cspan\u003eRefrigeration use case: use in the farm, the fan ventilation stops at 26 ℃, and the temperature rises to 30 ℃ to start ventilation again\u003c\/span\u003e\u003c\/div\u003e\n\u003cdiv\u003e\u003cspan\u003eStep 1: Refrigeration working mode, start temperature\u0026gt; stop temperature\u003c\/span\u003e\u003c\/div\u003e\n\u003cdiv\u003e\u003cspan\u003eStep 2: Press and hold the ▲ button, the starting temperature flashes, and set the starting temperature to 30 ℃ via the ▲ ▼ button\u003c\/span\u003e\u003c\/div\u003e\n\u003cdiv\u003e\u003cspan\u003eStep 3: Press and hold the ▼ button to stop the temperature flashing, and set the stop temperature to 26 ° C with the ▲ ▼ button. The setting is complete!\u003c\/span\u003e\u003c\/div\u003e\n\u003cdiv\u003e \u003c\/div\u003e\n\u003cdiv\u003e\u003cspan\u003eHumidification \/ dehumidification mode settings:\u003c\/span\u003e\u003c\/div\u003e\n\u003cdiv\u003e\u003cspan\u003eSetting (Start Humidity): Long press the △ key, the start humidity value flashes, set the start humidity value by the △ ▽ key. Set [Stop Humidity]: Long press the △ key, stop the humidity value flashing, and set the stop humidity by the △ ▽ key value.\u003c\/span\u003e\u003c\/div\u003e\n\u003cdiv\u003e \u003c\/div\u003e\n\u003cdiv\u003e\u003cspan\u003eExamples of humidification: Fresh supermarket humidification, control humidifier 50% RH to start humidification, humidification to 80% RH to stop humidification.\u003c\/span\u003e\u003c\/div\u003e\n\u003cdiv\u003e \u003c\/div\u003e\n\u003cdiv\u003e\u003cspan\u003eSetup steps:\u003c\/span\u003e\u003c\/div\u003e\n\u003cdiv\u003e\u003cspan\u003e Step 1: Press and hold the △ key for 3 seconds to start the humidity value flashing, and set the start humidity value to 50% RH.\u003c\/span\u003e\u003c\/div\u003e\n\u003cdiv\u003e\u003cspan\u003e Step 2: Press and hold the ▽ key for 3 seconds to stop the humidity value flashing, set the value to 80% RH, the setting is completed, press the button for 5 seconds without operation, and automatically return to the normal display state\u003c\/span\u003e\u003c\/div\u003e\n\u003cdiv\u003e \u003c\/div\u003e\n\u003cdiv\u003e\u003cspan\u003eDehumidification example: workshop control exhaust dehumidification system, humidity 70% RH starts dehumidification, humidity 40% RH stops dehumidification\u003c\/span\u003e\u003c\/div\u003e\n\u003cdiv\u003e \u003c\/div\u003e\n\u003cdiv\u003e\u003cspan\u003eSetup steps:\u003c\/span\u003e\u003c\/div\u003e\n\u003cdiv\u003e\u003cspan\u003e Step 1: Press and hold the △ key for 3 seconds to start the humidity value flashing, and set the start humidity value to 40% RH.\u003c\/span\u003e\u003c\/div\u003e\n\u003cdiv\u003e\u003cspan\u003e Step 2: Press and hold the ▽ key for 3 seconds to stop the humidity value from flashing, set the value to 70% RH, the setting is completed, press the button for 5 seconds without operation, and automatically return to the normal display state\u003c\/span\u003e\u003c\/div\u003e\n\u003cdiv\u003e \u003c\/div\u003e\n\u003cdiv\u003e \u003c\/div\u003e\n\u003cdiv\u003e\u003cspan\u003eTemperature correction:\u003c\/span\u003e\u003c\/div\u003e\n\u003cdiv\u003e\u003cspan\u003eSimultaneously press the ▲ ▼ key for 3 seconds to start the temperature digit flashing, and use the ▲ ▼ key to set the start temperature correction value; after the setting is completed, press the button for 5 seconds without operation, and automatically return to the normal display state.\u003c\/span\u003e\u003c\/div\u003e\n\u003cdiv\u003e \u003c\/div\u003e\n\u003cdiv\u003e\u003cspan\u003eHumidity correction:\u003c\/span\u003e\u003c\/div\u003e\n\u003cdiv\u003e\u003cspan\u003eSimultaneously press the △ ▽ key for 3 seconds to start the humidity digit flashing, and set the humidity correction value by the △ ▽ key; after the setting is completed, press the button for 5 seconds without operation, and it will automatically return to the normal display state.\u003c\/span\u003e\u003c\/div\u003e\n\u003cdiv\u003e \u003c\/div\u003e\n\u003cdiv\u003e\u003cspan\u003eWiring instructions:\u003c\/span\u003e\u003c\/div\u003e\n\u003cdiv\u003e \u003c\/div\u003e\n\u003cdiv\u003e \u003cimg alt=\"11\" src=\"https:\/\/ae01.alicdn.com\/kf\/H818f4241e00c4a4383e69801a2e9fd69R.jpg\"\u003e\n\u003c\/div\u003e\n\u003cdiv\u003e \u003c\/div\u003e\n\u003cdiv\u003e \u003c\/div\u003e\n\u003cdiv\u003e\u003cspan\u003e※ If the temperature and humidity display LLL, please confirm whether the wiring of the SHT20 digital temperature and humidity sensor is correct and whether there is poor contact, you can try to reconnect the wiring.\u003c\/span\u003e\u003c\/div\u003e\n\u003cdiv\u003e \u003c\/div\u003e\n\u003cdiv\u003e\n\u003cimg alt=\"1(23)\" src=\"https:\/\/ae01.alicdn.com\/kf\/H12eb95c3e0d2444c96477c9c4e96c5e2r.jpg\"\u003e\u003cimg alt=\"1 (2)\" src=\"https:\/\/ae01.alicdn.com\/kf\/H4aec1fa943784e678b9d5a13ef92c840u.jpg\"\u003e\u003cimg alt=\"1 (9)\" src=\"https:\/\/ae01.alicdn.com\/kf\/H62f61e0071094feb8e4b5a95452126815.jpg\"\u003e\u003cimg alt=\"1 (15)\" src=\"https:\/\/ae01.alicdn.com\/kf\/H3015a4e6d81f490b9020dca461f7694bX.jpg\"\u003e\u003cimg alt=\"1 (18)\" src=\"https:\/\/ae01.alicdn.com\/kf\/He260f2df36064fe2af5530c7a561437ed.jpg\"\u003e\u003cimg alt=\"1 (20)\" src=\"https:\/\/ae01.alicdn.com\/kf\/He00db8acc649445db0f1f4fce6df2bf95.jpg\"\u003e\u003cimg alt=\"1 (22)\" src=\"https:\/\/ae01.alicdn.com\/kf\/H5e7b7c932bd44e159fcc998c54110021C.jpg\"\u003e\u003cimg alt=\"1 (4)\" src=\"https:\/\/ae01.alicdn.com\/kf\/H31b481ef695c453d88993756e902f3dec.jpg\"\u003e\u003cimg alt=\"1 (3)\" src=\"https:\/\/ae01.alicdn.com\/kf\/H72f864579840411fa481222392614398v.jpg\"\u003e\n\u003c\/div\u003e","published_at":"2020-05-04T20:03:25+08:00","created_at":"2020-05-04T20:20:56+08:00","vendor":"diymore","type":"Thermostat","tags":[],"price":1399,"price_min":1399,"price_max":1399,"available":true,"price_varies":false,"compare_at_price":null,"compare_at_price_min":0,"compare_at_price_max":0,"compare_at_price_varies":false,"variants":[{"id":32174110441543,"title":"AC 110V-220V DTC2210 Dual display","option1":"AC 110V-220V DTC2210 Dual display","option2":null,"option3":null,"sku":"XA0022","requires_shipping":true,"taxable":true,"featured_image":null,"available":true,"name":"110V-220V LED Digital Temperature Controller Thermostat Thermoregulator for Incubator Heating Cooling Replace STC-1000 DTC1200 - AC 110V-220V DTC2210 Dual display","public_title":"AC 110V-220V DTC2210 Dual display","options":["AC 110V-220V DTC2210 Dual display"],"price":1399,"weight":0,"compare_at_price":null,"inventory_management":"shopify","barcode":"","requires_selling_plan":false,"selling_plan_allocations":[],"quantity_rule":{"min":1,"max":null,"increment":1}},{"id":32174110474311,"title":"AC 110V-220V DTC1100 Dual display","option1":"AC 110V-220V DTC1100 Dual display","option2":null,"option3":null,"sku":"XA0021","requires_shipping":true,"taxable":true,"featured_image":null,"available":true,"name":"110V-220V LED Digital Temperature Controller Thermostat Thermoregulator for Incubator Heating Cooling Replace STC-1000 DTC1200 - AC 110V-220V DTC1100 Dual display","public_title":"AC 110V-220V DTC1100 Dual display","options":["AC 110V-220V DTC1100 Dual display"],"price":1399,"weight":0,"compare_at_price":null,"inventory_management":"shopify","barcode":"","requires_selling_plan":false,"selling_plan_allocations":[],"quantity_rule":{"min":1,"max":null,"increment":1}},{"id":32174110539847,"title":"AC 110V-220V DTC3200 Dual display","option1":"AC 110V-220V DTC3200 Dual display","option2":null,"option3":null,"sku":"XA0024","requires_shipping":true,"taxable":true,"featured_image":null,"available":true,"name":"110V-220V LED Digital Temperature Controller Thermostat Thermoregulator for Incubator Heating Cooling Replace STC-1000 DTC1200 - AC 110V-220V DTC3200 Dual display","public_title":"AC 110V-220V DTC3200 Dual display","options":["AC 110V-220V DTC3200 Dual display"],"price":1399,"weight":0,"compare_at_price":null,"inventory_management":"shopify","barcode":"","requires_selling_plan":false,"selling_plan_allocations":[],"quantity_rule":{"min":1,"max":null,"increment":1}},{"id":32174110572615,"title":"AC 110V-220V DTC1100","option1":"AC 110V-220V DTC1100","option2":null,"option3":null,"sku":"XA0020","requires_shipping":true,"taxable":true,"featured_image":null,"available":true,"name":"110V-220V LED Digital Temperature Controller Thermostat Thermoregulator for Incubator Heating Cooling Replace STC-1000 DTC1200 - AC 110V-220V DTC1100","public_title":"AC 110V-220V DTC1100","options":["AC 110V-220V DTC1100"],"price":1399,"weight":0,"compare_at_price":null,"inventory_management":"shopify","barcode":"","requires_selling_plan":false,"selling_plan_allocations":[],"quantity_rule":{"min":1,"max":null,"increment":1}},{"id":32174110605383,"title":"AC 110V-220V DTC2200","option1":"AC 110V-220V DTC2200","option2":null,"option3":null,"sku":"XA0023","requires_shipping":true,"taxable":true,"featured_image":null,"available":true,"name":"110V-220V LED Digital Temperature Controller Thermostat Thermoregulator for Incubator Heating Cooling Replace STC-1000 DTC1200 - AC 110V-220V DTC2200","public_title":"AC 110V-220V DTC2200","options":["AC 110V-220V DTC2200"],"price":1399,"weight":0,"compare_at_price":null,"inventory_management":"shopify","barcode":"","requires_selling_plan":false,"selling_plan_allocations":[],"quantity_rule":{"min":1,"max":null,"increment":1}},{"id":32174110638151,"title":"AC 110V-220V DTC1200","option1":"AC 110V-220V DTC1200","option2":null,"option3":null,"sku":"XA0008","requires_shipping":true,"taxable":true,"featured_image":null,"available":true,"name":"110V-220V LED Digital Temperature Controller Thermostat Thermoregulator for Incubator Heating Cooling Replace STC-1000 DTC1200 - AC 110V-220V DTC1200","public_title":"AC 110V-220V DTC1200","options":["AC 110V-220V DTC1200"],"price":1399,"weight":0,"compare_at_price":null,"inventory_management":"shopify","barcode":"","requires_selling_plan":false,"selling_plan_allocations":[],"quantity_rule":{"min":1,"max":null,"increment":1}}],"images":["\/\/www.diymore.cc\/cdn\/shop\/products\/1_1_423.jpg?v=1588701927","\/\/www.diymore.cc\/cdn\/shop\/products\/1_8_460.jpg?v=1588701927","\/\/www.diymore.cc\/cdn\/shop\/products\/1_9_135.jpg?v=1588701927","\/\/www.diymore.cc\/cdn\/shop\/products\/1_16_853.jpg?v=1588701927","\/\/www.diymore.cc\/cdn\/shop\/products\/1_18_816.jpg?v=1588701927","\/\/www.diymore.cc\/cdn\/shop\/products\/1_19_930.jpg?v=1588701927"],"featured_image":"\/\/www.diymore.cc\/cdn\/shop\/products\/1_1_423.jpg?v=1588701927","options":["Type"],"media":[{"alt":"110V-220V Led Digital Temperature Controller Thermostat Thermoregulator For Incubator Heating","id":6682595557447,"position":1,"preview_image":{"aspect_ratio":1.0,"height":1000,"width":1000,"src":"\/\/www.diymore.cc\/cdn\/shop\/products\/1_1_423.jpg?v=1588701927"},"aspect_ratio":1.0,"height":1000,"media_type":"image","src":"\/\/www.diymore.cc\/cdn\/shop\/products\/1_1_423.jpg?v=1588701927","width":1000},{"alt":"110V-220V Led Digital Temperature Controller Thermostat Thermoregulator For Incubator Heating","id":6682596311111,"position":2,"preview_image":{"aspect_ratio":1.0,"height":1000,"width":1000,"src":"\/\/www.diymore.cc\/cdn\/shop\/products\/1_8_460.jpg?v=1588701927"},"aspect_ratio":1.0,"height":1000,"media_type":"image","src":"\/\/www.diymore.cc\/cdn\/shop\/products\/1_8_460.jpg?v=1588701927","width":1000},{"alt":"110V-220V Led Digital Temperature Controller Thermostat Thermoregulator For Incubator Heating","id":6682596606023,"position":3,"preview_image":{"aspect_ratio":1.0,"height":1000,"width":1000,"src":"\/\/www.diymore.cc\/cdn\/shop\/products\/1_9_135.jpg?v=1588701927"},"aspect_ratio":1.0,"height":1000,"media_type":"image","src":"\/\/www.diymore.cc\/cdn\/shop\/products\/1_9_135.jpg?v=1588701927","width":1000},{"alt":"110V-220V Led Digital Temperature Controller Thermostat Thermoregulator For Incubator Heating","id":6682597326919,"position":4,"preview_image":{"aspect_ratio":1.0,"height":1000,"width":1000,"src":"\/\/www.diymore.cc\/cdn\/shop\/products\/1_16_853.jpg?v=1588701927"},"aspect_ratio":1.0,"height":1000,"media_type":"image","src":"\/\/www.diymore.cc\/cdn\/shop\/products\/1_16_853.jpg?v=1588701927","width":1000},{"alt":"110V-220V Led Digital Temperature Controller Thermostat Thermoregulator For Incubator Heating","id":6682597687367,"position":5,"preview_image":{"aspect_ratio":1.0,"height":1000,"width":1000,"src":"\/\/www.diymore.cc\/cdn\/shop\/products\/1_18_816.jpg?v=1588701927"},"aspect_ratio":1.0,"height":1000,"media_type":"image","src":"\/\/www.diymore.cc\/cdn\/shop\/products\/1_18_816.jpg?v=1588701927","width":1000},{"alt":"110V-220V Led Digital Temperature Controller Thermostat Thermoregulator For Incubator Heating","id":6682598015047,"position":6,"preview_image":{"aspect_ratio":1.0,"height":1000,"width":1000,"src":"\/\/www.diymore.cc\/cdn\/shop\/products\/1_19_930.jpg?v=1588701927"},"aspect_ratio":1.0,"height":1000,"media_type":"image","src":"\/\/www.diymore.cc\/cdn\/shop\/products\/1_19_930.jpg?v=1588701927","width":1000}],"requires_selling_plan":false,"selling_plan_groups":[],"content":"\u003cdiv\u003e\u003cstrong\u003e\u003cspan\u003eDescription:\u003c\/span\u003e\u003c\/strong\u003e\u003c\/div\u003e\n\u003cdiv\u003e \u003c\/div\u003e\n\u003cdiv\u003e\n\u003cdiv\u003e\u003cspan\u003eProduct Name: Thermostat\u003c\/span\u003e\u003c\/div\u003e\n\u003cdiv\u003e\u003cspan\u003eProduct model: DTC1200\u003c\/span\u003e\u003c\/div\u003e\n\u003cdiv data-spm-anchor-id=\"a2g0o.detail.1000023.i0.766b67b1vR7Vg3\"\u003e\u003cspan\u003eSupply voltage: AC110~230V\u003c\/span\u003e\u003c\/div\u003e\n\u003cdiv data-spm-anchor-id=\"a2g0o.detail.1000023.i1.766b67b1vR7Vg3\"\u003e\u003cspan\u003eTemperature range: -40°C~+99°C\u003c\/span\u003e\u003c\/div\u003e\n\u003cdiv\u003e\u003cspan\u003eTemperature measurement accuracy: ±1 °C (-40 °C ~ +70 °C)\u003c\/span\u003e\u003c\/div\u003e\n\u003cdiv data-spm-anchor-id=\"a2g0o.detail.1000023.i2.766b67b1vR7Vg3\"\u003e\u003cspan\u003eSensor line length: 100cm\u003c\/span\u003e\u003c\/div\u003e\n\u003cdiv data-spm-anchor-id=\"a2g0o.detail.1000023.i3.766b67b1vR7Vg3\"\u003e\u003cspan\u003eThermostat size: 93mm*56mm*34mm\u003c\/span\u003e\u003c\/div\u003e\n\u003cdiv\u003e\u003cspan\u003eOutput capacity: cooling (compressor 3A) heating (10A\/250VAC)\u003c\/span\u003e\u003c\/div\u003e\n\u003cdiv\u003e \u003c\/div\u003e\n\u003cdiv\u003e\u003cspan\u003eSee parameter method:\u003c\/span\u003e\u003c\/div\u003e\n\u003cdiv\u003e \u003c\/div\u003e\n\u003cdiv\u003e\u003cspan\u003eWhen the thermostat is working normally, press and release \"▲\"the key once to display the temperature setting value; press and release \"▼\" the key once to display the temperature difference setting value. After 3 seconds, the temperature returns to the normal display state.\u003c\/span\u003e\u003c\/div\u003e\n\u003cdiv\u003e \u003c\/div\u003e\n\u003cdiv\u003e\u003cspan\u003eSetting parameter method:\u003c\/span\u003e\u003c\/div\u003e\n\u003cdiv\u003e \u003c\/div\u003e\n\u003cdiv\u003e\u003cspan\u003eWhen the thermostat is working normally, press \"S\" key and hold the button for more than 3 seconds to enter the modified parameter mode. The “Set” indicator lights up, the digital tube displays the code “F1” of the first menu item, and press the \"▲\" or \"▼\"key to up or down the code of the menu item. Press \"S\" the key to display the parameter setting value of the current menu, press \"S\" and hold the key, then press the \"▲\"or \"▼\" key to increase or decrease the parameter setting value of the current menu; press \"S\" key and hold the key, and press the \"▲\"or \"▼\" key to quickly increase the speed; Or down and display the parameter settings of the current menu.\u003c\/span\u003e\u003c\/div\u003e\n\u003cdiv\u003e\u003cspan\u003ePress and hold \"▲\"or \"▼\" the key at the same time to restore the parameters to the factory settings.\u003c\/span\u003e\u003c\/div\u003e\n\u003cdiv\u003e \u003c\/div\u003e\n\u003cdiv\u003e\u003cspan\u003eOperation instructions:\u003c\/span\u003e\u003c\/div\u003e\n\u003cdiv\u003e \u003c\/div\u003e\n\u003cdiv\u003e\u003cspan\u003e1.When the thermostat is working normally, press and hold the \"power button\" for more than 3 seconds to turn off the thermostat. When the thermostat is off, press and hold the \"power button\" for more than 3 seconds to open the thermostat.\u003c\/span\u003e\u003c\/div\u003e\n\u003cdiv\u003e\u003cspan\u003eWhen the thermostat is working normally, the digital tube displays the current temperature measurement value, and performs automatic recognition conversion of the cooling heating operation mode.\u003c\/span\u003e\u003c\/div\u003e\n\u003cdiv\u003e\u003cspan\u003e2.When the measured temperature ≥ temperature set value + temperature difference set value, enter the cooling state, the Cool indicator light is on, the cooling relay normally open contact is closed; the Cool indicator flashes, indicating that the cooling device is in the press delay protection state; when measuring the temperature ≤ temperature set value, the Cool indicator is off, and the normally open contact of the refrigeration relay is disconnected.\u003c\/span\u003e\u003c\/div\u003e\n\u003cdiv\u003e\u003cspan\u003e3.When the measured temperature ≤ temperature set value - temperature difference set value enters the heating state, the Heat indicator light is on, the heating relay normally open contact is closed; when the measured temperature ≥ temperature set value, the Heat indicator is off, the heating relay normally open contact disconnect.\u003c\/span\u003e\u003c\/div\u003e\n\u003cdiv\u003e \u003c\/div\u003e\n\u003cdiv data-spm-anchor-id=\"a2g0o.detail.1000023.i1.17566478417y5U\"\u003e\n\u003cp data-spm-anchor-id=\"a2g0o.detail.1000023.i0.17566478417y5U\"\u003e\u003cspan\u003eIndicator status description:\u003c\/span\u003e\u003c\/p\u003e\n\u003ctable border=\"1\" cellspacing=\"0\"\u003e\n\u003ctbody\u003e\n\u003ctr\u003e\n\u003ctd\u003e\n\u003cp align=\"center\"\u003e\u003cspan\u003eIndicator\u003c\/span\u003e\u003c\/p\u003e\n\u003c\/td\u003e\n\u003ctd\u003e\n\u003cp align=\"center\"\u003e\u003cspan\u003eFunction\u003c\/span\u003e\u003c\/p\u003e\n\u003c\/td\u003e\n\u003ctd\u003e\n\u003cp align=\"center\" data-spm-anchor-id=\"a2g0o.detail.1000023.i10.17566478417y5U\"\u003e\u003cspan\u003eNote\u003c\/span\u003e\u003c\/p\u003e\n\u003c\/td\u003e\n\u003c\/tr\u003e\n\u003ctr\u003e\n\u003ctd\u003e\n\u003cp align=\"center\" data-spm-anchor-id=\"a2g0o.detail.1000023.i4.17566478417y5U\"\u003e\u003cspan\u003eCool indicator\u003c\/span\u003e\u003c\/p\u003e\n\u003c\/td\u003e\n\u003ctd\u003e\n\u003cp align=\"center\" data-spm-anchor-id=\"a2g0o.detail.1000023.i5.17566478417y5U\"\u003e\u003cspan\u003eLight on:cooling work;\u003c\/span\u003e\u003c\/p\u003e\n\u003cp align=\"center\"\u003e\u003cspan\u003e Light off:cooling off;\u003c\/span\u003e\u003c\/p\u003e\n\u003cp align=\"center\"\u003e\u003cspan\u003eFlashing: press delay\u003c\/span\u003e\u003c\/p\u003e\n\u003c\/td\u003e\n\u003ctd rowspan=\"2\"\u003e\n\u003cp align=\"center\" data-spm-anchor-id=\"a2g0o.detail.1000023.i11.17566478417y5U\"\u003e\u003cspan\u003eCool and Heat Both indicator lights cannot be lit at the same time\u003c\/span\u003e\u003c\/p\u003e\n\u003c\/td\u003e\n\u003c\/tr\u003e\n\u003ctr\u003e\n\u003ctd\u003e\n\u003cp align=\"center\" data-spm-anchor-id=\"a2g0o.detail.1000023.i6.17566478417y5U\"\u003e\u003cspan\u003eHeat indicator\u003c\/span\u003e\u003c\/p\u003e\n\u003c\/td\u003e\n\u003ctd\u003e\n\u003cp align=\"center\" data-spm-anchor-id=\"a2g0o.detail.1000023.i7.17566478417y5U\"\u003e\u003cspan\u003eBright: heating work;\u003c\/span\u003e\u003c\/p\u003e\n\u003cp align=\"center\"\u003e\u003cspan\u003eoff: heating off\u003c\/span\u003e\u003c\/p\u003e\n\u003c\/td\u003e\n\u003c\/tr\u003e\n\u003ctr\u003e\n\u003ctd\u003e\n\u003cp align=\"center\" data-spm-anchor-id=\"a2g0o.detail.1000023.i8.17566478417y5U\"\u003e\u003cspan\u003eSet indicator\u003c\/span\u003e\u003c\/p\u003e\n\u003c\/td\u003e\n\u003ctd\u003e\n\u003cp align=\"center\" data-spm-anchor-id=\"a2g0o.detail.1000023.i9.17566478417y5U\"\u003e\u003cspan\u003eOn: parameter setting status\u003c\/span\u003e\u003c\/p\u003e\n\u003c\/td\u003e\n\u003ctd\u003e\n\u003cp align=\"center\"\u003e \u003c\/p\u003e\n\u003c\/td\u003e\n\u003c\/tr\u003e\n\u003c\/tbody\u003e\n\u003c\/table\u003e\n\u003cp\u003e \u003c\/p\u003e\n\u003cp\u003e\u003cspan\u003eMenu function description:\u003c\/span\u003e\u003c\/p\u003e\n\u003ctable border=\"1\" cellspacing=\"0\"\u003e\n\u003ctbody\u003e\n\u003ctr\u003e\n\u003ctd\u003e\n\u003cp align=\"center\" data-spm-anchor-id=\"a2g0o.detail.1000023.i13.17566478417y5U\"\u003e\u003cspan\u003eMenu identifier\u003c\/span\u003e\u003c\/p\u003e\n\u003c\/td\u003e\n\u003ctd\u003e\n\u003cp align=\"center\" data-spm-anchor-id=\"a2g0o.detail.1000023.i16.17566478417y5U\"\u003e\u003cspan\u003eMenu function\u003c\/span\u003e\u003c\/p\u003e\n\u003c\/td\u003e\n\u003ctd\u003e\n\u003cp align=\"center\" data-spm-anchor-id=\"a2g0o.detail.1000023.i17.17566478417y5U\"\u003e\u003cspan\u003eSetting range\u003c\/span\u003e\u003c\/p\u003e\n\u003c\/td\u003e\n\u003ctd\u003e\n\u003cp align=\"center\" data-spm-anchor-id=\"a2g0o.detail.1000023.i18.17566478417y5U\"\u003e\u003cspan\u003eFactory setting\u003c\/span\u003e\u003c\/p\u003e\n\u003c\/td\u003e\n\u003c\/tr\u003e\n\u003ctr\u003e\n\u003ctd\u003e\n\u003cp align=\"center\" data-spm-anchor-id=\"a2g0o.detail.1000023.i12.17566478417y5U\"\u003e\u003cspan\u003eF1\u003c\/span\u003e\u003c\/p\u003e\n\u003c\/td\u003e\n\u003ctd\u003e\n\u003cp align=\"center\" data-spm-anchor-id=\"a2g0o.detail.1000023.i14.17566478417y5U\"\u003e\u003cspan\u003eTemperature setting value\u003c\/span\u003e\u003c\/p\u003e\n\u003c\/td\u003e\n\u003ctd\u003e\n\u003cp align=\"center\" data-spm-anchor-id=\"a2g0o.detail.1000023.i15.17566478417y5U\"\u003e\u003cspan\u003e-40.0~99.9℃\u003c\/span\u003e\u003c\/p\u003e\n\u003c\/td\u003e\n\u003ctd\u003e\n\u003cp align=\"center\" data-spm-anchor-id=\"a2g0o.detail.1000023.i19.17566478417y5U\"\u003e\u003cspan\u003e10.0℃\u003c\/span\u003e\u003c\/p\u003e\n\u003c\/td\u003e\n\u003c\/tr\u003e\n\u003ctr\u003e\n\u003ctd\u003e\n\u003cp align=\"center\" data-spm-anchor-id=\"a2g0o.detail.1000023.i20.17566478417y5U\"\u003e\u003cspan\u003eF2\u003c\/span\u003e\u003c\/p\u003e\n\u003c\/td\u003e\n\u003ctd\u003e\n\u003cp align=\"center\" data-spm-anchor-id=\"a2g0o.detail.1000023.i21.17566478417y5U\"\u003e\u003cspan\u003eTemperature difference setting value\u003c\/span\u003e\u003c\/p\u003e\n\u003c\/td\u003e\n\u003ctd\u003e\n\u003cp align=\"center\" data-spm-anchor-id=\"a2g0o.detail.1000023.i22.17566478417y5U\"\u003e\u003cspan\u003e0.3~10.0℃\u003c\/span\u003e\u003c\/p\u003e\n\u003c\/td\u003e\n\u003ctd\u003e\n\u003cp align=\"center\" data-spm-anchor-id=\"a2g0o.detail.1000023.i23.17566478417y5U\"\u003e\u003cspan\u003e0.5℃\u003c\/span\u003e\u003c\/p\u003e\n\u003c\/td\u003e\n\u003c\/tr\u003e\n\u003ctr\u003e\n\u003ctd\u003e\n\u003cp align=\"center\" data-spm-anchor-id=\"a2g0o.detail.1000023.i24.17566478417y5U\"\u003e\u003cspan\u003eF3\u003c\/span\u003e\u003c\/p\u003e\n\u003c\/td\u003e\n\u003ctd\u003e\n\u003cp align=\"center\" data-spm-anchor-id=\"a2g0o.detail.1000023.i25.17566478417y5U\"\u003e\u003cspan\u003ePress delay\u003c\/span\u003e\u003c\/p\u003e\n\u003c\/td\u003e\n\u003ctd\u003e\n\u003cp align=\"center\" data-spm-anchor-id=\"a2g0o.detail.1000023.i26.17566478417y5U\"\u003e\u003cspan\u003e1~10 min\u003c\/span\u003e\u003c\/p\u003e\n\u003c\/td\u003e\n\u003ctd\u003e\n\u003cp align=\"center\" data-spm-anchor-id=\"a2g0o.detail.1000023.i27.17566478417y5U\"\u003e\u003cspan\u003e3 min\u003c\/span\u003e\u003c\/p\u003e\n\u003c\/td\u003e\n\u003c\/tr\u003e\n\u003ctr\u003e\n\u003ctd data-spm-anchor-id=\"a2g0o.detail.1000023.i28.17566478417y5U\"\u003e\n\u003cp align=\"center\"\u003e\u003cspan\u003eF4\u003c\/span\u003e\u003c\/p\u003e\n\u003c\/td\u003e\n\u003ctd\u003e\n\u003cp align=\"center\" data-spm-anchor-id=\"a2g0o.detail.1000023.i29.17566478417y5U\"\u003e\u003cspan\u003eTemperature correction\u003c\/span\u003e\u003c\/p\u003e\n\u003c\/td\u003e\n\u003ctd\u003e\n\u003cp align=\"center\" data-spm-anchor-id=\"a2g0o.detail.1000023.i30.17566478417y5U\"\u003e\u003cspan\u003e-10.0~10.0℃\u003c\/span\u003e\u003c\/p\u003e\n\u003c\/td\u003e\n\u003ctd\u003e\n\u003cp align=\"center\" data-spm-anchor-id=\"a2g0o.detail.1000023.i31.17566478417y5U\"\u003e\u003cspan\u003e0℃\u003c\/span\u003e\u003c\/p\u003e\n\u003c\/td\u003e\n\u003c\/tr\u003e\n\u003c\/tbody\u003e\n\u003c\/table\u003e\n\u003cp\u003e \u003c\/p\u003e\n\u003cp\u003e\u003cspan\u003eWiring Diagram:\u003c\/span\u003e\u003c\/p\u003e\n\u003cp\u003e\u003cspan\u003e\u003cimg alt=\"图片1\" src=\"https:\/\/ae01.alicdn.com\/kf\/H001eadcd3b8e49109ce4fd472825de6dW.jpg\"\u003e\u003c\/span\u003e\u003c\/p\u003e\n\u003cp\u003e \u003c\/p\u003e\n\u003cdiv\u003e\n\u003cdiv\u003e \u003c\/div\u003e\n\u003cdiv\u003e\u003cspan\u003eRepair System Data:\u003c\/span\u003e\u003c\/div\u003e\n\u003cdiv\u003e \u003c\/div\u003e\n\u003cdiv\u003e\u003cspan\u003eAfter the thermostat is powered on, first check whether the parameter settings are correct. If an error is detected, “Er” is displayed. Pressing any key will restore the default parameter settings and work normally. It is recommended to reset the parameters at this time.\u003c\/span\u003e\u003c\/div\u003e\n\u003cdiv\u003e \u003c\/div\u003e\n\u003cdiv\u003e\u003cspan\u003eSystem Code, reason and action:\u003c\/span\u003e\u003c\/div\u003e\n\u003cdiv\u003e \u003c\/div\u003e\n\u003cdiv\u003e\u003cspan\u003eSensor fault alarm: When the temperature probe loop is short-circuited or open-circuit fault, the thermostat starts the probe fault alarm mode, closes all execution states, and the digital tube displays “EE”. After the fault is cleared, press any key to return to the normal working mode.\u003c\/span\u003e\u003c\/div\u003e\n\u003cdiv\u003e\u003cspan\u003eOver-temperature alarm: When the temperature measurement exceeds the temperature measurement range, the thermostat starts the over-temperature limit fault alarm mode, and all execution states are turned off. The digital tube displays “HH”. When the temperature returns to the normal measurement range, press any key. Return to normal working mode.\u003c\/span\u003e\u003c\/div\u003e\n\u003cdiv\u003e \u003c\/div\u003e\n\u003cdiv\u003e\u003cspan\u003eSafety rules:\u003c\/span\u003e\u003c\/div\u003e\n\u003cdiv\u003e \u003c\/div\u003e\n\u003cdiv\u003e\u003cspan\u003e☆ Danger:\u003c\/span\u003e\u003c\/div\u003e\n\u003cdiv\u003e\u003cspan\u003e1. Strictly distinguish the sensor lead, power line and output relay interface, can not be connected incorrectly, the relay can not be overloaded;\u003c\/span\u003e\u003c\/div\u003e\n\u003cdiv\u003e\u003cspan\u003e2. All wiring changes must be made with the power off.\u003c\/span\u003e\u003c\/div\u003e\n\u003cdiv\u003e\u003cspan\u003e☆ Warning:\u003c\/span\u003e\u003c\/div\u003e\n\u003cdiv\u003e\u003cspan\u003e1. This thermostat is forbidden to be used in water or excessively humid environment. It is forbidden to use in high temperature, strong electromagnetic interference and strong corrosive environment.\u003c\/span\u003e\u003c\/div\u003e\n\u003cdiv\u003e\u003cspan\u003e☆ Note:\u003c\/span\u003e\u003c\/div\u003e\n\u003cdiv\u003e\u003cspan\u003e1. The supply voltage should be consistent with the voltage marked by the thermostat and ensure the stability of the supply voltage;\u003c\/span\u003e\u003c\/div\u003e\n\u003cdiv\u003e\u003cspan\u003e2. To avoid possible interference, it is recommended that the sensor leads be at an appropriate distance from the power line.\u003c\/span\u003e\u003c\/div\u003e\n\u003cdiv\u003e \u003c\/div\u003e\n\u003cdiv\u003e \u003c\/div\u003e\n\u003cdiv\u003e\u003cstrong\u003e\u003cspan\u003ePackage Included:\u003c\/span\u003e\u003c\/strong\u003e\u003c\/div\u003e\n\u003cdiv\u003e \u003c\/div\u003e\n\u003cdiv\u003e\u003cspan\u003e1 x DTC1200 Intellligent Temperature Controller\u003c\/span\u003e\u003c\/div\u003e\n\u003cdiv\u003e\u003cspan\u003e1 x Temperature sensor\u003c\/span\u003e\u003c\/div\u003e\n\u003cdiv\u003e\u003cspan\u003e1 x Instruction manual\u003c\/span\u003e\u003c\/div\u003e\n\u003cdiv\u003e\u003cspan\u003e1 x Packing box\u003c\/span\u003e\u003c\/div\u003e\n\u003cdiv\u003e\u003cspan\u003e\u003c\/span\u003e\u003c\/div\u003e\n\u003c\/div\u003e\n\u003c\/div\u003e\n\u003c\/div\u003e\n\u003cdiv\u003e\n\u003cp\u003e\u003cimg alt=\"pictures2\" src=\"https:\/\/ae01.alicdn.com\/kf\/H48e07ca430b143a1bd6390f007d70893r.jpg\"\u003e\u003c\/p\u003e\n\u003cp\u003e\u003cimg alt=\"XA0008 (3)\" src=\"https:\/\/ae01.alicdn.com\/kf\/H909cdc0df9ef48b2909767f61c05f908Y.jpg\"\u003e\u003cimg alt=\"XA0008 (4)\" src=\"https:\/\/ae01.alicdn.com\/kf\/He57b51af913d453bb4631f7f71fac13e1.jpg\"\u003e\u003cimg alt=\"XA0008 (5)\" src=\"https:\/\/ae01.alicdn.com\/kf\/H1d793d42fd7945cba1d4202db1861873q.jpg\"\u003e\u003cimg alt=\"XA0008 (24)\" src=\"https:\/\/ae01.alicdn.com\/kf\/Hddf60c92d3bf47e7a4377478d2ae0f4c0.jpg\"\u003e\u003cimg alt=\"XA0008 (7)\" src=\"https:\/\/ae01.alicdn.com\/kf\/H81eb27e7121545b799fea5521905e3c7U.jpg\"\u003e\u003cimg alt=\"XA0008 (6)\" src=\"https:\/\/ae01.alicdn.com\/kf\/H9b1a57d5932b47359fe4cb26b4df8221z.jpg\"\u003e\u003cimg alt=\"XA0008 (1)\" src=\"https:\/\/ae01.alicdn.com\/kf\/H3b043d774f204356b0278e4786d01f14k.jpg\"\u003e\u003cimg alt=\"XA0008 (9)\" src=\"https:\/\/ae01.alicdn.com\/kf\/H97fb15979930424092f839c9a8a3830fK.jpg\"\u003e\u003cimg alt=\"XA0008 (10)\" src=\"https:\/\/ae01.alicdn.com\/kf\/H6e4b81a56f9949e385541d0be905a572G.jpg\"\u003e\u003cimg alt=\"XA0008 (11)\" src=\"https:\/\/ae01.alicdn.com\/kf\/Hd0829f171f2f41bdb34c36cff898940cl.jpg\"\u003e\u003cimg alt=\"XA0008 (12)\" src=\"https:\/\/ae01.alicdn.com\/kf\/Hc210386716324310a4aa3248b0a8a09dp.jpg\"\u003e\u003cimg alt=\"XA0008 (19)\" src=\"https:\/\/ae01.alicdn.com\/kf\/H2743991dcfaf488b936cea38071fdc22l.jpg\"\u003e\u003cimg alt=\"XA0008 (21)\" src=\"https:\/\/ae01.alicdn.com\/kf\/H5d8b10d76d27477aa6d4f2e96f92b18fw.jpg\"\u003e\u003c\/p\u003e\n\u003c\/div\u003e\n\u003cp\u003e \u003c\/p\u003e\n\u003cp\u003e \u003c\/p\u003e\n\u003cp\u003e\u003cspan\u003e\u003cstrong\u003eDTC1100 DTC1110 DTC2210 DTC2200 Temperature Controller\u003c\/strong\u003e\u003c\/span\u003e\u003c\/p\u003e\n\u003cdiv\u003e\u003cspan\u003eProduct Name: Temperature Controller \u003c\/span\u003e\u003c\/div\u003e\n\u003cdiv\u003e\u003cspan\u003eProduct Models: DTC1100; DTC1110; DTC2210; DTC2200 \u003c\/span\u003e\u003c\/div\u003e\n\u003cdiv\u003e\u003cspan\u003ePower supply: AC110V-220V\u003c\/span\u003e\u003c\/div\u003e\n\u003cdiv\u003e\u003cspan\u003eTemperature range: -40°C~+99°C\u003c\/span\u003e\u003c\/div\u003e\n\u003cdiv\u003e\u003cspan\u003eTemperature measurement accuracy: ±1°C (-40 °C ~ +70 °C)\u003c\/span\u003e\u003c\/div\u003e\n\u003cdiv\u003e\u003cspan\u003eThermostat size: 93mm*56mm*34mm\u003c\/span\u003e\u003c\/div\u003e\n\u003cdiv\u003e\u003cspan\u003eRelay contact capacity: Cool(10WC250V); Heat(10A\/AC250V)\u003c\/span\u003e\u003c\/div\u003e\n\u003cdiv\u003e \u003c\/div\u003e\n\u003cdiv\u003e\u003cspan\u003e\u003cimg alt=\"1 (1)\" src=\"https:\/\/ae01.alicdn.com\/kf\/H55d10cb072154207bcdd46dd1dafbc8fh.jpg\"\u003e\u003cimg alt=\"1 (4)\" src=\"https:\/\/ae01.alicdn.com\/kf\/H2f4f0f7cfec445b58c5e00fbdd8435872.jpg\"\u003e\u003cimg alt=\"1 (2)\" src=\"https:\/\/ae01.alicdn.com\/kf\/Hdaf8974533f04094ac13d6f88bd4a970o.jpg\"\u003e\u003cimg alt=\"接线图 (1)\" src=\"https:\/\/ae01.alicdn.com\/kf\/Ha2a95c321166465591f5af870fd231bfp.jpg\"\u003e\u003cimg alt=\"1 (13)\" src=\"https:\/\/ae01.alicdn.com\/kf\/He9464c5ea5c24e168157faff9566d0ecj.jpg\"\u003e\u003cimg alt=\"1 (18)\" src=\"https:\/\/ae01.alicdn.com\/kf\/H44dfe2dd19c14a14bdd1e3d351e03a4bE.jpg\"\u003e\u003cimg alt=\"01 (1)\" src=\"https:\/\/ae01.alicdn.com\/kf\/Ha529d255334543f68affa9a95cb27f16o.jpg\"\u003e\u003cimg alt=\"4\" src=\"https:\/\/ae01.alicdn.com\/kf\/H312943e7f91e4b709b5d642e25598a6a5.jpg\"\u003e\u003cimg alt=\"15\" src=\"https:\/\/ae01.alicdn.com\/kf\/Hb93149fbec8e4329a4c090147de3983fq.jpg\"\u003e\u003cimg alt=\"接线图 (1)\" src=\"https:\/\/ae01.alicdn.com\/kf\/H0e9b53e72d594dde8c46be7d94b346b9b.jpg\"\u003e\u003cimg alt=\"10\" src=\"https:\/\/ae01.alicdn.com\/kf\/Ha4ae55d77d754955bc11801c20abde77F.jpg\"\u003e\u003cimg alt=\"16\" src=\"https:\/\/ae01.alicdn.com\/kf\/H516b5c2e4e7140f5952500c8e005c7b6t.jpg\"\u003e\u003cimg alt=\"1 (1)\" src=\"https:\/\/ae01.alicdn.com\/kf\/H72183dd8d1fc4fe4b6deb8b28ee279cby.jpg\"\u003e\u003cimg alt=\"1 (3)\" src=\"https:\/\/ae01.alicdn.com\/kf\/H1c848b67f8704717802fa010419962b0m.jpg\"\u003e\u003cimg alt=\"1 (4)\" src=\"https:\/\/ae01.alicdn.com\/kf\/H5f22b2bb585948da837a0df46163a52ea.jpg\"\u003e\u003cimg alt=\"1 (8)\" src=\"https:\/\/ae01.alicdn.com\/kf\/Hb0db99a5e1424609a10aea7486f295ab5.jpg\"\u003e\u003cimg alt=\"1 (17)\" src=\"https:\/\/ae01.alicdn.com\/kf\/Hfb6298937ee7447fb751dd6aa5b96549O.jpg\"\u003e\u003cimg alt=\"1 (19)\" src=\"https:\/\/ae01.alicdn.com\/kf\/Hbf41fac7ac3a42fdb90f17b8ff0d308d2.jpg\"\u003e\u003cimg alt=\"1 (20)\" src=\"https:\/\/ae01.alicdn.com\/kf\/H4a3c5770430945089241d33dafef31fcm.jpg\"\u003e\u003cimg alt=\"1 (1)\" src=\"https:\/\/ae01.alicdn.com\/kf\/Hc39891a3e23d41b5968309454950c8bcI.jpg\"\u003e\u003cimg alt=\"1 (2)\" src=\"https:\/\/ae01.alicdn.com\/kf\/H4522829b7e6e44dc9603abf7792e0647G.jpg\"\u003e\u003cimg alt=\"接线图\" src=\"https:\/\/ae01.alicdn.com\/kf\/Hfe019fff700840c6ad7f4ba4869ef0eaq.jpg\"\u003e\u003cimg alt=\"1 (12)\" src=\"https:\/\/ae01.alicdn.com\/kf\/H1ddb9da69f8b4b6eb775e093490116feg.jpg\"\u003e\u003cimg alt=\"1 (18)\" src=\"https:\/\/ae01.alicdn.com\/kf\/H42755cdfd6174fe3b72473d7592b07fdr.jpg\"\u003e\u003cimg alt=\"1 (20)\" src=\"https:\/\/ae01.alicdn.com\/kf\/H2350b4b9bf9b48a78676cfa40085604fK.jpg\"\u003e\u003cimg alt=\"1 (21)\" src=\"https:\/\/ae01.alicdn.com\/kf\/H62b80cb1bda24ed8841e2f13742847a8d.jpg\"\u003e\u003c\/span\u003e\u003c\/div\u003e\n\u003cdiv\u003e \u003c\/div\u003e\n\u003cdiv\u003e \u003c\/div\u003e\n\u003cdiv\u003e \u003c\/div\u003e\n\u003cdiv\u003e \u003c\/div\u003e\n\u003cdiv\u003e\u003cspan\u003eDTC3200 Temperature and Humidity Controller\u003c\/span\u003e\u003c\/div\u003e\n\u003cdiv\u003e \u003c\/div\u003e\n\u003cdiv\u003e\u003cspan\u003eProduct Name: Temperature and Humidity Controller\u003c\/span\u003e\u003c\/div\u003e\n\u003cdiv\u003e\u003cspan\u003eProduct Model: DTC3200\u003c\/span\u003e\u003c\/div\u003e\n\u003cdiv\u003e\u003cspan\u003ePower supply voltage: AC 110 ~ 230V\u003c\/span\u003e\u003c\/div\u003e\n\u003cdiv\u003e\u003cspan\u003ePower supply frequency: 50 \/ 60Hz\u003c\/span\u003e\u003c\/div\u003e\n\u003cdiv\u003e\u003cspan\u003eTemperature measurement range: -20 ~ 60 ℃\u003c\/span\u003e\u003c\/div\u003e\n\u003cdiv\u003e\u003cspan\u003eHumidity measurement range: 0% ~ 100% RH\u003c\/span\u003e\u003c\/div\u003e\n\u003cdiv\u003e\u003cspan\u003eTemperature measurement accuracy: 0.3 ℃\u003c\/span\u003e\u003c\/div\u003e\n\u003cdiv\u003e\u003cspan\u003eHumidity measurement accuracy: 3%\u003c\/span\u003e\u003c\/div\u003e\n\u003cdiv\u003e\u003cspan\u003eOutput control: Relay output\u003c\/span\u003e\u003c\/div\u003e\n\u003cdiv\u003e\u003cspan\u003eOutput power: MAX 10A\u003c\/span\u003e\u003c\/div\u003e\n\u003cdiv\u003e \u003c\/div\u003e\n\u003cdiv\u003e\u003cspan\u003eSetting method: start value \u0026lt;stop value (the program automatically determines the working mode as heating \/ humidification mode)\u003c\/span\u003e\u003c\/div\u003e\n\u003cdiv\u003e\u003cspan\u003eSetting method: start value\u0026gt; stop value (the program automatically determines the working mode to be cooling \/ dehumidifying mode)\u003c\/span\u003e\u003c\/div\u003e\n\u003cdiv\u003e\u003cspan\u003eHeating \/ cooling mode setting\u003c\/span\u003e\u003c\/div\u003e\n\u003cdiv\u003e\u003cspan\u003eSetting method: setting (starting temperature): long press the ▲ button, the starting temperature flashes, and the starting temperature value is set by the ▲ ▼ button\u003c\/span\u003e\u003c\/div\u003e\n\u003cdiv\u003e\u003cspan\u003eSetting (stop temperature): long press the ▼ button to stop the temperature flashing, set the stop temperature value by ▲ ▼ button\u003c\/span\u003e\u003c\/div\u003e\n\u003cdiv\u003e \u003c\/div\u003e\n\u003cdiv\u003e\u003cspan\u003eHeating use case: control the water heater, heating to 65 ℃ to stop, the temperature drops to 50 ℃ to start heating again\u003c\/span\u003e\u003c\/div\u003e\n\u003cdiv\u003e\u003cspan\u003eThe first step: heating working mode, start temperature \u0026lt;stop temperature\u003c\/span\u003e\u003c\/div\u003e\n\u003cdiv\u003e\u003cspan\u003eStep 2: Press and hold the ▲ button, the starting temperature flashes, and set the starting temperature to 50 ℃ via the ▲ ▼ button\u003c\/span\u003e\u003c\/div\u003e\n\u003cdiv\u003e\u003cspan\u003eThe third step: long press the ▼ button to stop the temperature flashing, set the stop temperature to 65 ℃ through the ▲ ▼ button, the setting is complete!\u003c\/span\u003e\u003c\/div\u003e\n\u003cdiv\u003e\u003cspan\u003eRefrigeration use case: use in the farm, the fan ventilation stops at 26 ℃, and the temperature rises to 30 ℃ to start ventilation again\u003c\/span\u003e\u003c\/div\u003e\n\u003cdiv\u003e\u003cspan\u003eStep 1: Refrigeration working mode, start temperature\u0026gt; stop temperature\u003c\/span\u003e\u003c\/div\u003e\n\u003cdiv\u003e\u003cspan\u003eStep 2: Press and hold the ▲ button, the starting temperature flashes, and set the starting temperature to 30 ℃ via the ▲ ▼ button\u003c\/span\u003e\u003c\/div\u003e\n\u003cdiv\u003e\u003cspan\u003eStep 3: Press and hold the ▼ button to stop the temperature flashing, and set the stop temperature to 26 ° C with the ▲ ▼ button. The setting is complete!\u003c\/span\u003e\u003c\/div\u003e\n\u003cdiv\u003e \u003c\/div\u003e\n\u003cdiv\u003e\u003cspan\u003eHumidification \/ dehumidification mode settings:\u003c\/span\u003e\u003c\/div\u003e\n\u003cdiv\u003e\u003cspan\u003eSetting (Start Humidity): Long press the △ key, the start humidity value flashes, set the start humidity value by the △ ▽ key. Set [Stop Humidity]: Long press the △ key, stop the humidity value flashing, and set the stop humidity by the △ ▽ key value.\u003c\/span\u003e\u003c\/div\u003e\n\u003cdiv\u003e \u003c\/div\u003e\n\u003cdiv\u003e\u003cspan\u003eExamples of humidification: Fresh supermarket humidification, control humidifier 50% RH to start humidification, humidification to 80% RH to stop humidification.\u003c\/span\u003e\u003c\/div\u003e\n\u003cdiv\u003e \u003c\/div\u003e\n\u003cdiv\u003e\u003cspan\u003eSetup steps:\u003c\/span\u003e\u003c\/div\u003e\n\u003cdiv\u003e\u003cspan\u003e Step 1: Press and hold the △ key for 3 seconds to start the humidity value flashing, and set the start humidity value to 50% RH.\u003c\/span\u003e\u003c\/div\u003e\n\u003cdiv\u003e\u003cspan\u003e Step 2: Press and hold the ▽ key for 3 seconds to stop the humidity value flashing, set the value to 80% RH, the setting is completed, press the button for 5 seconds without operation, and automatically return to the normal display state\u003c\/span\u003e\u003c\/div\u003e\n\u003cdiv\u003e \u003c\/div\u003e\n\u003cdiv\u003e\u003cspan\u003eDehumidification example: workshop control exhaust dehumidification system, humidity 70% RH starts dehumidification, humidity 40% RH stops dehumidification\u003c\/span\u003e\u003c\/div\u003e\n\u003cdiv\u003e \u003c\/div\u003e\n\u003cdiv\u003e\u003cspan\u003eSetup steps:\u003c\/span\u003e\u003c\/div\u003e\n\u003cdiv\u003e\u003cspan\u003e Step 1: Press and hold the △ key for 3 seconds to start the humidity value flashing, and set the start humidity value to 40% RH.\u003c\/span\u003e\u003c\/div\u003e\n\u003cdiv\u003e\u003cspan\u003e Step 2: Press and hold the ▽ key for 3 seconds to stop the humidity value from flashing, set the value to 70% RH, the setting is completed, press the button for 5 seconds without operation, and automatically return to the normal display state\u003c\/span\u003e\u003c\/div\u003e\n\u003cdiv\u003e \u003c\/div\u003e\n\u003cdiv\u003e \u003c\/div\u003e\n\u003cdiv\u003e\u003cspan\u003eTemperature correction:\u003c\/span\u003e\u003c\/div\u003e\n\u003cdiv\u003e\u003cspan\u003eSimultaneously press the ▲ ▼ key for 3 seconds to start the temperature digit flashing, and use the ▲ ▼ key to set the start temperature correction value; after the setting is completed, press the button for 5 seconds without operation, and automatically return to the normal display state.\u003c\/span\u003e\u003c\/div\u003e\n\u003cdiv\u003e \u003c\/div\u003e\n\u003cdiv\u003e\u003cspan\u003eHumidity correction:\u003c\/span\u003e\u003c\/div\u003e\n\u003cdiv\u003e\u003cspan\u003eSimultaneously press the △ ▽ key for 3 seconds to start the humidity digit flashing, and set the humidity correction value by the △ ▽ key; after the setting is completed, press the button for 5 seconds without operation, and it will automatically return to the normal display state.\u003c\/span\u003e\u003c\/div\u003e\n\u003cdiv\u003e \u003c\/div\u003e\n\u003cdiv\u003e\u003cspan\u003eWiring instructions:\u003c\/span\u003e\u003c\/div\u003e\n\u003cdiv\u003e \u003c\/div\u003e\n\u003cdiv\u003e \u003cimg alt=\"11\" src=\"https:\/\/ae01.alicdn.com\/kf\/H818f4241e00c4a4383e69801a2e9fd69R.jpg\"\u003e\n\u003c\/div\u003e\n\u003cdiv\u003e \u003c\/div\u003e\n\u003cdiv\u003e \u003c\/div\u003e\n\u003cdiv\u003e\u003cspan\u003e※ If the temperature and humidity display LLL, please confirm whether the wiring of the SHT20 digital temperature and humidity sensor is correct and whether there is poor contact, you can try to reconnect the wiring.\u003c\/span\u003e\u003c\/div\u003e\n\u003cdiv\u003e \u003c\/div\u003e\n\u003cdiv\u003e\n\u003cimg alt=\"1(23)\" src=\"https:\/\/ae01.alicdn.com\/kf\/H12eb95c3e0d2444c96477c9c4e96c5e2r.jpg\"\u003e\u003cimg alt=\"1 (2)\" src=\"https:\/\/ae01.alicdn.com\/kf\/H4aec1fa943784e678b9d5a13ef92c840u.jpg\"\u003e\u003cimg alt=\"1 (9)\" src=\"https:\/\/ae01.alicdn.com\/kf\/H62f61e0071094feb8e4b5a95452126815.jpg\"\u003e\u003cimg alt=\"1 (15)\" src=\"https:\/\/ae01.alicdn.com\/kf\/H3015a4e6d81f490b9020dca461f7694bX.jpg\"\u003e\u003cimg alt=\"1 (18)\" src=\"https:\/\/ae01.alicdn.com\/kf\/He260f2df36064fe2af5530c7a561437ed.jpg\"\u003e\u003cimg alt=\"1 (20)\" src=\"https:\/\/ae01.alicdn.com\/kf\/He00db8acc649445db0f1f4fce6df2bf95.jpg\"\u003e\u003cimg alt=\"1 (22)\" src=\"https:\/\/ae01.alicdn.com\/kf\/H5e7b7c932bd44e159fcc998c54110021C.jpg\"\u003e\u003cimg alt=\"1 (4)\" src=\"https:\/\/ae01.alicdn.com\/kf\/H31b481ef695c453d88993756e902f3dec.jpg\"\u003e\u003cimg alt=\"1 (3)\" src=\"https:\/\/ae01.alicdn.com\/kf\/H72f864579840411fa481222392614398v.jpg\"\u003e\n\u003c\/div\u003e"}
 -
 Translation missing: en.products.product.regular_price $7.99{"id":4616159920199,"title":"110V-220V LED Digital Temperature Controller Thermostat Thermoregulator for Incubator Heating Cooling Replace STC-1000 DTC1200","handle":"110v-220v-led-digital-temperature-controller-thermostat-thermoregulator-for-incubator-heating-cooling-replace-stc-1000-dtc1200","description":"\u003cdiv\u003e\u003cstrong\u003e\u003cspan\u003eDescription:\u003c\/span\u003e\u003c\/strong\u003e\u003c\/div\u003e\n\u003cdiv\u003e \u003c\/div\u003e\n\u003cdiv\u003e\n\u003cdiv\u003e\u003cspan\u003eProduct Name: Thermostat\u003c\/span\u003e\u003c\/div\u003e\n\u003cdiv\u003e\u003cspan\u003eProduct model: DTC1200\u003c\/span\u003e\u003c\/div\u003e\n\u003cdiv data-spm-anchor-id=\"a2g0o.detail.1000023.i0.766b67b1vR7Vg3\"\u003e\u003cspan\u003eSupply voltage: AC110~230V\u003c\/span\u003e\u003c\/div\u003e\n\u003cdiv data-spm-anchor-id=\"a2g0o.detail.1000023.i1.766b67b1vR7Vg3\"\u003e\u003cspan\u003eTemperature range: -40°C~+99°C\u003c\/span\u003e\u003c\/div\u003e\n\u003cdiv\u003e\u003cspan\u003eTemperature measurement accuracy: ±1 °C (-40 °C ~ +70 °C)\u003c\/span\u003e\u003c\/div\u003e\n\u003cdiv data-spm-anchor-id=\"a2g0o.detail.1000023.i2.766b67b1vR7Vg3\"\u003e\u003cspan\u003eSensor line length: 100cm\u003c\/span\u003e\u003c\/div\u003e\n\u003cdiv data-spm-anchor-id=\"a2g0o.detail.1000023.i3.766b67b1vR7Vg3\"\u003e\u003cspan\u003eThermostat size: 93mm*56mm*34mm\u003c\/span\u003e\u003c\/div\u003e\n\u003cdiv\u003e\u003cspan\u003eOutput capacity: cooling (compressor 3A) heating (10A\/250VAC)\u003c\/span\u003e\u003c\/div\u003e\n\u003cdiv\u003e \u003c\/div\u003e\n\u003cdiv\u003e\u003cspan\u003eSee parameter method:\u003c\/span\u003e\u003c\/div\u003e\n\u003cdiv\u003e \u003c\/div\u003e\n\u003cdiv\u003e\u003cspan\u003eWhen the thermostat is working normally, press and release \"▲\"the key once to display the temperature setting value; press and release \"▼\" the key once to display the temperature difference setting value. After 3 seconds, the temperature returns to the normal display state.\u003c\/span\u003e\u003c\/div\u003e\n\u003cdiv\u003e \u003c\/div\u003e\n\u003cdiv\u003e\u003cspan\u003eSetting parameter method:\u003c\/span\u003e\u003c\/div\u003e\n\u003cdiv\u003e \u003c\/div\u003e\n\u003cdiv\u003e\u003cspan\u003eWhen the thermostat is working normally, press \"S\" key and hold the button for more than 3 seconds to enter the modified parameter mode. The “Set” indicator lights up, the digital tube displays the code “F1” of the first menu item, and press the \"▲\" or \"▼\"key to up or down the code of the menu item. Press \"S\" the key to display the parameter setting value of the current menu, press \"S\" and hold the key, then press the \"▲\"or \"▼\" key to increase or decrease the parameter setting value of the current menu; press \"S\" key and hold the key, and press the \"▲\"or \"▼\" key to quickly increase the speed; Or down and display the parameter settings of the current menu.\u003c\/span\u003e\u003c\/div\u003e\n\u003cdiv\u003e\u003cspan\u003ePress and hold \"▲\"or \"▼\" the key at the same time to restore the parameters to the factory settings.\u003c\/span\u003e\u003c\/div\u003e\n\u003cdiv\u003e \u003c\/div\u003e\n\u003cdiv\u003e\u003cspan\u003eOperation instructions:\u003c\/span\u003e\u003c\/div\u003e\n\u003cdiv\u003e \u003c\/div\u003e\n\u003cdiv\u003e\u003cspan\u003e1.When the thermostat is working normally, press and hold the \"power button\" for more than 3 seconds to turn off the thermostat. When the thermostat is off, press and hold the \"power button\" for more than 3 seconds to open the thermostat.\u003c\/span\u003e\u003c\/div\u003e\n\u003cdiv\u003e\u003cspan\u003eWhen the thermostat is working normally, the digital tube displays the current temperature measurement value, and performs automatic recognition conversion of the cooling heating operation mode.\u003c\/span\u003e\u003c\/div\u003e\n\u003cdiv\u003e\u003cspan\u003e2.When the measured temperature ≥ temperature set value + temperature difference set value, enter the cooling state, the Cool indicator light is on, the cooling relay normally open contact is closed; the Cool indicator flashes, indicating that the cooling device is in the press delay protection state; when measuring the temperature ≤ temperature set value, the Cool indicator is off, and the normally open contact of the refrigeration relay is disconnected.\u003c\/span\u003e\u003c\/div\u003e\n\u003cdiv\u003e\u003cspan\u003e3.When the measured temperature ≤ temperature set value - temperature difference set value enters the heating state, the Heat indicator light is on, the heating relay normally open contact is closed; when the measured temperature ≥ temperature set value, the Heat indicator is off, the heating relay normally open contact disconnect.\u003c\/span\u003e\u003c\/div\u003e\n\u003cdiv\u003e \u003c\/div\u003e\n\u003cdiv data-spm-anchor-id=\"a2g0o.detail.1000023.i1.17566478417y5U\"\u003e\n\u003cp data-spm-anchor-id=\"a2g0o.detail.1000023.i0.17566478417y5U\"\u003e\u003cspan\u003eIndicator status description:\u003c\/span\u003e\u003c\/p\u003e\n\u003ctable border=\"1\" cellspacing=\"0\"\u003e\n\u003ctbody\u003e\n\u003ctr\u003e\n\u003ctd\u003e\n\u003cp align=\"center\"\u003e\u003cspan\u003eIndicator\u003c\/span\u003e\u003c\/p\u003e\n\u003c\/td\u003e\n\u003ctd\u003e\n\u003cp align=\"center\"\u003e\u003cspan\u003eFunction\u003c\/span\u003e\u003c\/p\u003e\n\u003c\/td\u003e\n\u003ctd\u003e\n\u003cp align=\"center\" data-spm-anchor-id=\"a2g0o.detail.1000023.i10.17566478417y5U\"\u003e\u003cspan\u003eNote\u003c\/span\u003e\u003c\/p\u003e\n\u003c\/td\u003e\n\u003c\/tr\u003e\n\u003ctr\u003e\n\u003ctd\u003e\n\u003cp align=\"center\" data-spm-anchor-id=\"a2g0o.detail.1000023.i4.17566478417y5U\"\u003e\u003cspan\u003eCool indicator\u003c\/span\u003e\u003c\/p\u003e\n\u003c\/td\u003e\n\u003ctd\u003e\n\u003cp align=\"center\" data-spm-anchor-id=\"a2g0o.detail.1000023.i5.17566478417y5U\"\u003e\u003cspan\u003eLight on:cooling work;\u003c\/span\u003e\u003c\/p\u003e\n\u003cp align=\"center\"\u003e\u003cspan\u003e Light off:cooling off;\u003c\/span\u003e\u003c\/p\u003e\n\u003cp align=\"center\"\u003e\u003cspan\u003eFlashing: press delay\u003c\/span\u003e\u003c\/p\u003e\n\u003c\/td\u003e\n\u003ctd rowspan=\"2\"\u003e\n\u003cp align=\"center\" data-spm-anchor-id=\"a2g0o.detail.1000023.i11.17566478417y5U\"\u003e\u003cspan\u003eCool and Heat Both indicator lights cannot be lit at the same time\u003c\/span\u003e\u003c\/p\u003e\n\u003c\/td\u003e\n\u003c\/tr\u003e\n\u003ctr\u003e\n\u003ctd\u003e\n\u003cp align=\"center\" data-spm-anchor-id=\"a2g0o.detail.1000023.i6.17566478417y5U\"\u003e\u003cspan\u003eHeat indicator\u003c\/span\u003e\u003c\/p\u003e\n\u003c\/td\u003e\n\u003ctd\u003e\n\u003cp align=\"center\" data-spm-anchor-id=\"a2g0o.detail.1000023.i7.17566478417y5U\"\u003e\u003cspan\u003eBright: heating work;\u003c\/span\u003e\u003c\/p\u003e\n\u003cp align=\"center\"\u003e\u003cspan\u003eoff: heating off\u003c\/span\u003e\u003c\/p\u003e\n\u003c\/td\u003e\n\u003c\/tr\u003e\n\u003ctr\u003e\n\u003ctd\u003e\n\u003cp align=\"center\" data-spm-anchor-id=\"a2g0o.detail.1000023.i8.17566478417y5U\"\u003e\u003cspan\u003eSet indicator\u003c\/span\u003e\u003c\/p\u003e\n\u003c\/td\u003e\n\u003ctd\u003e\n\u003cp align=\"center\" data-spm-anchor-id=\"a2g0o.detail.1000023.i9.17566478417y5U\"\u003e\u003cspan\u003eOn: parameter setting status\u003c\/span\u003e\u003c\/p\u003e\n\u003c\/td\u003e\n\u003ctd\u003e\n\u003cp align=\"center\"\u003e \u003c\/p\u003e\n\u003c\/td\u003e\n\u003c\/tr\u003e\n\u003c\/tbody\u003e\n\u003c\/table\u003e\n\u003cp\u003e \u003c\/p\u003e\n\u003cp\u003e\u003cspan\u003eMenu function description:\u003c\/span\u003e\u003c\/p\u003e\n\u003ctable border=\"1\" cellspacing=\"0\"\u003e\n\u003ctbody\u003e\n\u003ctr\u003e\n\u003ctd\u003e\n\u003cp align=\"center\" data-spm-anchor-id=\"a2g0o.detail.1000023.i13.17566478417y5U\"\u003e\u003cspan\u003eMenu identifier\u003c\/span\u003e\u003c\/p\u003e\n\u003c\/td\u003e\n\u003ctd\u003e\n\u003cp align=\"center\" data-spm-anchor-id=\"a2g0o.detail.1000023.i16.17566478417y5U\"\u003e\u003cspan\u003eMenu function\u003c\/span\u003e\u003c\/p\u003e\n\u003c\/td\u003e\n\u003ctd\u003e\n\u003cp align=\"center\" data-spm-anchor-id=\"a2g0o.detail.1000023.i17.17566478417y5U\"\u003e\u003cspan\u003eSetting range\u003c\/span\u003e\u003c\/p\u003e\n\u003c\/td\u003e\n\u003ctd\u003e\n\u003cp align=\"center\" data-spm-anchor-id=\"a2g0o.detail.1000023.i18.17566478417y5U\"\u003e\u003cspan\u003eFactory setting\u003c\/span\u003e\u003c\/p\u003e\n\u003c\/td\u003e\n\u003c\/tr\u003e\n\u003ctr\u003e\n\u003ctd\u003e\n\u003cp align=\"center\" data-spm-anchor-id=\"a2g0o.detail.1000023.i12.17566478417y5U\"\u003e\u003cspan\u003eF1\u003c\/span\u003e\u003c\/p\u003e\n\u003c\/td\u003e\n\u003ctd\u003e\n\u003cp align=\"center\" data-spm-anchor-id=\"a2g0o.detail.1000023.i14.17566478417y5U\"\u003e\u003cspan\u003eTemperature setting value\u003c\/span\u003e\u003c\/p\u003e\n\u003c\/td\u003e\n\u003ctd\u003e\n\u003cp align=\"center\" data-spm-anchor-id=\"a2g0o.detail.1000023.i15.17566478417y5U\"\u003e\u003cspan\u003e-40.0~99.9℃\u003c\/span\u003e\u003c\/p\u003e\n\u003c\/td\u003e\n\u003ctd\u003e\n\u003cp align=\"center\" data-spm-anchor-id=\"a2g0o.detail.1000023.i19.17566478417y5U\"\u003e\u003cspan\u003e10.0℃\u003c\/span\u003e\u003c\/p\u003e\n\u003c\/td\u003e\n\u003c\/tr\u003e\n\u003ctr\u003e\n\u003ctd\u003e\n\u003cp align=\"center\" data-spm-anchor-id=\"a2g0o.detail.1000023.i20.17566478417y5U\"\u003e\u003cspan\u003eF2\u003c\/span\u003e\u003c\/p\u003e\n\u003c\/td\u003e\n\u003ctd\u003e\n\u003cp align=\"center\" data-spm-anchor-id=\"a2g0o.detail.1000023.i21.17566478417y5U\"\u003e\u003cspan\u003eTemperature difference setting value\u003c\/span\u003e\u003c\/p\u003e\n\u003c\/td\u003e\n\u003ctd\u003e\n\u003cp align=\"center\" data-spm-anchor-id=\"a2g0o.detail.1000023.i22.17566478417y5U\"\u003e\u003cspan\u003e0.3~10.0℃\u003c\/span\u003e\u003c\/p\u003e\n\u003c\/td\u003e\n\u003ctd\u003e\n\u003cp align=\"center\" data-spm-anchor-id=\"a2g0o.detail.1000023.i23.17566478417y5U\"\u003e\u003cspan\u003e0.5℃\u003c\/span\u003e\u003c\/p\u003e\n\u003c\/td\u003e\n\u003c\/tr\u003e\n\u003ctr\u003e\n\u003ctd\u003e\n\u003cp align=\"center\" data-spm-anchor-id=\"a2g0o.detail.1000023.i24.17566478417y5U\"\u003e\u003cspan\u003eF3\u003c\/span\u003e\u003c\/p\u003e\n\u003c\/td\u003e\n\u003ctd\u003e\n\u003cp align=\"center\" data-spm-anchor-id=\"a2g0o.detail.1000023.i25.17566478417y5U\"\u003e\u003cspan\u003ePress delay\u003c\/span\u003e\u003c\/p\u003e\n\u003c\/td\u003e\n\u003ctd\u003e\n\u003cp align=\"center\" data-spm-anchor-id=\"a2g0o.detail.1000023.i26.17566478417y5U\"\u003e\u003cspan\u003e1~10 min\u003c\/span\u003e\u003c\/p\u003e\n\u003c\/td\u003e\n\u003ctd\u003e\n\u003cp align=\"center\" data-spm-anchor-id=\"a2g0o.detail.1000023.i27.17566478417y5U\"\u003e\u003cspan\u003e3 min\u003c\/span\u003e\u003c\/p\u003e\n\u003c\/td\u003e\n\u003c\/tr\u003e\n\u003ctr\u003e\n\u003ctd data-spm-anchor-id=\"a2g0o.detail.1000023.i28.17566478417y5U\"\u003e\n\u003cp align=\"center\"\u003e\u003cspan\u003eF4\u003c\/span\u003e\u003c\/p\u003e\n\u003c\/td\u003e\n\u003ctd\u003e\n\u003cp align=\"center\" data-spm-anchor-id=\"a2g0o.detail.1000023.i29.17566478417y5U\"\u003e\u003cspan\u003eTemperature correction\u003c\/span\u003e\u003c\/p\u003e\n\u003c\/td\u003e\n\u003ctd\u003e\n\u003cp align=\"center\" data-spm-anchor-id=\"a2g0o.detail.1000023.i30.17566478417y5U\"\u003e\u003cspan\u003e-10.0~10.0℃\u003c\/span\u003e\u003c\/p\u003e\n\u003c\/td\u003e\n\u003ctd\u003e\n\u003cp align=\"center\" data-spm-anchor-id=\"a2g0o.detail.1000023.i31.17566478417y5U\"\u003e\u003cspan\u003e0℃\u003c\/span\u003e\u003c\/p\u003e\n\u003c\/td\u003e\n\u003c\/tr\u003e\n\u003c\/tbody\u003e\n\u003c\/table\u003e\n\u003cp\u003e \u003c\/p\u003e\n\u003cp\u003e\u003cspan\u003eWiring Diagram:\u003c\/span\u003e\u003c\/p\u003e\n\u003cp\u003e\u003cspan\u003e\u003cimg alt=\"图片1\" src=\"https:\/\/ae01.alicdn.com\/kf\/H001eadcd3b8e49109ce4fd472825de6dW.jpg\"\u003e\u003c\/span\u003e\u003c\/p\u003e\n\u003cp\u003e \u003c\/p\u003e\n\u003cdiv\u003e\n\u003cdiv\u003e \u003c\/div\u003e\n\u003cdiv\u003e\u003cspan\u003eRepair System Data:\u003c\/span\u003e\u003c\/div\u003e\n\u003cdiv\u003e \u003c\/div\u003e\n\u003cdiv\u003e\u003cspan\u003eAfter the thermostat is powered on, first check whether the parameter settings are correct. If an error is detected, “Er” is displayed. Pressing any key will restore the default parameter settings and work normally. It is recommended to reset the parameters at this time.\u003c\/span\u003e\u003c\/div\u003e\n\u003cdiv\u003e \u003c\/div\u003e\n\u003cdiv\u003e\u003cspan\u003eSystem Code, reason and action:\u003c\/span\u003e\u003c\/div\u003e\n\u003cdiv\u003e \u003c\/div\u003e\n\u003cdiv\u003e\u003cspan\u003eSensor fault alarm: When the temperature probe loop is short-circuited or open-circuit fault, the thermostat starts the probe fault alarm mode, closes all execution states, and the digital tube displays “EE”. After the fault is cleared, press any key to return to the normal working mode.\u003c\/span\u003e\u003c\/div\u003e\n\u003cdiv\u003e\u003cspan\u003eOver-temperature alarm: When the temperature measurement exceeds the temperature measurement range, the thermostat starts the over-temperature limit fault alarm mode, and all execution states are turned off. The digital tube displays “HH”. When the temperature returns to the normal measurement range, press any key. Return to normal working mode.\u003c\/span\u003e\u003c\/div\u003e\n\u003cdiv\u003e \u003c\/div\u003e\n\u003cdiv\u003e\u003cspan\u003eSafety rules:\u003c\/span\u003e\u003c\/div\u003e\n\u003cdiv\u003e \u003c\/div\u003e\n\u003cdiv\u003e\u003cspan\u003e☆ Danger:\u003c\/span\u003e\u003c\/div\u003e\n\u003cdiv\u003e\u003cspan\u003e1. Strictly distinguish the sensor lead, power line and output relay interface, can not be connected incorrectly, the relay can not be overloaded;\u003c\/span\u003e\u003c\/div\u003e\n\u003cdiv\u003e\u003cspan\u003e2. All wiring changes must be made with the power off.\u003c\/span\u003e\u003c\/div\u003e\n\u003cdiv\u003e\u003cspan\u003e☆ Warning:\u003c\/span\u003e\u003c\/div\u003e\n\u003cdiv\u003e\u003cspan\u003e1. This thermostat is forbidden to be used in water or excessively humid environment. It is forbidden to use in high temperature, strong electromagnetic interference and strong corrosive environment.\u003c\/span\u003e\u003c\/div\u003e\n\u003cdiv\u003e\u003cspan\u003e☆ Note:\u003c\/span\u003e\u003c\/div\u003e\n\u003cdiv\u003e\u003cspan\u003e1. The supply voltage should be consistent with the voltage marked by the thermostat and ensure the stability of the supply voltage;\u003c\/span\u003e\u003c\/div\u003e\n\u003cdiv\u003e\u003cspan\u003e2. To avoid possible interference, it is recommended that the sensor leads be at an appropriate distance from the power line.\u003c\/span\u003e\u003c\/div\u003e\n\u003cdiv\u003e \u003c\/div\u003e\n\u003cdiv\u003e \u003c\/div\u003e\n\u003cdiv\u003e\u003cstrong\u003e\u003cspan\u003ePackage Included:\u003c\/span\u003e\u003c\/strong\u003e\u003c\/div\u003e\n\u003cdiv\u003e \u003c\/div\u003e\n\u003cdiv\u003e\u003cspan\u003e1 x DTC1200 Intellligent Temperature Controller\u003c\/span\u003e\u003c\/div\u003e\n\u003cdiv\u003e\u003cspan\u003e1 x Temperature sensor\u003c\/span\u003e\u003c\/div\u003e\n\u003cdiv\u003e\u003cspan\u003e1 x Instruction manual\u003c\/span\u003e\u003c\/div\u003e\n\u003cdiv\u003e\u003cspan\u003e1 x Packing box\u003c\/span\u003e\u003c\/div\u003e\n\u003cdiv\u003e\u003cspan\u003e\u003c\/span\u003e\u003c\/div\u003e\n\u003c\/div\u003e\n\u003c\/div\u003e\n\u003c\/div\u003e\n\u003cdiv\u003e\n\u003cp\u003e\u003cimg alt=\"pictures2\" src=\"https:\/\/ae01.alicdn.com\/kf\/H48e07ca430b143a1bd6390f007d70893r.jpg\"\u003e\u003c\/p\u003e\n\u003cp\u003e\u003cimg alt=\"XA0008 (3)\" src=\"https:\/\/ae01.alicdn.com\/kf\/H909cdc0df9ef48b2909767f61c05f908Y.jpg\"\u003e\u003cimg alt=\"XA0008 (4)\" src=\"https:\/\/ae01.alicdn.com\/kf\/He57b51af913d453bb4631f7f71fac13e1.jpg\"\u003e\u003cimg alt=\"XA0008 (5)\" src=\"https:\/\/ae01.alicdn.com\/kf\/H1d793d42fd7945cba1d4202db1861873q.jpg\"\u003e\u003cimg alt=\"XA0008 (24)\" src=\"https:\/\/ae01.alicdn.com\/kf\/Hddf60c92d3bf47e7a4377478d2ae0f4c0.jpg\"\u003e\u003cimg alt=\"XA0008 (7)\" src=\"https:\/\/ae01.alicdn.com\/kf\/H81eb27e7121545b799fea5521905e3c7U.jpg\"\u003e\u003cimg alt=\"XA0008 (6)\" src=\"https:\/\/ae01.alicdn.com\/kf\/H9b1a57d5932b47359fe4cb26b4df8221z.jpg\"\u003e\u003cimg alt=\"XA0008 (1)\" src=\"https:\/\/ae01.alicdn.com\/kf\/H3b043d774f204356b0278e4786d01f14k.jpg\"\u003e\u003cimg alt=\"XA0008 (9)\" src=\"https:\/\/ae01.alicdn.com\/kf\/H97fb15979930424092f839c9a8a3830fK.jpg\"\u003e\u003cimg alt=\"XA0008 (10)\" src=\"https:\/\/ae01.alicdn.com\/kf\/H6e4b81a56f9949e385541d0be905a572G.jpg\"\u003e\u003cimg alt=\"XA0008 (11)\" src=\"https:\/\/ae01.alicdn.com\/kf\/Hd0829f171f2f41bdb34c36cff898940cl.jpg\"\u003e\u003cimg alt=\"XA0008 (12)\" src=\"https:\/\/ae01.alicdn.com\/kf\/Hc210386716324310a4aa3248b0a8a09dp.jpg\"\u003e\u003cimg alt=\"XA0008 (19)\" src=\"https:\/\/ae01.alicdn.com\/kf\/H2743991dcfaf488b936cea38071fdc22l.jpg\"\u003e\u003cimg alt=\"XA0008 (21)\" src=\"https:\/\/ae01.alicdn.com\/kf\/H5d8b10d76d27477aa6d4f2e96f92b18fw.jpg\"\u003e\u003c\/p\u003e\n\u003c\/div\u003e\n\u003cp\u003e \u003c\/p\u003e\n\u003cp\u003e \u003c\/p\u003e\n\u003cp\u003e\u003cspan\u003e\u003cstrong\u003eDTC1100 DTC1110 DTC2210 DTC2200 Temperature Controller\u003c\/strong\u003e\u003c\/span\u003e\u003c\/p\u003e\n\u003cdiv\u003e\u003cspan\u003eProduct Name: Temperature Controller \u003c\/span\u003e\u003c\/div\u003e\n\u003cdiv\u003e\u003cspan\u003eProduct Models: DTC1100; DTC1110; DTC2210; DTC2200 \u003c\/span\u003e\u003c\/div\u003e\n\u003cdiv\u003e\u003cspan\u003ePower supply: AC110V-220V\u003c\/span\u003e\u003c\/div\u003e\n\u003cdiv\u003e\u003cspan\u003eTemperature range: -40°C~+99°C\u003c\/span\u003e\u003c\/div\u003e\n\u003cdiv\u003e\u003cspan\u003eTemperature measurement accuracy: ±1°C (-40 °C ~ +70 °C)\u003c\/span\u003e\u003c\/div\u003e\n\u003cdiv\u003e\u003cspan\u003eThermostat size: 93mm*56mm*34mm\u003c\/span\u003e\u003c\/div\u003e\n\u003cdiv\u003e\u003cspan\u003eRelay contact capacity: Cool(10WC250V); Heat(10A\/AC250V)\u003c\/span\u003e\u003c\/div\u003e\n\u003cdiv\u003e \u003c\/div\u003e\n\u003cdiv\u003e\u003cspan\u003e\u003cimg alt=\"1 (1)\" src=\"https:\/\/ae01.alicdn.com\/kf\/H55d10cb072154207bcdd46dd1dafbc8fh.jpg\"\u003e\u003cimg alt=\"1 (4)\" src=\"https:\/\/ae01.alicdn.com\/kf\/H2f4f0f7cfec445b58c5e00fbdd8435872.jpg\"\u003e\u003cimg alt=\"1 (2)\" src=\"https:\/\/ae01.alicdn.com\/kf\/Hdaf8974533f04094ac13d6f88bd4a970o.jpg\"\u003e\u003cimg alt=\"接线图 (1)\" src=\"https:\/\/ae01.alicdn.com\/kf\/Ha2a95c321166465591f5af870fd231bfp.jpg\"\u003e\u003cimg alt=\"1 (13)\" src=\"https:\/\/ae01.alicdn.com\/kf\/He9464c5ea5c24e168157faff9566d0ecj.jpg\"\u003e\u003cimg alt=\"1 (18)\" src=\"https:\/\/ae01.alicdn.com\/kf\/H44dfe2dd19c14a14bdd1e3d351e03a4bE.jpg\"\u003e\u003cimg alt=\"01 (1)\" src=\"https:\/\/ae01.alicdn.com\/kf\/Ha529d255334543f68affa9a95cb27f16o.jpg\"\u003e\u003cimg alt=\"4\" src=\"https:\/\/ae01.alicdn.com\/kf\/H312943e7f91e4b709b5d642e25598a6a5.jpg\"\u003e\u003cimg alt=\"15\" src=\"https:\/\/ae01.alicdn.com\/kf\/Hb93149fbec8e4329a4c090147de3983fq.jpg\"\u003e\u003cimg alt=\"接线图 (1)\" src=\"https:\/\/ae01.alicdn.com\/kf\/H0e9b53e72d594dde8c46be7d94b346b9b.jpg\"\u003e\u003cimg alt=\"10\" src=\"https:\/\/ae01.alicdn.com\/kf\/Ha4ae55d77d754955bc11801c20abde77F.jpg\"\u003e\u003cimg alt=\"16\" src=\"https:\/\/ae01.alicdn.com\/kf\/H516b5c2e4e7140f5952500c8e005c7b6t.jpg\"\u003e\u003cimg alt=\"1 (1)\" src=\"https:\/\/ae01.alicdn.com\/kf\/H72183dd8d1fc4fe4b6deb8b28ee279cby.jpg\"\u003e\u003cimg alt=\"1 (3)\" src=\"https:\/\/ae01.alicdn.com\/kf\/H1c848b67f8704717802fa010419962b0m.jpg\"\u003e\u003cimg alt=\"1 (4)\" src=\"https:\/\/ae01.alicdn.com\/kf\/H5f22b2bb585948da837a0df46163a52ea.jpg\"\u003e\u003cimg alt=\"1 (8)\" src=\"https:\/\/ae01.alicdn.com\/kf\/Hb0db99a5e1424609a10aea7486f295ab5.jpg\"\u003e\u003cimg alt=\"1 (17)\" src=\"https:\/\/ae01.alicdn.com\/kf\/Hfb6298937ee7447fb751dd6aa5b96549O.jpg\"\u003e\u003cimg alt=\"1 (19)\" src=\"https:\/\/ae01.alicdn.com\/kf\/Hbf41fac7ac3a42fdb90f17b8ff0d308d2.jpg\"\u003e\u003cimg alt=\"1 (20)\" src=\"https:\/\/ae01.alicdn.com\/kf\/H4a3c5770430945089241d33dafef31fcm.jpg\"\u003e\u003cimg alt=\"1 (1)\" src=\"https:\/\/ae01.alicdn.com\/kf\/Hc39891a3e23d41b5968309454950c8bcI.jpg\"\u003e\u003cimg alt=\"1 (2)\" src=\"https:\/\/ae01.alicdn.com\/kf\/H4522829b7e6e44dc9603abf7792e0647G.jpg\"\u003e\u003cimg alt=\"接线图\" src=\"https:\/\/ae01.alicdn.com\/kf\/Hfe019fff700840c6ad7f4ba4869ef0eaq.jpg\"\u003e\u003cimg alt=\"1 (12)\" src=\"https:\/\/ae01.alicdn.com\/kf\/H1ddb9da69f8b4b6eb775e093490116feg.jpg\"\u003e\u003cimg alt=\"1 (18)\" src=\"https:\/\/ae01.alicdn.com\/kf\/H42755cdfd6174fe3b72473d7592b07fdr.jpg\"\u003e\u003cimg alt=\"1 (20)\" src=\"https:\/\/ae01.alicdn.com\/kf\/H2350b4b9bf9b48a78676cfa40085604fK.jpg\"\u003e\u003cimg alt=\"1 (21)\" src=\"https:\/\/ae01.alicdn.com\/kf\/H62b80cb1bda24ed8841e2f13742847a8d.jpg\"\u003e\u003c\/span\u003e\u003c\/div\u003e\n\u003cdiv\u003e \u003c\/div\u003e\n\u003cdiv\u003e \u003c\/div\u003e\n\u003cdiv\u003e \u003c\/div\u003e\n\u003cdiv\u003e \u003c\/div\u003e\n\u003cdiv\u003e\u003cspan\u003eDTC3200 Temperature and Humidity Controller\u003c\/span\u003e\u003c\/div\u003e\n\u003cdiv\u003e \u003c\/div\u003e\n\u003cdiv\u003e\u003cspan\u003eProduct Name: Temperature and Humidity Controller\u003c\/span\u003e\u003c\/div\u003e\n\u003cdiv\u003e\u003cspan\u003eProduct Model: DTC3200\u003c\/span\u003e\u003c\/div\u003e\n\u003cdiv\u003e\u003cspan\u003ePower supply voltage: AC 110 ~ 230V\u003c\/span\u003e\u003c\/div\u003e\n\u003cdiv\u003e\u003cspan\u003ePower supply frequency: 50 \/ 60Hz\u003c\/span\u003e\u003c\/div\u003e\n\u003cdiv\u003e\u003cspan\u003eTemperature measurement range: -20 ~ 60 ℃\u003c\/span\u003e\u003c\/div\u003e\n\u003cdiv\u003e\u003cspan\u003eHumidity measurement range: 0% ~ 100% RH\u003c\/span\u003e\u003c\/div\u003e\n\u003cdiv\u003e\u003cspan\u003eTemperature measurement accuracy: 0.3 ℃\u003c\/span\u003e\u003c\/div\u003e\n\u003cdiv\u003e\u003cspan\u003eHumidity measurement accuracy: 3%\u003c\/span\u003e\u003c\/div\u003e\n\u003cdiv\u003e\u003cspan\u003eOutput control: Relay output\u003c\/span\u003e\u003c\/div\u003e\n\u003cdiv\u003e\u003cspan\u003eOutput power: MAX 10A\u003c\/span\u003e\u003c\/div\u003e\n\u003cdiv\u003e \u003c\/div\u003e\n\u003cdiv\u003e\u003cspan\u003eSetting method: start value \u0026lt;stop value (the program automatically determines the working mode as heating \/ humidification mode)\u003c\/span\u003e\u003c\/div\u003e\n\u003cdiv\u003e\u003cspan\u003eSetting method: start value\u0026gt; stop value (the program automatically determines the working mode to be cooling \/ dehumidifying mode)\u003c\/span\u003e\u003c\/div\u003e\n\u003cdiv\u003e\u003cspan\u003eHeating \/ cooling mode setting\u003c\/span\u003e\u003c\/div\u003e\n\u003cdiv\u003e\u003cspan\u003eSetting method: setting (starting temperature): long press the ▲ button, the starting temperature flashes, and the starting temperature value is set by the ▲ ▼ button\u003c\/span\u003e\u003c\/div\u003e\n\u003cdiv\u003e\u003cspan\u003eSetting (stop temperature): long press the ▼ button to stop the temperature flashing, set the stop temperature value by ▲ ▼ button\u003c\/span\u003e\u003c\/div\u003e\n\u003cdiv\u003e \u003c\/div\u003e\n\u003cdiv\u003e\u003cspan\u003eHeating use case: control the water heater, heating to 65 ℃ to stop, the temperature drops to 50 ℃ to start heating again\u003c\/span\u003e\u003c\/div\u003e\n\u003cdiv\u003e\u003cspan\u003eThe first step: heating working mode, start temperature \u0026lt;stop temperature\u003c\/span\u003e\u003c\/div\u003e\n\u003cdiv\u003e\u003cspan\u003eStep 2: Press and hold the ▲ button, the starting temperature flashes, and set the starting temperature to 50 ℃ via the ▲ ▼ button\u003c\/span\u003e\u003c\/div\u003e\n\u003cdiv\u003e\u003cspan\u003eThe third step: long press the ▼ button to stop the temperature flashing, set the stop temperature to 65 ℃ through the ▲ ▼ button, the setting is complete!\u003c\/span\u003e\u003c\/div\u003e\n\u003cdiv\u003e\u003cspan\u003eRefrigeration use case: use in the farm, the fan ventilation stops at 26 ℃, and the temperature rises to 30 ℃ to start ventilation again\u003c\/span\u003e\u003c\/div\u003e\n\u003cdiv\u003e\u003cspan\u003eStep 1: Refrigeration working mode, start temperature\u0026gt; stop temperature\u003c\/span\u003e\u003c\/div\u003e\n\u003cdiv\u003e\u003cspan\u003eStep 2: Press and hold the ▲ button, the starting temperature flashes, and set the starting temperature to 30 ℃ via the ▲ ▼ button\u003c\/span\u003e\u003c\/div\u003e\n\u003cdiv\u003e\u003cspan\u003eStep 3: Press and hold the ▼ button to stop the temperature flashing, and set the stop temperature to 26 ° C with the ▲ ▼ button. The setting is complete!\u003c\/span\u003e\u003c\/div\u003e\n\u003cdiv\u003e \u003c\/div\u003e\n\u003cdiv\u003e\u003cspan\u003eHumidification \/ dehumidification mode settings:\u003c\/span\u003e\u003c\/div\u003e\n\u003cdiv\u003e\u003cspan\u003eSetting (Start Humidity): Long press the △ key, the start humidity value flashes, set the start humidity value by the △ ▽ key. Set [Stop Humidity]: Long press the △ key, stop the humidity value flashing, and set the stop humidity by the △ ▽ key value.\u003c\/span\u003e\u003c\/div\u003e\n\u003cdiv\u003e \u003c\/div\u003e\n\u003cdiv\u003e\u003cspan\u003eExamples of humidification: Fresh supermarket humidification, control humidifier 50% RH to start humidification, humidification to 80% RH to stop humidification.\u003c\/span\u003e\u003c\/div\u003e\n\u003cdiv\u003e \u003c\/div\u003e\n\u003cdiv\u003e\u003cspan\u003eSetup steps:\u003c\/span\u003e\u003c\/div\u003e\n\u003cdiv\u003e\u003cspan\u003e Step 1: Press and hold the △ key for 3 seconds to start the humidity value flashing, and set the start humidity value to 50% RH.\u003c\/span\u003e\u003c\/div\u003e\n\u003cdiv\u003e\u003cspan\u003e Step 2: Press and hold the ▽ key for 3 seconds to stop the humidity value flashing, set the value to 80% RH, the setting is completed, press the button for 5 seconds without operation, and automatically return to the normal display state\u003c\/span\u003e\u003c\/div\u003e\n\u003cdiv\u003e \u003c\/div\u003e\n\u003cdiv\u003e\u003cspan\u003eDehumidification example: workshop control exhaust dehumidification system, humidity 70% RH starts dehumidification, humidity 40% RH stops dehumidification\u003c\/span\u003e\u003c\/div\u003e\n\u003cdiv\u003e \u003c\/div\u003e\n\u003cdiv\u003e\u003cspan\u003eSetup steps:\u003c\/span\u003e\u003c\/div\u003e\n\u003cdiv\u003e\u003cspan\u003e Step 1: Press and hold the △ key for 3 seconds to start the humidity value flashing, and set the start humidity value to 40% RH.\u003c\/span\u003e\u003c\/div\u003e\n\u003cdiv\u003e\u003cspan\u003e Step 2: Press and hold the ▽ key for 3 seconds to stop the humidity value from flashing, set the value to 70% RH, the setting is completed, press the button for 5 seconds without operation, and automatically return to the normal display state\u003c\/span\u003e\u003c\/div\u003e\n\u003cdiv\u003e \u003c\/div\u003e\n\u003cdiv\u003e \u003c\/div\u003e\n\u003cdiv\u003e\u003cspan\u003eTemperature correction:\u003c\/span\u003e\u003c\/div\u003e\n\u003cdiv\u003e\u003cspan\u003eSimultaneously press the ▲ ▼ key for 3 seconds to start the temperature digit flashing, and use the ▲ ▼ key to set the start temperature correction value; after the setting is completed, press the button for 5 seconds without operation, and automatically return to the normal display state.\u003c\/span\u003e\u003c\/div\u003e\n\u003cdiv\u003e \u003c\/div\u003e\n\u003cdiv\u003e\u003cspan\u003eHumidity correction:\u003c\/span\u003e\u003c\/div\u003e\n\u003cdiv\u003e\u003cspan\u003eSimultaneously press the △ ▽ key for 3 seconds to start the humidity digit flashing, and set the humidity correction value by the △ ▽ key; after the setting is completed, press the button for 5 seconds without operation, and it will automatically return to the normal display state.\u003c\/span\u003e\u003c\/div\u003e\n\u003cdiv\u003e \u003c\/div\u003e\n\u003cdiv\u003e\u003cspan\u003eWiring instructions:\u003c\/span\u003e\u003c\/div\u003e\n\u003cdiv\u003e \u003c\/div\u003e\n\u003cdiv\u003e \u003cimg alt=\"11\" src=\"https:\/\/ae01.alicdn.com\/kf\/H818f4241e00c4a4383e69801a2e9fd69R.jpg\"\u003e\n\u003c\/div\u003e\n\u003cdiv\u003e \u003c\/div\u003e\n\u003cdiv\u003e \u003c\/div\u003e\n\u003cdiv\u003e\u003cspan\u003e※ If the temperature and humidity display LLL, please confirm whether the wiring of the SHT20 digital temperature and humidity sensor is correct and whether there is poor contact, you can try to reconnect the wiring.\u003c\/span\u003e\u003c\/div\u003e\n\u003cdiv\u003e \u003c\/div\u003e\n\u003cdiv\u003e\n\u003cimg alt=\"1(23)\" src=\"https:\/\/ae01.alicdn.com\/kf\/H12eb95c3e0d2444c96477c9c4e96c5e2r.jpg\"\u003e\u003cimg alt=\"1 (2)\" src=\"https:\/\/ae01.alicdn.com\/kf\/H4aec1fa943784e678b9d5a13ef92c840u.jpg\"\u003e\u003cimg alt=\"1 (9)\" src=\"https:\/\/ae01.alicdn.com\/kf\/H62f61e0071094feb8e4b5a95452126815.jpg\"\u003e\u003cimg alt=\"1 (15)\" src=\"https:\/\/ae01.alicdn.com\/kf\/H3015a4e6d81f490b9020dca461f7694bX.jpg\"\u003e\u003cimg alt=\"1 (18)\" src=\"https:\/\/ae01.alicdn.com\/kf\/He260f2df36064fe2af5530c7a561437ed.jpg\"\u003e\u003cimg alt=\"1 (20)\" src=\"https:\/\/ae01.alicdn.com\/kf\/He00db8acc649445db0f1f4fce6df2bf95.jpg\"\u003e\u003cimg alt=\"1 (22)\" src=\"https:\/\/ae01.alicdn.com\/kf\/H5e7b7c932bd44e159fcc998c54110021C.jpg\"\u003e\u003cimg alt=\"1 (4)\" src=\"https:\/\/ae01.alicdn.com\/kf\/H31b481ef695c453d88993756e902f3dec.jpg\"\u003e\u003cimg alt=\"1 (3)\" src=\"https:\/\/ae01.alicdn.com\/kf\/H72f864579840411fa481222392614398v.jpg\"\u003e\n\u003c\/div\u003e","published_at":"2020-05-04T20:03:25+08:00","created_at":"2020-05-04T20:20:56+08:00","vendor":"diymore","type":"Thermostat","tags":[],"price":1399,"price_min":1399,"price_max":1399,"available":true,"price_varies":false,"compare_at_price":null,"compare_at_price_min":0,"compare_at_price_max":0,"compare_at_price_varies":false,"variants":[{"id":32174110441543,"title":"AC 110V-220V DTC2210 Dual display","option1":"AC 110V-220V DTC2210 Dual display","option2":null,"option3":null,"sku":"XA0022","requires_shipping":true,"taxable":true,"featured_image":null,"available":true,"name":"110V-220V LED Digital Temperature Controller Thermostat Thermoregulator for Incubator Heating Cooling Replace STC-1000 DTC1200 - AC 110V-220V DTC2210 Dual display","public_title":"AC 110V-220V DTC2210 Dual display","options":["AC 110V-220V DTC2210 Dual display"],"price":1399,"weight":0,"compare_at_price":null,"inventory_management":"shopify","barcode":"","requires_selling_plan":false,"selling_plan_allocations":[],"quantity_rule":{"min":1,"max":null,"increment":1}},{"id":32174110474311,"title":"AC 110V-220V DTC1100 Dual display","option1":"AC 110V-220V DTC1100 Dual display","option2":null,"option3":null,"sku":"XA0021","requires_shipping":true,"taxable":true,"featured_image":null,"available":true,"name":"110V-220V LED Digital Temperature Controller Thermostat Thermoregulator for Incubator Heating Cooling Replace STC-1000 DTC1200 - AC 110V-220V DTC1100 Dual display","public_title":"AC 110V-220V DTC1100 Dual display","options":["AC 110V-220V DTC1100 Dual display"],"price":1399,"weight":0,"compare_at_price":null,"inventory_management":"shopify","barcode":"","requires_selling_plan":false,"selling_plan_allocations":[],"quantity_rule":{"min":1,"max":null,"increment":1}},{"id":32174110539847,"title":"AC 110V-220V DTC3200 Dual display","option1":"AC 110V-220V DTC3200 Dual display","option2":null,"option3":null,"sku":"XA0024","requires_shipping":true,"taxable":true,"featured_image":null,"available":true,"name":"110V-220V LED Digital Temperature Controller Thermostat Thermoregulator for Incubator Heating Cooling Replace STC-1000 DTC1200 - AC 110V-220V DTC3200 Dual display","public_title":"AC 110V-220V DTC3200 Dual display","options":["AC 110V-220V DTC3200 Dual display"],"price":1399,"weight":0,"compare_at_price":null,"inventory_management":"shopify","barcode":"","requires_selling_plan":false,"selling_plan_allocations":[],"quantity_rule":{"min":1,"max":null,"increment":1}},{"id":32174110572615,"title":"AC 110V-220V DTC1100","option1":"AC 110V-220V DTC1100","option2":null,"option3":null,"sku":"XA0020","requires_shipping":true,"taxable":true,"featured_image":null,"available":true,"name":"110V-220V LED Digital Temperature Controller Thermostat Thermoregulator for Incubator Heating Cooling Replace STC-1000 DTC1200 - AC 110V-220V DTC1100","public_title":"AC 110V-220V DTC1100","options":["AC 110V-220V DTC1100"],"price":1399,"weight":0,"compare_at_price":null,"inventory_management":"shopify","barcode":"","requires_selling_plan":false,"selling_plan_allocations":[],"quantity_rule":{"min":1,"max":null,"increment":1}},{"id":32174110605383,"title":"AC 110V-220V DTC2200","option1":"AC 110V-220V DTC2200","option2":null,"option3":null,"sku":"XA0023","requires_shipping":true,"taxable":true,"featured_image":null,"available":true,"name":"110V-220V LED Digital Temperature Controller Thermostat Thermoregulator for Incubator Heating Cooling Replace STC-1000 DTC1200 - AC 110V-220V DTC2200","public_title":"AC 110V-220V DTC2200","options":["AC 110V-220V DTC2200"],"price":1399,"weight":0,"compare_at_price":null,"inventory_management":"shopify","barcode":"","requires_selling_plan":false,"selling_plan_allocations":[],"quantity_rule":{"min":1,"max":null,"increment":1}},{"id":32174110638151,"title":"AC 110V-220V DTC1200","option1":"AC 110V-220V DTC1200","option2":null,"option3":null,"sku":"XA0008","requires_shipping":true,"taxable":true,"featured_image":null,"available":true,"name":"110V-220V LED Digital Temperature Controller Thermostat Thermoregulator for Incubator Heating Cooling Replace STC-1000 DTC1200 - AC 110V-220V DTC1200","public_title":"AC 110V-220V DTC1200","options":["AC 110V-220V DTC1200"],"price":1399,"weight":0,"compare_at_price":null,"inventory_management":"shopify","barcode":"","requires_selling_plan":false,"selling_plan_allocations":[],"quantity_rule":{"min":1,"max":null,"increment":1}}],"images":["\/\/www.diymore.cc\/cdn\/shop\/products\/1_1_423.jpg?v=1588701927","\/\/www.diymore.cc\/cdn\/shop\/products\/1_8_460.jpg?v=1588701927","\/\/www.diymore.cc\/cdn\/shop\/products\/1_9_135.jpg?v=1588701927","\/\/www.diymore.cc\/cdn\/shop\/products\/1_16_853.jpg?v=1588701927","\/\/www.diymore.cc\/cdn\/shop\/products\/1_18_816.jpg?v=1588701927","\/\/www.diymore.cc\/cdn\/shop\/products\/1_19_930.jpg?v=1588701927"],"featured_image":"\/\/www.diymore.cc\/cdn\/shop\/products\/1_1_423.jpg?v=1588701927","options":["Type"],"media":[{"alt":"110V-220V Led Digital Temperature Controller Thermostat Thermoregulator For Incubator Heating","id":6682595557447,"position":1,"preview_image":{"aspect_ratio":1.0,"height":1000,"width":1000,"src":"\/\/www.diymore.cc\/cdn\/shop\/products\/1_1_423.jpg?v=1588701927"},"aspect_ratio":1.0,"height":1000,"media_type":"image","src":"\/\/www.diymore.cc\/cdn\/shop\/products\/1_1_423.jpg?v=1588701927","width":1000},{"alt":"110V-220V Led Digital Temperature Controller Thermostat Thermoregulator For Incubator Heating","id":6682596311111,"position":2,"preview_image":{"aspect_ratio":1.0,"height":1000,"width":1000,"src":"\/\/www.diymore.cc\/cdn\/shop\/products\/1_8_460.jpg?v=1588701927"},"aspect_ratio":1.0,"height":1000,"media_type":"image","src":"\/\/www.diymore.cc\/cdn\/shop\/products\/1_8_460.jpg?v=1588701927","width":1000},{"alt":"110V-220V Led Digital Temperature Controller Thermostat Thermoregulator For Incubator Heating","id":6682596606023,"position":3,"preview_image":{"aspect_ratio":1.0,"height":1000,"width":1000,"src":"\/\/www.diymore.cc\/cdn\/shop\/products\/1_9_135.jpg?v=1588701927"},"aspect_ratio":1.0,"height":1000,"media_type":"image","src":"\/\/www.diymore.cc\/cdn\/shop\/products\/1_9_135.jpg?v=1588701927","width":1000},{"alt":"110V-220V Led Digital Temperature Controller Thermostat Thermoregulator For Incubator Heating","id":6682597326919,"position":4,"preview_image":{"aspect_ratio":1.0,"height":1000,"width":1000,"src":"\/\/www.diymore.cc\/cdn\/shop\/products\/1_16_853.jpg?v=1588701927"},"aspect_ratio":1.0,"height":1000,"media_type":"image","src":"\/\/www.diymore.cc\/cdn\/shop\/products\/1_16_853.jpg?v=1588701927","width":1000},{"alt":"110V-220V Led Digital Temperature Controller Thermostat Thermoregulator For Incubator Heating","id":6682597687367,"position":5,"preview_image":{"aspect_ratio":1.0,"height":1000,"width":1000,"src":"\/\/www.diymore.cc\/cdn\/shop\/products\/1_18_816.jpg?v=1588701927"},"aspect_ratio":1.0,"height":1000,"media_type":"image","src":"\/\/www.diymore.cc\/cdn\/shop\/products\/1_18_816.jpg?v=1588701927","width":1000},{"alt":"110V-220V Led Digital Temperature Controller Thermostat Thermoregulator For Incubator Heating","id":6682598015047,"position":6,"preview_image":{"aspect_ratio":1.0,"height":1000,"width":1000,"src":"\/\/www.diymore.cc\/cdn\/shop\/products\/1_19_930.jpg?v=1588701927"},"aspect_ratio":1.0,"height":1000,"media_type":"image","src":"\/\/www.diymore.cc\/cdn\/shop\/products\/1_19_930.jpg?v=1588701927","width":1000}],"requires_selling_plan":false,"selling_plan_groups":[],"content":"\u003cdiv\u003e\u003cstrong\u003e\u003cspan\u003eDescription:\u003c\/span\u003e\u003c\/strong\u003e\u003c\/div\u003e\n\u003cdiv\u003e \u003c\/div\u003e\n\u003cdiv\u003e\n\u003cdiv\u003e\u003cspan\u003eProduct Name: Thermostat\u003c\/span\u003e\u003c\/div\u003e\n\u003cdiv\u003e\u003cspan\u003eProduct model: DTC1200\u003c\/span\u003e\u003c\/div\u003e\n\u003cdiv data-spm-anchor-id=\"a2g0o.detail.1000023.i0.766b67b1vR7Vg3\"\u003e\u003cspan\u003eSupply voltage: AC110~230V\u003c\/span\u003e\u003c\/div\u003e\n\u003cdiv data-spm-anchor-id=\"a2g0o.detail.1000023.i1.766b67b1vR7Vg3\"\u003e\u003cspan\u003eTemperature range: -40°C~+99°C\u003c\/span\u003e\u003c\/div\u003e\n\u003cdiv\u003e\u003cspan\u003eTemperature measurement accuracy: ±1 °C (-40 °C ~ +70 °C)\u003c\/span\u003e\u003c\/div\u003e\n\u003cdiv data-spm-anchor-id=\"a2g0o.detail.1000023.i2.766b67b1vR7Vg3\"\u003e\u003cspan\u003eSensor line length: 100cm\u003c\/span\u003e\u003c\/div\u003e\n\u003cdiv data-spm-anchor-id=\"a2g0o.detail.1000023.i3.766b67b1vR7Vg3\"\u003e\u003cspan\u003eThermostat size: 93mm*56mm*34mm\u003c\/span\u003e\u003c\/div\u003e\n\u003cdiv\u003e\u003cspan\u003eOutput capacity: cooling (compressor 3A) heating (10A\/250VAC)\u003c\/span\u003e\u003c\/div\u003e\n\u003cdiv\u003e \u003c\/div\u003e\n\u003cdiv\u003e\u003cspan\u003eSee parameter method:\u003c\/span\u003e\u003c\/div\u003e\n\u003cdiv\u003e \u003c\/div\u003e\n\u003cdiv\u003e\u003cspan\u003eWhen the thermostat is working normally, press and release \"▲\"the key once to display the temperature setting value; press and release \"▼\" the key once to display the temperature difference setting value. After 3 seconds, the temperature returns to the normal display state.\u003c\/span\u003e\u003c\/div\u003e\n\u003cdiv\u003e \u003c\/div\u003e\n\u003cdiv\u003e\u003cspan\u003eSetting parameter method:\u003c\/span\u003e\u003c\/div\u003e\n\u003cdiv\u003e \u003c\/div\u003e\n\u003cdiv\u003e\u003cspan\u003eWhen the thermostat is working normally, press \"S\" key and hold the button for more than 3 seconds to enter the modified parameter mode. The “Set” indicator lights up, the digital tube displays the code “F1” of the first menu item, and press the \"▲\" or \"▼\"key to up or down the code of the menu item. Press \"S\" the key to display the parameter setting value of the current menu, press \"S\" and hold the key, then press the \"▲\"or \"▼\" key to increase or decrease the parameter setting value of the current menu; press \"S\" key and hold the key, and press the \"▲\"or \"▼\" key to quickly increase the speed; Or down and display the parameter settings of the current menu.\u003c\/span\u003e\u003c\/div\u003e\n\u003cdiv\u003e\u003cspan\u003ePress and hold \"▲\"or \"▼\" the key at the same time to restore the parameters to the factory settings.\u003c\/span\u003e\u003c\/div\u003e\n\u003cdiv\u003e \u003c\/div\u003e\n\u003cdiv\u003e\u003cspan\u003eOperation instructions:\u003c\/span\u003e\u003c\/div\u003e\n\u003cdiv\u003e \u003c\/div\u003e\n\u003cdiv\u003e\u003cspan\u003e1.When the thermostat is working normally, press and hold the \"power button\" for more than 3 seconds to turn off the thermostat. When the thermostat is off, press and hold the \"power button\" for more than 3 seconds to open the thermostat.\u003c\/span\u003e\u003c\/div\u003e\n\u003cdiv\u003e\u003cspan\u003eWhen the thermostat is working normally, the digital tube displays the current temperature measurement value, and performs automatic recognition conversion of the cooling heating operation mode.\u003c\/span\u003e\u003c\/div\u003e\n\u003cdiv\u003e\u003cspan\u003e2.When the measured temperature ≥ temperature set value + temperature difference set value, enter the cooling state, the Cool indicator light is on, the cooling relay normally open contact is closed; the Cool indicator flashes, indicating that the cooling device is in the press delay protection state; when measuring the temperature ≤ temperature set value, the Cool indicator is off, and the normally open contact of the refrigeration relay is disconnected.\u003c\/span\u003e\u003c\/div\u003e\n\u003cdiv\u003e\u003cspan\u003e3.When the measured temperature ≤ temperature set value - temperature difference set value enters the heating state, the Heat indicator light is on, the heating relay normally open contact is closed; when the measured temperature ≥ temperature set value, the Heat indicator is off, the heating relay normally open contact disconnect.\u003c\/span\u003e\u003c\/div\u003e\n\u003cdiv\u003e \u003c\/div\u003e\n\u003cdiv data-spm-anchor-id=\"a2g0o.detail.1000023.i1.17566478417y5U\"\u003e\n\u003cp data-spm-anchor-id=\"a2g0o.detail.1000023.i0.17566478417y5U\"\u003e\u003cspan\u003eIndicator status description:\u003c\/span\u003e\u003c\/p\u003e\n\u003ctable border=\"1\" cellspacing=\"0\"\u003e\n\u003ctbody\u003e\n\u003ctr\u003e\n\u003ctd\u003e\n\u003cp align=\"center\"\u003e\u003cspan\u003eIndicator\u003c\/span\u003e\u003c\/p\u003e\n\u003c\/td\u003e\n\u003ctd\u003e\n\u003cp align=\"center\"\u003e\u003cspan\u003eFunction\u003c\/span\u003e\u003c\/p\u003e\n\u003c\/td\u003e\n\u003ctd\u003e\n\u003cp align=\"center\" data-spm-anchor-id=\"a2g0o.detail.1000023.i10.17566478417y5U\"\u003e\u003cspan\u003eNote\u003c\/span\u003e\u003c\/p\u003e\n\u003c\/td\u003e\n\u003c\/tr\u003e\n\u003ctr\u003e\n\u003ctd\u003e\n\u003cp align=\"center\" data-spm-anchor-id=\"a2g0o.detail.1000023.i4.17566478417y5U\"\u003e\u003cspan\u003eCool indicator\u003c\/span\u003e\u003c\/p\u003e\n\u003c\/td\u003e\n\u003ctd\u003e\n\u003cp align=\"center\" data-spm-anchor-id=\"a2g0o.detail.1000023.i5.17566478417y5U\"\u003e\u003cspan\u003eLight on:cooling work;\u003c\/span\u003e\u003c\/p\u003e\n\u003cp align=\"center\"\u003e\u003cspan\u003e Light off:cooling off;\u003c\/span\u003e\u003c\/p\u003e\n\u003cp align=\"center\"\u003e\u003cspan\u003eFlashing: press delay\u003c\/span\u003e\u003c\/p\u003e\n\u003c\/td\u003e\n\u003ctd rowspan=\"2\"\u003e\n\u003cp align=\"center\" data-spm-anchor-id=\"a2g0o.detail.1000023.i11.17566478417y5U\"\u003e\u003cspan\u003eCool and Heat Both indicator lights cannot be lit at the same time\u003c\/span\u003e\u003c\/p\u003e\n\u003c\/td\u003e\n\u003c\/tr\u003e\n\u003ctr\u003e\n\u003ctd\u003e\n\u003cp align=\"center\" data-spm-anchor-id=\"a2g0o.detail.1000023.i6.17566478417y5U\"\u003e\u003cspan\u003eHeat indicator\u003c\/span\u003e\u003c\/p\u003e\n\u003c\/td\u003e\n\u003ctd\u003e\n\u003cp align=\"center\" data-spm-anchor-id=\"a2g0o.detail.1000023.i7.17566478417y5U\"\u003e\u003cspan\u003eBright: heating work;\u003c\/span\u003e\u003c\/p\u003e\n\u003cp align=\"center\"\u003e\u003cspan\u003eoff: heating off\u003c\/span\u003e\u003c\/p\u003e\n\u003c\/td\u003e\n\u003c\/tr\u003e\n\u003ctr\u003e\n\u003ctd\u003e\n\u003cp align=\"center\" data-spm-anchor-id=\"a2g0o.detail.1000023.i8.17566478417y5U\"\u003e\u003cspan\u003eSet indicator\u003c\/span\u003e\u003c\/p\u003e\n\u003c\/td\u003e\n\u003ctd\u003e\n\u003cp align=\"center\" data-spm-anchor-id=\"a2g0o.detail.1000023.i9.17566478417y5U\"\u003e\u003cspan\u003eOn: parameter setting status\u003c\/span\u003e\u003c\/p\u003e\n\u003c\/td\u003e\n\u003ctd\u003e\n\u003cp align=\"center\"\u003e \u003c\/p\u003e\n\u003c\/td\u003e\n\u003c\/tr\u003e\n\u003c\/tbody\u003e\n\u003c\/table\u003e\n\u003cp\u003e \u003c\/p\u003e\n\u003cp\u003e\u003cspan\u003eMenu function description:\u003c\/span\u003e\u003c\/p\u003e\n\u003ctable border=\"1\" cellspacing=\"0\"\u003e\n\u003ctbody\u003e\n\u003ctr\u003e\n\u003ctd\u003e\n\u003cp align=\"center\" data-spm-anchor-id=\"a2g0o.detail.1000023.i13.17566478417y5U\"\u003e\u003cspan\u003eMenu identifier\u003c\/span\u003e\u003c\/p\u003e\n\u003c\/td\u003e\n\u003ctd\u003e\n\u003cp align=\"center\" data-spm-anchor-id=\"a2g0o.detail.1000023.i16.17566478417y5U\"\u003e\u003cspan\u003eMenu function\u003c\/span\u003e\u003c\/p\u003e\n\u003c\/td\u003e\n\u003ctd\u003e\n\u003cp align=\"center\" data-spm-anchor-id=\"a2g0o.detail.1000023.i17.17566478417y5U\"\u003e\u003cspan\u003eSetting range\u003c\/span\u003e\u003c\/p\u003e\n\u003c\/td\u003e\n\u003ctd\u003e\n\u003cp align=\"center\" data-spm-anchor-id=\"a2g0o.detail.1000023.i18.17566478417y5U\"\u003e\u003cspan\u003eFactory setting\u003c\/span\u003e\u003c\/p\u003e\n\u003c\/td\u003e\n\u003c\/tr\u003e\n\u003ctr\u003e\n\u003ctd\u003e\n\u003cp align=\"center\" data-spm-anchor-id=\"a2g0o.detail.1000023.i12.17566478417y5U\"\u003e\u003cspan\u003eF1\u003c\/span\u003e\u003c\/p\u003e\n\u003c\/td\u003e\n\u003ctd\u003e\n\u003cp align=\"center\" data-spm-anchor-id=\"a2g0o.detail.1000023.i14.17566478417y5U\"\u003e\u003cspan\u003eTemperature setting value\u003c\/span\u003e\u003c\/p\u003e\n\u003c\/td\u003e\n\u003ctd\u003e\n\u003cp align=\"center\" data-spm-anchor-id=\"a2g0o.detail.1000023.i15.17566478417y5U\"\u003e\u003cspan\u003e-40.0~99.9℃\u003c\/span\u003e\u003c\/p\u003e\n\u003c\/td\u003e\n\u003ctd\u003e\n\u003cp align=\"center\" data-spm-anchor-id=\"a2g0o.detail.1000023.i19.17566478417y5U\"\u003e\u003cspan\u003e10.0℃\u003c\/span\u003e\u003c\/p\u003e\n\u003c\/td\u003e\n\u003c\/tr\u003e\n\u003ctr\u003e\n\u003ctd\u003e\n\u003cp align=\"center\" data-spm-anchor-id=\"a2g0o.detail.1000023.i20.17566478417y5U\"\u003e\u003cspan\u003eF2\u003c\/span\u003e\u003c\/p\u003e\n\u003c\/td\u003e\n\u003ctd\u003e\n\u003cp align=\"center\" data-spm-anchor-id=\"a2g0o.detail.1000023.i21.17566478417y5U\"\u003e\u003cspan\u003eTemperature difference setting value\u003c\/span\u003e\u003c\/p\u003e\n\u003c\/td\u003e\n\u003ctd\u003e\n\u003cp align=\"center\" data-spm-anchor-id=\"a2g0o.detail.1000023.i22.17566478417y5U\"\u003e\u003cspan\u003e0.3~10.0℃\u003c\/span\u003e\u003c\/p\u003e\n\u003c\/td\u003e\n\u003ctd\u003e\n\u003cp align=\"center\" data-spm-anchor-id=\"a2g0o.detail.1000023.i23.17566478417y5U\"\u003e\u003cspan\u003e0.5℃\u003c\/span\u003e\u003c\/p\u003e\n\u003c\/td\u003e\n\u003c\/tr\u003e\n\u003ctr\u003e\n\u003ctd\u003e\n\u003cp align=\"center\" data-spm-anchor-id=\"a2g0o.detail.1000023.i24.17566478417y5U\"\u003e\u003cspan\u003eF3\u003c\/span\u003e\u003c\/p\u003e\n\u003c\/td\u003e\n\u003ctd\u003e\n\u003cp align=\"center\" data-spm-anchor-id=\"a2g0o.detail.1000023.i25.17566478417y5U\"\u003e\u003cspan\u003ePress delay\u003c\/span\u003e\u003c\/p\u003e\n\u003c\/td\u003e\n\u003ctd\u003e\n\u003cp align=\"center\" data-spm-anchor-id=\"a2g0o.detail.1000023.i26.17566478417y5U\"\u003e\u003cspan\u003e1~10 min\u003c\/span\u003e\u003c\/p\u003e\n\u003c\/td\u003e\n\u003ctd\u003e\n\u003cp align=\"center\" data-spm-anchor-id=\"a2g0o.detail.1000023.i27.17566478417y5U\"\u003e\u003cspan\u003e3 min\u003c\/span\u003e\u003c\/p\u003e\n\u003c\/td\u003e\n\u003c\/tr\u003e\n\u003ctr\u003e\n\u003ctd data-spm-anchor-id=\"a2g0o.detail.1000023.i28.17566478417y5U\"\u003e\n\u003cp align=\"center\"\u003e\u003cspan\u003eF4\u003c\/span\u003e\u003c\/p\u003e\n\u003c\/td\u003e\n\u003ctd\u003e\n\u003cp align=\"center\" data-spm-anchor-id=\"a2g0o.detail.1000023.i29.17566478417y5U\"\u003e\u003cspan\u003eTemperature correction\u003c\/span\u003e\u003c\/p\u003e\n\u003c\/td\u003e\n\u003ctd\u003e\n\u003cp align=\"center\" data-spm-anchor-id=\"a2g0o.detail.1000023.i30.17566478417y5U\"\u003e\u003cspan\u003e-10.0~10.0℃\u003c\/span\u003e\u003c\/p\u003e\n\u003c\/td\u003e\n\u003ctd\u003e\n\u003cp align=\"center\" data-spm-anchor-id=\"a2g0o.detail.1000023.i31.17566478417y5U\"\u003e\u003cspan\u003e0℃\u003c\/span\u003e\u003c\/p\u003e\n\u003c\/td\u003e\n\u003c\/tr\u003e\n\u003c\/tbody\u003e\n\u003c\/table\u003e\n\u003cp\u003e \u003c\/p\u003e\n\u003cp\u003e\u003cspan\u003eWiring Diagram:\u003c\/span\u003e\u003c\/p\u003e\n\u003cp\u003e\u003cspan\u003e\u003cimg alt=\"图片1\" src=\"https:\/\/ae01.alicdn.com\/kf\/H001eadcd3b8e49109ce4fd472825de6dW.jpg\"\u003e\u003c\/span\u003e\u003c\/p\u003e\n\u003cp\u003e \u003c\/p\u003e\n\u003cdiv\u003e\n\u003cdiv\u003e \u003c\/div\u003e\n\u003cdiv\u003e\u003cspan\u003eRepair System Data:\u003c\/span\u003e\u003c\/div\u003e\n\u003cdiv\u003e \u003c\/div\u003e\n\u003cdiv\u003e\u003cspan\u003eAfter the thermostat is powered on, first check whether the parameter settings are correct. If an error is detected, “Er” is displayed. Pressing any key will restore the default parameter settings and work normally. It is recommended to reset the parameters at this time.\u003c\/span\u003e\u003c\/div\u003e\n\u003cdiv\u003e \u003c\/div\u003e\n\u003cdiv\u003e\u003cspan\u003eSystem Code, reason and action:\u003c\/span\u003e\u003c\/div\u003e\n\u003cdiv\u003e \u003c\/div\u003e\n\u003cdiv\u003e\u003cspan\u003eSensor fault alarm: When the temperature probe loop is short-circuited or open-circuit fault, the thermostat starts the probe fault alarm mode, closes all execution states, and the digital tube displays “EE”. After the fault is cleared, press any key to return to the normal working mode.\u003c\/span\u003e\u003c\/div\u003e\n\u003cdiv\u003e\u003cspan\u003eOver-temperature alarm: When the temperature measurement exceeds the temperature measurement range, the thermostat starts the over-temperature limit fault alarm mode, and all execution states are turned off. The digital tube displays “HH”. When the temperature returns to the normal measurement range, press any key. Return to normal working mode.\u003c\/span\u003e\u003c\/div\u003e\n\u003cdiv\u003e \u003c\/div\u003e\n\u003cdiv\u003e\u003cspan\u003eSafety rules:\u003c\/span\u003e\u003c\/div\u003e\n\u003cdiv\u003e \u003c\/div\u003e\n\u003cdiv\u003e\u003cspan\u003e☆ Danger:\u003c\/span\u003e\u003c\/div\u003e\n\u003cdiv\u003e\u003cspan\u003e1. Strictly distinguish the sensor lead, power line and output relay interface, can not be connected incorrectly, the relay can not be overloaded;\u003c\/span\u003e\u003c\/div\u003e\n\u003cdiv\u003e\u003cspan\u003e2. All wiring changes must be made with the power off.\u003c\/span\u003e\u003c\/div\u003e\n\u003cdiv\u003e\u003cspan\u003e☆ Warning:\u003c\/span\u003e\u003c\/div\u003e\n\u003cdiv\u003e\u003cspan\u003e1. This thermostat is forbidden to be used in water or excessively humid environment. It is forbidden to use in high temperature, strong electromagnetic interference and strong corrosive environment.\u003c\/span\u003e\u003c\/div\u003e\n\u003cdiv\u003e\u003cspan\u003e☆ Note:\u003c\/span\u003e\u003c\/div\u003e\n\u003cdiv\u003e\u003cspan\u003e1. The supply voltage should be consistent with the voltage marked by the thermostat and ensure the stability of the supply voltage;\u003c\/span\u003e\u003c\/div\u003e\n\u003cdiv\u003e\u003cspan\u003e2. To avoid possible interference, it is recommended that the sensor leads be at an appropriate distance from the power line.\u003c\/span\u003e\u003c\/div\u003e\n\u003cdiv\u003e \u003c\/div\u003e\n\u003cdiv\u003e \u003c\/div\u003e\n\u003cdiv\u003e\u003cstrong\u003e\u003cspan\u003ePackage Included:\u003c\/span\u003e\u003c\/strong\u003e\u003c\/div\u003e\n\u003cdiv\u003e \u003c\/div\u003e\n\u003cdiv\u003e\u003cspan\u003e1 x DTC1200 Intellligent Temperature Controller\u003c\/span\u003e\u003c\/div\u003e\n\u003cdiv\u003e\u003cspan\u003e1 x Temperature sensor\u003c\/span\u003e\u003c\/div\u003e\n\u003cdiv\u003e\u003cspan\u003e1 x Instruction manual\u003c\/span\u003e\u003c\/div\u003e\n\u003cdiv\u003e\u003cspan\u003e1 x Packing box\u003c\/span\u003e\u003c\/div\u003e\n\u003cdiv\u003e\u003cspan\u003e\u003c\/span\u003e\u003c\/div\u003e\n\u003c\/div\u003e\n\u003c\/div\u003e\n\u003c\/div\u003e\n\u003cdiv\u003e\n\u003cp\u003e\u003cimg alt=\"pictures2\" src=\"https:\/\/ae01.alicdn.com\/kf\/H48e07ca430b143a1bd6390f007d70893r.jpg\"\u003e\u003c\/p\u003e\n\u003cp\u003e\u003cimg alt=\"XA0008 (3)\" src=\"https:\/\/ae01.alicdn.com\/kf\/H909cdc0df9ef48b2909767f61c05f908Y.jpg\"\u003e\u003cimg alt=\"XA0008 (4)\" src=\"https:\/\/ae01.alicdn.com\/kf\/He57b51af913d453bb4631f7f71fac13e1.jpg\"\u003e\u003cimg alt=\"XA0008 (5)\" src=\"https:\/\/ae01.alicdn.com\/kf\/H1d793d42fd7945cba1d4202db1861873q.jpg\"\u003e\u003cimg alt=\"XA0008 (24)\" src=\"https:\/\/ae01.alicdn.com\/kf\/Hddf60c92d3bf47e7a4377478d2ae0f4c0.jpg\"\u003e\u003cimg alt=\"XA0008 (7)\" src=\"https:\/\/ae01.alicdn.com\/kf\/H81eb27e7121545b799fea5521905e3c7U.jpg\"\u003e\u003cimg alt=\"XA0008 (6)\" src=\"https:\/\/ae01.alicdn.com\/kf\/H9b1a57d5932b47359fe4cb26b4df8221z.jpg\"\u003e\u003cimg alt=\"XA0008 (1)\" src=\"https:\/\/ae01.alicdn.com\/kf\/H3b043d774f204356b0278e4786d01f14k.jpg\"\u003e\u003cimg alt=\"XA0008 (9)\" src=\"https:\/\/ae01.alicdn.com\/kf\/H97fb15979930424092f839c9a8a3830fK.jpg\"\u003e\u003cimg alt=\"XA0008 (10)\" src=\"https:\/\/ae01.alicdn.com\/kf\/H6e4b81a56f9949e385541d0be905a572G.jpg\"\u003e\u003cimg alt=\"XA0008 (11)\" src=\"https:\/\/ae01.alicdn.com\/kf\/Hd0829f171f2f41bdb34c36cff898940cl.jpg\"\u003e\u003cimg alt=\"XA0008 (12)\" src=\"https:\/\/ae01.alicdn.com\/kf\/Hc210386716324310a4aa3248b0a8a09dp.jpg\"\u003e\u003cimg alt=\"XA0008 (19)\" src=\"https:\/\/ae01.alicdn.com\/kf\/H2743991dcfaf488b936cea38071fdc22l.jpg\"\u003e\u003cimg alt=\"XA0008 (21)\" src=\"https:\/\/ae01.alicdn.com\/kf\/H5d8b10d76d27477aa6d4f2e96f92b18fw.jpg\"\u003e\u003c\/p\u003e\n\u003c\/div\u003e\n\u003cp\u003e \u003c\/p\u003e\n\u003cp\u003e \u003c\/p\u003e\n\u003cp\u003e\u003cspan\u003e\u003cstrong\u003eDTC1100 DTC1110 DTC2210 DTC2200 Temperature Controller\u003c\/strong\u003e\u003c\/span\u003e\u003c\/p\u003e\n\u003cdiv\u003e\u003cspan\u003eProduct Name: Temperature Controller \u003c\/span\u003e\u003c\/div\u003e\n\u003cdiv\u003e\u003cspan\u003eProduct Models: DTC1100; DTC1110; DTC2210; DTC2200 \u003c\/span\u003e\u003c\/div\u003e\n\u003cdiv\u003e\u003cspan\u003ePower supply: AC110V-220V\u003c\/span\u003e\u003c\/div\u003e\n\u003cdiv\u003e\u003cspan\u003eTemperature range: -40°C~+99°C\u003c\/span\u003e\u003c\/div\u003e\n\u003cdiv\u003e\u003cspan\u003eTemperature measurement accuracy: ±1°C (-40 °C ~ +70 °C)\u003c\/span\u003e\u003c\/div\u003e\n\u003cdiv\u003e\u003cspan\u003eThermostat size: 93mm*56mm*34mm\u003c\/span\u003e\u003c\/div\u003e\n\u003cdiv\u003e\u003cspan\u003eRelay contact capacity: Cool(10WC250V); Heat(10A\/AC250V)\u003c\/span\u003e\u003c\/div\u003e\n\u003cdiv\u003e \u003c\/div\u003e\n\u003cdiv\u003e\u003cspan\u003e\u003cimg alt=\"1 (1)\" src=\"https:\/\/ae01.alicdn.com\/kf\/H55d10cb072154207bcdd46dd1dafbc8fh.jpg\"\u003e\u003cimg alt=\"1 (4)\" src=\"https:\/\/ae01.alicdn.com\/kf\/H2f4f0f7cfec445b58c5e00fbdd8435872.jpg\"\u003e\u003cimg alt=\"1 (2)\" src=\"https:\/\/ae01.alicdn.com\/kf\/Hdaf8974533f04094ac13d6f88bd4a970o.jpg\"\u003e\u003cimg alt=\"接线图 (1)\" src=\"https:\/\/ae01.alicdn.com\/kf\/Ha2a95c321166465591f5af870fd231bfp.jpg\"\u003e\u003cimg alt=\"1 (13)\" src=\"https:\/\/ae01.alicdn.com\/kf\/He9464c5ea5c24e168157faff9566d0ecj.jpg\"\u003e\u003cimg alt=\"1 (18)\" src=\"https:\/\/ae01.alicdn.com\/kf\/H44dfe2dd19c14a14bdd1e3d351e03a4bE.jpg\"\u003e\u003cimg alt=\"01 (1)\" src=\"https:\/\/ae01.alicdn.com\/kf\/Ha529d255334543f68affa9a95cb27f16o.jpg\"\u003e\u003cimg alt=\"4\" src=\"https:\/\/ae01.alicdn.com\/kf\/H312943e7f91e4b709b5d642e25598a6a5.jpg\"\u003e\u003cimg alt=\"15\" src=\"https:\/\/ae01.alicdn.com\/kf\/Hb93149fbec8e4329a4c090147de3983fq.jpg\"\u003e\u003cimg alt=\"接线图 (1)\" src=\"https:\/\/ae01.alicdn.com\/kf\/H0e9b53e72d594dde8c46be7d94b346b9b.jpg\"\u003e\u003cimg alt=\"10\" src=\"https:\/\/ae01.alicdn.com\/kf\/Ha4ae55d77d754955bc11801c20abde77F.jpg\"\u003e\u003cimg alt=\"16\" src=\"https:\/\/ae01.alicdn.com\/kf\/H516b5c2e4e7140f5952500c8e005c7b6t.jpg\"\u003e\u003cimg alt=\"1 (1)\" src=\"https:\/\/ae01.alicdn.com\/kf\/H72183dd8d1fc4fe4b6deb8b28ee279cby.jpg\"\u003e\u003cimg alt=\"1 (3)\" src=\"https:\/\/ae01.alicdn.com\/kf\/H1c848b67f8704717802fa010419962b0m.jpg\"\u003e\u003cimg alt=\"1 (4)\" src=\"https:\/\/ae01.alicdn.com\/kf\/H5f22b2bb585948da837a0df46163a52ea.jpg\"\u003e\u003cimg alt=\"1 (8)\" src=\"https:\/\/ae01.alicdn.com\/kf\/Hb0db99a5e1424609a10aea7486f295ab5.jpg\"\u003e\u003cimg alt=\"1 (17)\" src=\"https:\/\/ae01.alicdn.com\/kf\/Hfb6298937ee7447fb751dd6aa5b96549O.jpg\"\u003e\u003cimg alt=\"1 (19)\" src=\"https:\/\/ae01.alicdn.com\/kf\/Hbf41fac7ac3a42fdb90f17b8ff0d308d2.jpg\"\u003e\u003cimg alt=\"1 (20)\" src=\"https:\/\/ae01.alicdn.com\/kf\/H4a3c5770430945089241d33dafef31fcm.jpg\"\u003e\u003cimg alt=\"1 (1)\" src=\"https:\/\/ae01.alicdn.com\/kf\/Hc39891a3e23d41b5968309454950c8bcI.jpg\"\u003e\u003cimg alt=\"1 (2)\" src=\"https:\/\/ae01.alicdn.com\/kf\/H4522829b7e6e44dc9603abf7792e0647G.jpg\"\u003e\u003cimg alt=\"接线图\" src=\"https:\/\/ae01.alicdn.com\/kf\/Hfe019fff700840c6ad7f4ba4869ef0eaq.jpg\"\u003e\u003cimg alt=\"1 (12)\" src=\"https:\/\/ae01.alicdn.com\/kf\/H1ddb9da69f8b4b6eb775e093490116feg.jpg\"\u003e\u003cimg alt=\"1 (18)\" src=\"https:\/\/ae01.alicdn.com\/kf\/H42755cdfd6174fe3b72473d7592b07fdr.jpg\"\u003e\u003cimg alt=\"1 (20)\" src=\"https:\/\/ae01.alicdn.com\/kf\/H2350b4b9bf9b48a78676cfa40085604fK.jpg\"\u003e\u003cimg alt=\"1 (21)\" src=\"https:\/\/ae01.alicdn.com\/kf\/H62b80cb1bda24ed8841e2f13742847a8d.jpg\"\u003e\u003c\/span\u003e\u003c\/div\u003e\n\u003cdiv\u003e \u003c\/div\u003e\n\u003cdiv\u003e \u003c\/div\u003e\n\u003cdiv\u003e \u003c\/div\u003e\n\u003cdiv\u003e \u003c\/div\u003e\n\u003cdiv\u003e\u003cspan\u003eDTC3200 Temperature and Humidity Controller\u003c\/span\u003e\u003c\/div\u003e\n\u003cdiv\u003e \u003c\/div\u003e\n\u003cdiv\u003e\u003cspan\u003eProduct Name: Temperature and Humidity Controller\u003c\/span\u003e\u003c\/div\u003e\n\u003cdiv\u003e\u003cspan\u003eProduct Model: DTC3200\u003c\/span\u003e\u003c\/div\u003e\n\u003cdiv\u003e\u003cspan\u003ePower supply voltage: AC 110 ~ 230V\u003c\/span\u003e\u003c\/div\u003e\n\u003cdiv\u003e\u003cspan\u003ePower supply frequency: 50 \/ 60Hz\u003c\/span\u003e\u003c\/div\u003e\n\u003cdiv\u003e\u003cspan\u003eTemperature measurement range: -20 ~ 60 ℃\u003c\/span\u003e\u003c\/div\u003e\n\u003cdiv\u003e\u003cspan\u003eHumidity measurement range: 0% ~ 100% RH\u003c\/span\u003e\u003c\/div\u003e\n\u003cdiv\u003e\u003cspan\u003eTemperature measurement accuracy: 0.3 ℃\u003c\/span\u003e\u003c\/div\u003e\n\u003cdiv\u003e\u003cspan\u003eHumidity measurement accuracy: 3%\u003c\/span\u003e\u003c\/div\u003e\n\u003cdiv\u003e\u003cspan\u003eOutput control: Relay output\u003c\/span\u003e\u003c\/div\u003e\n\u003cdiv\u003e\u003cspan\u003eOutput power: MAX 10A\u003c\/span\u003e\u003c\/div\u003e\n\u003cdiv\u003e \u003c\/div\u003e\n\u003cdiv\u003e\u003cspan\u003eSetting method: start value \u0026lt;stop value (the program automatically determines the working mode as heating \/ humidification mode)\u003c\/span\u003e\u003c\/div\u003e\n\u003cdiv\u003e\u003cspan\u003eSetting method: start value\u0026gt; stop value (the program automatically determines the working mode to be cooling \/ dehumidifying mode)\u003c\/span\u003e\u003c\/div\u003e\n\u003cdiv\u003e\u003cspan\u003eHeating \/ cooling mode setting\u003c\/span\u003e\u003c\/div\u003e\n\u003cdiv\u003e\u003cspan\u003eSetting method: setting (starting temperature): long press the ▲ button, the starting temperature flashes, and the starting temperature value is set by the ▲ ▼ button\u003c\/span\u003e\u003c\/div\u003e\n\u003cdiv\u003e\u003cspan\u003eSetting (stop temperature): long press the ▼ button to stop the temperature flashing, set the stop temperature value by ▲ ▼ button\u003c\/span\u003e\u003c\/div\u003e\n\u003cdiv\u003e \u003c\/div\u003e\n\u003cdiv\u003e\u003cspan\u003eHeating use case: control the water heater, heating to 65 ℃ to stop, the temperature drops to 50 ℃ to start heating again\u003c\/span\u003e\u003c\/div\u003e\n\u003cdiv\u003e\u003cspan\u003eThe first step: heating working mode, start temperature \u0026lt;stop temperature\u003c\/span\u003e\u003c\/div\u003e\n\u003cdiv\u003e\u003cspan\u003eStep 2: Press and hold the ▲ button, the starting temperature flashes, and set the starting temperature to 50 ℃ via the ▲ ▼ button\u003c\/span\u003e\u003c\/div\u003e\n\u003cdiv\u003e\u003cspan\u003eThe third step: long press the ▼ button to stop the temperature flashing, set the stop temperature to 65 ℃ through the ▲ ▼ button, the setting is complete!\u003c\/span\u003e\u003c\/div\u003e\n\u003cdiv\u003e\u003cspan\u003eRefrigeration use case: use in the farm, the fan ventilation stops at 26 ℃, and the temperature rises to 30 ℃ to start ventilation again\u003c\/span\u003e\u003c\/div\u003e\n\u003cdiv\u003e\u003cspan\u003eStep 1: Refrigeration working mode, start temperature\u0026gt; stop temperature\u003c\/span\u003e\u003c\/div\u003e\n\u003cdiv\u003e\u003cspan\u003eStep 2: Press and hold the ▲ button, the starting temperature flashes, and set the starting temperature to 30 ℃ via the ▲ ▼ button\u003c\/span\u003e\u003c\/div\u003e\n\u003cdiv\u003e\u003cspan\u003eStep 3: Press and hold the ▼ button to stop the temperature flashing, and set the stop temperature to 26 ° C with the ▲ ▼ button. The setting is complete!\u003c\/span\u003e\u003c\/div\u003e\n\u003cdiv\u003e \u003c\/div\u003e\n\u003cdiv\u003e\u003cspan\u003eHumidification \/ dehumidification mode settings:\u003c\/span\u003e\u003c\/div\u003e\n\u003cdiv\u003e\u003cspan\u003eSetting (Start Humidity): Long press the △ key, the start humidity value flashes, set the start humidity value by the △ ▽ key. Set [Stop Humidity]: Long press the △ key, stop the humidity value flashing, and set the stop humidity by the △ ▽ key value.\u003c\/span\u003e\u003c\/div\u003e\n\u003cdiv\u003e \u003c\/div\u003e\n\u003cdiv\u003e\u003cspan\u003eExamples of humidification: Fresh supermarket humidification, control humidifier 50% RH to start humidification, humidification to 80% RH to stop humidification.\u003c\/span\u003e\u003c\/div\u003e\n\u003cdiv\u003e \u003c\/div\u003e\n\u003cdiv\u003e\u003cspan\u003eSetup steps:\u003c\/span\u003e\u003c\/div\u003e\n\u003cdiv\u003e\u003cspan\u003e Step 1: Press and hold the △ key for 3 seconds to start the humidity value flashing, and set the start humidity value to 50% RH.\u003c\/span\u003e\u003c\/div\u003e\n\u003cdiv\u003e\u003cspan\u003e Step 2: Press and hold the ▽ key for 3 seconds to stop the humidity value flashing, set the value to 80% RH, the setting is completed, press the button for 5 seconds without operation, and automatically return to the normal display state\u003c\/span\u003e\u003c\/div\u003e\n\u003cdiv\u003e \u003c\/div\u003e\n\u003cdiv\u003e\u003cspan\u003eDehumidification example: workshop control exhaust dehumidification system, humidity 70% RH starts dehumidification, humidity 40% RH stops dehumidification\u003c\/span\u003e\u003c\/div\u003e\n\u003cdiv\u003e \u003c\/div\u003e\n\u003cdiv\u003e\u003cspan\u003eSetup steps:\u003c\/span\u003e\u003c\/div\u003e\n\u003cdiv\u003e\u003cspan\u003e Step 1: Press and hold the △ key for 3 seconds to start the humidity value flashing, and set the start humidity value to 40% RH.\u003c\/span\u003e\u003c\/div\u003e\n\u003cdiv\u003e\u003cspan\u003e Step 2: Press and hold the ▽ key for 3 seconds to stop the humidity value from flashing, set the value to 70% RH, the setting is completed, press the button for 5 seconds without operation, and automatically return to the normal display state\u003c\/span\u003e\u003c\/div\u003e\n\u003cdiv\u003e \u003c\/div\u003e\n\u003cdiv\u003e \u003c\/div\u003e\n\u003cdiv\u003e\u003cspan\u003eTemperature correction:\u003c\/span\u003e\u003c\/div\u003e\n\u003cdiv\u003e\u003cspan\u003eSimultaneously press the ▲ ▼ key for 3 seconds to start the temperature digit flashing, and use the ▲ ▼ key to set the start temperature correction value; after the setting is completed, press the button for 5 seconds without operation, and automatically return to the normal display state.\u003c\/span\u003e\u003c\/div\u003e\n\u003cdiv\u003e \u003c\/div\u003e\n\u003cdiv\u003e\u003cspan\u003eHumidity correction:\u003c\/span\u003e\u003c\/div\u003e\n\u003cdiv\u003e\u003cspan\u003eSimultaneously press the △ ▽ key for 3 seconds to start the humidity digit flashing, and set the humidity correction value by the △ ▽ key; after the setting is completed, press the button for 5 seconds without operation, and it will automatically return to the normal display state.\u003c\/span\u003e\u003c\/div\u003e\n\u003cdiv\u003e \u003c\/div\u003e\n\u003cdiv\u003e\u003cspan\u003eWiring instructions:\u003c\/span\u003e\u003c\/div\u003e\n\u003cdiv\u003e \u003c\/div\u003e\n\u003cdiv\u003e \u003cimg alt=\"11\" src=\"https:\/\/ae01.alicdn.com\/kf\/H818f4241e00c4a4383e69801a2e9fd69R.jpg\"\u003e\n\u003c\/div\u003e\n\u003cdiv\u003e \u003c\/div\u003e\n\u003cdiv\u003e \u003c\/div\u003e\n\u003cdiv\u003e\u003cspan\u003e※ If the temperature and humidity display LLL, please confirm whether the wiring of the SHT20 digital temperature and humidity sensor is correct and whether there is poor contact, you can try to reconnect the wiring.\u003c\/span\u003e\u003c\/div\u003e\n\u003cdiv\u003e \u003c\/div\u003e\n\u003cdiv\u003e\n\u003cimg alt=\"1(23)\" src=\"https:\/\/ae01.alicdn.com\/kf\/H12eb95c3e0d2444c96477c9c4e96c5e2r.jpg\"\u003e\u003cimg alt=\"1 (2)\" src=\"https:\/\/ae01.alicdn.com\/kf\/H4aec1fa943784e678b9d5a13ef92c840u.jpg\"\u003e\u003cimg alt=\"1 (9)\" src=\"https:\/\/ae01.alicdn.com\/kf\/H62f61e0071094feb8e4b5a95452126815.jpg\"\u003e\u003cimg alt=\"1 (15)\" src=\"https:\/\/ae01.alicdn.com\/kf\/H3015a4e6d81f490b9020dca461f7694bX.jpg\"\u003e\u003cimg alt=\"1 (18)\" src=\"https:\/\/ae01.alicdn.com\/kf\/He260f2df36064fe2af5530c7a561437ed.jpg\"\u003e\u003cimg alt=\"1 (20)\" src=\"https:\/\/ae01.alicdn.com\/kf\/He00db8acc649445db0f1f4fce6df2bf95.jpg\"\u003e\u003cimg alt=\"1 (22)\" src=\"https:\/\/ae01.alicdn.com\/kf\/H5e7b7c932bd44e159fcc998c54110021C.jpg\"\u003e\u003cimg alt=\"1 (4)\" src=\"https:\/\/ae01.alicdn.com\/kf\/H31b481ef695c453d88993756e902f3dec.jpg\"\u003e\u003cimg alt=\"1 (3)\" src=\"https:\/\/ae01.alicdn.com\/kf\/H72f864579840411fa481222392614398v.jpg\"\u003e\n\u003c\/div\u003e"}
 -
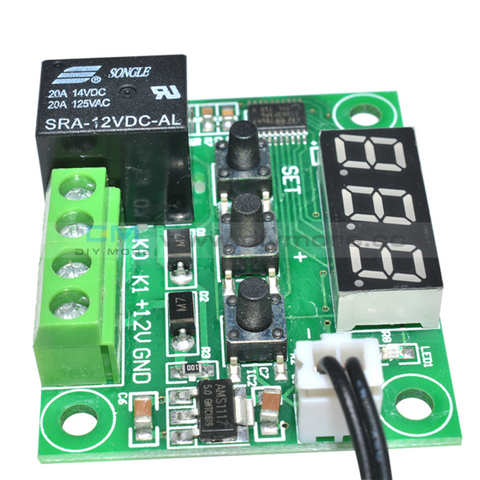 Translation missing: en.products.product.regular_price $5.99{"id":4616159920199,"title":"110V-220V LED Digital Temperature Controller Thermostat Thermoregulator for Incubator Heating Cooling Replace STC-1000 DTC1200","handle":"110v-220v-led-digital-temperature-controller-thermostat-thermoregulator-for-incubator-heating-cooling-replace-stc-1000-dtc1200","description":"\u003cdiv\u003e\u003cstrong\u003e\u003cspan\u003eDescription:\u003c\/span\u003e\u003c\/strong\u003e\u003c\/div\u003e\n\u003cdiv\u003e \u003c\/div\u003e\n\u003cdiv\u003e\n\u003cdiv\u003e\u003cspan\u003eProduct Name: Thermostat\u003c\/span\u003e\u003c\/div\u003e\n\u003cdiv\u003e\u003cspan\u003eProduct model: DTC1200\u003c\/span\u003e\u003c\/div\u003e\n\u003cdiv data-spm-anchor-id=\"a2g0o.detail.1000023.i0.766b67b1vR7Vg3\"\u003e\u003cspan\u003eSupply voltage: AC110~230V\u003c\/span\u003e\u003c\/div\u003e\n\u003cdiv data-spm-anchor-id=\"a2g0o.detail.1000023.i1.766b67b1vR7Vg3\"\u003e\u003cspan\u003eTemperature range: -40°C~+99°C\u003c\/span\u003e\u003c\/div\u003e\n\u003cdiv\u003e\u003cspan\u003eTemperature measurement accuracy: ±1 °C (-40 °C ~ +70 °C)\u003c\/span\u003e\u003c\/div\u003e\n\u003cdiv data-spm-anchor-id=\"a2g0o.detail.1000023.i2.766b67b1vR7Vg3\"\u003e\u003cspan\u003eSensor line length: 100cm\u003c\/span\u003e\u003c\/div\u003e\n\u003cdiv data-spm-anchor-id=\"a2g0o.detail.1000023.i3.766b67b1vR7Vg3\"\u003e\u003cspan\u003eThermostat size: 93mm*56mm*34mm\u003c\/span\u003e\u003c\/div\u003e\n\u003cdiv\u003e\u003cspan\u003eOutput capacity: cooling (compressor 3A) heating (10A\/250VAC)\u003c\/span\u003e\u003c\/div\u003e\n\u003cdiv\u003e \u003c\/div\u003e\n\u003cdiv\u003e\u003cspan\u003eSee parameter method:\u003c\/span\u003e\u003c\/div\u003e\n\u003cdiv\u003e \u003c\/div\u003e\n\u003cdiv\u003e\u003cspan\u003eWhen the thermostat is working normally, press and release \"▲\"the key once to display the temperature setting value; press and release \"▼\" the key once to display the temperature difference setting value. After 3 seconds, the temperature returns to the normal display state.\u003c\/span\u003e\u003c\/div\u003e\n\u003cdiv\u003e \u003c\/div\u003e\n\u003cdiv\u003e\u003cspan\u003eSetting parameter method:\u003c\/span\u003e\u003c\/div\u003e\n\u003cdiv\u003e \u003c\/div\u003e\n\u003cdiv\u003e\u003cspan\u003eWhen the thermostat is working normally, press \"S\" key and hold the button for more than 3 seconds to enter the modified parameter mode. The “Set” indicator lights up, the digital tube displays the code “F1” of the first menu item, and press the \"▲\" or \"▼\"key to up or down the code of the menu item. Press \"S\" the key to display the parameter setting value of the current menu, press \"S\" and hold the key, then press the \"▲\"or \"▼\" key to increase or decrease the parameter setting value of the current menu; press \"S\" key and hold the key, and press the \"▲\"or \"▼\" key to quickly increase the speed; Or down and display the parameter settings of the current menu.\u003c\/span\u003e\u003c\/div\u003e\n\u003cdiv\u003e\u003cspan\u003ePress and hold \"▲\"or \"▼\" the key at the same time to restore the parameters to the factory settings.\u003c\/span\u003e\u003c\/div\u003e\n\u003cdiv\u003e \u003c\/div\u003e\n\u003cdiv\u003e\u003cspan\u003eOperation instructions:\u003c\/span\u003e\u003c\/div\u003e\n\u003cdiv\u003e \u003c\/div\u003e\n\u003cdiv\u003e\u003cspan\u003e1.When the thermostat is working normally, press and hold the \"power button\" for more than 3 seconds to turn off the thermostat. When the thermostat is off, press and hold the \"power button\" for more than 3 seconds to open the thermostat.\u003c\/span\u003e\u003c\/div\u003e\n\u003cdiv\u003e\u003cspan\u003eWhen the thermostat is working normally, the digital tube displays the current temperature measurement value, and performs automatic recognition conversion of the cooling heating operation mode.\u003c\/span\u003e\u003c\/div\u003e\n\u003cdiv\u003e\u003cspan\u003e2.When the measured temperature ≥ temperature set value + temperature difference set value, enter the cooling state, the Cool indicator light is on, the cooling relay normally open contact is closed; the Cool indicator flashes, indicating that the cooling device is in the press delay protection state; when measuring the temperature ≤ temperature set value, the Cool indicator is off, and the normally open contact of the refrigeration relay is disconnected.\u003c\/span\u003e\u003c\/div\u003e\n\u003cdiv\u003e\u003cspan\u003e3.When the measured temperature ≤ temperature set value - temperature difference set value enters the heating state, the Heat indicator light is on, the heating relay normally open contact is closed; when the measured temperature ≥ temperature set value, the Heat indicator is off, the heating relay normally open contact disconnect.\u003c\/span\u003e\u003c\/div\u003e\n\u003cdiv\u003e \u003c\/div\u003e\n\u003cdiv data-spm-anchor-id=\"a2g0o.detail.1000023.i1.17566478417y5U\"\u003e\n\u003cp data-spm-anchor-id=\"a2g0o.detail.1000023.i0.17566478417y5U\"\u003e\u003cspan\u003eIndicator status description:\u003c\/span\u003e\u003c\/p\u003e\n\u003ctable border=\"1\" cellspacing=\"0\"\u003e\n\u003ctbody\u003e\n\u003ctr\u003e\n\u003ctd\u003e\n\u003cp align=\"center\"\u003e\u003cspan\u003eIndicator\u003c\/span\u003e\u003c\/p\u003e\n\u003c\/td\u003e\n\u003ctd\u003e\n\u003cp align=\"center\"\u003e\u003cspan\u003eFunction\u003c\/span\u003e\u003c\/p\u003e\n\u003c\/td\u003e\n\u003ctd\u003e\n\u003cp align=\"center\" data-spm-anchor-id=\"a2g0o.detail.1000023.i10.17566478417y5U\"\u003e\u003cspan\u003eNote\u003c\/span\u003e\u003c\/p\u003e\n\u003c\/td\u003e\n\u003c\/tr\u003e\n\u003ctr\u003e\n\u003ctd\u003e\n\u003cp align=\"center\" data-spm-anchor-id=\"a2g0o.detail.1000023.i4.17566478417y5U\"\u003e\u003cspan\u003eCool indicator\u003c\/span\u003e\u003c\/p\u003e\n\u003c\/td\u003e\n\u003ctd\u003e\n\u003cp align=\"center\" data-spm-anchor-id=\"a2g0o.detail.1000023.i5.17566478417y5U\"\u003e\u003cspan\u003eLight on:cooling work;\u003c\/span\u003e\u003c\/p\u003e\n\u003cp align=\"center\"\u003e\u003cspan\u003e Light off:cooling off;\u003c\/span\u003e\u003c\/p\u003e\n\u003cp align=\"center\"\u003e\u003cspan\u003eFlashing: press delay\u003c\/span\u003e\u003c\/p\u003e\n\u003c\/td\u003e\n\u003ctd rowspan=\"2\"\u003e\n\u003cp align=\"center\" data-spm-anchor-id=\"a2g0o.detail.1000023.i11.17566478417y5U\"\u003e\u003cspan\u003eCool and Heat Both indicator lights cannot be lit at the same time\u003c\/span\u003e\u003c\/p\u003e\n\u003c\/td\u003e\n\u003c\/tr\u003e\n\u003ctr\u003e\n\u003ctd\u003e\n\u003cp align=\"center\" data-spm-anchor-id=\"a2g0o.detail.1000023.i6.17566478417y5U\"\u003e\u003cspan\u003eHeat indicator\u003c\/span\u003e\u003c\/p\u003e\n\u003c\/td\u003e\n\u003ctd\u003e\n\u003cp align=\"center\" data-spm-anchor-id=\"a2g0o.detail.1000023.i7.17566478417y5U\"\u003e\u003cspan\u003eBright: heating work;\u003c\/span\u003e\u003c\/p\u003e\n\u003cp align=\"center\"\u003e\u003cspan\u003eoff: heating off\u003c\/span\u003e\u003c\/p\u003e\n\u003c\/td\u003e\n\u003c\/tr\u003e\n\u003ctr\u003e\n\u003ctd\u003e\n\u003cp align=\"center\" data-spm-anchor-id=\"a2g0o.detail.1000023.i8.17566478417y5U\"\u003e\u003cspan\u003eSet indicator\u003c\/span\u003e\u003c\/p\u003e\n\u003c\/td\u003e\n\u003ctd\u003e\n\u003cp align=\"center\" data-spm-anchor-id=\"a2g0o.detail.1000023.i9.17566478417y5U\"\u003e\u003cspan\u003eOn: parameter setting status\u003c\/span\u003e\u003c\/p\u003e\n\u003c\/td\u003e\n\u003ctd\u003e\n\u003cp align=\"center\"\u003e \u003c\/p\u003e\n\u003c\/td\u003e\n\u003c\/tr\u003e\n\u003c\/tbody\u003e\n\u003c\/table\u003e\n\u003cp\u003e \u003c\/p\u003e\n\u003cp\u003e\u003cspan\u003eMenu function description:\u003c\/span\u003e\u003c\/p\u003e\n\u003ctable border=\"1\" cellspacing=\"0\"\u003e\n\u003ctbody\u003e\n\u003ctr\u003e\n\u003ctd\u003e\n\u003cp align=\"center\" data-spm-anchor-id=\"a2g0o.detail.1000023.i13.17566478417y5U\"\u003e\u003cspan\u003eMenu identifier\u003c\/span\u003e\u003c\/p\u003e\n\u003c\/td\u003e\n\u003ctd\u003e\n\u003cp align=\"center\" data-spm-anchor-id=\"a2g0o.detail.1000023.i16.17566478417y5U\"\u003e\u003cspan\u003eMenu function\u003c\/span\u003e\u003c\/p\u003e\n\u003c\/td\u003e\n\u003ctd\u003e\n\u003cp align=\"center\" data-spm-anchor-id=\"a2g0o.detail.1000023.i17.17566478417y5U\"\u003e\u003cspan\u003eSetting range\u003c\/span\u003e\u003c\/p\u003e\n\u003c\/td\u003e\n\u003ctd\u003e\n\u003cp align=\"center\" data-spm-anchor-id=\"a2g0o.detail.1000023.i18.17566478417y5U\"\u003e\u003cspan\u003eFactory setting\u003c\/span\u003e\u003c\/p\u003e\n\u003c\/td\u003e\n\u003c\/tr\u003e\n\u003ctr\u003e\n\u003ctd\u003e\n\u003cp align=\"center\" data-spm-anchor-id=\"a2g0o.detail.1000023.i12.17566478417y5U\"\u003e\u003cspan\u003eF1\u003c\/span\u003e\u003c\/p\u003e\n\u003c\/td\u003e\n\u003ctd\u003e\n\u003cp align=\"center\" data-spm-anchor-id=\"a2g0o.detail.1000023.i14.17566478417y5U\"\u003e\u003cspan\u003eTemperature setting value\u003c\/span\u003e\u003c\/p\u003e\n\u003c\/td\u003e\n\u003ctd\u003e\n\u003cp align=\"center\" data-spm-anchor-id=\"a2g0o.detail.1000023.i15.17566478417y5U\"\u003e\u003cspan\u003e-40.0~99.9℃\u003c\/span\u003e\u003c\/p\u003e\n\u003c\/td\u003e\n\u003ctd\u003e\n\u003cp align=\"center\" data-spm-anchor-id=\"a2g0o.detail.1000023.i19.17566478417y5U\"\u003e\u003cspan\u003e10.0℃\u003c\/span\u003e\u003c\/p\u003e\n\u003c\/td\u003e\n\u003c\/tr\u003e\n\u003ctr\u003e\n\u003ctd\u003e\n\u003cp align=\"center\" data-spm-anchor-id=\"a2g0o.detail.1000023.i20.17566478417y5U\"\u003e\u003cspan\u003eF2\u003c\/span\u003e\u003c\/p\u003e\n\u003c\/td\u003e\n\u003ctd\u003e\n\u003cp align=\"center\" data-spm-anchor-id=\"a2g0o.detail.1000023.i21.17566478417y5U\"\u003e\u003cspan\u003eTemperature difference setting value\u003c\/span\u003e\u003c\/p\u003e\n\u003c\/td\u003e\n\u003ctd\u003e\n\u003cp align=\"center\" data-spm-anchor-id=\"a2g0o.detail.1000023.i22.17566478417y5U\"\u003e\u003cspan\u003e0.3~10.0℃\u003c\/span\u003e\u003c\/p\u003e\n\u003c\/td\u003e\n\u003ctd\u003e\n\u003cp align=\"center\" data-spm-anchor-id=\"a2g0o.detail.1000023.i23.17566478417y5U\"\u003e\u003cspan\u003e0.5℃\u003c\/span\u003e\u003c\/p\u003e\n\u003c\/td\u003e\n\u003c\/tr\u003e\n\u003ctr\u003e\n\u003ctd\u003e\n\u003cp align=\"center\" data-spm-anchor-id=\"a2g0o.detail.1000023.i24.17566478417y5U\"\u003e\u003cspan\u003eF3\u003c\/span\u003e\u003c\/p\u003e\n\u003c\/td\u003e\n\u003ctd\u003e\n\u003cp align=\"center\" data-spm-anchor-id=\"a2g0o.detail.1000023.i25.17566478417y5U\"\u003e\u003cspan\u003ePress delay\u003c\/span\u003e\u003c\/p\u003e\n\u003c\/td\u003e\n\u003ctd\u003e\n\u003cp align=\"center\" data-spm-anchor-id=\"a2g0o.detail.1000023.i26.17566478417y5U\"\u003e\u003cspan\u003e1~10 min\u003c\/span\u003e\u003c\/p\u003e\n\u003c\/td\u003e\n\u003ctd\u003e\n\u003cp align=\"center\" data-spm-anchor-id=\"a2g0o.detail.1000023.i27.17566478417y5U\"\u003e\u003cspan\u003e3 min\u003c\/span\u003e\u003c\/p\u003e\n\u003c\/td\u003e\n\u003c\/tr\u003e\n\u003ctr\u003e\n\u003ctd data-spm-anchor-id=\"a2g0o.detail.1000023.i28.17566478417y5U\"\u003e\n\u003cp align=\"center\"\u003e\u003cspan\u003eF4\u003c\/span\u003e\u003c\/p\u003e\n\u003c\/td\u003e\n\u003ctd\u003e\n\u003cp align=\"center\" data-spm-anchor-id=\"a2g0o.detail.1000023.i29.17566478417y5U\"\u003e\u003cspan\u003eTemperature correction\u003c\/span\u003e\u003c\/p\u003e\n\u003c\/td\u003e\n\u003ctd\u003e\n\u003cp align=\"center\" data-spm-anchor-id=\"a2g0o.detail.1000023.i30.17566478417y5U\"\u003e\u003cspan\u003e-10.0~10.0℃\u003c\/span\u003e\u003c\/p\u003e\n\u003c\/td\u003e\n\u003ctd\u003e\n\u003cp align=\"center\" data-spm-anchor-id=\"a2g0o.detail.1000023.i31.17566478417y5U\"\u003e\u003cspan\u003e0℃\u003c\/span\u003e\u003c\/p\u003e\n\u003c\/td\u003e\n\u003c\/tr\u003e\n\u003c\/tbody\u003e\n\u003c\/table\u003e\n\u003cp\u003e \u003c\/p\u003e\n\u003cp\u003e\u003cspan\u003eWiring Diagram:\u003c\/span\u003e\u003c\/p\u003e\n\u003cp\u003e\u003cspan\u003e\u003cimg alt=\"图片1\" src=\"https:\/\/ae01.alicdn.com\/kf\/H001eadcd3b8e49109ce4fd472825de6dW.jpg\"\u003e\u003c\/span\u003e\u003c\/p\u003e\n\u003cp\u003e \u003c\/p\u003e\n\u003cdiv\u003e\n\u003cdiv\u003e \u003c\/div\u003e\n\u003cdiv\u003e\u003cspan\u003eRepair System Data:\u003c\/span\u003e\u003c\/div\u003e\n\u003cdiv\u003e \u003c\/div\u003e\n\u003cdiv\u003e\u003cspan\u003eAfter the thermostat is powered on, first check whether the parameter settings are correct. If an error is detected, “Er” is displayed. Pressing any key will restore the default parameter settings and work normally. It is recommended to reset the parameters at this time.\u003c\/span\u003e\u003c\/div\u003e\n\u003cdiv\u003e \u003c\/div\u003e\n\u003cdiv\u003e\u003cspan\u003eSystem Code, reason and action:\u003c\/span\u003e\u003c\/div\u003e\n\u003cdiv\u003e \u003c\/div\u003e\n\u003cdiv\u003e\u003cspan\u003eSensor fault alarm: When the temperature probe loop is short-circuited or open-circuit fault, the thermostat starts the probe fault alarm mode, closes all execution states, and the digital tube displays “EE”. After the fault is cleared, press any key to return to the normal working mode.\u003c\/span\u003e\u003c\/div\u003e\n\u003cdiv\u003e\u003cspan\u003eOver-temperature alarm: When the temperature measurement exceeds the temperature measurement range, the thermostat starts the over-temperature limit fault alarm mode, and all execution states are turned off. The digital tube displays “HH”. When the temperature returns to the normal measurement range, press any key. Return to normal working mode.\u003c\/span\u003e\u003c\/div\u003e\n\u003cdiv\u003e \u003c\/div\u003e\n\u003cdiv\u003e\u003cspan\u003eSafety rules:\u003c\/span\u003e\u003c\/div\u003e\n\u003cdiv\u003e \u003c\/div\u003e\n\u003cdiv\u003e\u003cspan\u003e☆ Danger:\u003c\/span\u003e\u003c\/div\u003e\n\u003cdiv\u003e\u003cspan\u003e1. Strictly distinguish the sensor lead, power line and output relay interface, can not be connected incorrectly, the relay can not be overloaded;\u003c\/span\u003e\u003c\/div\u003e\n\u003cdiv\u003e\u003cspan\u003e2. All wiring changes must be made with the power off.\u003c\/span\u003e\u003c\/div\u003e\n\u003cdiv\u003e\u003cspan\u003e☆ Warning:\u003c\/span\u003e\u003c\/div\u003e\n\u003cdiv\u003e\u003cspan\u003e1. This thermostat is forbidden to be used in water or excessively humid environment. It is forbidden to use in high temperature, strong electromagnetic interference and strong corrosive environment.\u003c\/span\u003e\u003c\/div\u003e\n\u003cdiv\u003e\u003cspan\u003e☆ Note:\u003c\/span\u003e\u003c\/div\u003e\n\u003cdiv\u003e\u003cspan\u003e1. The supply voltage should be consistent with the voltage marked by the thermostat and ensure the stability of the supply voltage;\u003c\/span\u003e\u003c\/div\u003e\n\u003cdiv\u003e\u003cspan\u003e2. To avoid possible interference, it is recommended that the sensor leads be at an appropriate distance from the power line.\u003c\/span\u003e\u003c\/div\u003e\n\u003cdiv\u003e \u003c\/div\u003e\n\u003cdiv\u003e \u003c\/div\u003e\n\u003cdiv\u003e\u003cstrong\u003e\u003cspan\u003ePackage Included:\u003c\/span\u003e\u003c\/strong\u003e\u003c\/div\u003e\n\u003cdiv\u003e \u003c\/div\u003e\n\u003cdiv\u003e\u003cspan\u003e1 x DTC1200 Intellligent Temperature Controller\u003c\/span\u003e\u003c\/div\u003e\n\u003cdiv\u003e\u003cspan\u003e1 x Temperature sensor\u003c\/span\u003e\u003c\/div\u003e\n\u003cdiv\u003e\u003cspan\u003e1 x Instruction manual\u003c\/span\u003e\u003c\/div\u003e\n\u003cdiv\u003e\u003cspan\u003e1 x Packing box\u003c\/span\u003e\u003c\/div\u003e\n\u003cdiv\u003e\u003cspan\u003e\u003c\/span\u003e\u003c\/div\u003e\n\u003c\/div\u003e\n\u003c\/div\u003e\n\u003c\/div\u003e\n\u003cdiv\u003e\n\u003cp\u003e\u003cimg alt=\"pictures2\" src=\"https:\/\/ae01.alicdn.com\/kf\/H48e07ca430b143a1bd6390f007d70893r.jpg\"\u003e\u003c\/p\u003e\n\u003cp\u003e\u003cimg alt=\"XA0008 (3)\" src=\"https:\/\/ae01.alicdn.com\/kf\/H909cdc0df9ef48b2909767f61c05f908Y.jpg\"\u003e\u003cimg alt=\"XA0008 (4)\" src=\"https:\/\/ae01.alicdn.com\/kf\/He57b51af913d453bb4631f7f71fac13e1.jpg\"\u003e\u003cimg alt=\"XA0008 (5)\" src=\"https:\/\/ae01.alicdn.com\/kf\/H1d793d42fd7945cba1d4202db1861873q.jpg\"\u003e\u003cimg alt=\"XA0008 (24)\" src=\"https:\/\/ae01.alicdn.com\/kf\/Hddf60c92d3bf47e7a4377478d2ae0f4c0.jpg\"\u003e\u003cimg alt=\"XA0008 (7)\" src=\"https:\/\/ae01.alicdn.com\/kf\/H81eb27e7121545b799fea5521905e3c7U.jpg\"\u003e\u003cimg alt=\"XA0008 (6)\" src=\"https:\/\/ae01.alicdn.com\/kf\/H9b1a57d5932b47359fe4cb26b4df8221z.jpg\"\u003e\u003cimg alt=\"XA0008 (1)\" src=\"https:\/\/ae01.alicdn.com\/kf\/H3b043d774f204356b0278e4786d01f14k.jpg\"\u003e\u003cimg alt=\"XA0008 (9)\" src=\"https:\/\/ae01.alicdn.com\/kf\/H97fb15979930424092f839c9a8a3830fK.jpg\"\u003e\u003cimg alt=\"XA0008 (10)\" src=\"https:\/\/ae01.alicdn.com\/kf\/H6e4b81a56f9949e385541d0be905a572G.jpg\"\u003e\u003cimg alt=\"XA0008 (11)\" src=\"https:\/\/ae01.alicdn.com\/kf\/Hd0829f171f2f41bdb34c36cff898940cl.jpg\"\u003e\u003cimg alt=\"XA0008 (12)\" src=\"https:\/\/ae01.alicdn.com\/kf\/Hc210386716324310a4aa3248b0a8a09dp.jpg\"\u003e\u003cimg alt=\"XA0008 (19)\" src=\"https:\/\/ae01.alicdn.com\/kf\/H2743991dcfaf488b936cea38071fdc22l.jpg\"\u003e\u003cimg alt=\"XA0008 (21)\" src=\"https:\/\/ae01.alicdn.com\/kf\/H5d8b10d76d27477aa6d4f2e96f92b18fw.jpg\"\u003e\u003c\/p\u003e\n\u003c\/div\u003e\n\u003cp\u003e \u003c\/p\u003e\n\u003cp\u003e \u003c\/p\u003e\n\u003cp\u003e\u003cspan\u003e\u003cstrong\u003eDTC1100 DTC1110 DTC2210 DTC2200 Temperature Controller\u003c\/strong\u003e\u003c\/span\u003e\u003c\/p\u003e\n\u003cdiv\u003e\u003cspan\u003eProduct Name: Temperature Controller \u003c\/span\u003e\u003c\/div\u003e\n\u003cdiv\u003e\u003cspan\u003eProduct Models: DTC1100; DTC1110; DTC2210; DTC2200 \u003c\/span\u003e\u003c\/div\u003e\n\u003cdiv\u003e\u003cspan\u003ePower supply: AC110V-220V\u003c\/span\u003e\u003c\/div\u003e\n\u003cdiv\u003e\u003cspan\u003eTemperature range: -40°C~+99°C\u003c\/span\u003e\u003c\/div\u003e\n\u003cdiv\u003e\u003cspan\u003eTemperature measurement accuracy: ±1°C (-40 °C ~ +70 °C)\u003c\/span\u003e\u003c\/div\u003e\n\u003cdiv\u003e\u003cspan\u003eThermostat size: 93mm*56mm*34mm\u003c\/span\u003e\u003c\/div\u003e\n\u003cdiv\u003e\u003cspan\u003eRelay contact capacity: Cool(10WC250V); Heat(10A\/AC250V)\u003c\/span\u003e\u003c\/div\u003e\n\u003cdiv\u003e \u003c\/div\u003e\n\u003cdiv\u003e\u003cspan\u003e\u003cimg alt=\"1 (1)\" src=\"https:\/\/ae01.alicdn.com\/kf\/H55d10cb072154207bcdd46dd1dafbc8fh.jpg\"\u003e\u003cimg alt=\"1 (4)\" src=\"https:\/\/ae01.alicdn.com\/kf\/H2f4f0f7cfec445b58c5e00fbdd8435872.jpg\"\u003e\u003cimg alt=\"1 (2)\" src=\"https:\/\/ae01.alicdn.com\/kf\/Hdaf8974533f04094ac13d6f88bd4a970o.jpg\"\u003e\u003cimg alt=\"接线图 (1)\" src=\"https:\/\/ae01.alicdn.com\/kf\/Ha2a95c321166465591f5af870fd231bfp.jpg\"\u003e\u003cimg alt=\"1 (13)\" src=\"https:\/\/ae01.alicdn.com\/kf\/He9464c5ea5c24e168157faff9566d0ecj.jpg\"\u003e\u003cimg alt=\"1 (18)\" src=\"https:\/\/ae01.alicdn.com\/kf\/H44dfe2dd19c14a14bdd1e3d351e03a4bE.jpg\"\u003e\u003cimg alt=\"01 (1)\" src=\"https:\/\/ae01.alicdn.com\/kf\/Ha529d255334543f68affa9a95cb27f16o.jpg\"\u003e\u003cimg alt=\"4\" src=\"https:\/\/ae01.alicdn.com\/kf\/H312943e7f91e4b709b5d642e25598a6a5.jpg\"\u003e\u003cimg alt=\"15\" src=\"https:\/\/ae01.alicdn.com\/kf\/Hb93149fbec8e4329a4c090147de3983fq.jpg\"\u003e\u003cimg alt=\"接线图 (1)\" src=\"https:\/\/ae01.alicdn.com\/kf\/H0e9b53e72d594dde8c46be7d94b346b9b.jpg\"\u003e\u003cimg alt=\"10\" src=\"https:\/\/ae01.alicdn.com\/kf\/Ha4ae55d77d754955bc11801c20abde77F.jpg\"\u003e\u003cimg alt=\"16\" src=\"https:\/\/ae01.alicdn.com\/kf\/H516b5c2e4e7140f5952500c8e005c7b6t.jpg\"\u003e\u003cimg alt=\"1 (1)\" src=\"https:\/\/ae01.alicdn.com\/kf\/H72183dd8d1fc4fe4b6deb8b28ee279cby.jpg\"\u003e\u003cimg alt=\"1 (3)\" src=\"https:\/\/ae01.alicdn.com\/kf\/H1c848b67f8704717802fa010419962b0m.jpg\"\u003e\u003cimg alt=\"1 (4)\" src=\"https:\/\/ae01.alicdn.com\/kf\/H5f22b2bb585948da837a0df46163a52ea.jpg\"\u003e\u003cimg alt=\"1 (8)\" src=\"https:\/\/ae01.alicdn.com\/kf\/Hb0db99a5e1424609a10aea7486f295ab5.jpg\"\u003e\u003cimg alt=\"1 (17)\" src=\"https:\/\/ae01.alicdn.com\/kf\/Hfb6298937ee7447fb751dd6aa5b96549O.jpg\"\u003e\u003cimg alt=\"1 (19)\" src=\"https:\/\/ae01.alicdn.com\/kf\/Hbf41fac7ac3a42fdb90f17b8ff0d308d2.jpg\"\u003e\u003cimg alt=\"1 (20)\" src=\"https:\/\/ae01.alicdn.com\/kf\/H4a3c5770430945089241d33dafef31fcm.jpg\"\u003e\u003cimg alt=\"1 (1)\" src=\"https:\/\/ae01.alicdn.com\/kf\/Hc39891a3e23d41b5968309454950c8bcI.jpg\"\u003e\u003cimg alt=\"1 (2)\" src=\"https:\/\/ae01.alicdn.com\/kf\/H4522829b7e6e44dc9603abf7792e0647G.jpg\"\u003e\u003cimg alt=\"接线图\" src=\"https:\/\/ae01.alicdn.com\/kf\/Hfe019fff700840c6ad7f4ba4869ef0eaq.jpg\"\u003e\u003cimg alt=\"1 (12)\" src=\"https:\/\/ae01.alicdn.com\/kf\/H1ddb9da69f8b4b6eb775e093490116feg.jpg\"\u003e\u003cimg alt=\"1 (18)\" src=\"https:\/\/ae01.alicdn.com\/kf\/H42755cdfd6174fe3b72473d7592b07fdr.jpg\"\u003e\u003cimg alt=\"1 (20)\" src=\"https:\/\/ae01.alicdn.com\/kf\/H2350b4b9bf9b48a78676cfa40085604fK.jpg\"\u003e\u003cimg alt=\"1 (21)\" src=\"https:\/\/ae01.alicdn.com\/kf\/H62b80cb1bda24ed8841e2f13742847a8d.jpg\"\u003e\u003c\/span\u003e\u003c\/div\u003e\n\u003cdiv\u003e \u003c\/div\u003e\n\u003cdiv\u003e \u003c\/div\u003e\n\u003cdiv\u003e \u003c\/div\u003e\n\u003cdiv\u003e \u003c\/div\u003e\n\u003cdiv\u003e\u003cspan\u003eDTC3200 Temperature and Humidity Controller\u003c\/span\u003e\u003c\/div\u003e\n\u003cdiv\u003e \u003c\/div\u003e\n\u003cdiv\u003e\u003cspan\u003eProduct Name: Temperature and Humidity Controller\u003c\/span\u003e\u003c\/div\u003e\n\u003cdiv\u003e\u003cspan\u003eProduct Model: DTC3200\u003c\/span\u003e\u003c\/div\u003e\n\u003cdiv\u003e\u003cspan\u003ePower supply voltage: AC 110 ~ 230V\u003c\/span\u003e\u003c\/div\u003e\n\u003cdiv\u003e\u003cspan\u003ePower supply frequency: 50 \/ 60Hz\u003c\/span\u003e\u003c\/div\u003e\n\u003cdiv\u003e\u003cspan\u003eTemperature measurement range: -20 ~ 60 ℃\u003c\/span\u003e\u003c\/div\u003e\n\u003cdiv\u003e\u003cspan\u003eHumidity measurement range: 0% ~ 100% RH\u003c\/span\u003e\u003c\/div\u003e\n\u003cdiv\u003e\u003cspan\u003eTemperature measurement accuracy: 0.3 ℃\u003c\/span\u003e\u003c\/div\u003e\n\u003cdiv\u003e\u003cspan\u003eHumidity measurement accuracy: 3%\u003c\/span\u003e\u003c\/div\u003e\n\u003cdiv\u003e\u003cspan\u003eOutput control: Relay output\u003c\/span\u003e\u003c\/div\u003e\n\u003cdiv\u003e\u003cspan\u003eOutput power: MAX 10A\u003c\/span\u003e\u003c\/div\u003e\n\u003cdiv\u003e \u003c\/div\u003e\n\u003cdiv\u003e\u003cspan\u003eSetting method: start value \u0026lt;stop value (the program automatically determines the working mode as heating \/ humidification mode)\u003c\/span\u003e\u003c\/div\u003e\n\u003cdiv\u003e\u003cspan\u003eSetting method: start value\u0026gt; stop value (the program automatically determines the working mode to be cooling \/ dehumidifying mode)\u003c\/span\u003e\u003c\/div\u003e\n\u003cdiv\u003e\u003cspan\u003eHeating \/ cooling mode setting\u003c\/span\u003e\u003c\/div\u003e\n\u003cdiv\u003e\u003cspan\u003eSetting method: setting (starting temperature): long press the ▲ button, the starting temperature flashes, and the starting temperature value is set by the ▲ ▼ button\u003c\/span\u003e\u003c\/div\u003e\n\u003cdiv\u003e\u003cspan\u003eSetting (stop temperature): long press the ▼ button to stop the temperature flashing, set the stop temperature value by ▲ ▼ button\u003c\/span\u003e\u003c\/div\u003e\n\u003cdiv\u003e \u003c\/div\u003e\n\u003cdiv\u003e\u003cspan\u003eHeating use case: control the water heater, heating to 65 ℃ to stop, the temperature drops to 50 ℃ to start heating again\u003c\/span\u003e\u003c\/div\u003e\n\u003cdiv\u003e\u003cspan\u003eThe first step: heating working mode, start temperature \u0026lt;stop temperature\u003c\/span\u003e\u003c\/div\u003e\n\u003cdiv\u003e\u003cspan\u003eStep 2: Press and hold the ▲ button, the starting temperature flashes, and set the starting temperature to 50 ℃ via the ▲ ▼ button\u003c\/span\u003e\u003c\/div\u003e\n\u003cdiv\u003e\u003cspan\u003eThe third step: long press the ▼ button to stop the temperature flashing, set the stop temperature to 65 ℃ through the ▲ ▼ button, the setting is complete!\u003c\/span\u003e\u003c\/div\u003e\n\u003cdiv\u003e\u003cspan\u003eRefrigeration use case: use in the farm, the fan ventilation stops at 26 ℃, and the temperature rises to 30 ℃ to start ventilation again\u003c\/span\u003e\u003c\/div\u003e\n\u003cdiv\u003e\u003cspan\u003eStep 1: Refrigeration working mode, start temperature\u0026gt; stop temperature\u003c\/span\u003e\u003c\/div\u003e\n\u003cdiv\u003e\u003cspan\u003eStep 2: Press and hold the ▲ button, the starting temperature flashes, and set the starting temperature to 30 ℃ via the ▲ ▼ button\u003c\/span\u003e\u003c\/div\u003e\n\u003cdiv\u003e\u003cspan\u003eStep 3: Press and hold the ▼ button to stop the temperature flashing, and set the stop temperature to 26 ° C with the ▲ ▼ button. The setting is complete!\u003c\/span\u003e\u003c\/div\u003e\n\u003cdiv\u003e \u003c\/div\u003e\n\u003cdiv\u003e\u003cspan\u003eHumidification \/ dehumidification mode settings:\u003c\/span\u003e\u003c\/div\u003e\n\u003cdiv\u003e\u003cspan\u003eSetting (Start Humidity): Long press the △ key, the start humidity value flashes, set the start humidity value by the △ ▽ key. Set [Stop Humidity]: Long press the △ key, stop the humidity value flashing, and set the stop humidity by the △ ▽ key value.\u003c\/span\u003e\u003c\/div\u003e\n\u003cdiv\u003e \u003c\/div\u003e\n\u003cdiv\u003e\u003cspan\u003eExamples of humidification: Fresh supermarket humidification, control humidifier 50% RH to start humidification, humidification to 80% RH to stop humidification.\u003c\/span\u003e\u003c\/div\u003e\n\u003cdiv\u003e \u003c\/div\u003e\n\u003cdiv\u003e\u003cspan\u003eSetup steps:\u003c\/span\u003e\u003c\/div\u003e\n\u003cdiv\u003e\u003cspan\u003e Step 1: Press and hold the △ key for 3 seconds to start the humidity value flashing, and set the start humidity value to 50% RH.\u003c\/span\u003e\u003c\/div\u003e\n\u003cdiv\u003e\u003cspan\u003e Step 2: Press and hold the ▽ key for 3 seconds to stop the humidity value flashing, set the value to 80% RH, the setting is completed, press the button for 5 seconds without operation, and automatically return to the normal display state\u003c\/span\u003e\u003c\/div\u003e\n\u003cdiv\u003e \u003c\/div\u003e\n\u003cdiv\u003e\u003cspan\u003eDehumidification example: workshop control exhaust dehumidification system, humidity 70% RH starts dehumidification, humidity 40% RH stops dehumidification\u003c\/span\u003e\u003c\/div\u003e\n\u003cdiv\u003e \u003c\/div\u003e\n\u003cdiv\u003e\u003cspan\u003eSetup steps:\u003c\/span\u003e\u003c\/div\u003e\n\u003cdiv\u003e\u003cspan\u003e Step 1: Press and hold the △ key for 3 seconds to start the humidity value flashing, and set the start humidity value to 40% RH.\u003c\/span\u003e\u003c\/div\u003e\n\u003cdiv\u003e\u003cspan\u003e Step 2: Press and hold the ▽ key for 3 seconds to stop the humidity value from flashing, set the value to 70% RH, the setting is completed, press the button for 5 seconds without operation, and automatically return to the normal display state\u003c\/span\u003e\u003c\/div\u003e\n\u003cdiv\u003e \u003c\/div\u003e\n\u003cdiv\u003e \u003c\/div\u003e\n\u003cdiv\u003e\u003cspan\u003eTemperature correction:\u003c\/span\u003e\u003c\/div\u003e\n\u003cdiv\u003e\u003cspan\u003eSimultaneously press the ▲ ▼ key for 3 seconds to start the temperature digit flashing, and use the ▲ ▼ key to set the start temperature correction value; after the setting is completed, press the button for 5 seconds without operation, and automatically return to the normal display state.\u003c\/span\u003e\u003c\/div\u003e\n\u003cdiv\u003e \u003c\/div\u003e\n\u003cdiv\u003e\u003cspan\u003eHumidity correction:\u003c\/span\u003e\u003c\/div\u003e\n\u003cdiv\u003e\u003cspan\u003eSimultaneously press the △ ▽ key for 3 seconds to start the humidity digit flashing, and set the humidity correction value by the △ ▽ key; after the setting is completed, press the button for 5 seconds without operation, and it will automatically return to the normal display state.\u003c\/span\u003e\u003c\/div\u003e\n\u003cdiv\u003e \u003c\/div\u003e\n\u003cdiv\u003e\u003cspan\u003eWiring instructions:\u003c\/span\u003e\u003c\/div\u003e\n\u003cdiv\u003e \u003c\/div\u003e\n\u003cdiv\u003e \u003cimg alt=\"11\" src=\"https:\/\/ae01.alicdn.com\/kf\/H818f4241e00c4a4383e69801a2e9fd69R.jpg\"\u003e\n\u003c\/div\u003e\n\u003cdiv\u003e \u003c\/div\u003e\n\u003cdiv\u003e \u003c\/div\u003e\n\u003cdiv\u003e\u003cspan\u003e※ If the temperature and humidity display LLL, please confirm whether the wiring of the SHT20 digital temperature and humidity sensor is correct and whether there is poor contact, you can try to reconnect the wiring.\u003c\/span\u003e\u003c\/div\u003e\n\u003cdiv\u003e \u003c\/div\u003e\n\u003cdiv\u003e\n\u003cimg alt=\"1(23)\" src=\"https:\/\/ae01.alicdn.com\/kf\/H12eb95c3e0d2444c96477c9c4e96c5e2r.jpg\"\u003e\u003cimg alt=\"1 (2)\" src=\"https:\/\/ae01.alicdn.com\/kf\/H4aec1fa943784e678b9d5a13ef92c840u.jpg\"\u003e\u003cimg alt=\"1 (9)\" src=\"https:\/\/ae01.alicdn.com\/kf\/H62f61e0071094feb8e4b5a95452126815.jpg\"\u003e\u003cimg alt=\"1 (15)\" src=\"https:\/\/ae01.alicdn.com\/kf\/H3015a4e6d81f490b9020dca461f7694bX.jpg\"\u003e\u003cimg alt=\"1 (18)\" src=\"https:\/\/ae01.alicdn.com\/kf\/He260f2df36064fe2af5530c7a561437ed.jpg\"\u003e\u003cimg alt=\"1 (20)\" src=\"https:\/\/ae01.alicdn.com\/kf\/He00db8acc649445db0f1f4fce6df2bf95.jpg\"\u003e\u003cimg alt=\"1 (22)\" src=\"https:\/\/ae01.alicdn.com\/kf\/H5e7b7c932bd44e159fcc998c54110021C.jpg\"\u003e\u003cimg alt=\"1 (4)\" src=\"https:\/\/ae01.alicdn.com\/kf\/H31b481ef695c453d88993756e902f3dec.jpg\"\u003e\u003cimg alt=\"1 (3)\" src=\"https:\/\/ae01.alicdn.com\/kf\/H72f864579840411fa481222392614398v.jpg\"\u003e\n\u003c\/div\u003e","published_at":"2020-05-04T20:03:25+08:00","created_at":"2020-05-04T20:20:56+08:00","vendor":"diymore","type":"Thermostat","tags":[],"price":1399,"price_min":1399,"price_max":1399,"available":true,"price_varies":false,"compare_at_price":null,"compare_at_price_min":0,"compare_at_price_max":0,"compare_at_price_varies":false,"variants":[{"id":32174110441543,"title":"AC 110V-220V DTC2210 Dual display","option1":"AC 110V-220V DTC2210 Dual display","option2":null,"option3":null,"sku":"XA0022","requires_shipping":true,"taxable":true,"featured_image":null,"available":true,"name":"110V-220V LED Digital Temperature Controller Thermostat Thermoregulator for Incubator Heating Cooling Replace STC-1000 DTC1200 - AC 110V-220V DTC2210 Dual display","public_title":"AC 110V-220V DTC2210 Dual display","options":["AC 110V-220V DTC2210 Dual display"],"price":1399,"weight":0,"compare_at_price":null,"inventory_management":"shopify","barcode":"","requires_selling_plan":false,"selling_plan_allocations":[],"quantity_rule":{"min":1,"max":null,"increment":1}},{"id":32174110474311,"title":"AC 110V-220V DTC1100 Dual display","option1":"AC 110V-220V DTC1100 Dual display","option2":null,"option3":null,"sku":"XA0021","requires_shipping":true,"taxable":true,"featured_image":null,"available":true,"name":"110V-220V LED Digital Temperature Controller Thermostat Thermoregulator for Incubator Heating Cooling Replace STC-1000 DTC1200 - AC 110V-220V DTC1100 Dual display","public_title":"AC 110V-220V DTC1100 Dual display","options":["AC 110V-220V DTC1100 Dual display"],"price":1399,"weight":0,"compare_at_price":null,"inventory_management":"shopify","barcode":"","requires_selling_plan":false,"selling_plan_allocations":[],"quantity_rule":{"min":1,"max":null,"increment":1}},{"id":32174110539847,"title":"AC 110V-220V DTC3200 Dual display","option1":"AC 110V-220V DTC3200 Dual display","option2":null,"option3":null,"sku":"XA0024","requires_shipping":true,"taxable":true,"featured_image":null,"available":true,"name":"110V-220V LED Digital Temperature Controller Thermostat Thermoregulator for Incubator Heating Cooling Replace STC-1000 DTC1200 - AC 110V-220V DTC3200 Dual display","public_title":"AC 110V-220V DTC3200 Dual display","options":["AC 110V-220V DTC3200 Dual display"],"price":1399,"weight":0,"compare_at_price":null,"inventory_management":"shopify","barcode":"","requires_selling_plan":false,"selling_plan_allocations":[],"quantity_rule":{"min":1,"max":null,"increment":1}},{"id":32174110572615,"title":"AC 110V-220V DTC1100","option1":"AC 110V-220V DTC1100","option2":null,"option3":null,"sku":"XA0020","requires_shipping":true,"taxable":true,"featured_image":null,"available":true,"name":"110V-220V LED Digital Temperature Controller Thermostat Thermoregulator for Incubator Heating Cooling Replace STC-1000 DTC1200 - AC 110V-220V DTC1100","public_title":"AC 110V-220V DTC1100","options":["AC 110V-220V DTC1100"],"price":1399,"weight":0,"compare_at_price":null,"inventory_management":"shopify","barcode":"","requires_selling_plan":false,"selling_plan_allocations":[],"quantity_rule":{"min":1,"max":null,"increment":1}},{"id":32174110605383,"title":"AC 110V-220V DTC2200","option1":"AC 110V-220V DTC2200","option2":null,"option3":null,"sku":"XA0023","requires_shipping":true,"taxable":true,"featured_image":null,"available":true,"name":"110V-220V LED Digital Temperature Controller Thermostat Thermoregulator for Incubator Heating Cooling Replace STC-1000 DTC1200 - AC 110V-220V DTC2200","public_title":"AC 110V-220V DTC2200","options":["AC 110V-220V DTC2200"],"price":1399,"weight":0,"compare_at_price":null,"inventory_management":"shopify","barcode":"","requires_selling_plan":false,"selling_plan_allocations":[],"quantity_rule":{"min":1,"max":null,"increment":1}},{"id":32174110638151,"title":"AC 110V-220V DTC1200","option1":"AC 110V-220V DTC1200","option2":null,"option3":null,"sku":"XA0008","requires_shipping":true,"taxable":true,"featured_image":null,"available":true,"name":"110V-220V LED Digital Temperature Controller Thermostat Thermoregulator for Incubator Heating Cooling Replace STC-1000 DTC1200 - AC 110V-220V DTC1200","public_title":"AC 110V-220V DTC1200","options":["AC 110V-220V DTC1200"],"price":1399,"weight":0,"compare_at_price":null,"inventory_management":"shopify","barcode":"","requires_selling_plan":false,"selling_plan_allocations":[],"quantity_rule":{"min":1,"max":null,"increment":1}}],"images":["\/\/www.diymore.cc\/cdn\/shop\/products\/1_1_423.jpg?v=1588701927","\/\/www.diymore.cc\/cdn\/shop\/products\/1_8_460.jpg?v=1588701927","\/\/www.diymore.cc\/cdn\/shop\/products\/1_9_135.jpg?v=1588701927","\/\/www.diymore.cc\/cdn\/shop\/products\/1_16_853.jpg?v=1588701927","\/\/www.diymore.cc\/cdn\/shop\/products\/1_18_816.jpg?v=1588701927","\/\/www.diymore.cc\/cdn\/shop\/products\/1_19_930.jpg?v=1588701927"],"featured_image":"\/\/www.diymore.cc\/cdn\/shop\/products\/1_1_423.jpg?v=1588701927","options":["Type"],"media":[{"alt":"110V-220V Led Digital Temperature Controller Thermostat Thermoregulator For Incubator Heating","id":6682595557447,"position":1,"preview_image":{"aspect_ratio":1.0,"height":1000,"width":1000,"src":"\/\/www.diymore.cc\/cdn\/shop\/products\/1_1_423.jpg?v=1588701927"},"aspect_ratio":1.0,"height":1000,"media_type":"image","src":"\/\/www.diymore.cc\/cdn\/shop\/products\/1_1_423.jpg?v=1588701927","width":1000},{"alt":"110V-220V Led Digital Temperature Controller Thermostat Thermoregulator For Incubator Heating","id":6682596311111,"position":2,"preview_image":{"aspect_ratio":1.0,"height":1000,"width":1000,"src":"\/\/www.diymore.cc\/cdn\/shop\/products\/1_8_460.jpg?v=1588701927"},"aspect_ratio":1.0,"height":1000,"media_type":"image","src":"\/\/www.diymore.cc\/cdn\/shop\/products\/1_8_460.jpg?v=1588701927","width":1000},{"alt":"110V-220V Led Digital Temperature Controller Thermostat Thermoregulator For Incubator Heating","id":6682596606023,"position":3,"preview_image":{"aspect_ratio":1.0,"height":1000,"width":1000,"src":"\/\/www.diymore.cc\/cdn\/shop\/products\/1_9_135.jpg?v=1588701927"},"aspect_ratio":1.0,"height":1000,"media_type":"image","src":"\/\/www.diymore.cc\/cdn\/shop\/products\/1_9_135.jpg?v=1588701927","width":1000},{"alt":"110V-220V Led Digital Temperature Controller Thermostat Thermoregulator For Incubator Heating","id":6682597326919,"position":4,"preview_image":{"aspect_ratio":1.0,"height":1000,"width":1000,"src":"\/\/www.diymore.cc\/cdn\/shop\/products\/1_16_853.jpg?v=1588701927"},"aspect_ratio":1.0,"height":1000,"media_type":"image","src":"\/\/www.diymore.cc\/cdn\/shop\/products\/1_16_853.jpg?v=1588701927","width":1000},{"alt":"110V-220V Led Digital Temperature Controller Thermostat Thermoregulator For Incubator Heating","id":6682597687367,"position":5,"preview_image":{"aspect_ratio":1.0,"height":1000,"width":1000,"src":"\/\/www.diymore.cc\/cdn\/shop\/products\/1_18_816.jpg?v=1588701927"},"aspect_ratio":1.0,"height":1000,"media_type":"image","src":"\/\/www.diymore.cc\/cdn\/shop\/products\/1_18_816.jpg?v=1588701927","width":1000},{"alt":"110V-220V Led Digital Temperature Controller Thermostat Thermoregulator For Incubator Heating","id":6682598015047,"position":6,"preview_image":{"aspect_ratio":1.0,"height":1000,"width":1000,"src":"\/\/www.diymore.cc\/cdn\/shop\/products\/1_19_930.jpg?v=1588701927"},"aspect_ratio":1.0,"height":1000,"media_type":"image","src":"\/\/www.diymore.cc\/cdn\/shop\/products\/1_19_930.jpg?v=1588701927","width":1000}],"requires_selling_plan":false,"selling_plan_groups":[],"content":"\u003cdiv\u003e\u003cstrong\u003e\u003cspan\u003eDescription:\u003c\/span\u003e\u003c\/strong\u003e\u003c\/div\u003e\n\u003cdiv\u003e \u003c\/div\u003e\n\u003cdiv\u003e\n\u003cdiv\u003e\u003cspan\u003eProduct Name: Thermostat\u003c\/span\u003e\u003c\/div\u003e\n\u003cdiv\u003e\u003cspan\u003eProduct model: DTC1200\u003c\/span\u003e\u003c\/div\u003e\n\u003cdiv data-spm-anchor-id=\"a2g0o.detail.1000023.i0.766b67b1vR7Vg3\"\u003e\u003cspan\u003eSupply voltage: AC110~230V\u003c\/span\u003e\u003c\/div\u003e\n\u003cdiv data-spm-anchor-id=\"a2g0o.detail.1000023.i1.766b67b1vR7Vg3\"\u003e\u003cspan\u003eTemperature range: -40°C~+99°C\u003c\/span\u003e\u003c\/div\u003e\n\u003cdiv\u003e\u003cspan\u003eTemperature measurement accuracy: ±1 °C (-40 °C ~ +70 °C)\u003c\/span\u003e\u003c\/div\u003e\n\u003cdiv data-spm-anchor-id=\"a2g0o.detail.1000023.i2.766b67b1vR7Vg3\"\u003e\u003cspan\u003eSensor line length: 100cm\u003c\/span\u003e\u003c\/div\u003e\n\u003cdiv data-spm-anchor-id=\"a2g0o.detail.1000023.i3.766b67b1vR7Vg3\"\u003e\u003cspan\u003eThermostat size: 93mm*56mm*34mm\u003c\/span\u003e\u003c\/div\u003e\n\u003cdiv\u003e\u003cspan\u003eOutput capacity: cooling (compressor 3A) heating (10A\/250VAC)\u003c\/span\u003e\u003c\/div\u003e\n\u003cdiv\u003e \u003c\/div\u003e\n\u003cdiv\u003e\u003cspan\u003eSee parameter method:\u003c\/span\u003e\u003c\/div\u003e\n\u003cdiv\u003e \u003c\/div\u003e\n\u003cdiv\u003e\u003cspan\u003eWhen the thermostat is working normally, press and release \"▲\"the key once to display the temperature setting value; press and release \"▼\" the key once to display the temperature difference setting value. After 3 seconds, the temperature returns to the normal display state.\u003c\/span\u003e\u003c\/div\u003e\n\u003cdiv\u003e \u003c\/div\u003e\n\u003cdiv\u003e\u003cspan\u003eSetting parameter method:\u003c\/span\u003e\u003c\/div\u003e\n\u003cdiv\u003e \u003c\/div\u003e\n\u003cdiv\u003e\u003cspan\u003eWhen the thermostat is working normally, press \"S\" key and hold the button for more than 3 seconds to enter the modified parameter mode. The “Set” indicator lights up, the digital tube displays the code “F1” of the first menu item, and press the \"▲\" or \"▼\"key to up or down the code of the menu item. Press \"S\" the key to display the parameter setting value of the current menu, press \"S\" and hold the key, then press the \"▲\"or \"▼\" key to increase or decrease the parameter setting value of the current menu; press \"S\" key and hold the key, and press the \"▲\"or \"▼\" key to quickly increase the speed; Or down and display the parameter settings of the current menu.\u003c\/span\u003e\u003c\/div\u003e\n\u003cdiv\u003e\u003cspan\u003ePress and hold \"▲\"or \"▼\" the key at the same time to restore the parameters to the factory settings.\u003c\/span\u003e\u003c\/div\u003e\n\u003cdiv\u003e \u003c\/div\u003e\n\u003cdiv\u003e\u003cspan\u003eOperation instructions:\u003c\/span\u003e\u003c\/div\u003e\n\u003cdiv\u003e \u003c\/div\u003e\n\u003cdiv\u003e\u003cspan\u003e1.When the thermostat is working normally, press and hold the \"power button\" for more than 3 seconds to turn off the thermostat. When the thermostat is off, press and hold the \"power button\" for more than 3 seconds to open the thermostat.\u003c\/span\u003e\u003c\/div\u003e\n\u003cdiv\u003e\u003cspan\u003eWhen the thermostat is working normally, the digital tube displays the current temperature measurement value, and performs automatic recognition conversion of the cooling heating operation mode.\u003c\/span\u003e\u003c\/div\u003e\n\u003cdiv\u003e\u003cspan\u003e2.When the measured temperature ≥ temperature set value + temperature difference set value, enter the cooling state, the Cool indicator light is on, the cooling relay normally open contact is closed; the Cool indicator flashes, indicating that the cooling device is in the press delay protection state; when measuring the temperature ≤ temperature set value, the Cool indicator is off, and the normally open contact of the refrigeration relay is disconnected.\u003c\/span\u003e\u003c\/div\u003e\n\u003cdiv\u003e\u003cspan\u003e3.When the measured temperature ≤ temperature set value - temperature difference set value enters the heating state, the Heat indicator light is on, the heating relay normally open contact is closed; when the measured temperature ≥ temperature set value, the Heat indicator is off, the heating relay normally open contact disconnect.\u003c\/span\u003e\u003c\/div\u003e\n\u003cdiv\u003e \u003c\/div\u003e\n\u003cdiv data-spm-anchor-id=\"a2g0o.detail.1000023.i1.17566478417y5U\"\u003e\n\u003cp data-spm-anchor-id=\"a2g0o.detail.1000023.i0.17566478417y5U\"\u003e\u003cspan\u003eIndicator status description:\u003c\/span\u003e\u003c\/p\u003e\n\u003ctable border=\"1\" cellspacing=\"0\"\u003e\n\u003ctbody\u003e\n\u003ctr\u003e\n\u003ctd\u003e\n\u003cp align=\"center\"\u003e\u003cspan\u003eIndicator\u003c\/span\u003e\u003c\/p\u003e\n\u003c\/td\u003e\n\u003ctd\u003e\n\u003cp align=\"center\"\u003e\u003cspan\u003eFunction\u003c\/span\u003e\u003c\/p\u003e\n\u003c\/td\u003e\n\u003ctd\u003e\n\u003cp align=\"center\" data-spm-anchor-id=\"a2g0o.detail.1000023.i10.17566478417y5U\"\u003e\u003cspan\u003eNote\u003c\/span\u003e\u003c\/p\u003e\n\u003c\/td\u003e\n\u003c\/tr\u003e\n\u003ctr\u003e\n\u003ctd\u003e\n\u003cp align=\"center\" data-spm-anchor-id=\"a2g0o.detail.1000023.i4.17566478417y5U\"\u003e\u003cspan\u003eCool indicator\u003c\/span\u003e\u003c\/p\u003e\n\u003c\/td\u003e\n\u003ctd\u003e\n\u003cp align=\"center\" data-spm-anchor-id=\"a2g0o.detail.1000023.i5.17566478417y5U\"\u003e\u003cspan\u003eLight on:cooling work;\u003c\/span\u003e\u003c\/p\u003e\n\u003cp align=\"center\"\u003e\u003cspan\u003e Light off:cooling off;\u003c\/span\u003e\u003c\/p\u003e\n\u003cp align=\"center\"\u003e\u003cspan\u003eFlashing: press delay\u003c\/span\u003e\u003c\/p\u003e\n\u003c\/td\u003e\n\u003ctd rowspan=\"2\"\u003e\n\u003cp align=\"center\" data-spm-anchor-id=\"a2g0o.detail.1000023.i11.17566478417y5U\"\u003e\u003cspan\u003eCool and Heat Both indicator lights cannot be lit at the same time\u003c\/span\u003e\u003c\/p\u003e\n\u003c\/td\u003e\n\u003c\/tr\u003e\n\u003ctr\u003e\n\u003ctd\u003e\n\u003cp align=\"center\" data-spm-anchor-id=\"a2g0o.detail.1000023.i6.17566478417y5U\"\u003e\u003cspan\u003eHeat indicator\u003c\/span\u003e\u003c\/p\u003e\n\u003c\/td\u003e\n\u003ctd\u003e\n\u003cp align=\"center\" data-spm-anchor-id=\"a2g0o.detail.1000023.i7.17566478417y5U\"\u003e\u003cspan\u003eBright: heating work;\u003c\/span\u003e\u003c\/p\u003e\n\u003cp align=\"center\"\u003e\u003cspan\u003eoff: heating off\u003c\/span\u003e\u003c\/p\u003e\n\u003c\/td\u003e\n\u003c\/tr\u003e\n\u003ctr\u003e\n\u003ctd\u003e\n\u003cp align=\"center\" data-spm-anchor-id=\"a2g0o.detail.1000023.i8.17566478417y5U\"\u003e\u003cspan\u003eSet indicator\u003c\/span\u003e\u003c\/p\u003e\n\u003c\/td\u003e\n\u003ctd\u003e\n\u003cp align=\"center\" data-spm-anchor-id=\"a2g0o.detail.1000023.i9.17566478417y5U\"\u003e\u003cspan\u003eOn: parameter setting status\u003c\/span\u003e\u003c\/p\u003e\n\u003c\/td\u003e\n\u003ctd\u003e\n\u003cp align=\"center\"\u003e \u003c\/p\u003e\n\u003c\/td\u003e\n\u003c\/tr\u003e\n\u003c\/tbody\u003e\n\u003c\/table\u003e\n\u003cp\u003e \u003c\/p\u003e\n\u003cp\u003e\u003cspan\u003eMenu function description:\u003c\/span\u003e\u003c\/p\u003e\n\u003ctable border=\"1\" cellspacing=\"0\"\u003e\n\u003ctbody\u003e\n\u003ctr\u003e\n\u003ctd\u003e\n\u003cp align=\"center\" data-spm-anchor-id=\"a2g0o.detail.1000023.i13.17566478417y5U\"\u003e\u003cspan\u003eMenu identifier\u003c\/span\u003e\u003c\/p\u003e\n\u003c\/td\u003e\n\u003ctd\u003e\n\u003cp align=\"center\" data-spm-anchor-id=\"a2g0o.detail.1000023.i16.17566478417y5U\"\u003e\u003cspan\u003eMenu function\u003c\/span\u003e\u003c\/p\u003e\n\u003c\/td\u003e\n\u003ctd\u003e\n\u003cp align=\"center\" data-spm-anchor-id=\"a2g0o.detail.1000023.i17.17566478417y5U\"\u003e\u003cspan\u003eSetting range\u003c\/span\u003e\u003c\/p\u003e\n\u003c\/td\u003e\n\u003ctd\u003e\n\u003cp align=\"center\" data-spm-anchor-id=\"a2g0o.detail.1000023.i18.17566478417y5U\"\u003e\u003cspan\u003eFactory setting\u003c\/span\u003e\u003c\/p\u003e\n\u003c\/td\u003e\n\u003c\/tr\u003e\n\u003ctr\u003e\n\u003ctd\u003e\n\u003cp align=\"center\" data-spm-anchor-id=\"a2g0o.detail.1000023.i12.17566478417y5U\"\u003e\u003cspan\u003eF1\u003c\/span\u003e\u003c\/p\u003e\n\u003c\/td\u003e\n\u003ctd\u003e\n\u003cp align=\"center\" data-spm-anchor-id=\"a2g0o.detail.1000023.i14.17566478417y5U\"\u003e\u003cspan\u003eTemperature setting value\u003c\/span\u003e\u003c\/p\u003e\n\u003c\/td\u003e\n\u003ctd\u003e\n\u003cp align=\"center\" data-spm-anchor-id=\"a2g0o.detail.1000023.i15.17566478417y5U\"\u003e\u003cspan\u003e-40.0~99.9℃\u003c\/span\u003e\u003c\/p\u003e\n\u003c\/td\u003e\n\u003ctd\u003e\n\u003cp align=\"center\" data-spm-anchor-id=\"a2g0o.detail.1000023.i19.17566478417y5U\"\u003e\u003cspan\u003e10.0℃\u003c\/span\u003e\u003c\/p\u003e\n\u003c\/td\u003e\n\u003c\/tr\u003e\n\u003ctr\u003e\n\u003ctd\u003e\n\u003cp align=\"center\" data-spm-anchor-id=\"a2g0o.detail.1000023.i20.17566478417y5U\"\u003e\u003cspan\u003eF2\u003c\/span\u003e\u003c\/p\u003e\n\u003c\/td\u003e\n\u003ctd\u003e\n\u003cp align=\"center\" data-spm-anchor-id=\"a2g0o.detail.1000023.i21.17566478417y5U\"\u003e\u003cspan\u003eTemperature difference setting value\u003c\/span\u003e\u003c\/p\u003e\n\u003c\/td\u003e\n\u003ctd\u003e\n\u003cp align=\"center\" data-spm-anchor-id=\"a2g0o.detail.1000023.i22.17566478417y5U\"\u003e\u003cspan\u003e0.3~10.0℃\u003c\/span\u003e\u003c\/p\u003e\n\u003c\/td\u003e\n\u003ctd\u003e\n\u003cp align=\"center\" data-spm-anchor-id=\"a2g0o.detail.1000023.i23.17566478417y5U\"\u003e\u003cspan\u003e0.5℃\u003c\/span\u003e\u003c\/p\u003e\n\u003c\/td\u003e\n\u003c\/tr\u003e\n\u003ctr\u003e\n\u003ctd\u003e\n\u003cp align=\"center\" data-spm-anchor-id=\"a2g0o.detail.1000023.i24.17566478417y5U\"\u003e\u003cspan\u003eF3\u003c\/span\u003e\u003c\/p\u003e\n\u003c\/td\u003e\n\u003ctd\u003e\n\u003cp align=\"center\" data-spm-anchor-id=\"a2g0o.detail.1000023.i25.17566478417y5U\"\u003e\u003cspan\u003ePress delay\u003c\/span\u003e\u003c\/p\u003e\n\u003c\/td\u003e\n\u003ctd\u003e\n\u003cp align=\"center\" data-spm-anchor-id=\"a2g0o.detail.1000023.i26.17566478417y5U\"\u003e\u003cspan\u003e1~10 min\u003c\/span\u003e\u003c\/p\u003e\n\u003c\/td\u003e\n\u003ctd\u003e\n\u003cp align=\"center\" data-spm-anchor-id=\"a2g0o.detail.1000023.i27.17566478417y5U\"\u003e\u003cspan\u003e3 min\u003c\/span\u003e\u003c\/p\u003e\n\u003c\/td\u003e\n\u003c\/tr\u003e\n\u003ctr\u003e\n\u003ctd data-spm-anchor-id=\"a2g0o.detail.1000023.i28.17566478417y5U\"\u003e\n\u003cp align=\"center\"\u003e\u003cspan\u003eF4\u003c\/span\u003e\u003c\/p\u003e\n\u003c\/td\u003e\n\u003ctd\u003e\n\u003cp align=\"center\" data-spm-anchor-id=\"a2g0o.detail.1000023.i29.17566478417y5U\"\u003e\u003cspan\u003eTemperature correction\u003c\/span\u003e\u003c\/p\u003e\n\u003c\/td\u003e\n\u003ctd\u003e\n\u003cp align=\"center\" data-spm-anchor-id=\"a2g0o.detail.1000023.i30.17566478417y5U\"\u003e\u003cspan\u003e-10.0~10.0℃\u003c\/span\u003e\u003c\/p\u003e\n\u003c\/td\u003e\n\u003ctd\u003e\n\u003cp align=\"center\" data-spm-anchor-id=\"a2g0o.detail.1000023.i31.17566478417y5U\"\u003e\u003cspan\u003e0℃\u003c\/span\u003e\u003c\/p\u003e\n\u003c\/td\u003e\n\u003c\/tr\u003e\n\u003c\/tbody\u003e\n\u003c\/table\u003e\n\u003cp\u003e \u003c\/p\u003e\n\u003cp\u003e\u003cspan\u003eWiring Diagram:\u003c\/span\u003e\u003c\/p\u003e\n\u003cp\u003e\u003cspan\u003e\u003cimg alt=\"图片1\" src=\"https:\/\/ae01.alicdn.com\/kf\/H001eadcd3b8e49109ce4fd472825de6dW.jpg\"\u003e\u003c\/span\u003e\u003c\/p\u003e\n\u003cp\u003e \u003c\/p\u003e\n\u003cdiv\u003e\n\u003cdiv\u003e \u003c\/div\u003e\n\u003cdiv\u003e\u003cspan\u003eRepair System Data:\u003c\/span\u003e\u003c\/div\u003e\n\u003cdiv\u003e \u003c\/div\u003e\n\u003cdiv\u003e\u003cspan\u003eAfter the thermostat is powered on, first check whether the parameter settings are correct. If an error is detected, “Er” is displayed. Pressing any key will restore the default parameter settings and work normally. It is recommended to reset the parameters at this time.\u003c\/span\u003e\u003c\/div\u003e\n\u003cdiv\u003e \u003c\/div\u003e\n\u003cdiv\u003e\u003cspan\u003eSystem Code, reason and action:\u003c\/span\u003e\u003c\/div\u003e\n\u003cdiv\u003e \u003c\/div\u003e\n\u003cdiv\u003e\u003cspan\u003eSensor fault alarm: When the temperature probe loop is short-circuited or open-circuit fault, the thermostat starts the probe fault alarm mode, closes all execution states, and the digital tube displays “EE”. After the fault is cleared, press any key to return to the normal working mode.\u003c\/span\u003e\u003c\/div\u003e\n\u003cdiv\u003e\u003cspan\u003eOver-temperature alarm: When the temperature measurement exceeds the temperature measurement range, the thermostat starts the over-temperature limit fault alarm mode, and all execution states are turned off. The digital tube displays “HH”. When the temperature returns to the normal measurement range, press any key. Return to normal working mode.\u003c\/span\u003e\u003c\/div\u003e\n\u003cdiv\u003e \u003c\/div\u003e\n\u003cdiv\u003e\u003cspan\u003eSafety rules:\u003c\/span\u003e\u003c\/div\u003e\n\u003cdiv\u003e \u003c\/div\u003e\n\u003cdiv\u003e\u003cspan\u003e☆ Danger:\u003c\/span\u003e\u003c\/div\u003e\n\u003cdiv\u003e\u003cspan\u003e1. Strictly distinguish the sensor lead, power line and output relay interface, can not be connected incorrectly, the relay can not be overloaded;\u003c\/span\u003e\u003c\/div\u003e\n\u003cdiv\u003e\u003cspan\u003e2. All wiring changes must be made with the power off.\u003c\/span\u003e\u003c\/div\u003e\n\u003cdiv\u003e\u003cspan\u003e☆ Warning:\u003c\/span\u003e\u003c\/div\u003e\n\u003cdiv\u003e\u003cspan\u003e1. This thermostat is forbidden to be used in water or excessively humid environment. It is forbidden to use in high temperature, strong electromagnetic interference and strong corrosive environment.\u003c\/span\u003e\u003c\/div\u003e\n\u003cdiv\u003e\u003cspan\u003e☆ Note:\u003c\/span\u003e\u003c\/div\u003e\n\u003cdiv\u003e\u003cspan\u003e1. The supply voltage should be consistent with the voltage marked by the thermostat and ensure the stability of the supply voltage;\u003c\/span\u003e\u003c\/div\u003e\n\u003cdiv\u003e\u003cspan\u003e2. To avoid possible interference, it is recommended that the sensor leads be at an appropriate distance from the power line.\u003c\/span\u003e\u003c\/div\u003e\n\u003cdiv\u003e \u003c\/div\u003e\n\u003cdiv\u003e \u003c\/div\u003e\n\u003cdiv\u003e\u003cstrong\u003e\u003cspan\u003ePackage Included:\u003c\/span\u003e\u003c\/strong\u003e\u003c\/div\u003e\n\u003cdiv\u003e \u003c\/div\u003e\n\u003cdiv\u003e\u003cspan\u003e1 x DTC1200 Intellligent Temperature Controller\u003c\/span\u003e\u003c\/div\u003e\n\u003cdiv\u003e\u003cspan\u003e1 x Temperature sensor\u003c\/span\u003e\u003c\/div\u003e\n\u003cdiv\u003e\u003cspan\u003e1 x Instruction manual\u003c\/span\u003e\u003c\/div\u003e\n\u003cdiv\u003e\u003cspan\u003e1 x Packing box\u003c\/span\u003e\u003c\/div\u003e\n\u003cdiv\u003e\u003cspan\u003e\u003c\/span\u003e\u003c\/div\u003e\n\u003c\/div\u003e\n\u003c\/div\u003e\n\u003c\/div\u003e\n\u003cdiv\u003e\n\u003cp\u003e\u003cimg alt=\"pictures2\" src=\"https:\/\/ae01.alicdn.com\/kf\/H48e07ca430b143a1bd6390f007d70893r.jpg\"\u003e\u003c\/p\u003e\n\u003cp\u003e\u003cimg alt=\"XA0008 (3)\" src=\"https:\/\/ae01.alicdn.com\/kf\/H909cdc0df9ef48b2909767f61c05f908Y.jpg\"\u003e\u003cimg alt=\"XA0008 (4)\" src=\"https:\/\/ae01.alicdn.com\/kf\/He57b51af913d453bb4631f7f71fac13e1.jpg\"\u003e\u003cimg alt=\"XA0008 (5)\" src=\"https:\/\/ae01.alicdn.com\/kf\/H1d793d42fd7945cba1d4202db1861873q.jpg\"\u003e\u003cimg alt=\"XA0008 (24)\" src=\"https:\/\/ae01.alicdn.com\/kf\/Hddf60c92d3bf47e7a4377478d2ae0f4c0.jpg\"\u003e\u003cimg alt=\"XA0008 (7)\" src=\"https:\/\/ae01.alicdn.com\/kf\/H81eb27e7121545b799fea5521905e3c7U.jpg\"\u003e\u003cimg alt=\"XA0008 (6)\" src=\"https:\/\/ae01.alicdn.com\/kf\/H9b1a57d5932b47359fe4cb26b4df8221z.jpg\"\u003e\u003cimg alt=\"XA0008 (1)\" src=\"https:\/\/ae01.alicdn.com\/kf\/H3b043d774f204356b0278e4786d01f14k.jpg\"\u003e\u003cimg alt=\"XA0008 (9)\" src=\"https:\/\/ae01.alicdn.com\/kf\/H97fb15979930424092f839c9a8a3830fK.jpg\"\u003e\u003cimg alt=\"XA0008 (10)\" src=\"https:\/\/ae01.alicdn.com\/kf\/H6e4b81a56f9949e385541d0be905a572G.jpg\"\u003e\u003cimg alt=\"XA0008 (11)\" src=\"https:\/\/ae01.alicdn.com\/kf\/Hd0829f171f2f41bdb34c36cff898940cl.jpg\"\u003e\u003cimg alt=\"XA0008 (12)\" src=\"https:\/\/ae01.alicdn.com\/kf\/Hc210386716324310a4aa3248b0a8a09dp.jpg\"\u003e\u003cimg alt=\"XA0008 (19)\" src=\"https:\/\/ae01.alicdn.com\/kf\/H2743991dcfaf488b936cea38071fdc22l.jpg\"\u003e\u003cimg alt=\"XA0008 (21)\" src=\"https:\/\/ae01.alicdn.com\/kf\/H5d8b10d76d27477aa6d4f2e96f92b18fw.jpg\"\u003e\u003c\/p\u003e\n\u003c\/div\u003e\n\u003cp\u003e \u003c\/p\u003e\n\u003cp\u003e \u003c\/p\u003e\n\u003cp\u003e\u003cspan\u003e\u003cstrong\u003eDTC1100 DTC1110 DTC2210 DTC2200 Temperature Controller\u003c\/strong\u003e\u003c\/span\u003e\u003c\/p\u003e\n\u003cdiv\u003e\u003cspan\u003eProduct Name: Temperature Controller \u003c\/span\u003e\u003c\/div\u003e\n\u003cdiv\u003e\u003cspan\u003eProduct Models: DTC1100; DTC1110; DTC2210; DTC2200 \u003c\/span\u003e\u003c\/div\u003e\n\u003cdiv\u003e\u003cspan\u003ePower supply: AC110V-220V\u003c\/span\u003e\u003c\/div\u003e\n\u003cdiv\u003e\u003cspan\u003eTemperature range: -40°C~+99°C\u003c\/span\u003e\u003c\/div\u003e\n\u003cdiv\u003e\u003cspan\u003eTemperature measurement accuracy: ±1°C (-40 °C ~ +70 °C)\u003c\/span\u003e\u003c\/div\u003e\n\u003cdiv\u003e\u003cspan\u003eThermostat size: 93mm*56mm*34mm\u003c\/span\u003e\u003c\/div\u003e\n\u003cdiv\u003e\u003cspan\u003eRelay contact capacity: Cool(10WC250V); Heat(10A\/AC250V)\u003c\/span\u003e\u003c\/div\u003e\n\u003cdiv\u003e \u003c\/div\u003e\n\u003cdiv\u003e\u003cspan\u003e\u003cimg alt=\"1 (1)\" src=\"https:\/\/ae01.alicdn.com\/kf\/H55d10cb072154207bcdd46dd1dafbc8fh.jpg\"\u003e\u003cimg alt=\"1 (4)\" src=\"https:\/\/ae01.alicdn.com\/kf\/H2f4f0f7cfec445b58c5e00fbdd8435872.jpg\"\u003e\u003cimg alt=\"1 (2)\" src=\"https:\/\/ae01.alicdn.com\/kf\/Hdaf8974533f04094ac13d6f88bd4a970o.jpg\"\u003e\u003cimg alt=\"接线图 (1)\" src=\"https:\/\/ae01.alicdn.com\/kf\/Ha2a95c321166465591f5af870fd231bfp.jpg\"\u003e\u003cimg alt=\"1 (13)\" src=\"https:\/\/ae01.alicdn.com\/kf\/He9464c5ea5c24e168157faff9566d0ecj.jpg\"\u003e\u003cimg alt=\"1 (18)\" src=\"https:\/\/ae01.alicdn.com\/kf\/H44dfe2dd19c14a14bdd1e3d351e03a4bE.jpg\"\u003e\u003cimg alt=\"01 (1)\" src=\"https:\/\/ae01.alicdn.com\/kf\/Ha529d255334543f68affa9a95cb27f16o.jpg\"\u003e\u003cimg alt=\"4\" src=\"https:\/\/ae01.alicdn.com\/kf\/H312943e7f91e4b709b5d642e25598a6a5.jpg\"\u003e\u003cimg alt=\"15\" src=\"https:\/\/ae01.alicdn.com\/kf\/Hb93149fbec8e4329a4c090147de3983fq.jpg\"\u003e\u003cimg alt=\"接线图 (1)\" src=\"https:\/\/ae01.alicdn.com\/kf\/H0e9b53e72d594dde8c46be7d94b346b9b.jpg\"\u003e\u003cimg alt=\"10\" src=\"https:\/\/ae01.alicdn.com\/kf\/Ha4ae55d77d754955bc11801c20abde77F.jpg\"\u003e\u003cimg alt=\"16\" src=\"https:\/\/ae01.alicdn.com\/kf\/H516b5c2e4e7140f5952500c8e005c7b6t.jpg\"\u003e\u003cimg alt=\"1 (1)\" src=\"https:\/\/ae01.alicdn.com\/kf\/H72183dd8d1fc4fe4b6deb8b28ee279cby.jpg\"\u003e\u003cimg alt=\"1 (3)\" src=\"https:\/\/ae01.alicdn.com\/kf\/H1c848b67f8704717802fa010419962b0m.jpg\"\u003e\u003cimg alt=\"1 (4)\" src=\"https:\/\/ae01.alicdn.com\/kf\/H5f22b2bb585948da837a0df46163a52ea.jpg\"\u003e\u003cimg alt=\"1 (8)\" src=\"https:\/\/ae01.alicdn.com\/kf\/Hb0db99a5e1424609a10aea7486f295ab5.jpg\"\u003e\u003cimg alt=\"1 (17)\" src=\"https:\/\/ae01.alicdn.com\/kf\/Hfb6298937ee7447fb751dd6aa5b96549O.jpg\"\u003e\u003cimg alt=\"1 (19)\" src=\"https:\/\/ae01.alicdn.com\/kf\/Hbf41fac7ac3a42fdb90f17b8ff0d308d2.jpg\"\u003e\u003cimg alt=\"1 (20)\" src=\"https:\/\/ae01.alicdn.com\/kf\/H4a3c5770430945089241d33dafef31fcm.jpg\"\u003e\u003cimg alt=\"1 (1)\" src=\"https:\/\/ae01.alicdn.com\/kf\/Hc39891a3e23d41b5968309454950c8bcI.jpg\"\u003e\u003cimg alt=\"1 (2)\" src=\"https:\/\/ae01.alicdn.com\/kf\/H4522829b7e6e44dc9603abf7792e0647G.jpg\"\u003e\u003cimg alt=\"接线图\" src=\"https:\/\/ae01.alicdn.com\/kf\/Hfe019fff700840c6ad7f4ba4869ef0eaq.jpg\"\u003e\u003cimg alt=\"1 (12)\" src=\"https:\/\/ae01.alicdn.com\/kf\/H1ddb9da69f8b4b6eb775e093490116feg.jpg\"\u003e\u003cimg alt=\"1 (18)\" src=\"https:\/\/ae01.alicdn.com\/kf\/H42755cdfd6174fe3b72473d7592b07fdr.jpg\"\u003e\u003cimg alt=\"1 (20)\" src=\"https:\/\/ae01.alicdn.com\/kf\/H2350b4b9bf9b48a78676cfa40085604fK.jpg\"\u003e\u003cimg alt=\"1 (21)\" src=\"https:\/\/ae01.alicdn.com\/kf\/H62b80cb1bda24ed8841e2f13742847a8d.jpg\"\u003e\u003c\/span\u003e\u003c\/div\u003e\n\u003cdiv\u003e \u003c\/div\u003e\n\u003cdiv\u003e \u003c\/div\u003e\n\u003cdiv\u003e \u003c\/div\u003e\n\u003cdiv\u003e \u003c\/div\u003e\n\u003cdiv\u003e\u003cspan\u003eDTC3200 Temperature and Humidity Controller\u003c\/span\u003e\u003c\/div\u003e\n\u003cdiv\u003e \u003c\/div\u003e\n\u003cdiv\u003e\u003cspan\u003eProduct Name: Temperature and Humidity Controller\u003c\/span\u003e\u003c\/div\u003e\n\u003cdiv\u003e\u003cspan\u003eProduct Model: DTC3200\u003c\/span\u003e\u003c\/div\u003e\n\u003cdiv\u003e\u003cspan\u003ePower supply voltage: AC 110 ~ 230V\u003c\/span\u003e\u003c\/div\u003e\n\u003cdiv\u003e\u003cspan\u003ePower supply frequency: 50 \/ 60Hz\u003c\/span\u003e\u003c\/div\u003e\n\u003cdiv\u003e\u003cspan\u003eTemperature measurement range: -20 ~ 60 ℃\u003c\/span\u003e\u003c\/div\u003e\n\u003cdiv\u003e\u003cspan\u003eHumidity measurement range: 0% ~ 100% RH\u003c\/span\u003e\u003c\/div\u003e\n\u003cdiv\u003e\u003cspan\u003eTemperature measurement accuracy: 0.3 ℃\u003c\/span\u003e\u003c\/div\u003e\n\u003cdiv\u003e\u003cspan\u003eHumidity measurement accuracy: 3%\u003c\/span\u003e\u003c\/div\u003e\n\u003cdiv\u003e\u003cspan\u003eOutput control: Relay output\u003c\/span\u003e\u003c\/div\u003e\n\u003cdiv\u003e\u003cspan\u003eOutput power: MAX 10A\u003c\/span\u003e\u003c\/div\u003e\n\u003cdiv\u003e \u003c\/div\u003e\n\u003cdiv\u003e\u003cspan\u003eSetting method: start value \u0026lt;stop value (the program automatically determines the working mode as heating \/ humidification mode)\u003c\/span\u003e\u003c\/div\u003e\n\u003cdiv\u003e\u003cspan\u003eSetting method: start value\u0026gt; stop value (the program automatically determines the working mode to be cooling \/ dehumidifying mode)\u003c\/span\u003e\u003c\/div\u003e\n\u003cdiv\u003e\u003cspan\u003eHeating \/ cooling mode setting\u003c\/span\u003e\u003c\/div\u003e\n\u003cdiv\u003e\u003cspan\u003eSetting method: setting (starting temperature): long press the ▲ button, the starting temperature flashes, and the starting temperature value is set by the ▲ ▼ button\u003c\/span\u003e\u003c\/div\u003e\n\u003cdiv\u003e\u003cspan\u003eSetting (stop temperature): long press the ▼ button to stop the temperature flashing, set the stop temperature value by ▲ ▼ button\u003c\/span\u003e\u003c\/div\u003e\n\u003cdiv\u003e \u003c\/div\u003e\n\u003cdiv\u003e\u003cspan\u003eHeating use case: control the water heater, heating to 65 ℃ to stop, the temperature drops to 50 ℃ to start heating again\u003c\/span\u003e\u003c\/div\u003e\n\u003cdiv\u003e\u003cspan\u003eThe first step: heating working mode, start temperature \u0026lt;stop temperature\u003c\/span\u003e\u003c\/div\u003e\n\u003cdiv\u003e\u003cspan\u003eStep 2: Press and hold the ▲ button, the starting temperature flashes, and set the starting temperature to 50 ℃ via the ▲ ▼ button\u003c\/span\u003e\u003c\/div\u003e\n\u003cdiv\u003e\u003cspan\u003eThe third step: long press the ▼ button to stop the temperature flashing, set the stop temperature to 65 ℃ through the ▲ ▼ button, the setting is complete!\u003c\/span\u003e\u003c\/div\u003e\n\u003cdiv\u003e\u003cspan\u003eRefrigeration use case: use in the farm, the fan ventilation stops at 26 ℃, and the temperature rises to 30 ℃ to start ventilation again\u003c\/span\u003e\u003c\/div\u003e\n\u003cdiv\u003e\u003cspan\u003eStep 1: Refrigeration working mode, start temperature\u0026gt; stop temperature\u003c\/span\u003e\u003c\/div\u003e\n\u003cdiv\u003e\u003cspan\u003eStep 2: Press and hold the ▲ button, the starting temperature flashes, and set the starting temperature to 30 ℃ via the ▲ ▼ button\u003c\/span\u003e\u003c\/div\u003e\n\u003cdiv\u003e\u003cspan\u003eStep 3: Press and hold the ▼ button to stop the temperature flashing, and set the stop temperature to 26 ° C with the ▲ ▼ button. The setting is complete!\u003c\/span\u003e\u003c\/div\u003e\n\u003cdiv\u003e \u003c\/div\u003e\n\u003cdiv\u003e\u003cspan\u003eHumidification \/ dehumidification mode settings:\u003c\/span\u003e\u003c\/div\u003e\n\u003cdiv\u003e\u003cspan\u003eSetting (Start Humidity): Long press the △ key, the start humidity value flashes, set the start humidity value by the △ ▽ key. Set [Stop Humidity]: Long press the △ key, stop the humidity value flashing, and set the stop humidity by the △ ▽ key value.\u003c\/span\u003e\u003c\/div\u003e\n\u003cdiv\u003e \u003c\/div\u003e\n\u003cdiv\u003e\u003cspan\u003eExamples of humidification: Fresh supermarket humidification, control humidifier 50% RH to start humidification, humidification to 80% RH to stop humidification.\u003c\/span\u003e\u003c\/div\u003e\n\u003cdiv\u003e \u003c\/div\u003e\n\u003cdiv\u003e\u003cspan\u003eSetup steps:\u003c\/span\u003e\u003c\/div\u003e\n\u003cdiv\u003e\u003cspan\u003e Step 1: Press and hold the △ key for 3 seconds to start the humidity value flashing, and set the start humidity value to 50% RH.\u003c\/span\u003e\u003c\/div\u003e\n\u003cdiv\u003e\u003cspan\u003e Step 2: Press and hold the ▽ key for 3 seconds to stop the humidity value flashing, set the value to 80% RH, the setting is completed, press the button for 5 seconds without operation, and automatically return to the normal display state\u003c\/span\u003e\u003c\/div\u003e\n\u003cdiv\u003e \u003c\/div\u003e\n\u003cdiv\u003e\u003cspan\u003eDehumidification example: workshop control exhaust dehumidification system, humidity 70% RH starts dehumidification, humidity 40% RH stops dehumidification\u003c\/span\u003e\u003c\/div\u003e\n\u003cdiv\u003e \u003c\/div\u003e\n\u003cdiv\u003e\u003cspan\u003eSetup steps:\u003c\/span\u003e\u003c\/div\u003e\n\u003cdiv\u003e\u003cspan\u003e Step 1: Press and hold the △ key for 3 seconds to start the humidity value flashing, and set the start humidity value to 40% RH.\u003c\/span\u003e\u003c\/div\u003e\n\u003cdiv\u003e\u003cspan\u003e Step 2: Press and hold the ▽ key for 3 seconds to stop the humidity value from flashing, set the value to 70% RH, the setting is completed, press the button for 5 seconds without operation, and automatically return to the normal display state\u003c\/span\u003e\u003c\/div\u003e\n\u003cdiv\u003e \u003c\/div\u003e\n\u003cdiv\u003e \u003c\/div\u003e\n\u003cdiv\u003e\u003cspan\u003eTemperature correction:\u003c\/span\u003e\u003c\/div\u003e\n\u003cdiv\u003e\u003cspan\u003eSimultaneously press the ▲ ▼ key for 3 seconds to start the temperature digit flashing, and use the ▲ ▼ key to set the start temperature correction value; after the setting is completed, press the button for 5 seconds without operation, and automatically return to the normal display state.\u003c\/span\u003e\u003c\/div\u003e\n\u003cdiv\u003e \u003c\/div\u003e\n\u003cdiv\u003e\u003cspan\u003eHumidity correction:\u003c\/span\u003e\u003c\/div\u003e\n\u003cdiv\u003e\u003cspan\u003eSimultaneously press the △ ▽ key for 3 seconds to start the humidity digit flashing, and set the humidity correction value by the △ ▽ key; after the setting is completed, press the button for 5 seconds without operation, and it will automatically return to the normal display state.\u003c\/span\u003e\u003c\/div\u003e\n\u003cdiv\u003e \u003c\/div\u003e\n\u003cdiv\u003e\u003cspan\u003eWiring instructions:\u003c\/span\u003e\u003c\/div\u003e\n\u003cdiv\u003e \u003c\/div\u003e\n\u003cdiv\u003e \u003cimg alt=\"11\" src=\"https:\/\/ae01.alicdn.com\/kf\/H818f4241e00c4a4383e69801a2e9fd69R.jpg\"\u003e\n\u003c\/div\u003e\n\u003cdiv\u003e \u003c\/div\u003e\n\u003cdiv\u003e \u003c\/div\u003e\n\u003cdiv\u003e\u003cspan\u003e※ If the temperature and humidity display LLL, please confirm whether the wiring of the SHT20 digital temperature and humidity sensor is correct and whether there is poor contact, you can try to reconnect the wiring.\u003c\/span\u003e\u003c\/div\u003e\n\u003cdiv\u003e \u003c\/div\u003e\n\u003cdiv\u003e\n\u003cimg alt=\"1(23)\" src=\"https:\/\/ae01.alicdn.com\/kf\/H12eb95c3e0d2444c96477c9c4e96c5e2r.jpg\"\u003e\u003cimg alt=\"1 (2)\" src=\"https:\/\/ae01.alicdn.com\/kf\/H4aec1fa943784e678b9d5a13ef92c840u.jpg\"\u003e\u003cimg alt=\"1 (9)\" src=\"https:\/\/ae01.alicdn.com\/kf\/H62f61e0071094feb8e4b5a95452126815.jpg\"\u003e\u003cimg alt=\"1 (15)\" src=\"https:\/\/ae01.alicdn.com\/kf\/H3015a4e6d81f490b9020dca461f7694bX.jpg\"\u003e\u003cimg alt=\"1 (18)\" src=\"https:\/\/ae01.alicdn.com\/kf\/He260f2df36064fe2af5530c7a561437ed.jpg\"\u003e\u003cimg alt=\"1 (20)\" src=\"https:\/\/ae01.alicdn.com\/kf\/He00db8acc649445db0f1f4fce6df2bf95.jpg\"\u003e\u003cimg alt=\"1 (22)\" src=\"https:\/\/ae01.alicdn.com\/kf\/H5e7b7c932bd44e159fcc998c54110021C.jpg\"\u003e\u003cimg alt=\"1 (4)\" src=\"https:\/\/ae01.alicdn.com\/kf\/H31b481ef695c453d88993756e902f3dec.jpg\"\u003e\u003cimg alt=\"1 (3)\" src=\"https:\/\/ae01.alicdn.com\/kf\/H72f864579840411fa481222392614398v.jpg\"\u003e\n\u003c\/div\u003e"}
 -

 Translation missing: en.products.product.regular_price $2.99{"id":4616159920199,"title":"110V-220V LED Digital Temperature Controller Thermostat Thermoregulator for Incubator Heating Cooling Replace STC-1000 DTC1200","handle":"110v-220v-led-digital-temperature-controller-thermostat-thermoregulator-for-incubator-heating-cooling-replace-stc-1000-dtc1200","description":"\u003cdiv\u003e\u003cstrong\u003e\u003cspan\u003eDescription:\u003c\/span\u003e\u003c\/strong\u003e\u003c\/div\u003e\n\u003cdiv\u003e \u003c\/div\u003e\n\u003cdiv\u003e\n\u003cdiv\u003e\u003cspan\u003eProduct Name: Thermostat\u003c\/span\u003e\u003c\/div\u003e\n\u003cdiv\u003e\u003cspan\u003eProduct model: DTC1200\u003c\/span\u003e\u003c\/div\u003e\n\u003cdiv data-spm-anchor-id=\"a2g0o.detail.1000023.i0.766b67b1vR7Vg3\"\u003e\u003cspan\u003eSupply voltage: AC110~230V\u003c\/span\u003e\u003c\/div\u003e\n\u003cdiv data-spm-anchor-id=\"a2g0o.detail.1000023.i1.766b67b1vR7Vg3\"\u003e\u003cspan\u003eTemperature range: -40°C~+99°C\u003c\/span\u003e\u003c\/div\u003e\n\u003cdiv\u003e\u003cspan\u003eTemperature measurement accuracy: ±1 °C (-40 °C ~ +70 °C)\u003c\/span\u003e\u003c\/div\u003e\n\u003cdiv data-spm-anchor-id=\"a2g0o.detail.1000023.i2.766b67b1vR7Vg3\"\u003e\u003cspan\u003eSensor line length: 100cm\u003c\/span\u003e\u003c\/div\u003e\n\u003cdiv data-spm-anchor-id=\"a2g0o.detail.1000023.i3.766b67b1vR7Vg3\"\u003e\u003cspan\u003eThermostat size: 93mm*56mm*34mm\u003c\/span\u003e\u003c\/div\u003e\n\u003cdiv\u003e\u003cspan\u003eOutput capacity: cooling (compressor 3A) heating (10A\/250VAC)\u003c\/span\u003e\u003c\/div\u003e\n\u003cdiv\u003e \u003c\/div\u003e\n\u003cdiv\u003e\u003cspan\u003eSee parameter method:\u003c\/span\u003e\u003c\/div\u003e\n\u003cdiv\u003e \u003c\/div\u003e\n\u003cdiv\u003e\u003cspan\u003eWhen the thermostat is working normally, press and release \"▲\"the key once to display the temperature setting value; press and release \"▼\" the key once to display the temperature difference setting value. After 3 seconds, the temperature returns to the normal display state.\u003c\/span\u003e\u003c\/div\u003e\n\u003cdiv\u003e \u003c\/div\u003e\n\u003cdiv\u003e\u003cspan\u003eSetting parameter method:\u003c\/span\u003e\u003c\/div\u003e\n\u003cdiv\u003e \u003c\/div\u003e\n\u003cdiv\u003e\u003cspan\u003eWhen the thermostat is working normally, press \"S\" key and hold the button for more than 3 seconds to enter the modified parameter mode. The “Set” indicator lights up, the digital tube displays the code “F1” of the first menu item, and press the \"▲\" or \"▼\"key to up or down the code of the menu item. Press \"S\" the key to display the parameter setting value of the current menu, press \"S\" and hold the key, then press the \"▲\"or \"▼\" key to increase or decrease the parameter setting value of the current menu; press \"S\" key and hold the key, and press the \"▲\"or \"▼\" key to quickly increase the speed; Or down and display the parameter settings of the current menu.\u003c\/span\u003e\u003c\/div\u003e\n\u003cdiv\u003e\u003cspan\u003ePress and hold \"▲\"or \"▼\" the key at the same time to restore the parameters to the factory settings.\u003c\/span\u003e\u003c\/div\u003e\n\u003cdiv\u003e \u003c\/div\u003e\n\u003cdiv\u003e\u003cspan\u003eOperation instructions:\u003c\/span\u003e\u003c\/div\u003e\n\u003cdiv\u003e \u003c\/div\u003e\n\u003cdiv\u003e\u003cspan\u003e1.When the thermostat is working normally, press and hold the \"power button\" for more than 3 seconds to turn off the thermostat. When the thermostat is off, press and hold the \"power button\" for more than 3 seconds to open the thermostat.\u003c\/span\u003e\u003c\/div\u003e\n\u003cdiv\u003e\u003cspan\u003eWhen the thermostat is working normally, the digital tube displays the current temperature measurement value, and performs automatic recognition conversion of the cooling heating operation mode.\u003c\/span\u003e\u003c\/div\u003e\n\u003cdiv\u003e\u003cspan\u003e2.When the measured temperature ≥ temperature set value + temperature difference set value, enter the cooling state, the Cool indicator light is on, the cooling relay normally open contact is closed; the Cool indicator flashes, indicating that the cooling device is in the press delay protection state; when measuring the temperature ≤ temperature set value, the Cool indicator is off, and the normally open contact of the refrigeration relay is disconnected.\u003c\/span\u003e\u003c\/div\u003e\n\u003cdiv\u003e\u003cspan\u003e3.When the measured temperature ≤ temperature set value - temperature difference set value enters the heating state, the Heat indicator light is on, the heating relay normally open contact is closed; when the measured temperature ≥ temperature set value, the Heat indicator is off, the heating relay normally open contact disconnect.\u003c\/span\u003e\u003c\/div\u003e\n\u003cdiv\u003e \u003c\/div\u003e\n\u003cdiv data-spm-anchor-id=\"a2g0o.detail.1000023.i1.17566478417y5U\"\u003e\n\u003cp data-spm-anchor-id=\"a2g0o.detail.1000023.i0.17566478417y5U\"\u003e\u003cspan\u003eIndicator status description:\u003c\/span\u003e\u003c\/p\u003e\n\u003ctable border=\"1\" cellspacing=\"0\"\u003e\n\u003ctbody\u003e\n\u003ctr\u003e\n\u003ctd\u003e\n\u003cp align=\"center\"\u003e\u003cspan\u003eIndicator\u003c\/span\u003e\u003c\/p\u003e\n\u003c\/td\u003e\n\u003ctd\u003e\n\u003cp align=\"center\"\u003e\u003cspan\u003eFunction\u003c\/span\u003e\u003c\/p\u003e\n\u003c\/td\u003e\n\u003ctd\u003e\n\u003cp align=\"center\" data-spm-anchor-id=\"a2g0o.detail.1000023.i10.17566478417y5U\"\u003e\u003cspan\u003eNote\u003c\/span\u003e\u003c\/p\u003e\n\u003c\/td\u003e\n\u003c\/tr\u003e\n\u003ctr\u003e\n\u003ctd\u003e\n\u003cp align=\"center\" data-spm-anchor-id=\"a2g0o.detail.1000023.i4.17566478417y5U\"\u003e\u003cspan\u003eCool indicator\u003c\/span\u003e\u003c\/p\u003e\n\u003c\/td\u003e\n\u003ctd\u003e\n\u003cp align=\"center\" data-spm-anchor-id=\"a2g0o.detail.1000023.i5.17566478417y5U\"\u003e\u003cspan\u003eLight on:cooling work;\u003c\/span\u003e\u003c\/p\u003e\n\u003cp align=\"center\"\u003e\u003cspan\u003e Light off:cooling off;\u003c\/span\u003e\u003c\/p\u003e\n\u003cp align=\"center\"\u003e\u003cspan\u003eFlashing: press delay\u003c\/span\u003e\u003c\/p\u003e\n\u003c\/td\u003e\n\u003ctd rowspan=\"2\"\u003e\n\u003cp align=\"center\" data-spm-anchor-id=\"a2g0o.detail.1000023.i11.17566478417y5U\"\u003e\u003cspan\u003eCool and Heat Both indicator lights cannot be lit at the same time\u003c\/span\u003e\u003c\/p\u003e\n\u003c\/td\u003e\n\u003c\/tr\u003e\n\u003ctr\u003e\n\u003ctd\u003e\n\u003cp align=\"center\" data-spm-anchor-id=\"a2g0o.detail.1000023.i6.17566478417y5U\"\u003e\u003cspan\u003eHeat indicator\u003c\/span\u003e\u003c\/p\u003e\n\u003c\/td\u003e\n\u003ctd\u003e\n\u003cp align=\"center\" data-spm-anchor-id=\"a2g0o.detail.1000023.i7.17566478417y5U\"\u003e\u003cspan\u003eBright: heating work;\u003c\/span\u003e\u003c\/p\u003e\n\u003cp align=\"center\"\u003e\u003cspan\u003eoff: heating off\u003c\/span\u003e\u003c\/p\u003e\n\u003c\/td\u003e\n\u003c\/tr\u003e\n\u003ctr\u003e\n\u003ctd\u003e\n\u003cp align=\"center\" data-spm-anchor-id=\"a2g0o.detail.1000023.i8.17566478417y5U\"\u003e\u003cspan\u003eSet indicator\u003c\/span\u003e\u003c\/p\u003e\n\u003c\/td\u003e\n\u003ctd\u003e\n\u003cp align=\"center\" data-spm-anchor-id=\"a2g0o.detail.1000023.i9.17566478417y5U\"\u003e\u003cspan\u003eOn: parameter setting status\u003c\/span\u003e\u003c\/p\u003e\n\u003c\/td\u003e\n\u003ctd\u003e\n\u003cp align=\"center\"\u003e \u003c\/p\u003e\n\u003c\/td\u003e\n\u003c\/tr\u003e\n\u003c\/tbody\u003e\n\u003c\/table\u003e\n\u003cp\u003e \u003c\/p\u003e\n\u003cp\u003e\u003cspan\u003eMenu function description:\u003c\/span\u003e\u003c\/p\u003e\n\u003ctable border=\"1\" cellspacing=\"0\"\u003e\n\u003ctbody\u003e\n\u003ctr\u003e\n\u003ctd\u003e\n\u003cp align=\"center\" data-spm-anchor-id=\"a2g0o.detail.1000023.i13.17566478417y5U\"\u003e\u003cspan\u003eMenu identifier\u003c\/span\u003e\u003c\/p\u003e\n\u003c\/td\u003e\n\u003ctd\u003e\n\u003cp align=\"center\" data-spm-anchor-id=\"a2g0o.detail.1000023.i16.17566478417y5U\"\u003e\u003cspan\u003eMenu function\u003c\/span\u003e\u003c\/p\u003e\n\u003c\/td\u003e\n\u003ctd\u003e\n\u003cp align=\"center\" data-spm-anchor-id=\"a2g0o.detail.1000023.i17.17566478417y5U\"\u003e\u003cspan\u003eSetting range\u003c\/span\u003e\u003c\/p\u003e\n\u003c\/td\u003e\n\u003ctd\u003e\n\u003cp align=\"center\" data-spm-anchor-id=\"a2g0o.detail.1000023.i18.17566478417y5U\"\u003e\u003cspan\u003eFactory setting\u003c\/span\u003e\u003c\/p\u003e\n\u003c\/td\u003e\n\u003c\/tr\u003e\n\u003ctr\u003e\n\u003ctd\u003e\n\u003cp align=\"center\" data-spm-anchor-id=\"a2g0o.detail.1000023.i12.17566478417y5U\"\u003e\u003cspan\u003eF1\u003c\/span\u003e\u003c\/p\u003e\n\u003c\/td\u003e\n\u003ctd\u003e\n\u003cp align=\"center\" data-spm-anchor-id=\"a2g0o.detail.1000023.i14.17566478417y5U\"\u003e\u003cspan\u003eTemperature setting value\u003c\/span\u003e\u003c\/p\u003e\n\u003c\/td\u003e\n\u003ctd\u003e\n\u003cp align=\"center\" data-spm-anchor-id=\"a2g0o.detail.1000023.i15.17566478417y5U\"\u003e\u003cspan\u003e-40.0~99.9℃\u003c\/span\u003e\u003c\/p\u003e\n\u003c\/td\u003e\n\u003ctd\u003e\n\u003cp align=\"center\" data-spm-anchor-id=\"a2g0o.detail.1000023.i19.17566478417y5U\"\u003e\u003cspan\u003e10.0℃\u003c\/span\u003e\u003c\/p\u003e\n\u003c\/td\u003e\n\u003c\/tr\u003e\n\u003ctr\u003e\n\u003ctd\u003e\n\u003cp align=\"center\" data-spm-anchor-id=\"a2g0o.detail.1000023.i20.17566478417y5U\"\u003e\u003cspan\u003eF2\u003c\/span\u003e\u003c\/p\u003e\n\u003c\/td\u003e\n\u003ctd\u003e\n\u003cp align=\"center\" data-spm-anchor-id=\"a2g0o.detail.1000023.i21.17566478417y5U\"\u003e\u003cspan\u003eTemperature difference setting value\u003c\/span\u003e\u003c\/p\u003e\n\u003c\/td\u003e\n\u003ctd\u003e\n\u003cp align=\"center\" data-spm-anchor-id=\"a2g0o.detail.1000023.i22.17566478417y5U\"\u003e\u003cspan\u003e0.3~10.0℃\u003c\/span\u003e\u003c\/p\u003e\n\u003c\/td\u003e\n\u003ctd\u003e\n\u003cp align=\"center\" data-spm-anchor-id=\"a2g0o.detail.1000023.i23.17566478417y5U\"\u003e\u003cspan\u003e0.5℃\u003c\/span\u003e\u003c\/p\u003e\n\u003c\/td\u003e\n\u003c\/tr\u003e\n\u003ctr\u003e\n\u003ctd\u003e\n\u003cp align=\"center\" data-spm-anchor-id=\"a2g0o.detail.1000023.i24.17566478417y5U\"\u003e\u003cspan\u003eF3\u003c\/span\u003e\u003c\/p\u003e\n\u003c\/td\u003e\n\u003ctd\u003e\n\u003cp align=\"center\" data-spm-anchor-id=\"a2g0o.detail.1000023.i25.17566478417y5U\"\u003e\u003cspan\u003ePress delay\u003c\/span\u003e\u003c\/p\u003e\n\u003c\/td\u003e\n\u003ctd\u003e\n\u003cp align=\"center\" data-spm-anchor-id=\"a2g0o.detail.1000023.i26.17566478417y5U\"\u003e\u003cspan\u003e1~10 min\u003c\/span\u003e\u003c\/p\u003e\n\u003c\/td\u003e\n\u003ctd\u003e\n\u003cp align=\"center\" data-spm-anchor-id=\"a2g0o.detail.1000023.i27.17566478417y5U\"\u003e\u003cspan\u003e3 min\u003c\/span\u003e\u003c\/p\u003e\n\u003c\/td\u003e\n\u003c\/tr\u003e\n\u003ctr\u003e\n\u003ctd data-spm-anchor-id=\"a2g0o.detail.1000023.i28.17566478417y5U\"\u003e\n\u003cp align=\"center\"\u003e\u003cspan\u003eF4\u003c\/span\u003e\u003c\/p\u003e\n\u003c\/td\u003e\n\u003ctd\u003e\n\u003cp align=\"center\" data-spm-anchor-id=\"a2g0o.detail.1000023.i29.17566478417y5U\"\u003e\u003cspan\u003eTemperature correction\u003c\/span\u003e\u003c\/p\u003e\n\u003c\/td\u003e\n\u003ctd\u003e\n\u003cp align=\"center\" data-spm-anchor-id=\"a2g0o.detail.1000023.i30.17566478417y5U\"\u003e\u003cspan\u003e-10.0~10.0℃\u003c\/span\u003e\u003c\/p\u003e\n\u003c\/td\u003e\n\u003ctd\u003e\n\u003cp align=\"center\" data-spm-anchor-id=\"a2g0o.detail.1000023.i31.17566478417y5U\"\u003e\u003cspan\u003e0℃\u003c\/span\u003e\u003c\/p\u003e\n\u003c\/td\u003e\n\u003c\/tr\u003e\n\u003c\/tbody\u003e\n\u003c\/table\u003e\n\u003cp\u003e \u003c\/p\u003e\n\u003cp\u003e\u003cspan\u003eWiring Diagram:\u003c\/span\u003e\u003c\/p\u003e\n\u003cp\u003e\u003cspan\u003e\u003cimg alt=\"图片1\" src=\"https:\/\/ae01.alicdn.com\/kf\/H001eadcd3b8e49109ce4fd472825de6dW.jpg\"\u003e\u003c\/span\u003e\u003c\/p\u003e\n\u003cp\u003e \u003c\/p\u003e\n\u003cdiv\u003e\n\u003cdiv\u003e \u003c\/div\u003e\n\u003cdiv\u003e\u003cspan\u003eRepair System Data:\u003c\/span\u003e\u003c\/div\u003e\n\u003cdiv\u003e \u003c\/div\u003e\n\u003cdiv\u003e\u003cspan\u003eAfter the thermostat is powered on, first check whether the parameter settings are correct. If an error is detected, “Er” is displayed. Pressing any key will restore the default parameter settings and work normally. It is recommended to reset the parameters at this time.\u003c\/span\u003e\u003c\/div\u003e\n\u003cdiv\u003e \u003c\/div\u003e\n\u003cdiv\u003e\u003cspan\u003eSystem Code, reason and action:\u003c\/span\u003e\u003c\/div\u003e\n\u003cdiv\u003e \u003c\/div\u003e\n\u003cdiv\u003e\u003cspan\u003eSensor fault alarm: When the temperature probe loop is short-circuited or open-circuit fault, the thermostat starts the probe fault alarm mode, closes all execution states, and the digital tube displays “EE”. After the fault is cleared, press any key to return to the normal working mode.\u003c\/span\u003e\u003c\/div\u003e\n\u003cdiv\u003e\u003cspan\u003eOver-temperature alarm: When the temperature measurement exceeds the temperature measurement range, the thermostat starts the over-temperature limit fault alarm mode, and all execution states are turned off. The digital tube displays “HH”. When the temperature returns to the normal measurement range, press any key. Return to normal working mode.\u003c\/span\u003e\u003c\/div\u003e\n\u003cdiv\u003e \u003c\/div\u003e\n\u003cdiv\u003e\u003cspan\u003eSafety rules:\u003c\/span\u003e\u003c\/div\u003e\n\u003cdiv\u003e \u003c\/div\u003e\n\u003cdiv\u003e\u003cspan\u003e☆ Danger:\u003c\/span\u003e\u003c\/div\u003e\n\u003cdiv\u003e\u003cspan\u003e1. Strictly distinguish the sensor lead, power line and output relay interface, can not be connected incorrectly, the relay can not be overloaded;\u003c\/span\u003e\u003c\/div\u003e\n\u003cdiv\u003e\u003cspan\u003e2. All wiring changes must be made with the power off.\u003c\/span\u003e\u003c\/div\u003e\n\u003cdiv\u003e\u003cspan\u003e☆ Warning:\u003c\/span\u003e\u003c\/div\u003e\n\u003cdiv\u003e\u003cspan\u003e1. This thermostat is forbidden to be used in water or excessively humid environment. It is forbidden to use in high temperature, strong electromagnetic interference and strong corrosive environment.\u003c\/span\u003e\u003c\/div\u003e\n\u003cdiv\u003e\u003cspan\u003e☆ Note:\u003c\/span\u003e\u003c\/div\u003e\n\u003cdiv\u003e\u003cspan\u003e1. The supply voltage should be consistent with the voltage marked by the thermostat and ensure the stability of the supply voltage;\u003c\/span\u003e\u003c\/div\u003e\n\u003cdiv\u003e\u003cspan\u003e2. To avoid possible interference, it is recommended that the sensor leads be at an appropriate distance from the power line.\u003c\/span\u003e\u003c\/div\u003e\n\u003cdiv\u003e \u003c\/div\u003e\n\u003cdiv\u003e \u003c\/div\u003e\n\u003cdiv\u003e\u003cstrong\u003e\u003cspan\u003ePackage Included:\u003c\/span\u003e\u003c\/strong\u003e\u003c\/div\u003e\n\u003cdiv\u003e \u003c\/div\u003e\n\u003cdiv\u003e\u003cspan\u003e1 x DTC1200 Intellligent Temperature Controller\u003c\/span\u003e\u003c\/div\u003e\n\u003cdiv\u003e\u003cspan\u003e1 x Temperature sensor\u003c\/span\u003e\u003c\/div\u003e\n\u003cdiv\u003e\u003cspan\u003e1 x Instruction manual\u003c\/span\u003e\u003c\/div\u003e\n\u003cdiv\u003e\u003cspan\u003e1 x Packing box\u003c\/span\u003e\u003c\/div\u003e\n\u003cdiv\u003e\u003cspan\u003e\u003c\/span\u003e\u003c\/div\u003e\n\u003c\/div\u003e\n\u003c\/div\u003e\n\u003c\/div\u003e\n\u003cdiv\u003e\n\u003cp\u003e\u003cimg alt=\"pictures2\" src=\"https:\/\/ae01.alicdn.com\/kf\/H48e07ca430b143a1bd6390f007d70893r.jpg\"\u003e\u003c\/p\u003e\n\u003cp\u003e\u003cimg alt=\"XA0008 (3)\" src=\"https:\/\/ae01.alicdn.com\/kf\/H909cdc0df9ef48b2909767f61c05f908Y.jpg\"\u003e\u003cimg alt=\"XA0008 (4)\" src=\"https:\/\/ae01.alicdn.com\/kf\/He57b51af913d453bb4631f7f71fac13e1.jpg\"\u003e\u003cimg alt=\"XA0008 (5)\" src=\"https:\/\/ae01.alicdn.com\/kf\/H1d793d42fd7945cba1d4202db1861873q.jpg\"\u003e\u003cimg alt=\"XA0008 (24)\" src=\"https:\/\/ae01.alicdn.com\/kf\/Hddf60c92d3bf47e7a4377478d2ae0f4c0.jpg\"\u003e\u003cimg alt=\"XA0008 (7)\" src=\"https:\/\/ae01.alicdn.com\/kf\/H81eb27e7121545b799fea5521905e3c7U.jpg\"\u003e\u003cimg alt=\"XA0008 (6)\" src=\"https:\/\/ae01.alicdn.com\/kf\/H9b1a57d5932b47359fe4cb26b4df8221z.jpg\"\u003e\u003cimg alt=\"XA0008 (1)\" src=\"https:\/\/ae01.alicdn.com\/kf\/H3b043d774f204356b0278e4786d01f14k.jpg\"\u003e\u003cimg alt=\"XA0008 (9)\" src=\"https:\/\/ae01.alicdn.com\/kf\/H97fb15979930424092f839c9a8a3830fK.jpg\"\u003e\u003cimg alt=\"XA0008 (10)\" src=\"https:\/\/ae01.alicdn.com\/kf\/H6e4b81a56f9949e385541d0be905a572G.jpg\"\u003e\u003cimg alt=\"XA0008 (11)\" src=\"https:\/\/ae01.alicdn.com\/kf\/Hd0829f171f2f41bdb34c36cff898940cl.jpg\"\u003e\u003cimg alt=\"XA0008 (12)\" src=\"https:\/\/ae01.alicdn.com\/kf\/Hc210386716324310a4aa3248b0a8a09dp.jpg\"\u003e\u003cimg alt=\"XA0008 (19)\" src=\"https:\/\/ae01.alicdn.com\/kf\/H2743991dcfaf488b936cea38071fdc22l.jpg\"\u003e\u003cimg alt=\"XA0008 (21)\" src=\"https:\/\/ae01.alicdn.com\/kf\/H5d8b10d76d27477aa6d4f2e96f92b18fw.jpg\"\u003e\u003c\/p\u003e\n\u003c\/div\u003e\n\u003cp\u003e \u003c\/p\u003e\n\u003cp\u003e \u003c\/p\u003e\n\u003cp\u003e\u003cspan\u003e\u003cstrong\u003eDTC1100 DTC1110 DTC2210 DTC2200 Temperature Controller\u003c\/strong\u003e\u003c\/span\u003e\u003c\/p\u003e\n\u003cdiv\u003e\u003cspan\u003eProduct Name: Temperature Controller \u003c\/span\u003e\u003c\/div\u003e\n\u003cdiv\u003e\u003cspan\u003eProduct Models: DTC1100; DTC1110; DTC2210; DTC2200 \u003c\/span\u003e\u003c\/div\u003e\n\u003cdiv\u003e\u003cspan\u003ePower supply: AC110V-220V\u003c\/span\u003e\u003c\/div\u003e\n\u003cdiv\u003e\u003cspan\u003eTemperature range: -40°C~+99°C\u003c\/span\u003e\u003c\/div\u003e\n\u003cdiv\u003e\u003cspan\u003eTemperature measurement accuracy: ±1°C (-40 °C ~ +70 °C)\u003c\/span\u003e\u003c\/div\u003e\n\u003cdiv\u003e\u003cspan\u003eThermostat size: 93mm*56mm*34mm\u003c\/span\u003e\u003c\/div\u003e\n\u003cdiv\u003e\u003cspan\u003eRelay contact capacity: Cool(10WC250V); Heat(10A\/AC250V)\u003c\/span\u003e\u003c\/div\u003e\n\u003cdiv\u003e \u003c\/div\u003e\n\u003cdiv\u003e\u003cspan\u003e\u003cimg alt=\"1 (1)\" src=\"https:\/\/ae01.alicdn.com\/kf\/H55d10cb072154207bcdd46dd1dafbc8fh.jpg\"\u003e\u003cimg alt=\"1 (4)\" src=\"https:\/\/ae01.alicdn.com\/kf\/H2f4f0f7cfec445b58c5e00fbdd8435872.jpg\"\u003e\u003cimg alt=\"1 (2)\" src=\"https:\/\/ae01.alicdn.com\/kf\/Hdaf8974533f04094ac13d6f88bd4a970o.jpg\"\u003e\u003cimg alt=\"接线图 (1)\" src=\"https:\/\/ae01.alicdn.com\/kf\/Ha2a95c321166465591f5af870fd231bfp.jpg\"\u003e\u003cimg alt=\"1 (13)\" src=\"https:\/\/ae01.alicdn.com\/kf\/He9464c5ea5c24e168157faff9566d0ecj.jpg\"\u003e\u003cimg alt=\"1 (18)\" src=\"https:\/\/ae01.alicdn.com\/kf\/H44dfe2dd19c14a14bdd1e3d351e03a4bE.jpg\"\u003e\u003cimg alt=\"01 (1)\" src=\"https:\/\/ae01.alicdn.com\/kf\/Ha529d255334543f68affa9a95cb27f16o.jpg\"\u003e\u003cimg alt=\"4\" src=\"https:\/\/ae01.alicdn.com\/kf\/H312943e7f91e4b709b5d642e25598a6a5.jpg\"\u003e\u003cimg alt=\"15\" src=\"https:\/\/ae01.alicdn.com\/kf\/Hb93149fbec8e4329a4c090147de3983fq.jpg\"\u003e\u003cimg alt=\"接线图 (1)\" src=\"https:\/\/ae01.alicdn.com\/kf\/H0e9b53e72d594dde8c46be7d94b346b9b.jpg\"\u003e\u003cimg alt=\"10\" src=\"https:\/\/ae01.alicdn.com\/kf\/Ha4ae55d77d754955bc11801c20abde77F.jpg\"\u003e\u003cimg alt=\"16\" src=\"https:\/\/ae01.alicdn.com\/kf\/H516b5c2e4e7140f5952500c8e005c7b6t.jpg\"\u003e\u003cimg alt=\"1 (1)\" src=\"https:\/\/ae01.alicdn.com\/kf\/H72183dd8d1fc4fe4b6deb8b28ee279cby.jpg\"\u003e\u003cimg alt=\"1 (3)\" src=\"https:\/\/ae01.alicdn.com\/kf\/H1c848b67f8704717802fa010419962b0m.jpg\"\u003e\u003cimg alt=\"1 (4)\" src=\"https:\/\/ae01.alicdn.com\/kf\/H5f22b2bb585948da837a0df46163a52ea.jpg\"\u003e\u003cimg alt=\"1 (8)\" src=\"https:\/\/ae01.alicdn.com\/kf\/Hb0db99a5e1424609a10aea7486f295ab5.jpg\"\u003e\u003cimg alt=\"1 (17)\" src=\"https:\/\/ae01.alicdn.com\/kf\/Hfb6298937ee7447fb751dd6aa5b96549O.jpg\"\u003e\u003cimg alt=\"1 (19)\" src=\"https:\/\/ae01.alicdn.com\/kf\/Hbf41fac7ac3a42fdb90f17b8ff0d308d2.jpg\"\u003e\u003cimg alt=\"1 (20)\" src=\"https:\/\/ae01.alicdn.com\/kf\/H4a3c5770430945089241d33dafef31fcm.jpg\"\u003e\u003cimg alt=\"1 (1)\" src=\"https:\/\/ae01.alicdn.com\/kf\/Hc39891a3e23d41b5968309454950c8bcI.jpg\"\u003e\u003cimg alt=\"1 (2)\" src=\"https:\/\/ae01.alicdn.com\/kf\/H4522829b7e6e44dc9603abf7792e0647G.jpg\"\u003e\u003cimg alt=\"接线图\" src=\"https:\/\/ae01.alicdn.com\/kf\/Hfe019fff700840c6ad7f4ba4869ef0eaq.jpg\"\u003e\u003cimg alt=\"1 (12)\" src=\"https:\/\/ae01.alicdn.com\/kf\/H1ddb9da69f8b4b6eb775e093490116feg.jpg\"\u003e\u003cimg alt=\"1 (18)\" src=\"https:\/\/ae01.alicdn.com\/kf\/H42755cdfd6174fe3b72473d7592b07fdr.jpg\"\u003e\u003cimg alt=\"1 (20)\" src=\"https:\/\/ae01.alicdn.com\/kf\/H2350b4b9bf9b48a78676cfa40085604fK.jpg\"\u003e\u003cimg alt=\"1 (21)\" src=\"https:\/\/ae01.alicdn.com\/kf\/H62b80cb1bda24ed8841e2f13742847a8d.jpg\"\u003e\u003c\/span\u003e\u003c\/div\u003e\n\u003cdiv\u003e \u003c\/div\u003e\n\u003cdiv\u003e \u003c\/div\u003e\n\u003cdiv\u003e \u003c\/div\u003e\n\u003cdiv\u003e \u003c\/div\u003e\n\u003cdiv\u003e\u003cspan\u003eDTC3200 Temperature and Humidity Controller\u003c\/span\u003e\u003c\/div\u003e\n\u003cdiv\u003e \u003c\/div\u003e\n\u003cdiv\u003e\u003cspan\u003eProduct Name: Temperature and Humidity Controller\u003c\/span\u003e\u003c\/div\u003e\n\u003cdiv\u003e\u003cspan\u003eProduct Model: DTC3200\u003c\/span\u003e\u003c\/div\u003e\n\u003cdiv\u003e\u003cspan\u003ePower supply voltage: AC 110 ~ 230V\u003c\/span\u003e\u003c\/div\u003e\n\u003cdiv\u003e\u003cspan\u003ePower supply frequency: 50 \/ 60Hz\u003c\/span\u003e\u003c\/div\u003e\n\u003cdiv\u003e\u003cspan\u003eTemperature measurement range: -20 ~ 60 ℃\u003c\/span\u003e\u003c\/div\u003e\n\u003cdiv\u003e\u003cspan\u003eHumidity measurement range: 0% ~ 100% RH\u003c\/span\u003e\u003c\/div\u003e\n\u003cdiv\u003e\u003cspan\u003eTemperature measurement accuracy: 0.3 ℃\u003c\/span\u003e\u003c\/div\u003e\n\u003cdiv\u003e\u003cspan\u003eHumidity measurement accuracy: 3%\u003c\/span\u003e\u003c\/div\u003e\n\u003cdiv\u003e\u003cspan\u003eOutput control: Relay output\u003c\/span\u003e\u003c\/div\u003e\n\u003cdiv\u003e\u003cspan\u003eOutput power: MAX 10A\u003c\/span\u003e\u003c\/div\u003e\n\u003cdiv\u003e \u003c\/div\u003e\n\u003cdiv\u003e\u003cspan\u003eSetting method: start value \u0026lt;stop value (the program automatically determines the working mode as heating \/ humidification mode)\u003c\/span\u003e\u003c\/div\u003e\n\u003cdiv\u003e\u003cspan\u003eSetting method: start value\u0026gt; stop value (the program automatically determines the working mode to be cooling \/ dehumidifying mode)\u003c\/span\u003e\u003c\/div\u003e\n\u003cdiv\u003e\u003cspan\u003eHeating \/ cooling mode setting\u003c\/span\u003e\u003c\/div\u003e\n\u003cdiv\u003e\u003cspan\u003eSetting method: setting (starting temperature): long press the ▲ button, the starting temperature flashes, and the starting temperature value is set by the ▲ ▼ button\u003c\/span\u003e\u003c\/div\u003e\n\u003cdiv\u003e\u003cspan\u003eSetting (stop temperature): long press the ▼ button to stop the temperature flashing, set the stop temperature value by ▲ ▼ button\u003c\/span\u003e\u003c\/div\u003e\n\u003cdiv\u003e \u003c\/div\u003e\n\u003cdiv\u003e\u003cspan\u003eHeating use case: control the water heater, heating to 65 ℃ to stop, the temperature drops to 50 ℃ to start heating again\u003c\/span\u003e\u003c\/div\u003e\n\u003cdiv\u003e\u003cspan\u003eThe first step: heating working mode, start temperature \u0026lt;stop temperature\u003c\/span\u003e\u003c\/div\u003e\n\u003cdiv\u003e\u003cspan\u003eStep 2: Press and hold the ▲ button, the starting temperature flashes, and set the starting temperature to 50 ℃ via the ▲ ▼ button\u003c\/span\u003e\u003c\/div\u003e\n\u003cdiv\u003e\u003cspan\u003eThe third step: long press the ▼ button to stop the temperature flashing, set the stop temperature to 65 ℃ through the ▲ ▼ button, the setting is complete!\u003c\/span\u003e\u003c\/div\u003e\n\u003cdiv\u003e\u003cspan\u003eRefrigeration use case: use in the farm, the fan ventilation stops at 26 ℃, and the temperature rises to 30 ℃ to start ventilation again\u003c\/span\u003e\u003c\/div\u003e\n\u003cdiv\u003e\u003cspan\u003eStep 1: Refrigeration working mode, start temperature\u0026gt; stop temperature\u003c\/span\u003e\u003c\/div\u003e\n\u003cdiv\u003e\u003cspan\u003eStep 2: Press and hold the ▲ button, the starting temperature flashes, and set the starting temperature to 30 ℃ via the ▲ ▼ button\u003c\/span\u003e\u003c\/div\u003e\n\u003cdiv\u003e\u003cspan\u003eStep 3: Press and hold the ▼ button to stop the temperature flashing, and set the stop temperature to 26 ° C with the ▲ ▼ button. The setting is complete!\u003c\/span\u003e\u003c\/div\u003e\n\u003cdiv\u003e \u003c\/div\u003e\n\u003cdiv\u003e\u003cspan\u003eHumidification \/ dehumidification mode settings:\u003c\/span\u003e\u003c\/div\u003e\n\u003cdiv\u003e\u003cspan\u003eSetting (Start Humidity): Long press the △ key, the start humidity value flashes, set the start humidity value by the △ ▽ key. Set [Stop Humidity]: Long press the △ key, stop the humidity value flashing, and set the stop humidity by the △ ▽ key value.\u003c\/span\u003e\u003c\/div\u003e\n\u003cdiv\u003e \u003c\/div\u003e\n\u003cdiv\u003e\u003cspan\u003eExamples of humidification: Fresh supermarket humidification, control humidifier 50% RH to start humidification, humidification to 80% RH to stop humidification.\u003c\/span\u003e\u003c\/div\u003e\n\u003cdiv\u003e \u003c\/div\u003e\n\u003cdiv\u003e\u003cspan\u003eSetup steps:\u003c\/span\u003e\u003c\/div\u003e\n\u003cdiv\u003e\u003cspan\u003e Step 1: Press and hold the △ key for 3 seconds to start the humidity value flashing, and set the start humidity value to 50% RH.\u003c\/span\u003e\u003c\/div\u003e\n\u003cdiv\u003e\u003cspan\u003e Step 2: Press and hold the ▽ key for 3 seconds to stop the humidity value flashing, set the value to 80% RH, the setting is completed, press the button for 5 seconds without operation, and automatically return to the normal display state\u003c\/span\u003e\u003c\/div\u003e\n\u003cdiv\u003e \u003c\/div\u003e\n\u003cdiv\u003e\u003cspan\u003eDehumidification example: workshop control exhaust dehumidification system, humidity 70% RH starts dehumidification, humidity 40% RH stops dehumidification\u003c\/span\u003e\u003c\/div\u003e\n\u003cdiv\u003e \u003c\/div\u003e\n\u003cdiv\u003e\u003cspan\u003eSetup steps:\u003c\/span\u003e\u003c\/div\u003e\n\u003cdiv\u003e\u003cspan\u003e Step 1: Press and hold the △ key for 3 seconds to start the humidity value flashing, and set the start humidity value to 40% RH.\u003c\/span\u003e\u003c\/div\u003e\n\u003cdiv\u003e\u003cspan\u003e Step 2: Press and hold the ▽ key for 3 seconds to stop the humidity value from flashing, set the value to 70% RH, the setting is completed, press the button for 5 seconds without operation, and automatically return to the normal display state\u003c\/span\u003e\u003c\/div\u003e\n\u003cdiv\u003e \u003c\/div\u003e\n\u003cdiv\u003e \u003c\/div\u003e\n\u003cdiv\u003e\u003cspan\u003eTemperature correction:\u003c\/span\u003e\u003c\/div\u003e\n\u003cdiv\u003e\u003cspan\u003eSimultaneously press the ▲ ▼ key for 3 seconds to start the temperature digit flashing, and use the ▲ ▼ key to set the start temperature correction value; after the setting is completed, press the button for 5 seconds without operation, and automatically return to the normal display state.\u003c\/span\u003e\u003c\/div\u003e\n\u003cdiv\u003e \u003c\/div\u003e\n\u003cdiv\u003e\u003cspan\u003eHumidity correction:\u003c\/span\u003e\u003c\/div\u003e\n\u003cdiv\u003e\u003cspan\u003eSimultaneously press the △ ▽ key for 3 seconds to start the humidity digit flashing, and set the humidity correction value by the △ ▽ key; after the setting is completed, press the button for 5 seconds without operation, and it will automatically return to the normal display state.\u003c\/span\u003e\u003c\/div\u003e\n\u003cdiv\u003e \u003c\/div\u003e\n\u003cdiv\u003e\u003cspan\u003eWiring instructions:\u003c\/span\u003e\u003c\/div\u003e\n\u003cdiv\u003e \u003c\/div\u003e\n\u003cdiv\u003e \u003cimg alt=\"11\" src=\"https:\/\/ae01.alicdn.com\/kf\/H818f4241e00c4a4383e69801a2e9fd69R.jpg\"\u003e\n\u003c\/div\u003e\n\u003cdiv\u003e \u003c\/div\u003e\n\u003cdiv\u003e \u003c\/div\u003e\n\u003cdiv\u003e\u003cspan\u003e※ If the temperature and humidity display LLL, please confirm whether the wiring of the SHT20 digital temperature and humidity sensor is correct and whether there is poor contact, you can try to reconnect the wiring.\u003c\/span\u003e\u003c\/div\u003e\n\u003cdiv\u003e \u003c\/div\u003e\n\u003cdiv\u003e\n\u003cimg alt=\"1(23)\" src=\"https:\/\/ae01.alicdn.com\/kf\/H12eb95c3e0d2444c96477c9c4e96c5e2r.jpg\"\u003e\u003cimg alt=\"1 (2)\" src=\"https:\/\/ae01.alicdn.com\/kf\/H4aec1fa943784e678b9d5a13ef92c840u.jpg\"\u003e\u003cimg alt=\"1 (9)\" src=\"https:\/\/ae01.alicdn.com\/kf\/H62f61e0071094feb8e4b5a95452126815.jpg\"\u003e\u003cimg alt=\"1 (15)\" src=\"https:\/\/ae01.alicdn.com\/kf\/H3015a4e6d81f490b9020dca461f7694bX.jpg\"\u003e\u003cimg alt=\"1 (18)\" src=\"https:\/\/ae01.alicdn.com\/kf\/He260f2df36064fe2af5530c7a561437ed.jpg\"\u003e\u003cimg alt=\"1 (20)\" src=\"https:\/\/ae01.alicdn.com\/kf\/He00db8acc649445db0f1f4fce6df2bf95.jpg\"\u003e\u003cimg alt=\"1 (22)\" src=\"https:\/\/ae01.alicdn.com\/kf\/H5e7b7c932bd44e159fcc998c54110021C.jpg\"\u003e\u003cimg alt=\"1 (4)\" src=\"https:\/\/ae01.alicdn.com\/kf\/H31b481ef695c453d88993756e902f3dec.jpg\"\u003e\u003cimg alt=\"1 (3)\" src=\"https:\/\/ae01.alicdn.com\/kf\/H72f864579840411fa481222392614398v.jpg\"\u003e\n\u003c\/div\u003e","published_at":"2020-05-04T20:03:25+08:00","created_at":"2020-05-04T20:20:56+08:00","vendor":"diymore","type":"Thermostat","tags":[],"price":1399,"price_min":1399,"price_max":1399,"available":true,"price_varies":false,"compare_at_price":null,"compare_at_price_min":0,"compare_at_price_max":0,"compare_at_price_varies":false,"variants":[{"id":32174110441543,"title":"AC 110V-220V DTC2210 Dual display","option1":"AC 110V-220V DTC2210 Dual display","option2":null,"option3":null,"sku":"XA0022","requires_shipping":true,"taxable":true,"featured_image":null,"available":true,"name":"110V-220V LED Digital Temperature Controller Thermostat Thermoregulator for Incubator Heating Cooling Replace STC-1000 DTC1200 - AC 110V-220V DTC2210 Dual display","public_title":"AC 110V-220V DTC2210 Dual display","options":["AC 110V-220V DTC2210 Dual display"],"price":1399,"weight":0,"compare_at_price":null,"inventory_management":"shopify","barcode":"","requires_selling_plan":false,"selling_plan_allocations":[],"quantity_rule":{"min":1,"max":null,"increment":1}},{"id":32174110474311,"title":"AC 110V-220V DTC1100 Dual display","option1":"AC 110V-220V DTC1100 Dual display","option2":null,"option3":null,"sku":"XA0021","requires_shipping":true,"taxable":true,"featured_image":null,"available":true,"name":"110V-220V LED Digital Temperature Controller Thermostat Thermoregulator for Incubator Heating Cooling Replace STC-1000 DTC1200 - AC 110V-220V DTC1100 Dual display","public_title":"AC 110V-220V DTC1100 Dual display","options":["AC 110V-220V DTC1100 Dual display"],"price":1399,"weight":0,"compare_at_price":null,"inventory_management":"shopify","barcode":"","requires_selling_plan":false,"selling_plan_allocations":[],"quantity_rule":{"min":1,"max":null,"increment":1}},{"id":32174110539847,"title":"AC 110V-220V DTC3200 Dual display","option1":"AC 110V-220V DTC3200 Dual display","option2":null,"option3":null,"sku":"XA0024","requires_shipping":true,"taxable":true,"featured_image":null,"available":true,"name":"110V-220V LED Digital Temperature Controller Thermostat Thermoregulator for Incubator Heating Cooling Replace STC-1000 DTC1200 - AC 110V-220V DTC3200 Dual display","public_title":"AC 110V-220V DTC3200 Dual display","options":["AC 110V-220V DTC3200 Dual display"],"price":1399,"weight":0,"compare_at_price":null,"inventory_management":"shopify","barcode":"","requires_selling_plan":false,"selling_plan_allocations":[],"quantity_rule":{"min":1,"max":null,"increment":1}},{"id":32174110572615,"title":"AC 110V-220V DTC1100","option1":"AC 110V-220V DTC1100","option2":null,"option3":null,"sku":"XA0020","requires_shipping":true,"taxable":true,"featured_image":null,"available":true,"name":"110V-220V LED Digital Temperature Controller Thermostat Thermoregulator for Incubator Heating Cooling Replace STC-1000 DTC1200 - AC 110V-220V DTC1100","public_title":"AC 110V-220V DTC1100","options":["AC 110V-220V DTC1100"],"price":1399,"weight":0,"compare_at_price":null,"inventory_management":"shopify","barcode":"","requires_selling_plan":false,"selling_plan_allocations":[],"quantity_rule":{"min":1,"max":null,"increment":1}},{"id":32174110605383,"title":"AC 110V-220V DTC2200","option1":"AC 110V-220V DTC2200","option2":null,"option3":null,"sku":"XA0023","requires_shipping":true,"taxable":true,"featured_image":null,"available":true,"name":"110V-220V LED Digital Temperature Controller Thermostat Thermoregulator for Incubator Heating Cooling Replace STC-1000 DTC1200 - AC 110V-220V DTC2200","public_title":"AC 110V-220V DTC2200","options":["AC 110V-220V DTC2200"],"price":1399,"weight":0,"compare_at_price":null,"inventory_management":"shopify","barcode":"","requires_selling_plan":false,"selling_plan_allocations":[],"quantity_rule":{"min":1,"max":null,"increment":1}},{"id":32174110638151,"title":"AC 110V-220V DTC1200","option1":"AC 110V-220V DTC1200","option2":null,"option3":null,"sku":"XA0008","requires_shipping":true,"taxable":true,"featured_image":null,"available":true,"name":"110V-220V LED Digital Temperature Controller Thermostat Thermoregulator for Incubator Heating Cooling Replace STC-1000 DTC1200 - AC 110V-220V DTC1200","public_title":"AC 110V-220V DTC1200","options":["AC 110V-220V DTC1200"],"price":1399,"weight":0,"compare_at_price":null,"inventory_management":"shopify","barcode":"","requires_selling_plan":false,"selling_plan_allocations":[],"quantity_rule":{"min":1,"max":null,"increment":1}}],"images":["\/\/www.diymore.cc\/cdn\/shop\/products\/1_1_423.jpg?v=1588701927","\/\/www.diymore.cc\/cdn\/shop\/products\/1_8_460.jpg?v=1588701927","\/\/www.diymore.cc\/cdn\/shop\/products\/1_9_135.jpg?v=1588701927","\/\/www.diymore.cc\/cdn\/shop\/products\/1_16_853.jpg?v=1588701927","\/\/www.diymore.cc\/cdn\/shop\/products\/1_18_816.jpg?v=1588701927","\/\/www.diymore.cc\/cdn\/shop\/products\/1_19_930.jpg?v=1588701927"],"featured_image":"\/\/www.diymore.cc\/cdn\/shop\/products\/1_1_423.jpg?v=1588701927","options":["Type"],"media":[{"alt":"110V-220V Led Digital Temperature Controller Thermostat Thermoregulator For Incubator Heating","id":6682595557447,"position":1,"preview_image":{"aspect_ratio":1.0,"height":1000,"width":1000,"src":"\/\/www.diymore.cc\/cdn\/shop\/products\/1_1_423.jpg?v=1588701927"},"aspect_ratio":1.0,"height":1000,"media_type":"image","src":"\/\/www.diymore.cc\/cdn\/shop\/products\/1_1_423.jpg?v=1588701927","width":1000},{"alt":"110V-220V Led Digital Temperature Controller Thermostat Thermoregulator For Incubator Heating","id":6682596311111,"position":2,"preview_image":{"aspect_ratio":1.0,"height":1000,"width":1000,"src":"\/\/www.diymore.cc\/cdn\/shop\/products\/1_8_460.jpg?v=1588701927"},"aspect_ratio":1.0,"height":1000,"media_type":"image","src":"\/\/www.diymore.cc\/cdn\/shop\/products\/1_8_460.jpg?v=1588701927","width":1000},{"alt":"110V-220V Led Digital Temperature Controller Thermostat Thermoregulator For Incubator Heating","id":6682596606023,"position":3,"preview_image":{"aspect_ratio":1.0,"height":1000,"width":1000,"src":"\/\/www.diymore.cc\/cdn\/shop\/products\/1_9_135.jpg?v=1588701927"},"aspect_ratio":1.0,"height":1000,"media_type":"image","src":"\/\/www.diymore.cc\/cdn\/shop\/products\/1_9_135.jpg?v=1588701927","width":1000},{"alt":"110V-220V Led Digital Temperature Controller Thermostat Thermoregulator For Incubator Heating","id":6682597326919,"position":4,"preview_image":{"aspect_ratio":1.0,"height":1000,"width":1000,"src":"\/\/www.diymore.cc\/cdn\/shop\/products\/1_16_853.jpg?v=1588701927"},"aspect_ratio":1.0,"height":1000,"media_type":"image","src":"\/\/www.diymore.cc\/cdn\/shop\/products\/1_16_853.jpg?v=1588701927","width":1000},{"alt":"110V-220V Led Digital Temperature Controller Thermostat Thermoregulator For Incubator Heating","id":6682597687367,"position":5,"preview_image":{"aspect_ratio":1.0,"height":1000,"width":1000,"src":"\/\/www.diymore.cc\/cdn\/shop\/products\/1_18_816.jpg?v=1588701927"},"aspect_ratio":1.0,"height":1000,"media_type":"image","src":"\/\/www.diymore.cc\/cdn\/shop\/products\/1_18_816.jpg?v=1588701927","width":1000},{"alt":"110V-220V Led Digital Temperature Controller Thermostat Thermoregulator For Incubator Heating","id":6682598015047,"position":6,"preview_image":{"aspect_ratio":1.0,"height":1000,"width":1000,"src":"\/\/www.diymore.cc\/cdn\/shop\/products\/1_19_930.jpg?v=1588701927"},"aspect_ratio":1.0,"height":1000,"media_type":"image","src":"\/\/www.diymore.cc\/cdn\/shop\/products\/1_19_930.jpg?v=1588701927","width":1000}],"requires_selling_plan":false,"selling_plan_groups":[],"content":"\u003cdiv\u003e\u003cstrong\u003e\u003cspan\u003eDescription:\u003c\/span\u003e\u003c\/strong\u003e\u003c\/div\u003e\n\u003cdiv\u003e \u003c\/div\u003e\n\u003cdiv\u003e\n\u003cdiv\u003e\u003cspan\u003eProduct Name: Thermostat\u003c\/span\u003e\u003c\/div\u003e\n\u003cdiv\u003e\u003cspan\u003eProduct model: DTC1200\u003c\/span\u003e\u003c\/div\u003e\n\u003cdiv data-spm-anchor-id=\"a2g0o.detail.1000023.i0.766b67b1vR7Vg3\"\u003e\u003cspan\u003eSupply voltage: AC110~230V\u003c\/span\u003e\u003c\/div\u003e\n\u003cdiv data-spm-anchor-id=\"a2g0o.detail.1000023.i1.766b67b1vR7Vg3\"\u003e\u003cspan\u003eTemperature range: -40°C~+99°C\u003c\/span\u003e\u003c\/div\u003e\n\u003cdiv\u003e\u003cspan\u003eTemperature measurement accuracy: ±1 °C (-40 °C ~ +70 °C)\u003c\/span\u003e\u003c\/div\u003e\n\u003cdiv data-spm-anchor-id=\"a2g0o.detail.1000023.i2.766b67b1vR7Vg3\"\u003e\u003cspan\u003eSensor line length: 100cm\u003c\/span\u003e\u003c\/div\u003e\n\u003cdiv data-spm-anchor-id=\"a2g0o.detail.1000023.i3.766b67b1vR7Vg3\"\u003e\u003cspan\u003eThermostat size: 93mm*56mm*34mm\u003c\/span\u003e\u003c\/div\u003e\n\u003cdiv\u003e\u003cspan\u003eOutput capacity: cooling (compressor 3A) heating (10A\/250VAC)\u003c\/span\u003e\u003c\/div\u003e\n\u003cdiv\u003e \u003c\/div\u003e\n\u003cdiv\u003e\u003cspan\u003eSee parameter method:\u003c\/span\u003e\u003c\/div\u003e\n\u003cdiv\u003e \u003c\/div\u003e\n\u003cdiv\u003e\u003cspan\u003eWhen the thermostat is working normally, press and release \"▲\"the key once to display the temperature setting value; press and release \"▼\" the key once to display the temperature difference setting value. After 3 seconds, the temperature returns to the normal display state.\u003c\/span\u003e\u003c\/div\u003e\n\u003cdiv\u003e \u003c\/div\u003e\n\u003cdiv\u003e\u003cspan\u003eSetting parameter method:\u003c\/span\u003e\u003c\/div\u003e\n\u003cdiv\u003e \u003c\/div\u003e\n\u003cdiv\u003e\u003cspan\u003eWhen the thermostat is working normally, press \"S\" key and hold the button for more than 3 seconds to enter the modified parameter mode. The “Set” indicator lights up, the digital tube displays the code “F1” of the first menu item, and press the \"▲\" or \"▼\"key to up or down the code of the menu item. Press \"S\" the key to display the parameter setting value of the current menu, press \"S\" and hold the key, then press the \"▲\"or \"▼\" key to increase or decrease the parameter setting value of the current menu; press \"S\" key and hold the key, and press the \"▲\"or \"▼\" key to quickly increase the speed; Or down and display the parameter settings of the current menu.\u003c\/span\u003e\u003c\/div\u003e\n\u003cdiv\u003e\u003cspan\u003ePress and hold \"▲\"or \"▼\" the key at the same time to restore the parameters to the factory settings.\u003c\/span\u003e\u003c\/div\u003e\n\u003cdiv\u003e \u003c\/div\u003e\n\u003cdiv\u003e\u003cspan\u003eOperation instructions:\u003c\/span\u003e\u003c\/div\u003e\n\u003cdiv\u003e \u003c\/div\u003e\n\u003cdiv\u003e\u003cspan\u003e1.When the thermostat is working normally, press and hold the \"power button\" for more than 3 seconds to turn off the thermostat. When the thermostat is off, press and hold the \"power button\" for more than 3 seconds to open the thermostat.\u003c\/span\u003e\u003c\/div\u003e\n\u003cdiv\u003e\u003cspan\u003eWhen the thermostat is working normally, the digital tube displays the current temperature measurement value, and performs automatic recognition conversion of the cooling heating operation mode.\u003c\/span\u003e\u003c\/div\u003e\n\u003cdiv\u003e\u003cspan\u003e2.When the measured temperature ≥ temperature set value + temperature difference set value, enter the cooling state, the Cool indicator light is on, the cooling relay normally open contact is closed; the Cool indicator flashes, indicating that the cooling device is in the press delay protection state; when measuring the temperature ≤ temperature set value, the Cool indicator is off, and the normally open contact of the refrigeration relay is disconnected.\u003c\/span\u003e\u003c\/div\u003e\n\u003cdiv\u003e\u003cspan\u003e3.When the measured temperature ≤ temperature set value - temperature difference set value enters the heating state, the Heat indicator light is on, the heating relay normally open contact is closed; when the measured temperature ≥ temperature set value, the Heat indicator is off, the heating relay normally open contact disconnect.\u003c\/span\u003e\u003c\/div\u003e\n\u003cdiv\u003e \u003c\/div\u003e\n\u003cdiv data-spm-anchor-id=\"a2g0o.detail.1000023.i1.17566478417y5U\"\u003e\n\u003cp data-spm-anchor-id=\"a2g0o.detail.1000023.i0.17566478417y5U\"\u003e\u003cspan\u003eIndicator status description:\u003c\/span\u003e\u003c\/p\u003e\n\u003ctable border=\"1\" cellspacing=\"0\"\u003e\n\u003ctbody\u003e\n\u003ctr\u003e\n\u003ctd\u003e\n\u003cp align=\"center\"\u003e\u003cspan\u003eIndicator\u003c\/span\u003e\u003c\/p\u003e\n\u003c\/td\u003e\n\u003ctd\u003e\n\u003cp align=\"center\"\u003e\u003cspan\u003eFunction\u003c\/span\u003e\u003c\/p\u003e\n\u003c\/td\u003e\n\u003ctd\u003e\n\u003cp align=\"center\" data-spm-anchor-id=\"a2g0o.detail.1000023.i10.17566478417y5U\"\u003e\u003cspan\u003eNote\u003c\/span\u003e\u003c\/p\u003e\n\u003c\/td\u003e\n\u003c\/tr\u003e\n\u003ctr\u003e\n\u003ctd\u003e\n\u003cp align=\"center\" data-spm-anchor-id=\"a2g0o.detail.1000023.i4.17566478417y5U\"\u003e\u003cspan\u003eCool indicator\u003c\/span\u003e\u003c\/p\u003e\n\u003c\/td\u003e\n\u003ctd\u003e\n\u003cp align=\"center\" data-spm-anchor-id=\"a2g0o.detail.1000023.i5.17566478417y5U\"\u003e\u003cspan\u003eLight on:cooling work;\u003c\/span\u003e\u003c\/p\u003e\n\u003cp align=\"center\"\u003e\u003cspan\u003e Light off:cooling off;\u003c\/span\u003e\u003c\/p\u003e\n\u003cp align=\"center\"\u003e\u003cspan\u003eFlashing: press delay\u003c\/span\u003e\u003c\/p\u003e\n\u003c\/td\u003e\n\u003ctd rowspan=\"2\"\u003e\n\u003cp align=\"center\" data-spm-anchor-id=\"a2g0o.detail.1000023.i11.17566478417y5U\"\u003e\u003cspan\u003eCool and Heat Both indicator lights cannot be lit at the same time\u003c\/span\u003e\u003c\/p\u003e\n\u003c\/td\u003e\n\u003c\/tr\u003e\n\u003ctr\u003e\n\u003ctd\u003e\n\u003cp align=\"center\" data-spm-anchor-id=\"a2g0o.detail.1000023.i6.17566478417y5U\"\u003e\u003cspan\u003eHeat indicator\u003c\/span\u003e\u003c\/p\u003e\n\u003c\/td\u003e\n\u003ctd\u003e\n\u003cp align=\"center\" data-spm-anchor-id=\"a2g0o.detail.1000023.i7.17566478417y5U\"\u003e\u003cspan\u003eBright: heating work;\u003c\/span\u003e\u003c\/p\u003e\n\u003cp align=\"center\"\u003e\u003cspan\u003eoff: heating off\u003c\/span\u003e\u003c\/p\u003e\n\u003c\/td\u003e\n\u003c\/tr\u003e\n\u003ctr\u003e\n\u003ctd\u003e\n\u003cp align=\"center\" data-spm-anchor-id=\"a2g0o.detail.1000023.i8.17566478417y5U\"\u003e\u003cspan\u003eSet indicator\u003c\/span\u003e\u003c\/p\u003e\n\u003c\/td\u003e\n\u003ctd\u003e\n\u003cp align=\"center\" data-spm-anchor-id=\"a2g0o.detail.1000023.i9.17566478417y5U\"\u003e\u003cspan\u003eOn: parameter setting status\u003c\/span\u003e\u003c\/p\u003e\n\u003c\/td\u003e\n\u003ctd\u003e\n\u003cp align=\"center\"\u003e \u003c\/p\u003e\n\u003c\/td\u003e\n\u003c\/tr\u003e\n\u003c\/tbody\u003e\n\u003c\/table\u003e\n\u003cp\u003e \u003c\/p\u003e\n\u003cp\u003e\u003cspan\u003eMenu function description:\u003c\/span\u003e\u003c\/p\u003e\n\u003ctable border=\"1\" cellspacing=\"0\"\u003e\n\u003ctbody\u003e\n\u003ctr\u003e\n\u003ctd\u003e\n\u003cp align=\"center\" data-spm-anchor-id=\"a2g0o.detail.1000023.i13.17566478417y5U\"\u003e\u003cspan\u003eMenu identifier\u003c\/span\u003e\u003c\/p\u003e\n\u003c\/td\u003e\n\u003ctd\u003e\n\u003cp align=\"center\" data-spm-anchor-id=\"a2g0o.detail.1000023.i16.17566478417y5U\"\u003e\u003cspan\u003eMenu function\u003c\/span\u003e\u003c\/p\u003e\n\u003c\/td\u003e\n\u003ctd\u003e\n\u003cp align=\"center\" data-spm-anchor-id=\"a2g0o.detail.1000023.i17.17566478417y5U\"\u003e\u003cspan\u003eSetting range\u003c\/span\u003e\u003c\/p\u003e\n\u003c\/td\u003e\n\u003ctd\u003e\n\u003cp align=\"center\" data-spm-anchor-id=\"a2g0o.detail.1000023.i18.17566478417y5U\"\u003e\u003cspan\u003eFactory setting\u003c\/span\u003e\u003c\/p\u003e\n\u003c\/td\u003e\n\u003c\/tr\u003e\n\u003ctr\u003e\n\u003ctd\u003e\n\u003cp align=\"center\" data-spm-anchor-id=\"a2g0o.detail.1000023.i12.17566478417y5U\"\u003e\u003cspan\u003eF1\u003c\/span\u003e\u003c\/p\u003e\n\u003c\/td\u003e\n\u003ctd\u003e\n\u003cp align=\"center\" data-spm-anchor-id=\"a2g0o.detail.1000023.i14.17566478417y5U\"\u003e\u003cspan\u003eTemperature setting value\u003c\/span\u003e\u003c\/p\u003e\n\u003c\/td\u003e\n\u003ctd\u003e\n\u003cp align=\"center\" data-spm-anchor-id=\"a2g0o.detail.1000023.i15.17566478417y5U\"\u003e\u003cspan\u003e-40.0~99.9℃\u003c\/span\u003e\u003c\/p\u003e\n\u003c\/td\u003e\n\u003ctd\u003e\n\u003cp align=\"center\" data-spm-anchor-id=\"a2g0o.detail.1000023.i19.17566478417y5U\"\u003e\u003cspan\u003e10.0℃\u003c\/span\u003e\u003c\/p\u003e\n\u003c\/td\u003e\n\u003c\/tr\u003e\n\u003ctr\u003e\n\u003ctd\u003e\n\u003cp align=\"center\" data-spm-anchor-id=\"a2g0o.detail.1000023.i20.17566478417y5U\"\u003e\u003cspan\u003eF2\u003c\/span\u003e\u003c\/p\u003e\n\u003c\/td\u003e\n\u003ctd\u003e\n\u003cp align=\"center\" data-spm-anchor-id=\"a2g0o.detail.1000023.i21.17566478417y5U\"\u003e\u003cspan\u003eTemperature difference setting value\u003c\/span\u003e\u003c\/p\u003e\n\u003c\/td\u003e\n\u003ctd\u003e\n\u003cp align=\"center\" data-spm-anchor-id=\"a2g0o.detail.1000023.i22.17566478417y5U\"\u003e\u003cspan\u003e0.3~10.0℃\u003c\/span\u003e\u003c\/p\u003e\n\u003c\/td\u003e\n\u003ctd\u003e\n\u003cp align=\"center\" data-spm-anchor-id=\"a2g0o.detail.1000023.i23.17566478417y5U\"\u003e\u003cspan\u003e0.5℃\u003c\/span\u003e\u003c\/p\u003e\n\u003c\/td\u003e\n\u003c\/tr\u003e\n\u003ctr\u003e\n\u003ctd\u003e\n\u003cp align=\"center\" data-spm-anchor-id=\"a2g0o.detail.1000023.i24.17566478417y5U\"\u003e\u003cspan\u003eF3\u003c\/span\u003e\u003c\/p\u003e\n\u003c\/td\u003e\n\u003ctd\u003e\n\u003cp align=\"center\" data-spm-anchor-id=\"a2g0o.detail.1000023.i25.17566478417y5U\"\u003e\u003cspan\u003ePress delay\u003c\/span\u003e\u003c\/p\u003e\n\u003c\/td\u003e\n\u003ctd\u003e\n\u003cp align=\"center\" data-spm-anchor-id=\"a2g0o.detail.1000023.i26.17566478417y5U\"\u003e\u003cspan\u003e1~10 min\u003c\/span\u003e\u003c\/p\u003e\n\u003c\/td\u003e\n\u003ctd\u003e\n\u003cp align=\"center\" data-spm-anchor-id=\"a2g0o.detail.1000023.i27.17566478417y5U\"\u003e\u003cspan\u003e3 min\u003c\/span\u003e\u003c\/p\u003e\n\u003c\/td\u003e\n\u003c\/tr\u003e\n\u003ctr\u003e\n\u003ctd data-spm-anchor-id=\"a2g0o.detail.1000023.i28.17566478417y5U\"\u003e\n\u003cp align=\"center\"\u003e\u003cspan\u003eF4\u003c\/span\u003e\u003c\/p\u003e\n\u003c\/td\u003e\n\u003ctd\u003e\n\u003cp align=\"center\" data-spm-anchor-id=\"a2g0o.detail.1000023.i29.17566478417y5U\"\u003e\u003cspan\u003eTemperature correction\u003c\/span\u003e\u003c\/p\u003e\n\u003c\/td\u003e\n\u003ctd\u003e\n\u003cp align=\"center\" data-spm-anchor-id=\"a2g0o.detail.1000023.i30.17566478417y5U\"\u003e\u003cspan\u003e-10.0~10.0℃\u003c\/span\u003e\u003c\/p\u003e\n\u003c\/td\u003e\n\u003ctd\u003e\n\u003cp align=\"center\" data-spm-anchor-id=\"a2g0o.detail.1000023.i31.17566478417y5U\"\u003e\u003cspan\u003e0℃\u003c\/span\u003e\u003c\/p\u003e\n\u003c\/td\u003e\n\u003c\/tr\u003e\n\u003c\/tbody\u003e\n\u003c\/table\u003e\n\u003cp\u003e \u003c\/p\u003e\n\u003cp\u003e\u003cspan\u003eWiring Diagram:\u003c\/span\u003e\u003c\/p\u003e\n\u003cp\u003e\u003cspan\u003e\u003cimg alt=\"图片1\" src=\"https:\/\/ae01.alicdn.com\/kf\/H001eadcd3b8e49109ce4fd472825de6dW.jpg\"\u003e\u003c\/span\u003e\u003c\/p\u003e\n\u003cp\u003e \u003c\/p\u003e\n\u003cdiv\u003e\n\u003cdiv\u003e \u003c\/div\u003e\n\u003cdiv\u003e\u003cspan\u003eRepair System Data:\u003c\/span\u003e\u003c\/div\u003e\n\u003cdiv\u003e \u003c\/div\u003e\n\u003cdiv\u003e\u003cspan\u003eAfter the thermostat is powered on, first check whether the parameter settings are correct. If an error is detected, “Er” is displayed. Pressing any key will restore the default parameter settings and work normally. It is recommended to reset the parameters at this time.\u003c\/span\u003e\u003c\/div\u003e\n\u003cdiv\u003e \u003c\/div\u003e\n\u003cdiv\u003e\u003cspan\u003eSystem Code, reason and action:\u003c\/span\u003e\u003c\/div\u003e\n\u003cdiv\u003e \u003c\/div\u003e\n\u003cdiv\u003e\u003cspan\u003eSensor fault alarm: When the temperature probe loop is short-circuited or open-circuit fault, the thermostat starts the probe fault alarm mode, closes all execution states, and the digital tube displays “EE”. After the fault is cleared, press any key to return to the normal working mode.\u003c\/span\u003e\u003c\/div\u003e\n\u003cdiv\u003e\u003cspan\u003eOver-temperature alarm: When the temperature measurement exceeds the temperature measurement range, the thermostat starts the over-temperature limit fault alarm mode, and all execution states are turned off. The digital tube displays “HH”. When the temperature returns to the normal measurement range, press any key. Return to normal working mode.\u003c\/span\u003e\u003c\/div\u003e\n\u003cdiv\u003e \u003c\/div\u003e\n\u003cdiv\u003e\u003cspan\u003eSafety rules:\u003c\/span\u003e\u003c\/div\u003e\n\u003cdiv\u003e \u003c\/div\u003e\n\u003cdiv\u003e\u003cspan\u003e☆ Danger:\u003c\/span\u003e\u003c\/div\u003e\n\u003cdiv\u003e\u003cspan\u003e1. Strictly distinguish the sensor lead, power line and output relay interface, can not be connected incorrectly, the relay can not be overloaded;\u003c\/span\u003e\u003c\/div\u003e\n\u003cdiv\u003e\u003cspan\u003e2. All wiring changes must be made with the power off.\u003c\/span\u003e\u003c\/div\u003e\n\u003cdiv\u003e\u003cspan\u003e☆ Warning:\u003c\/span\u003e\u003c\/div\u003e\n\u003cdiv\u003e\u003cspan\u003e1. This thermostat is forbidden to be used in water or excessively humid environment. It is forbidden to use in high temperature, strong electromagnetic interference and strong corrosive environment.\u003c\/span\u003e\u003c\/div\u003e\n\u003cdiv\u003e\u003cspan\u003e☆ Note:\u003c\/span\u003e\u003c\/div\u003e\n\u003cdiv\u003e\u003cspan\u003e1. The supply voltage should be consistent with the voltage marked by the thermostat and ensure the stability of the supply voltage;\u003c\/span\u003e\u003c\/div\u003e\n\u003cdiv\u003e\u003cspan\u003e2. To avoid possible interference, it is recommended that the sensor leads be at an appropriate distance from the power line.\u003c\/span\u003e\u003c\/div\u003e\n\u003cdiv\u003e \u003c\/div\u003e\n\u003cdiv\u003e \u003c\/div\u003e\n\u003cdiv\u003e\u003cstrong\u003e\u003cspan\u003ePackage Included:\u003c\/span\u003e\u003c\/strong\u003e\u003c\/div\u003e\n\u003cdiv\u003e \u003c\/div\u003e\n\u003cdiv\u003e\u003cspan\u003e1 x DTC1200 Intellligent Temperature Controller\u003c\/span\u003e\u003c\/div\u003e\n\u003cdiv\u003e\u003cspan\u003e1 x Temperature sensor\u003c\/span\u003e\u003c\/div\u003e\n\u003cdiv\u003e\u003cspan\u003e1 x Instruction manual\u003c\/span\u003e\u003c\/div\u003e\n\u003cdiv\u003e\u003cspan\u003e1 x Packing box\u003c\/span\u003e\u003c\/div\u003e\n\u003cdiv\u003e\u003cspan\u003e\u003c\/span\u003e\u003c\/div\u003e\n\u003c\/div\u003e\n\u003c\/div\u003e\n\u003c\/div\u003e\n\u003cdiv\u003e\n\u003cp\u003e\u003cimg alt=\"pictures2\" src=\"https:\/\/ae01.alicdn.com\/kf\/H48e07ca430b143a1bd6390f007d70893r.jpg\"\u003e\u003c\/p\u003e\n\u003cp\u003e\u003cimg alt=\"XA0008 (3)\" src=\"https:\/\/ae01.alicdn.com\/kf\/H909cdc0df9ef48b2909767f61c05f908Y.jpg\"\u003e\u003cimg alt=\"XA0008 (4)\" src=\"https:\/\/ae01.alicdn.com\/kf\/He57b51af913d453bb4631f7f71fac13e1.jpg\"\u003e\u003cimg alt=\"XA0008 (5)\" src=\"https:\/\/ae01.alicdn.com\/kf\/H1d793d42fd7945cba1d4202db1861873q.jpg\"\u003e\u003cimg alt=\"XA0008 (24)\" src=\"https:\/\/ae01.alicdn.com\/kf\/Hddf60c92d3bf47e7a4377478d2ae0f4c0.jpg\"\u003e\u003cimg alt=\"XA0008 (7)\" src=\"https:\/\/ae01.alicdn.com\/kf\/H81eb27e7121545b799fea5521905e3c7U.jpg\"\u003e\u003cimg alt=\"XA0008 (6)\" src=\"https:\/\/ae01.alicdn.com\/kf\/H9b1a57d5932b47359fe4cb26b4df8221z.jpg\"\u003e\u003cimg alt=\"XA0008 (1)\" src=\"https:\/\/ae01.alicdn.com\/kf\/H3b043d774f204356b0278e4786d01f14k.jpg\"\u003e\u003cimg alt=\"XA0008 (9)\" src=\"https:\/\/ae01.alicdn.com\/kf\/H97fb15979930424092f839c9a8a3830fK.jpg\"\u003e\u003cimg alt=\"XA0008 (10)\" src=\"https:\/\/ae01.alicdn.com\/kf\/H6e4b81a56f9949e385541d0be905a572G.jpg\"\u003e\u003cimg alt=\"XA0008 (11)\" src=\"https:\/\/ae01.alicdn.com\/kf\/Hd0829f171f2f41bdb34c36cff898940cl.jpg\"\u003e\u003cimg alt=\"XA0008 (12)\" src=\"https:\/\/ae01.alicdn.com\/kf\/Hc210386716324310a4aa3248b0a8a09dp.jpg\"\u003e\u003cimg alt=\"XA0008 (19)\" src=\"https:\/\/ae01.alicdn.com\/kf\/H2743991dcfaf488b936cea38071fdc22l.jpg\"\u003e\u003cimg alt=\"XA0008 (21)\" src=\"https:\/\/ae01.alicdn.com\/kf\/H5d8b10d76d27477aa6d4f2e96f92b18fw.jpg\"\u003e\u003c\/p\u003e\n\u003c\/div\u003e\n\u003cp\u003e \u003c\/p\u003e\n\u003cp\u003e \u003c\/p\u003e\n\u003cp\u003e\u003cspan\u003e\u003cstrong\u003eDTC1100 DTC1110 DTC2210 DTC2200 Temperature Controller\u003c\/strong\u003e\u003c\/span\u003e\u003c\/p\u003e\n\u003cdiv\u003e\u003cspan\u003eProduct Name: Temperature Controller \u003c\/span\u003e\u003c\/div\u003e\n\u003cdiv\u003e\u003cspan\u003eProduct Models: DTC1100; DTC1110; DTC2210; DTC2200 \u003c\/span\u003e\u003c\/div\u003e\n\u003cdiv\u003e\u003cspan\u003ePower supply: AC110V-220V\u003c\/span\u003e\u003c\/div\u003e\n\u003cdiv\u003e\u003cspan\u003eTemperature range: -40°C~+99°C\u003c\/span\u003e\u003c\/div\u003e\n\u003cdiv\u003e\u003cspan\u003eTemperature measurement accuracy: ±1°C (-40 °C ~ +70 °C)\u003c\/span\u003e\u003c\/div\u003e\n\u003cdiv\u003e\u003cspan\u003eThermostat size: 93mm*56mm*34mm\u003c\/span\u003e\u003c\/div\u003e\n\u003cdiv\u003e\u003cspan\u003eRelay contact capacity: Cool(10WC250V); Heat(10A\/AC250V)\u003c\/span\u003e\u003c\/div\u003e\n\u003cdiv\u003e \u003c\/div\u003e\n\u003cdiv\u003e\u003cspan\u003e\u003cimg alt=\"1 (1)\" src=\"https:\/\/ae01.alicdn.com\/kf\/H55d10cb072154207bcdd46dd1dafbc8fh.jpg\"\u003e\u003cimg alt=\"1 (4)\" src=\"https:\/\/ae01.alicdn.com\/kf\/H2f4f0f7cfec445b58c5e00fbdd8435872.jpg\"\u003e\u003cimg alt=\"1 (2)\" src=\"https:\/\/ae01.alicdn.com\/kf\/Hdaf8974533f04094ac13d6f88bd4a970o.jpg\"\u003e\u003cimg alt=\"接线图 (1)\" src=\"https:\/\/ae01.alicdn.com\/kf\/Ha2a95c321166465591f5af870fd231bfp.jpg\"\u003e\u003cimg alt=\"1 (13)\" src=\"https:\/\/ae01.alicdn.com\/kf\/He9464c5ea5c24e168157faff9566d0ecj.jpg\"\u003e\u003cimg alt=\"1 (18)\" src=\"https:\/\/ae01.alicdn.com\/kf\/H44dfe2dd19c14a14bdd1e3d351e03a4bE.jpg\"\u003e\u003cimg alt=\"01 (1)\" src=\"https:\/\/ae01.alicdn.com\/kf\/Ha529d255334543f68affa9a95cb27f16o.jpg\"\u003e\u003cimg alt=\"4\" src=\"https:\/\/ae01.alicdn.com\/kf\/H312943e7f91e4b709b5d642e25598a6a5.jpg\"\u003e\u003cimg alt=\"15\" src=\"https:\/\/ae01.alicdn.com\/kf\/Hb93149fbec8e4329a4c090147de3983fq.jpg\"\u003e\u003cimg alt=\"接线图 (1)\" src=\"https:\/\/ae01.alicdn.com\/kf\/H0e9b53e72d594dde8c46be7d94b346b9b.jpg\"\u003e\u003cimg alt=\"10\" src=\"https:\/\/ae01.alicdn.com\/kf\/Ha4ae55d77d754955bc11801c20abde77F.jpg\"\u003e\u003cimg alt=\"16\" src=\"https:\/\/ae01.alicdn.com\/kf\/H516b5c2e4e7140f5952500c8e005c7b6t.jpg\"\u003e\u003cimg alt=\"1 (1)\" src=\"https:\/\/ae01.alicdn.com\/kf\/H72183dd8d1fc4fe4b6deb8b28ee279cby.jpg\"\u003e\u003cimg alt=\"1 (3)\" src=\"https:\/\/ae01.alicdn.com\/kf\/H1c848b67f8704717802fa010419962b0m.jpg\"\u003e\u003cimg alt=\"1 (4)\" src=\"https:\/\/ae01.alicdn.com\/kf\/H5f22b2bb585948da837a0df46163a52ea.jpg\"\u003e\u003cimg alt=\"1 (8)\" src=\"https:\/\/ae01.alicdn.com\/kf\/Hb0db99a5e1424609a10aea7486f295ab5.jpg\"\u003e\u003cimg alt=\"1 (17)\" src=\"https:\/\/ae01.alicdn.com\/kf\/Hfb6298937ee7447fb751dd6aa5b96549O.jpg\"\u003e\u003cimg alt=\"1 (19)\" src=\"https:\/\/ae01.alicdn.com\/kf\/Hbf41fac7ac3a42fdb90f17b8ff0d308d2.jpg\"\u003e\u003cimg alt=\"1 (20)\" src=\"https:\/\/ae01.alicdn.com\/kf\/H4a3c5770430945089241d33dafef31fcm.jpg\"\u003e\u003cimg alt=\"1 (1)\" src=\"https:\/\/ae01.alicdn.com\/kf\/Hc39891a3e23d41b5968309454950c8bcI.jpg\"\u003e\u003cimg alt=\"1 (2)\" src=\"https:\/\/ae01.alicdn.com\/kf\/H4522829b7e6e44dc9603abf7792e0647G.jpg\"\u003e\u003cimg alt=\"接线图\" src=\"https:\/\/ae01.alicdn.com\/kf\/Hfe019fff700840c6ad7f4ba4869ef0eaq.jpg\"\u003e\u003cimg alt=\"1 (12)\" src=\"https:\/\/ae01.alicdn.com\/kf\/H1ddb9da69f8b4b6eb775e093490116feg.jpg\"\u003e\u003cimg alt=\"1 (18)\" src=\"https:\/\/ae01.alicdn.com\/kf\/H42755cdfd6174fe3b72473d7592b07fdr.jpg\"\u003e\u003cimg alt=\"1 (20)\" src=\"https:\/\/ae01.alicdn.com\/kf\/H2350b4b9bf9b48a78676cfa40085604fK.jpg\"\u003e\u003cimg alt=\"1 (21)\" src=\"https:\/\/ae01.alicdn.com\/kf\/H62b80cb1bda24ed8841e2f13742847a8d.jpg\"\u003e\u003c\/span\u003e\u003c\/div\u003e\n\u003cdiv\u003e \u003c\/div\u003e\n\u003cdiv\u003e \u003c\/div\u003e\n\u003cdiv\u003e \u003c\/div\u003e\n\u003cdiv\u003e \u003c\/div\u003e\n\u003cdiv\u003e\u003cspan\u003eDTC3200 Temperature and Humidity Controller\u003c\/span\u003e\u003c\/div\u003e\n\u003cdiv\u003e \u003c\/div\u003e\n\u003cdiv\u003e\u003cspan\u003eProduct Name: Temperature and Humidity Controller\u003c\/span\u003e\u003c\/div\u003e\n\u003cdiv\u003e\u003cspan\u003eProduct Model: DTC3200\u003c\/span\u003e\u003c\/div\u003e\n\u003cdiv\u003e\u003cspan\u003ePower supply voltage: AC 110 ~ 230V\u003c\/span\u003e\u003c\/div\u003e\n\u003cdiv\u003e\u003cspan\u003ePower supply frequency: 50 \/ 60Hz\u003c\/span\u003e\u003c\/div\u003e\n\u003cdiv\u003e\u003cspan\u003eTemperature measurement range: -20 ~ 60 ℃\u003c\/span\u003e\u003c\/div\u003e\n\u003cdiv\u003e\u003cspan\u003eHumidity measurement range: 0% ~ 100% RH\u003c\/span\u003e\u003c\/div\u003e\n\u003cdiv\u003e\u003cspan\u003eTemperature measurement accuracy: 0.3 ℃\u003c\/span\u003e\u003c\/div\u003e\n\u003cdiv\u003e\u003cspan\u003eHumidity measurement accuracy: 3%\u003c\/span\u003e\u003c\/div\u003e\n\u003cdiv\u003e\u003cspan\u003eOutput control: Relay output\u003c\/span\u003e\u003c\/div\u003e\n\u003cdiv\u003e\u003cspan\u003eOutput power: MAX 10A\u003c\/span\u003e\u003c\/div\u003e\n\u003cdiv\u003e \u003c\/div\u003e\n\u003cdiv\u003e\u003cspan\u003eSetting method: start value \u0026lt;stop value (the program automatically determines the working mode as heating \/ humidification mode)\u003c\/span\u003e\u003c\/div\u003e\n\u003cdiv\u003e\u003cspan\u003eSetting method: start value\u0026gt; stop value (the program automatically determines the working mode to be cooling \/ dehumidifying mode)\u003c\/span\u003e\u003c\/div\u003e\n\u003cdiv\u003e\u003cspan\u003eHeating \/ cooling mode setting\u003c\/span\u003e\u003c\/div\u003e\n\u003cdiv\u003e\u003cspan\u003eSetting method: setting (starting temperature): long press the ▲ button, the starting temperature flashes, and the starting temperature value is set by the ▲ ▼ button\u003c\/span\u003e\u003c\/div\u003e\n\u003cdiv\u003e\u003cspan\u003eSetting (stop temperature): long press the ▼ button to stop the temperature flashing, set the stop temperature value by ▲ ▼ button\u003c\/span\u003e\u003c\/div\u003e\n\u003cdiv\u003e \u003c\/div\u003e\n\u003cdiv\u003e\u003cspan\u003eHeating use case: control the water heater, heating to 65 ℃ to stop, the temperature drops to 50 ℃ to start heating again\u003c\/span\u003e\u003c\/div\u003e\n\u003cdiv\u003e\u003cspan\u003eThe first step: heating working mode, start temperature \u0026lt;stop temperature\u003c\/span\u003e\u003c\/div\u003e\n\u003cdiv\u003e\u003cspan\u003eStep 2: Press and hold the ▲ button, the starting temperature flashes, and set the starting temperature to 50 ℃ via the ▲ ▼ button\u003c\/span\u003e\u003c\/div\u003e\n\u003cdiv\u003e\u003cspan\u003eThe third step: long press the ▼ button to stop the temperature flashing, set the stop temperature to 65 ℃ through the ▲ ▼ button, the setting is complete!\u003c\/span\u003e\u003c\/div\u003e\n\u003cdiv\u003e\u003cspan\u003eRefrigeration use case: use in the farm, the fan ventilation stops at 26 ℃, and the temperature rises to 30 ℃ to start ventilation again\u003c\/span\u003e\u003c\/div\u003e\n\u003cdiv\u003e\u003cspan\u003eStep 1: Refrigeration working mode, start temperature\u0026gt; stop temperature\u003c\/span\u003e\u003c\/div\u003e\n\u003cdiv\u003e\u003cspan\u003eStep 2: Press and hold the ▲ button, the starting temperature flashes, and set the starting temperature to 30 ℃ via the ▲ ▼ button\u003c\/span\u003e\u003c\/div\u003e\n\u003cdiv\u003e\u003cspan\u003eStep 3: Press and hold the ▼ button to stop the temperature flashing, and set the stop temperature to 26 ° C with the ▲ ▼ button. The setting is complete!\u003c\/span\u003e\u003c\/div\u003e\n\u003cdiv\u003e \u003c\/div\u003e\n\u003cdiv\u003e\u003cspan\u003eHumidification \/ dehumidification mode settings:\u003c\/span\u003e\u003c\/div\u003e\n\u003cdiv\u003e\u003cspan\u003eSetting (Start Humidity): Long press the △ key, the start humidity value flashes, set the start humidity value by the △ ▽ key. Set [Stop Humidity]: Long press the △ key, stop the humidity value flashing, and set the stop humidity by the △ ▽ key value.\u003c\/span\u003e\u003c\/div\u003e\n\u003cdiv\u003e \u003c\/div\u003e\n\u003cdiv\u003e\u003cspan\u003eExamples of humidification: Fresh supermarket humidification, control humidifier 50% RH to start humidification, humidification to 80% RH to stop humidification.\u003c\/span\u003e\u003c\/div\u003e\n\u003cdiv\u003e \u003c\/div\u003e\n\u003cdiv\u003e\u003cspan\u003eSetup steps:\u003c\/span\u003e\u003c\/div\u003e\n\u003cdiv\u003e\u003cspan\u003e Step 1: Press and hold the △ key for 3 seconds to start the humidity value flashing, and set the start humidity value to 50% RH.\u003c\/span\u003e\u003c\/div\u003e\n\u003cdiv\u003e\u003cspan\u003e Step 2: Press and hold the ▽ key for 3 seconds to stop the humidity value flashing, set the value to 80% RH, the setting is completed, press the button for 5 seconds without operation, and automatically return to the normal display state\u003c\/span\u003e\u003c\/div\u003e\n\u003cdiv\u003e \u003c\/div\u003e\n\u003cdiv\u003e\u003cspan\u003eDehumidification example: workshop control exhaust dehumidification system, humidity 70% RH starts dehumidification, humidity 40% RH stops dehumidification\u003c\/span\u003e\u003c\/div\u003e\n\u003cdiv\u003e \u003c\/div\u003e\n\u003cdiv\u003e\u003cspan\u003eSetup steps:\u003c\/span\u003e\u003c\/div\u003e\n\u003cdiv\u003e\u003cspan\u003e Step 1: Press and hold the △ key for 3 seconds to start the humidity value flashing, and set the start humidity value to 40% RH.\u003c\/span\u003e\u003c\/div\u003e\n\u003cdiv\u003e\u003cspan\u003e Step 2: Press and hold the ▽ key for 3 seconds to stop the humidity value from flashing, set the value to 70% RH, the setting is completed, press the button for 5 seconds without operation, and automatically return to the normal display state\u003c\/span\u003e\u003c\/div\u003e\n\u003cdiv\u003e \u003c\/div\u003e\n\u003cdiv\u003e \u003c\/div\u003e\n\u003cdiv\u003e\u003cspan\u003eTemperature correction:\u003c\/span\u003e\u003c\/div\u003e\n\u003cdiv\u003e\u003cspan\u003eSimultaneously press the ▲ ▼ key for 3 seconds to start the temperature digit flashing, and use the ▲ ▼ key to set the start temperature correction value; after the setting is completed, press the button for 5 seconds without operation, and automatically return to the normal display state.\u003c\/span\u003e\u003c\/div\u003e\n\u003cdiv\u003e \u003c\/div\u003e\n\u003cdiv\u003e\u003cspan\u003eHumidity correction:\u003c\/span\u003e\u003c\/div\u003e\n\u003cdiv\u003e\u003cspan\u003eSimultaneously press the △ ▽ key for 3 seconds to start the humidity digit flashing, and set the humidity correction value by the △ ▽ key; after the setting is completed, press the button for 5 seconds without operation, and it will automatically return to the normal display state.\u003c\/span\u003e\u003c\/div\u003e\n\u003cdiv\u003e \u003c\/div\u003e\n\u003cdiv\u003e\u003cspan\u003eWiring instructions:\u003c\/span\u003e\u003c\/div\u003e\n\u003cdiv\u003e \u003c\/div\u003e\n\u003cdiv\u003e \u003cimg alt=\"11\" src=\"https:\/\/ae01.alicdn.com\/kf\/H818f4241e00c4a4383e69801a2e9fd69R.jpg\"\u003e\n\u003c\/div\u003e\n\u003cdiv\u003e \u003c\/div\u003e\n\u003cdiv\u003e \u003c\/div\u003e\n\u003cdiv\u003e\u003cspan\u003e※ If the temperature and humidity display LLL, please confirm whether the wiring of the SHT20 digital temperature and humidity sensor is correct and whether there is poor contact, you can try to reconnect the wiring.\u003c\/span\u003e\u003c\/div\u003e\n\u003cdiv\u003e \u003c\/div\u003e\n\u003cdiv\u003e\n\u003cimg alt=\"1(23)\" src=\"https:\/\/ae01.alicdn.com\/kf\/H12eb95c3e0d2444c96477c9c4e96c5e2r.jpg\"\u003e\u003cimg alt=\"1 (2)\" src=\"https:\/\/ae01.alicdn.com\/kf\/H4aec1fa943784e678b9d5a13ef92c840u.jpg\"\u003e\u003cimg alt=\"1 (9)\" src=\"https:\/\/ae01.alicdn.com\/kf\/H62f61e0071094feb8e4b5a95452126815.jpg\"\u003e\u003cimg alt=\"1 (15)\" src=\"https:\/\/ae01.alicdn.com\/kf\/H3015a4e6d81f490b9020dca461f7694bX.jpg\"\u003e\u003cimg alt=\"1 (18)\" src=\"https:\/\/ae01.alicdn.com\/kf\/He260f2df36064fe2af5530c7a561437ed.jpg\"\u003e\u003cimg alt=\"1 (20)\" src=\"https:\/\/ae01.alicdn.com\/kf\/He00db8acc649445db0f1f4fce6df2bf95.jpg\"\u003e\u003cimg alt=\"1 (22)\" src=\"https:\/\/ae01.alicdn.com\/kf\/H5e7b7c932bd44e159fcc998c54110021C.jpg\"\u003e\u003cimg alt=\"1 (4)\" src=\"https:\/\/ae01.alicdn.com\/kf\/H31b481ef695c453d88993756e902f3dec.jpg\"\u003e\u003cimg alt=\"1 (3)\" src=\"https:\/\/ae01.alicdn.com\/kf\/H72f864579840411fa481222392614398v.jpg\"\u003e\n\u003c\/div\u003e"}