

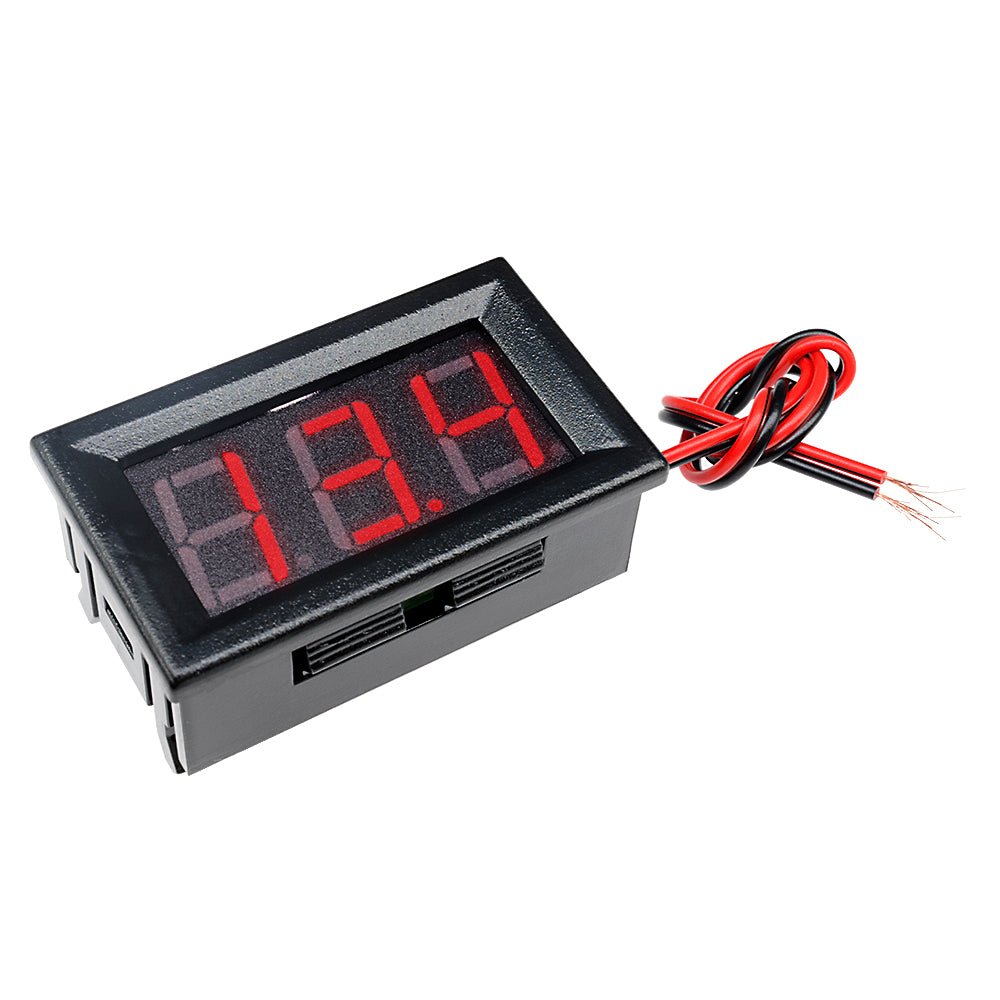
W1308 110V 220V 10A Digital Red+Blue LED Display Thermostat Alarm Controller


W1308 110V 220V 10A Digital Red+Blue LED Display Thermostat Alarm Controller
SKU:X13327
Regular price
$9.99
![]()
- guaranteeQuality checked
- Special gift cardsSpecial gift cards
- Free return Within 60 days
- Consultancy86-0755-85201155
Instructions
1. Connect the power supply and load according to the instructions. Be careful not to overpressure and overload!
2. Setting mode, long press SET for 5 seconds will display P0 Short press SET to set H (red light) to heating mode C (green light) to cooling mode
3. Set the stop temperature, press the SET screen once. Press the up and down keys to directly set the desired temperature.
4. ENT is the confirmation button. Press and hold this button to realize the function of power on/off.
Technical parameters:
Temperature control range: -50 to 120 ° C
Resolution: -9.9 to 99.9 hours 0.1 °C Other temperature range 1 °C
Temperature measurement accuracy: 0.2% FS
Temperature control accuracy: 0.1 °C
Refresh rate: 2 times / sec
Input power: 12V-24V-220V optional (see purchase parameters)
Measurement input: NTC10K (B3950) 1 meter waterproof sensor
Output type: relay output, maximum capacity 10A
Environmental requirements: -30 ~ 60 ° C humidity 20% - 85%
Machine size: 100*48*28mm
Opening size: 27*22mm
The Parameter Function Description:
Press and hold SET for 5 seconds to enter the internal parameter setting, press the up and down keys to switch P0...P8 Press ENT to confirm the return.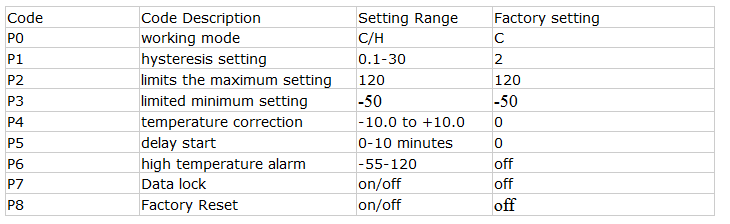
P0 cooling and heating mode
High temperature start for cooling mode, please set to C
Low temperature start for heating mode, please set to H
P1 hysteresis setting
In heating mode (H): measured value ≤ set value - start output heating to set value stop when returning
In cooling mode (C), when the measured value ≥ set value + hysteresis, the output cooling is started to the set value stop.
P2 limits the maximum setting (non-temperature setting)
P3 defines the lowest set value (non-temperature control setting)
P4 temperature correction
When the measured temperature deviates from the standard temperature, this function can be used to correct the corrected temperature = temperature before correction + correction value
P5 delay start time (unit: minute)
When controlling the cooling of the compressor equipment, the delay time can be set as needed. When the controller outputs, the equipment will not start immediately, and it needs to start after the set delay time.
P6 high temperature alarm
When the measured value is greater than this value, the screen is displayed -- and the sound alarm is dropped. Simultaneously disconnect the output
P7 data lock function
Turn on the data lock to keep the current settings from being changed. At this time, the setting temperature and function are invalid. If you need to modify it, you need to turn off the data frequency function.
P8 factory reset
Long press SET to switch to P8, press SET to set to on, press ENT to restore factory settings
You can also press and hold the + - button to disable the POST and restore the factory settings.
Instructions for using:
Please connect the power supply according to the parameters and wiring diagram, and connect the cooling or heating equipment to the output.
Enter the internal setting as needed to select the heating (into PO selection H) or cooling (into PO selection C) mode to set the temperature method, press the SET screen once, press the upper and lower to set the desired temperature, press ENT to confirm the OUT indicator of the return panel. Light: Blinking indicates cooling or heating start delay, always on indicates output
Digital tube: Display LLL for sensor open circuit: display HHH is out of measurement range, thermostat will force power off, display --- for high temperature alarm.
Schematic Diagram:
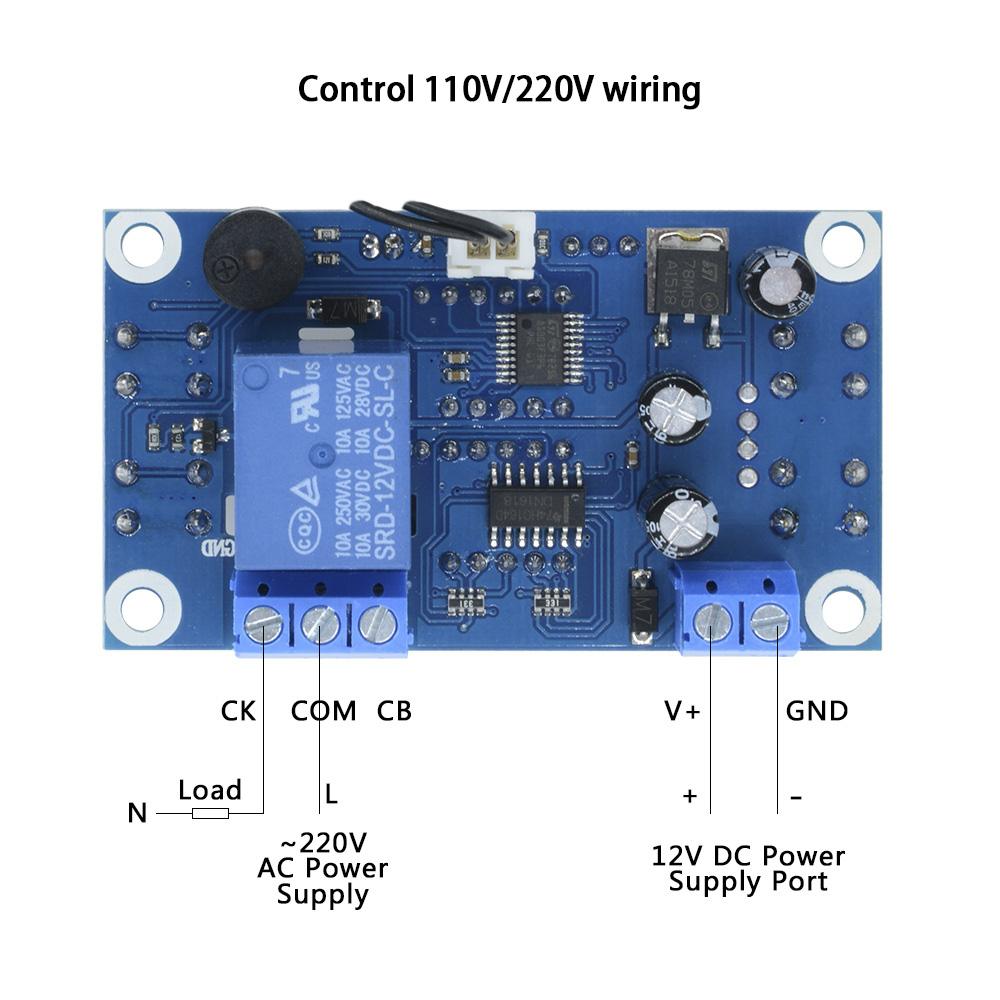
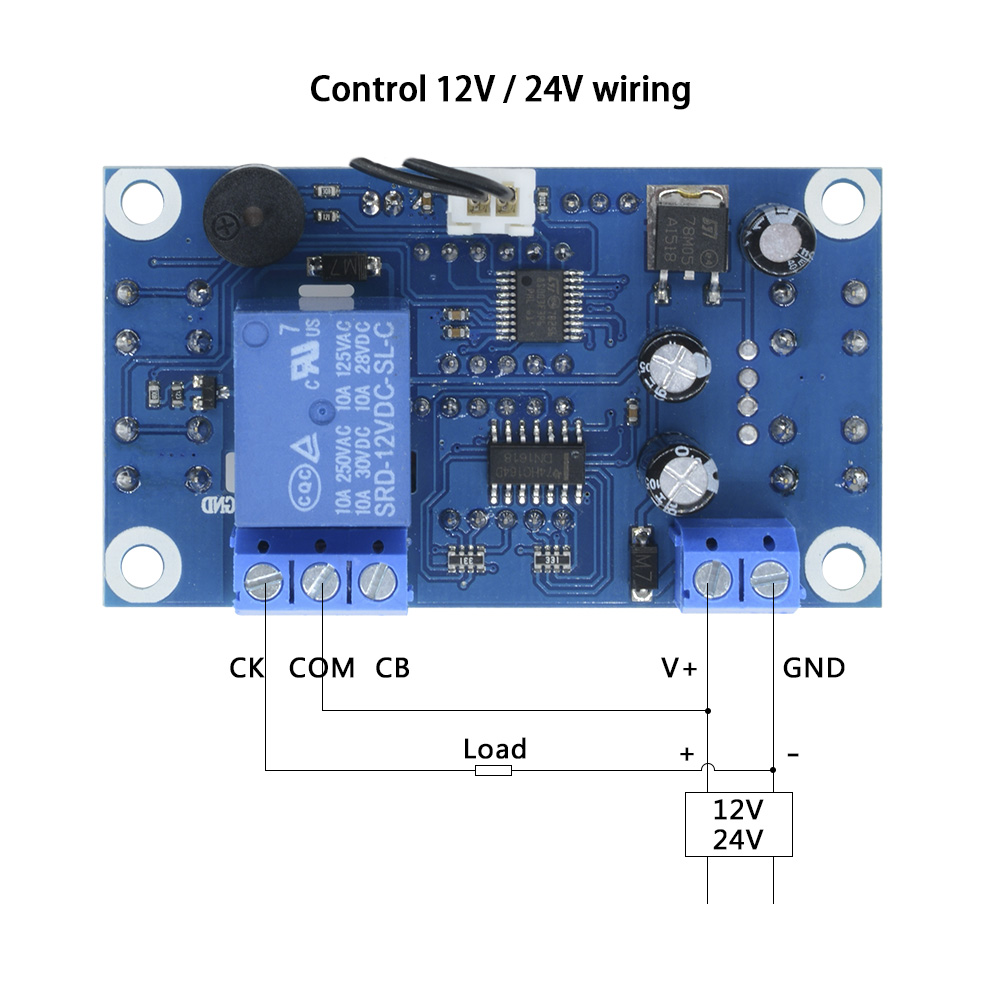
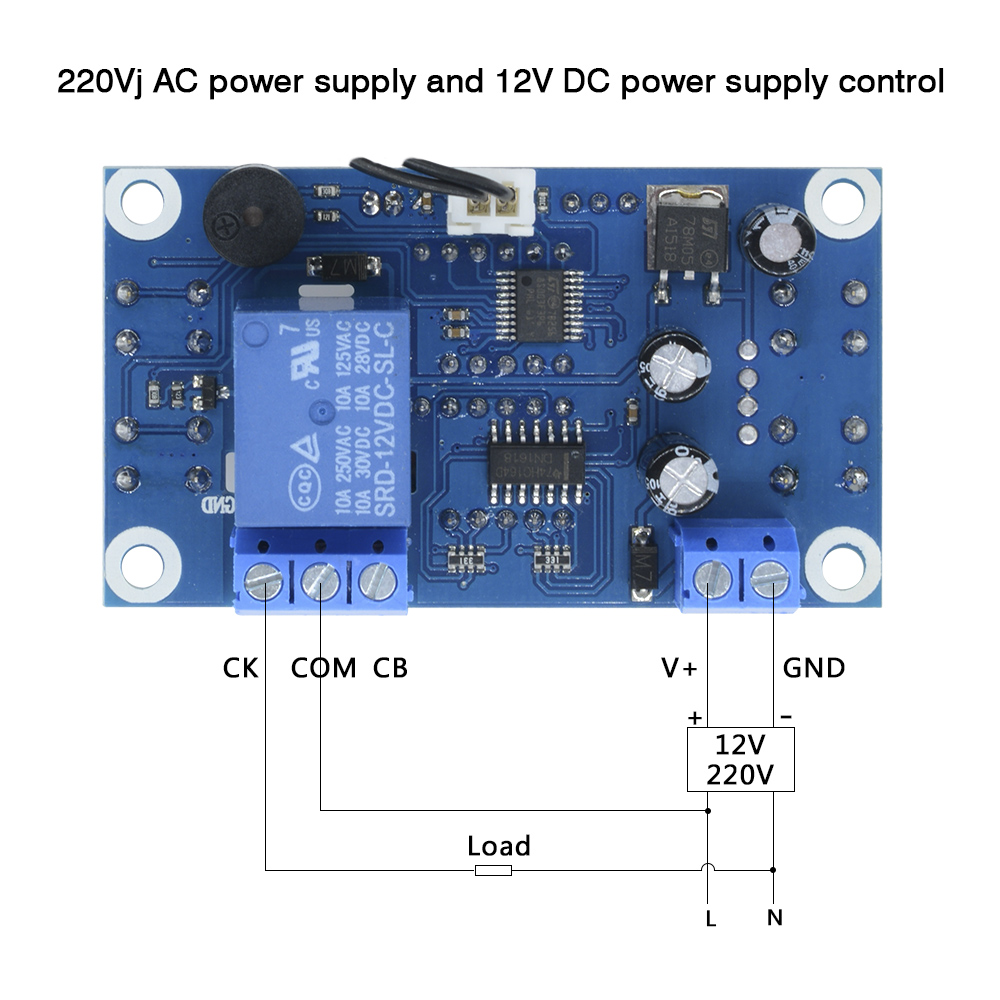

Notice:
1. Input terminal is connected to the power supply. +V is the positive GND is the negative pole. Do not exceed the range according to the type of power supply.
2, the output type is relay output, the load needs to be connected in series at the output, the maximum capacity is 10A
3. After connecting the line, you must first set the cooling or heating. When finished, press the SET screen when the temperature is normally displayed. Press the up and down to set the required stop temperature.
4. Before starting the machine, press and hold the power up and down to release the factory to restore the factory settings.
Package Included:1PC*W1308 110V 220V 10A Digital Red+Blue LED Display Thermostat Alarm Controller
Purchasing & Delivery
Before you make your purchase, it’s helpful to know the measurements of the area you plan to place the furniture. You should also measure any doorways and hallways through which the furniture will pass to get to its final destination.Picking up at the store
Shopify Shop requires that all products are properly inspected BEFORE you take it home to insure there are no surprises. Our team is happy to open all packages and will assist in the inspection process. We will then reseal packages for safe transport. We encourage all customers to bring furniture pads or blankets to protect the items during transport as well as rope or tie downs. Shopify Shop will not be responsible for damage that occurs after leaving the store or during transit. It is the purchaser’s responsibility to make sure the correct items are picked up and in good condition.Delivery
Customers are able to pick the next available delivery day that best fits their schedule. However, to route stops as efficiently as possible, Shopify Shop will provide the time frame. Customers will not be able to choose a time. You will be notified in advance of your scheduled time frame. Please make sure that a responsible adult (18 years or older) will be home at that time.In preparation for your delivery, please remove existing furniture, pictures, mirrors, accessories, etc. to prevent damages. Also insure that the area where you would like your furniture placed is clear of any old furniture and any other items that may obstruct the passageway of the delivery team. Shopify Shop will deliver, assemble, and set-up your new furniture purchase and remove all packing materials from your home. Our delivery crews are not permitted to move your existing furniture or other household items. Delivery personnel will attempt to deliver the purchased items in a safe and controlled manner but will not attempt to place furniture if they feel it will result in damage to the product or your home. Delivery personnel are unable to remove doors, hoist furniture or carry furniture up more than 3 flights of stairs. An elevator must be available for deliveries to the 4th floor and above.
Other Customers also buy:
-
 Translation missing: en.products.product.regular_price $5.99{"id":4360742797383,"title":"W1308 110V 220V 10A Digital Red+Blue LED Display Thermostat Alarm Controller","handle":"w1308-ac-100-240v-10a-digital-temperature-controller-thermostat","description":"\u003cdiv\u003e\u003cspan id=\"result_box\" lang=\"en\"\u003e\u003cstrong\u003eInstructions\u003c\/strong\u003e\u003cbr\u003e1. Connect the power supply and load according to the instructions. Be careful not to overpressure and overload!\u003cbr\u003e2. Setting mode, long press SET for 5 seconds will display P0 Short press SET to set H (red light) to heating mode C (green light) to cooling mode\u003cbr\u003e3. Set the stop temperature, press the SET screen once. Press the up and down keys to directly set the desired temperature.\u003cbr\u003e4. ENT is the confirmation button. Press and hold this button to realize the function of power on\/off.\u003cbr\u003e\u003cbr\u003e\u003cstrong\u003eTechnical parameters:\u003c\/strong\u003e\u003cbr\u003eTemperature control range: -50 to 120 ° C\u003cbr\u003eResolution: -9.9 to 99.9 hours 0.1 °C Other temperature range 1 °C\u003cbr\u003eTemperature measurement accuracy: 0.2% FS\u003cbr\u003eTemperature control accuracy: 0.1 °C\u003cbr\u003eRefresh rate: 2 times \/ sec\u003cbr\u003eInput power: 12V-24V-220V optional (see purchase parameters)\u003cbr\u003eMeasurement input: NTC10K (B3950) 1 meter waterproof sensor\u003cbr\u003eOutput type: relay output, maximum capacity 10A\u003cbr\u003eEnvironmental requirements: -30 ~ 60 ° C humidity 20% - 85%\u003cbr\u003eMachine size: 100*48*28mm\u003cbr\u003eOpening size: 27*22mm\u003c\/span\u003e\u003c\/div\u003e\n\u003cdiv\u003e\u003cspan\u003e\u003cstrong\u003e\u003cspan lang=\"en\"\u003e\u003cspan id=\"result_box\" lang=\"en\"\u003eThe Parameter Function Description:\u003c\/span\u003e\u003c\/span\u003e\u003c\/strong\u003e\u003c\/span\u003e\u003c\/div\u003e\n\u003cdiv\u003e\u003cspan\u003e\u003cspan lang=\"en\"\u003e\u003cspan id=\"result_box\" lang=\"en\"\u003ePress and hold SET for 5 seconds to enter the internal parameter setting, press the up and down keys to switch P0...P8 Press ENT to confirm the return.\u003cimg src=\"https:\/\/pg-cdn-a2.datacaciques.com\/00\/NDAy\/18\/11\/02\/qlrvj98eok4d5t50\/ae2959708795fc37.png\"\u003e\u003c\/span\u003e\u003c\/span\u003e\u003c\/span\u003e\u003c\/div\u003e\n\u003cdiv\u003e\n\u003cdiv id=\"gt-res-content\"\u003e\n\u003cdiv id=\"gt-res-dir-ctr\" dir=\"ltr\"\u003e\u003cspan id=\"result_box\" lang=\"en\"\u003e\u003cspan title=\"P0制冷、加热模式\n\"\u003e\u003cstrong\u003eP0 cooling and heating mode\u003c\/strong\u003e\u003cbr\u003e\u003c\/span\u003e\u003cspan title=\"高温启动为制冷模式请设置为C\n\"\u003eHigh temperature start for cooling mode, please set to C\u003cbr\u003e\u003c\/span\u003e\u003cspan title=\"低温启动为加热模式请设置为H\n\"\u003eLow temperature start for heating mode, please set to H\u003cbr\u003e\u003c\/span\u003e\u003cspan title=\"P1回差设定\n\"\u003e\u003cstrong\u003eP1 hysteresis setting\u003c\/strong\u003e\u003cbr\u003e\u003c\/span\u003e\u003cspan title=\"加热模式(H)下:测量值≤设定值—回差时启动输出加热到设定值停止\n\"\u003eIn heating mode (H): measured value ≤ set value - start output heating to set value stop when returning\u003cbr\u003e\u003c\/span\u003e\u003cspan title=\"制冷模式(C)下,测量值≥设定值+回差时启动输出制冷到设定值停止\n\"\u003eIn cooling mode (C), when the measured value ≥ set value + hysteresis, the output cooling is started to the set value stop.\u003cbr\u003e\u003c\/span\u003e\u003cstrong\u003e\u003cspan title=\"P2限定最高设定值(非控温设定)\n\"\u003eP2 limits the maximum setting (non-temperature setting)\u003cbr\u003e\u003c\/span\u003e\u003cspan title=\"P3限定最低设定值(非控温设定)\n\"\u003eP3 defines the lowest set value (non-temperature control setting)\u003cbr\u003e\u003c\/span\u003e\u003c\/strong\u003e\u003cspan title=\"P4温度校正\n\"\u003e\u003cstrong\u003eP4 temperature correction\u003c\/strong\u003e\u003cbr\u003e\u003c\/span\u003e\u003cspan title=\"当测量温度和标准温度有偏差时,可以使用此功能校正,校正后的温度=校正前的温度+校正值\n\"\u003eWhen the measured temperature deviates from the standard temperature, this function can be used to correct the corrected temperature = temperature before correction + correction value\u003cbr\u003e\u003c\/span\u003e\u003cspan title=\"P5延时启动时间 (单位:分钟)\n\"\u003e\u003cstrong\u003eP5 delay start time (unit: minute)\u003c\/strong\u003e\u003cbr\u003e\u003c\/span\u003e\u003cspan title=\"当控制压缩机设备制冷时,可根据需要设定延时时间,当控制器输出时设备不会立即启动,需要运行完设定的延时时间后启动\n\"\u003eWhen controlling the cooling of the compressor equipment, the delay time can be set as needed. When the controller outputs, the equipment will not start immediately, and it needs to start after the set delay time.\u003cbr\u003e\u003c\/span\u003e\u003cspan title=\"P6高温报警\n\"\u003e\u003cstrong\u003eP6 high temperature alarm\u003c\/strong\u003e\u003cbr\u003e\u003c\/span\u003e\u003cspan title=\"当测量值大于此值屏都显示--并滴演声报警。\"\u003eWhen the measured value is greater than this value, the screen is displayed -- and the sound alarm is dropped.\u003cspan\u003e \u003c\/span\u003e\u003c\/span\u003e\u003cspan title=\"同时强制断开输出\n\"\u003eSimultaneously disconnect the output\u003cbr\u003e\u003c\/span\u003e\u003cspan title=\"P7数据锁功使\n\"\u003e\u003cstrong\u003eP7 data lock function\u003c\/strong\u003e\u003cbr\u003e\u003c\/span\u003e\u003cspan title=\"开启数据锁,可以保持当前设定不被改动,此时设置温度和功能都无效,如需修改,需关闭数据频功能\n\"\u003eTurn on the data lock to keep the current settings from being changed. At this time, the setting temperature and function are invalid. If you need to modify it, you need to turn off the data frequency function.\u003cbr\u003e\u003c\/span\u003e\u003cspan title=\"P8恢复出厂设置\n\"\u003e\u003cstrong\u003eP8 factory reset\u003c\/strong\u003e\u003cbr\u003e\u003c\/span\u003e\u003cspan title=\"长按SET切换到P8,按次SET设置为on,按ENT恢复出厂设置\n\"\u003eLong press SET to switch to P8, press SET to set to on, press ENT to restore factory settings\u003cbr\u003e\u003c\/span\u003e\u003cspan title=\"也可按住+ -键不放开机自检和恢复出厂设定\"\u003eYou can also press and hold the + - button to disable the POST and restore the factory settings.\u003c\/span\u003e\u003cspan title=\"\"\u003e\u003c\/span\u003e\u003c\/span\u003e\u003c\/div\u003e\n\u003cdiv dir=\"ltr\"\u003e\u003cspan lang=\"en\"\u003e\u003cspan title=\"也可按住+ -键不放开机自检和恢复出厂设定\"\u003e \u003c\/span\u003e\u003c\/span\u003e\u003c\/div\u003e\n\u003cdiv dir=\"ltr\"\u003e\u003cspan lang=\"en\"\u003e\u003cspan id=\"result_box\" lang=\"en\"\u003e\u003cstrong\u003eInstructions for using:\u003c\/strong\u003e\u003cbr\u003ePlease connect the power supply according to the parameters and wiring diagram, and connect the cooling or heating equipment to the output.\u003cbr\u003eEnter the internal setting as needed to select the heating (into PO selection H) or cooling (into PO selection C) mode to set the temperature method, press the SET screen once, press the upper and lower to set the desired temperature, press ENT to confirm the OUT indicator of the return panel. Light: Blinking indicates cooling or heating start delay, always on indicates output\u003cbr\u003eDigital tube: Display LLL for sensor open circuit: display HHH is out of measurement range, thermostat will force power off, display --- for high temperature alarm.\u003c\/span\u003e\u003c\/span\u003e\u003c\/div\u003e\n\u003cdiv dir=\"ltr\"\u003e\u003cspan lang=\"en\"\u003e \u003c\/span\u003e\u003c\/div\u003e\n\u003cdiv dir=\"ltr\"\u003e\u003cstrong\u003e\u003cspan lang=\"en\"\u003e\u003cspan id=\"result_box\" lang=\"en\"\u003eSchematic Diagram:\u003c\/span\u003e\u003c\/span\u003e\u003c\/strong\u003e\u003c\/div\u003e\n\u003cdiv dir=\"ltr\"\u003e\u003cspan lang=\"en\"\u003e\u003cstrong\u003e\u003cimg src=\"https:\/\/pg-cdn-a2.datacaciques.com\/00\/NDAy\/19\/01\/12\/b7r74m86z1992b8p\/4f95d4b966b784c7.jpg\" width=\"553\" height=\"553\"\u003e\u003cimg src=\"https:\/\/pg-cdn-a2.datacaciques.com\/00\/NDAy\/19\/01\/12\/b7r74m86z1992b8p\/dbd4729ba3375d9b.jpg\" width=\"547\" height=\"547\"\u003e\u003c\/strong\u003e\u003c\/span\u003e\u003c\/div\u003e\n\u003cdiv dir=\"ltr\"\u003e\n\u003cspan lang=\"en\"\u003e \u003c\/span\u003e\u003cspan lang=\"en\"\u003e\u003cstrong\u003e\u003cimg src=\"https:\/\/pg-cdn-a2.datacaciques.com\/00\/NDAy\/18\/11\/02\/z6f718h9b39hpdqc\/3f00bf7f9405aa12.jpg\" width=\"517\" height=\"519\"\u003e\u003cimg src=\"https:\/\/pg-cdn-a2.datacaciques.com\/00\/NDAy\/19\/04\/01\/3ui760nq9b0r2612\/36e62941144bb7ac.jpg\" caption=\"false\" width=\"487\" height=\"487\"\u003e\u003c\/strong\u003e\u003c\/span\u003e\n\u003c\/div\u003e\n\u003cdiv dir=\"ltr\"\u003e\u003cspan lang=\"en\"\u003e\u003cstrong\u003eNotice:\u003c\/strong\u003e\u003cbr\u003e1. Input terminal is connected to the power supply. +V is the positive GND is the negative pole. Do not exceed the range according to the type of power supply.\u003cbr\u003e2, the output type is relay output, the load needs to be connected in series at the output, the maximum capacity is 10A\u003cbr\u003e3. After connecting the line, you must first set the cooling or heating. When finished, press the SET screen when the temperature is normally displayed. Press the up and down to set the required stop temperature.\u003cbr\u003e4. Before starting the machine, press and hold the power up and down to release the factory to restore the factory settings.\u003c\/span\u003e\u003c\/div\u003e\n\u003c\/div\u003e\n\u003c\/div\u003e\n\u003cdiv\u003e\u003cspan\u003e\u003cstrong\u003e\u003cspan lang=\"en\"\u003ePackage Included:\u003c\/span\u003e\u003c\/strong\u003e\u003cspan lang=\"en\"\u003e1PC*W1308 110V 220V 10A Digital Red+Blue LED Display Thermostat Alarm Controller\u003c\/span\u003e\u003c\/span\u003e\u003c\/div\u003e","published_at":"2019-11-18T15:54:03+08:00","created_at":"2019-11-18T16:13:14+08:00","vendor":"diymore","type":"Thermostat","tags":[],"price":999,"price_min":999,"price_max":999,"available":true,"price_varies":false,"compare_at_price":null,"compare_at_price_min":0,"compare_at_price_max":0,"compare_at_price_varies":false,"variants":[{"id":31275759534151,"title":"Default Title","option1":"Default Title","option2":null,"option3":null,"sku":"X13327","requires_shipping":true,"taxable":true,"featured_image":null,"available":true,"name":"W1308 110V 220V 10A Digital Red+Blue LED Display Thermostat Alarm Controller","public_title":null,"options":["Default Title"],"price":999,"weight":0,"compare_at_price":null,"inventory_management":null,"barcode":"","requires_selling_plan":false,"selling_plan_allocations":[]}],"images":["\/\/www.diymore.cc\/cdn\/shop\/products\/X13327_4_759.jpg?v=1588668174","\/\/www.diymore.cc\/cdn\/shop\/products\/X13327_7_718.jpg?v=1588668174","\/\/www.diymore.cc\/cdn\/shop\/products\/X13327_1_484.jpg?v=1588668174","\/\/www.diymore.cc\/cdn\/shop\/products\/X13327_5_561.jpg?v=1588668174","\/\/www.diymore.cc\/cdn\/shop\/products\/X13327_10_804.jpg?v=1588668174","\/\/www.diymore.cc\/cdn\/shop\/products\/X13327_14_203.jpg?v=1588668174"],"featured_image":"\/\/www.diymore.cc\/cdn\/shop\/products\/X13327_4_759.jpg?v=1588668174","options":["Title"],"media":[{"alt":"W1308 110V 220V 10A Digital Red+Blue Led Display Thermostat Alarm Controller","id":6679844356167,"position":1,"preview_image":{"aspect_ratio":1.0,"height":1000,"width":1000,"src":"\/\/www.diymore.cc\/cdn\/shop\/products\/X13327_4_759.jpg?v=1588668174"},"aspect_ratio":1.0,"height":1000,"media_type":"image","src":"\/\/www.diymore.cc\/cdn\/shop\/products\/X13327_4_759.jpg?v=1588668174","width":1000},{"alt":"W1308 110V 220V 10A Digital Red+Blue Led Display Thermostat Alarm Controller","id":6679844520007,"position":2,"preview_image":{"aspect_ratio":1.0,"height":1000,"width":1000,"src":"\/\/www.diymore.cc\/cdn\/shop\/products\/X13327_7_718.jpg?v=1588668174"},"aspect_ratio":1.0,"height":1000,"media_type":"image","src":"\/\/www.diymore.cc\/cdn\/shop\/products\/X13327_7_718.jpg?v=1588668174","width":1000},{"alt":"W1308 110V 220V 10A Digital Red+Blue Led Display Thermostat Alarm Controller","id":6679845306439,"position":3,"preview_image":{"aspect_ratio":1.0,"height":1000,"width":1000,"src":"\/\/www.diymore.cc\/cdn\/shop\/products\/X13327_1_484.jpg?v=1588668174"},"aspect_ratio":1.0,"height":1000,"media_type":"image","src":"\/\/www.diymore.cc\/cdn\/shop\/products\/X13327_1_484.jpg?v=1588668174","width":1000},{"alt":"W1308 110V 220V 10A Digital Red+Blue Led Display Thermostat Alarm Controller","id":6679845666887,"position":4,"preview_image":{"aspect_ratio":1.0,"height":1000,"width":1000,"src":"\/\/www.diymore.cc\/cdn\/shop\/products\/X13327_5_561.jpg?v=1588668174"},"aspect_ratio":1.0,"height":1000,"media_type":"image","src":"\/\/www.diymore.cc\/cdn\/shop\/products\/X13327_5_561.jpg?v=1588668174","width":1000},{"alt":"W1308 110V 220V 10A Digital Red+Blue Led Display Thermostat Alarm Controller","id":6679845797959,"position":5,"preview_image":{"aspect_ratio":1.0,"height":1000,"width":1000,"src":"\/\/www.diymore.cc\/cdn\/shop\/products\/X13327_10_804.jpg?v=1588668174"},"aspect_ratio":1.0,"height":1000,"media_type":"image","src":"\/\/www.diymore.cc\/cdn\/shop\/products\/X13327_10_804.jpg?v=1588668174","width":1000},{"alt":"W1308 110V 220V 10A Digital Red+Blue Led Display Thermostat Alarm Controller","id":6679846322247,"position":6,"preview_image":{"aspect_ratio":1.0,"height":1000,"width":1000,"src":"\/\/www.diymore.cc\/cdn\/shop\/products\/X13327_14_203.jpg?v=1588668174"},"aspect_ratio":1.0,"height":1000,"media_type":"image","src":"\/\/www.diymore.cc\/cdn\/shop\/products\/X13327_14_203.jpg?v=1588668174","width":1000}],"requires_selling_plan":false,"selling_plan_groups":[],"content":"\u003cdiv\u003e\u003cspan id=\"result_box\" lang=\"en\"\u003e\u003cstrong\u003eInstructions\u003c\/strong\u003e\u003cbr\u003e1. Connect the power supply and load according to the instructions. Be careful not to overpressure and overload!\u003cbr\u003e2. Setting mode, long press SET for 5 seconds will display P0 Short press SET to set H (red light) to heating mode C (green light) to cooling mode\u003cbr\u003e3. Set the stop temperature, press the SET screen once. Press the up and down keys to directly set the desired temperature.\u003cbr\u003e4. ENT is the confirmation button. Press and hold this button to realize the function of power on\/off.\u003cbr\u003e\u003cbr\u003e\u003cstrong\u003eTechnical parameters:\u003c\/strong\u003e\u003cbr\u003eTemperature control range: -50 to 120 ° C\u003cbr\u003eResolution: -9.9 to 99.9 hours 0.1 °C Other temperature range 1 °C\u003cbr\u003eTemperature measurement accuracy: 0.2% FS\u003cbr\u003eTemperature control accuracy: 0.1 °C\u003cbr\u003eRefresh rate: 2 times \/ sec\u003cbr\u003eInput power: 12V-24V-220V optional (see purchase parameters)\u003cbr\u003eMeasurement input: NTC10K (B3950) 1 meter waterproof sensor\u003cbr\u003eOutput type: relay output, maximum capacity 10A\u003cbr\u003eEnvironmental requirements: -30 ~ 60 ° C humidity 20% - 85%\u003cbr\u003eMachine size: 100*48*28mm\u003cbr\u003eOpening size: 27*22mm\u003c\/span\u003e\u003c\/div\u003e\n\u003cdiv\u003e\u003cspan\u003e\u003cstrong\u003e\u003cspan lang=\"en\"\u003e\u003cspan id=\"result_box\" lang=\"en\"\u003eThe Parameter Function Description:\u003c\/span\u003e\u003c\/span\u003e\u003c\/strong\u003e\u003c\/span\u003e\u003c\/div\u003e\n\u003cdiv\u003e\u003cspan\u003e\u003cspan lang=\"en\"\u003e\u003cspan id=\"result_box\" lang=\"en\"\u003ePress and hold SET for 5 seconds to enter the internal parameter setting, press the up and down keys to switch P0...P8 Press ENT to confirm the return.\u003cimg src=\"https:\/\/pg-cdn-a2.datacaciques.com\/00\/NDAy\/18\/11\/02\/qlrvj98eok4d5t50\/ae2959708795fc37.png\"\u003e\u003c\/span\u003e\u003c\/span\u003e\u003c\/span\u003e\u003c\/div\u003e\n\u003cdiv\u003e\n\u003cdiv id=\"gt-res-content\"\u003e\n\u003cdiv id=\"gt-res-dir-ctr\" dir=\"ltr\"\u003e\u003cspan id=\"result_box\" lang=\"en\"\u003e\u003cspan title=\"P0制冷、加热模式\n\"\u003e\u003cstrong\u003eP0 cooling and heating mode\u003c\/strong\u003e\u003cbr\u003e\u003c\/span\u003e\u003cspan title=\"高温启动为制冷模式请设置为C\n\"\u003eHigh temperature start for cooling mode, please set to C\u003cbr\u003e\u003c\/span\u003e\u003cspan title=\"低温启动为加热模式请设置为H\n\"\u003eLow temperature start for heating mode, please set to H\u003cbr\u003e\u003c\/span\u003e\u003cspan title=\"P1回差设定\n\"\u003e\u003cstrong\u003eP1 hysteresis setting\u003c\/strong\u003e\u003cbr\u003e\u003c\/span\u003e\u003cspan title=\"加热模式(H)下:测量值≤设定值—回差时启动输出加热到设定值停止\n\"\u003eIn heating mode (H): measured value ≤ set value - start output heating to set value stop when returning\u003cbr\u003e\u003c\/span\u003e\u003cspan title=\"制冷模式(C)下,测量值≥设定值+回差时启动输出制冷到设定值停止\n\"\u003eIn cooling mode (C), when the measured value ≥ set value + hysteresis, the output cooling is started to the set value stop.\u003cbr\u003e\u003c\/span\u003e\u003cstrong\u003e\u003cspan title=\"P2限定最高设定值(非控温设定)\n\"\u003eP2 limits the maximum setting (non-temperature setting)\u003cbr\u003e\u003c\/span\u003e\u003cspan title=\"P3限定最低设定值(非控温设定)\n\"\u003eP3 defines the lowest set value (non-temperature control setting)\u003cbr\u003e\u003c\/span\u003e\u003c\/strong\u003e\u003cspan title=\"P4温度校正\n\"\u003e\u003cstrong\u003eP4 temperature correction\u003c\/strong\u003e\u003cbr\u003e\u003c\/span\u003e\u003cspan title=\"当测量温度和标准温度有偏差时,可以使用此功能校正,校正后的温度=校正前的温度+校正值\n\"\u003eWhen the measured temperature deviates from the standard temperature, this function can be used to correct the corrected temperature = temperature before correction + correction value\u003cbr\u003e\u003c\/span\u003e\u003cspan title=\"P5延时启动时间 (单位:分钟)\n\"\u003e\u003cstrong\u003eP5 delay start time (unit: minute)\u003c\/strong\u003e\u003cbr\u003e\u003c\/span\u003e\u003cspan title=\"当控制压缩机设备制冷时,可根据需要设定延时时间,当控制器输出时设备不会立即启动,需要运行完设定的延时时间后启动\n\"\u003eWhen controlling the cooling of the compressor equipment, the delay time can be set as needed. When the controller outputs, the equipment will not start immediately, and it needs to start after the set delay time.\u003cbr\u003e\u003c\/span\u003e\u003cspan title=\"P6高温报警\n\"\u003e\u003cstrong\u003eP6 high temperature alarm\u003c\/strong\u003e\u003cbr\u003e\u003c\/span\u003e\u003cspan title=\"当测量值大于此值屏都显示--并滴演声报警。\"\u003eWhen the measured value is greater than this value, the screen is displayed -- and the sound alarm is dropped.\u003cspan\u003e \u003c\/span\u003e\u003c\/span\u003e\u003cspan title=\"同时强制断开输出\n\"\u003eSimultaneously disconnect the output\u003cbr\u003e\u003c\/span\u003e\u003cspan title=\"P7数据锁功使\n\"\u003e\u003cstrong\u003eP7 data lock function\u003c\/strong\u003e\u003cbr\u003e\u003c\/span\u003e\u003cspan title=\"开启数据锁,可以保持当前设定不被改动,此时设置温度和功能都无效,如需修改,需关闭数据频功能\n\"\u003eTurn on the data lock to keep the current settings from being changed. At this time, the setting temperature and function are invalid. If you need to modify it, you need to turn off the data frequency function.\u003cbr\u003e\u003c\/span\u003e\u003cspan title=\"P8恢复出厂设置\n\"\u003e\u003cstrong\u003eP8 factory reset\u003c\/strong\u003e\u003cbr\u003e\u003c\/span\u003e\u003cspan title=\"长按SET切换到P8,按次SET设置为on,按ENT恢复出厂设置\n\"\u003eLong press SET to switch to P8, press SET to set to on, press ENT to restore factory settings\u003cbr\u003e\u003c\/span\u003e\u003cspan title=\"也可按住+ -键不放开机自检和恢复出厂设定\"\u003eYou can also press and hold the + - button to disable the POST and restore the factory settings.\u003c\/span\u003e\u003cspan title=\"\"\u003e\u003c\/span\u003e\u003c\/span\u003e\u003c\/div\u003e\n\u003cdiv dir=\"ltr\"\u003e\u003cspan lang=\"en\"\u003e\u003cspan title=\"也可按住+ -键不放开机自检和恢复出厂设定\"\u003e \u003c\/span\u003e\u003c\/span\u003e\u003c\/div\u003e\n\u003cdiv dir=\"ltr\"\u003e\u003cspan lang=\"en\"\u003e\u003cspan id=\"result_box\" lang=\"en\"\u003e\u003cstrong\u003eInstructions for using:\u003c\/strong\u003e\u003cbr\u003ePlease connect the power supply according to the parameters and wiring diagram, and connect the cooling or heating equipment to the output.\u003cbr\u003eEnter the internal setting as needed to select the heating (into PO selection H) or cooling (into PO selection C) mode to set the temperature method, press the SET screen once, press the upper and lower to set the desired temperature, press ENT to confirm the OUT indicator of the return panel. Light: Blinking indicates cooling or heating start delay, always on indicates output\u003cbr\u003eDigital tube: Display LLL for sensor open circuit: display HHH is out of measurement range, thermostat will force power off, display --- for high temperature alarm.\u003c\/span\u003e\u003c\/span\u003e\u003c\/div\u003e\n\u003cdiv dir=\"ltr\"\u003e\u003cspan lang=\"en\"\u003e \u003c\/span\u003e\u003c\/div\u003e\n\u003cdiv dir=\"ltr\"\u003e\u003cstrong\u003e\u003cspan lang=\"en\"\u003e\u003cspan id=\"result_box\" lang=\"en\"\u003eSchematic Diagram:\u003c\/span\u003e\u003c\/span\u003e\u003c\/strong\u003e\u003c\/div\u003e\n\u003cdiv dir=\"ltr\"\u003e\u003cspan lang=\"en\"\u003e\u003cstrong\u003e\u003cimg src=\"https:\/\/pg-cdn-a2.datacaciques.com\/00\/NDAy\/19\/01\/12\/b7r74m86z1992b8p\/4f95d4b966b784c7.jpg\" width=\"553\" height=\"553\"\u003e\u003cimg src=\"https:\/\/pg-cdn-a2.datacaciques.com\/00\/NDAy\/19\/01\/12\/b7r74m86z1992b8p\/dbd4729ba3375d9b.jpg\" width=\"547\" height=\"547\"\u003e\u003c\/strong\u003e\u003c\/span\u003e\u003c\/div\u003e\n\u003cdiv dir=\"ltr\"\u003e\n\u003cspan lang=\"en\"\u003e \u003c\/span\u003e\u003cspan lang=\"en\"\u003e\u003cstrong\u003e\u003cimg src=\"https:\/\/pg-cdn-a2.datacaciques.com\/00\/NDAy\/18\/11\/02\/z6f718h9b39hpdqc\/3f00bf7f9405aa12.jpg\" width=\"517\" height=\"519\"\u003e\u003cimg src=\"https:\/\/pg-cdn-a2.datacaciques.com\/00\/NDAy\/19\/04\/01\/3ui760nq9b0r2612\/36e62941144bb7ac.jpg\" caption=\"false\" width=\"487\" height=\"487\"\u003e\u003c\/strong\u003e\u003c\/span\u003e\n\u003c\/div\u003e\n\u003cdiv dir=\"ltr\"\u003e\u003cspan lang=\"en\"\u003e\u003cstrong\u003eNotice:\u003c\/strong\u003e\u003cbr\u003e1. Input terminal is connected to the power supply. +V is the positive GND is the negative pole. Do not exceed the range according to the type of power supply.\u003cbr\u003e2, the output type is relay output, the load needs to be connected in series at the output, the maximum capacity is 10A\u003cbr\u003e3. After connecting the line, you must first set the cooling or heating. When finished, press the SET screen when the temperature is normally displayed. Press the up and down to set the required stop temperature.\u003cbr\u003e4. Before starting the machine, press and hold the power up and down to release the factory to restore the factory settings.\u003c\/span\u003e\u003c\/div\u003e\n\u003c\/div\u003e\n\u003c\/div\u003e\n\u003cdiv\u003e\u003cspan\u003e\u003cstrong\u003e\u003cspan lang=\"en\"\u003ePackage Included:\u003c\/span\u003e\u003c\/strong\u003e\u003cspan lang=\"en\"\u003e1PC*W1308 110V 220V 10A Digital Red+Blue LED Display Thermostat Alarm Controller\u003c\/span\u003e\u003c\/span\u003e\u003c\/div\u003e"}
 -
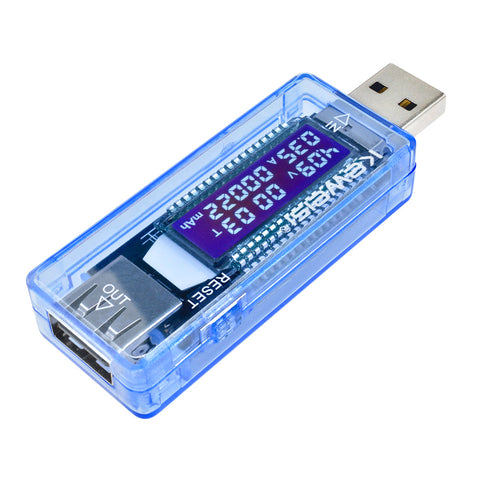 Translation missing: en.products.product.regular_price $7.99{"id":4360742797383,"title":"W1308 110V 220V 10A Digital Red+Blue LED Display Thermostat Alarm Controller","handle":"w1308-ac-100-240v-10a-digital-temperature-controller-thermostat","description":"\u003cdiv\u003e\u003cspan id=\"result_box\" lang=\"en\"\u003e\u003cstrong\u003eInstructions\u003c\/strong\u003e\u003cbr\u003e1. Connect the power supply and load according to the instructions. Be careful not to overpressure and overload!\u003cbr\u003e2. Setting mode, long press SET for 5 seconds will display P0 Short press SET to set H (red light) to heating mode C (green light) to cooling mode\u003cbr\u003e3. Set the stop temperature, press the SET screen once. Press the up and down keys to directly set the desired temperature.\u003cbr\u003e4. ENT is the confirmation button. Press and hold this button to realize the function of power on\/off.\u003cbr\u003e\u003cbr\u003e\u003cstrong\u003eTechnical parameters:\u003c\/strong\u003e\u003cbr\u003eTemperature control range: -50 to 120 ° C\u003cbr\u003eResolution: -9.9 to 99.9 hours 0.1 °C Other temperature range 1 °C\u003cbr\u003eTemperature measurement accuracy: 0.2% FS\u003cbr\u003eTemperature control accuracy: 0.1 °C\u003cbr\u003eRefresh rate: 2 times \/ sec\u003cbr\u003eInput power: 12V-24V-220V optional (see purchase parameters)\u003cbr\u003eMeasurement input: NTC10K (B3950) 1 meter waterproof sensor\u003cbr\u003eOutput type: relay output, maximum capacity 10A\u003cbr\u003eEnvironmental requirements: -30 ~ 60 ° C humidity 20% - 85%\u003cbr\u003eMachine size: 100*48*28mm\u003cbr\u003eOpening size: 27*22mm\u003c\/span\u003e\u003c\/div\u003e\n\u003cdiv\u003e\u003cspan\u003e\u003cstrong\u003e\u003cspan lang=\"en\"\u003e\u003cspan id=\"result_box\" lang=\"en\"\u003eThe Parameter Function Description:\u003c\/span\u003e\u003c\/span\u003e\u003c\/strong\u003e\u003c\/span\u003e\u003c\/div\u003e\n\u003cdiv\u003e\u003cspan\u003e\u003cspan lang=\"en\"\u003e\u003cspan id=\"result_box\" lang=\"en\"\u003ePress and hold SET for 5 seconds to enter the internal parameter setting, press the up and down keys to switch P0...P8 Press ENT to confirm the return.\u003cimg src=\"https:\/\/pg-cdn-a2.datacaciques.com\/00\/NDAy\/18\/11\/02\/qlrvj98eok4d5t50\/ae2959708795fc37.png\"\u003e\u003c\/span\u003e\u003c\/span\u003e\u003c\/span\u003e\u003c\/div\u003e\n\u003cdiv\u003e\n\u003cdiv id=\"gt-res-content\"\u003e\n\u003cdiv id=\"gt-res-dir-ctr\" dir=\"ltr\"\u003e\u003cspan id=\"result_box\" lang=\"en\"\u003e\u003cspan title=\"P0制冷、加热模式\n\"\u003e\u003cstrong\u003eP0 cooling and heating mode\u003c\/strong\u003e\u003cbr\u003e\u003c\/span\u003e\u003cspan title=\"高温启动为制冷模式请设置为C\n\"\u003eHigh temperature start for cooling mode, please set to C\u003cbr\u003e\u003c\/span\u003e\u003cspan title=\"低温启动为加热模式请设置为H\n\"\u003eLow temperature start for heating mode, please set to H\u003cbr\u003e\u003c\/span\u003e\u003cspan title=\"P1回差设定\n\"\u003e\u003cstrong\u003eP1 hysteresis setting\u003c\/strong\u003e\u003cbr\u003e\u003c\/span\u003e\u003cspan title=\"加热模式(H)下:测量值≤设定值—回差时启动输出加热到设定值停止\n\"\u003eIn heating mode (H): measured value ≤ set value - start output heating to set value stop when returning\u003cbr\u003e\u003c\/span\u003e\u003cspan title=\"制冷模式(C)下,测量值≥设定值+回差时启动输出制冷到设定值停止\n\"\u003eIn cooling mode (C), when the measured value ≥ set value + hysteresis, the output cooling is started to the set value stop.\u003cbr\u003e\u003c\/span\u003e\u003cstrong\u003e\u003cspan title=\"P2限定最高设定值(非控温设定)\n\"\u003eP2 limits the maximum setting (non-temperature setting)\u003cbr\u003e\u003c\/span\u003e\u003cspan title=\"P3限定最低设定值(非控温设定)\n\"\u003eP3 defines the lowest set value (non-temperature control setting)\u003cbr\u003e\u003c\/span\u003e\u003c\/strong\u003e\u003cspan title=\"P4温度校正\n\"\u003e\u003cstrong\u003eP4 temperature correction\u003c\/strong\u003e\u003cbr\u003e\u003c\/span\u003e\u003cspan title=\"当测量温度和标准温度有偏差时,可以使用此功能校正,校正后的温度=校正前的温度+校正值\n\"\u003eWhen the measured temperature deviates from the standard temperature, this function can be used to correct the corrected temperature = temperature before correction + correction value\u003cbr\u003e\u003c\/span\u003e\u003cspan title=\"P5延时启动时间 (单位:分钟)\n\"\u003e\u003cstrong\u003eP5 delay start time (unit: minute)\u003c\/strong\u003e\u003cbr\u003e\u003c\/span\u003e\u003cspan title=\"当控制压缩机设备制冷时,可根据需要设定延时时间,当控制器输出时设备不会立即启动,需要运行完设定的延时时间后启动\n\"\u003eWhen controlling the cooling of the compressor equipment, the delay time can be set as needed. When the controller outputs, the equipment will not start immediately, and it needs to start after the set delay time.\u003cbr\u003e\u003c\/span\u003e\u003cspan title=\"P6高温报警\n\"\u003e\u003cstrong\u003eP6 high temperature alarm\u003c\/strong\u003e\u003cbr\u003e\u003c\/span\u003e\u003cspan title=\"当测量值大于此值屏都显示--并滴演声报警。\"\u003eWhen the measured value is greater than this value, the screen is displayed -- and the sound alarm is dropped.\u003cspan\u003e \u003c\/span\u003e\u003c\/span\u003e\u003cspan title=\"同时强制断开输出\n\"\u003eSimultaneously disconnect the output\u003cbr\u003e\u003c\/span\u003e\u003cspan title=\"P7数据锁功使\n\"\u003e\u003cstrong\u003eP7 data lock function\u003c\/strong\u003e\u003cbr\u003e\u003c\/span\u003e\u003cspan title=\"开启数据锁,可以保持当前设定不被改动,此时设置温度和功能都无效,如需修改,需关闭数据频功能\n\"\u003eTurn on the data lock to keep the current settings from being changed. At this time, the setting temperature and function are invalid. If you need to modify it, you need to turn off the data frequency function.\u003cbr\u003e\u003c\/span\u003e\u003cspan title=\"P8恢复出厂设置\n\"\u003e\u003cstrong\u003eP8 factory reset\u003c\/strong\u003e\u003cbr\u003e\u003c\/span\u003e\u003cspan title=\"长按SET切换到P8,按次SET设置为on,按ENT恢复出厂设置\n\"\u003eLong press SET to switch to P8, press SET to set to on, press ENT to restore factory settings\u003cbr\u003e\u003c\/span\u003e\u003cspan title=\"也可按住+ -键不放开机自检和恢复出厂设定\"\u003eYou can also press and hold the + - button to disable the POST and restore the factory settings.\u003c\/span\u003e\u003cspan title=\"\"\u003e\u003c\/span\u003e\u003c\/span\u003e\u003c\/div\u003e\n\u003cdiv dir=\"ltr\"\u003e\u003cspan lang=\"en\"\u003e\u003cspan title=\"也可按住+ -键不放开机自检和恢复出厂设定\"\u003e \u003c\/span\u003e\u003c\/span\u003e\u003c\/div\u003e\n\u003cdiv dir=\"ltr\"\u003e\u003cspan lang=\"en\"\u003e\u003cspan id=\"result_box\" lang=\"en\"\u003e\u003cstrong\u003eInstructions for using:\u003c\/strong\u003e\u003cbr\u003ePlease connect the power supply according to the parameters and wiring diagram, and connect the cooling or heating equipment to the output.\u003cbr\u003eEnter the internal setting as needed to select the heating (into PO selection H) or cooling (into PO selection C) mode to set the temperature method, press the SET screen once, press the upper and lower to set the desired temperature, press ENT to confirm the OUT indicator of the return panel. Light: Blinking indicates cooling or heating start delay, always on indicates output\u003cbr\u003eDigital tube: Display LLL for sensor open circuit: display HHH is out of measurement range, thermostat will force power off, display --- for high temperature alarm.\u003c\/span\u003e\u003c\/span\u003e\u003c\/div\u003e\n\u003cdiv dir=\"ltr\"\u003e\u003cspan lang=\"en\"\u003e \u003c\/span\u003e\u003c\/div\u003e\n\u003cdiv dir=\"ltr\"\u003e\u003cstrong\u003e\u003cspan lang=\"en\"\u003e\u003cspan id=\"result_box\" lang=\"en\"\u003eSchematic Diagram:\u003c\/span\u003e\u003c\/span\u003e\u003c\/strong\u003e\u003c\/div\u003e\n\u003cdiv dir=\"ltr\"\u003e\u003cspan lang=\"en\"\u003e\u003cstrong\u003e\u003cimg src=\"https:\/\/pg-cdn-a2.datacaciques.com\/00\/NDAy\/19\/01\/12\/b7r74m86z1992b8p\/4f95d4b966b784c7.jpg\" width=\"553\" height=\"553\"\u003e\u003cimg src=\"https:\/\/pg-cdn-a2.datacaciques.com\/00\/NDAy\/19\/01\/12\/b7r74m86z1992b8p\/dbd4729ba3375d9b.jpg\" width=\"547\" height=\"547\"\u003e\u003c\/strong\u003e\u003c\/span\u003e\u003c\/div\u003e\n\u003cdiv dir=\"ltr\"\u003e\n\u003cspan lang=\"en\"\u003e \u003c\/span\u003e\u003cspan lang=\"en\"\u003e\u003cstrong\u003e\u003cimg src=\"https:\/\/pg-cdn-a2.datacaciques.com\/00\/NDAy\/18\/11\/02\/z6f718h9b39hpdqc\/3f00bf7f9405aa12.jpg\" width=\"517\" height=\"519\"\u003e\u003cimg src=\"https:\/\/pg-cdn-a2.datacaciques.com\/00\/NDAy\/19\/04\/01\/3ui760nq9b0r2612\/36e62941144bb7ac.jpg\" caption=\"false\" width=\"487\" height=\"487\"\u003e\u003c\/strong\u003e\u003c\/span\u003e\n\u003c\/div\u003e\n\u003cdiv dir=\"ltr\"\u003e\u003cspan lang=\"en\"\u003e\u003cstrong\u003eNotice:\u003c\/strong\u003e\u003cbr\u003e1. Input terminal is connected to the power supply. +V is the positive GND is the negative pole. Do not exceed the range according to the type of power supply.\u003cbr\u003e2, the output type is relay output, the load needs to be connected in series at the output, the maximum capacity is 10A\u003cbr\u003e3. After connecting the line, you must first set the cooling or heating. When finished, press the SET screen when the temperature is normally displayed. Press the up and down to set the required stop temperature.\u003cbr\u003e4. Before starting the machine, press and hold the power up and down to release the factory to restore the factory settings.\u003c\/span\u003e\u003c\/div\u003e\n\u003c\/div\u003e\n\u003c\/div\u003e\n\u003cdiv\u003e\u003cspan\u003e\u003cstrong\u003e\u003cspan lang=\"en\"\u003ePackage Included:\u003c\/span\u003e\u003c\/strong\u003e\u003cspan lang=\"en\"\u003e1PC*W1308 110V 220V 10A Digital Red+Blue LED Display Thermostat Alarm Controller\u003c\/span\u003e\u003c\/span\u003e\u003c\/div\u003e","published_at":"2019-11-18T15:54:03+08:00","created_at":"2019-11-18T16:13:14+08:00","vendor":"diymore","type":"Thermostat","tags":[],"price":999,"price_min":999,"price_max":999,"available":true,"price_varies":false,"compare_at_price":null,"compare_at_price_min":0,"compare_at_price_max":0,"compare_at_price_varies":false,"variants":[{"id":31275759534151,"title":"Default Title","option1":"Default Title","option2":null,"option3":null,"sku":"X13327","requires_shipping":true,"taxable":true,"featured_image":null,"available":true,"name":"W1308 110V 220V 10A Digital Red+Blue LED Display Thermostat Alarm Controller","public_title":null,"options":["Default Title"],"price":999,"weight":0,"compare_at_price":null,"inventory_management":null,"barcode":"","requires_selling_plan":false,"selling_plan_allocations":[]}],"images":["\/\/www.diymore.cc\/cdn\/shop\/products\/X13327_4_759.jpg?v=1588668174","\/\/www.diymore.cc\/cdn\/shop\/products\/X13327_7_718.jpg?v=1588668174","\/\/www.diymore.cc\/cdn\/shop\/products\/X13327_1_484.jpg?v=1588668174","\/\/www.diymore.cc\/cdn\/shop\/products\/X13327_5_561.jpg?v=1588668174","\/\/www.diymore.cc\/cdn\/shop\/products\/X13327_10_804.jpg?v=1588668174","\/\/www.diymore.cc\/cdn\/shop\/products\/X13327_14_203.jpg?v=1588668174"],"featured_image":"\/\/www.diymore.cc\/cdn\/shop\/products\/X13327_4_759.jpg?v=1588668174","options":["Title"],"media":[{"alt":"W1308 110V 220V 10A Digital Red+Blue Led Display Thermostat Alarm Controller","id":6679844356167,"position":1,"preview_image":{"aspect_ratio":1.0,"height":1000,"width":1000,"src":"\/\/www.diymore.cc\/cdn\/shop\/products\/X13327_4_759.jpg?v=1588668174"},"aspect_ratio":1.0,"height":1000,"media_type":"image","src":"\/\/www.diymore.cc\/cdn\/shop\/products\/X13327_4_759.jpg?v=1588668174","width":1000},{"alt":"W1308 110V 220V 10A Digital Red+Blue Led Display Thermostat Alarm Controller","id":6679844520007,"position":2,"preview_image":{"aspect_ratio":1.0,"height":1000,"width":1000,"src":"\/\/www.diymore.cc\/cdn\/shop\/products\/X13327_7_718.jpg?v=1588668174"},"aspect_ratio":1.0,"height":1000,"media_type":"image","src":"\/\/www.diymore.cc\/cdn\/shop\/products\/X13327_7_718.jpg?v=1588668174","width":1000},{"alt":"W1308 110V 220V 10A Digital Red+Blue Led Display Thermostat Alarm Controller","id":6679845306439,"position":3,"preview_image":{"aspect_ratio":1.0,"height":1000,"width":1000,"src":"\/\/www.diymore.cc\/cdn\/shop\/products\/X13327_1_484.jpg?v=1588668174"},"aspect_ratio":1.0,"height":1000,"media_type":"image","src":"\/\/www.diymore.cc\/cdn\/shop\/products\/X13327_1_484.jpg?v=1588668174","width":1000},{"alt":"W1308 110V 220V 10A Digital Red+Blue Led Display Thermostat Alarm Controller","id":6679845666887,"position":4,"preview_image":{"aspect_ratio":1.0,"height":1000,"width":1000,"src":"\/\/www.diymore.cc\/cdn\/shop\/products\/X13327_5_561.jpg?v=1588668174"},"aspect_ratio":1.0,"height":1000,"media_type":"image","src":"\/\/www.diymore.cc\/cdn\/shop\/products\/X13327_5_561.jpg?v=1588668174","width":1000},{"alt":"W1308 110V 220V 10A Digital Red+Blue Led Display Thermostat Alarm Controller","id":6679845797959,"position":5,"preview_image":{"aspect_ratio":1.0,"height":1000,"width":1000,"src":"\/\/www.diymore.cc\/cdn\/shop\/products\/X13327_10_804.jpg?v=1588668174"},"aspect_ratio":1.0,"height":1000,"media_type":"image","src":"\/\/www.diymore.cc\/cdn\/shop\/products\/X13327_10_804.jpg?v=1588668174","width":1000},{"alt":"W1308 110V 220V 10A Digital Red+Blue Led Display Thermostat Alarm Controller","id":6679846322247,"position":6,"preview_image":{"aspect_ratio":1.0,"height":1000,"width":1000,"src":"\/\/www.diymore.cc\/cdn\/shop\/products\/X13327_14_203.jpg?v=1588668174"},"aspect_ratio":1.0,"height":1000,"media_type":"image","src":"\/\/www.diymore.cc\/cdn\/shop\/products\/X13327_14_203.jpg?v=1588668174","width":1000}],"requires_selling_plan":false,"selling_plan_groups":[],"content":"\u003cdiv\u003e\u003cspan id=\"result_box\" lang=\"en\"\u003e\u003cstrong\u003eInstructions\u003c\/strong\u003e\u003cbr\u003e1. Connect the power supply and load according to the instructions. Be careful not to overpressure and overload!\u003cbr\u003e2. Setting mode, long press SET for 5 seconds will display P0 Short press SET to set H (red light) to heating mode C (green light) to cooling mode\u003cbr\u003e3. Set the stop temperature, press the SET screen once. Press the up and down keys to directly set the desired temperature.\u003cbr\u003e4. ENT is the confirmation button. Press and hold this button to realize the function of power on\/off.\u003cbr\u003e\u003cbr\u003e\u003cstrong\u003eTechnical parameters:\u003c\/strong\u003e\u003cbr\u003eTemperature control range: -50 to 120 ° C\u003cbr\u003eResolution: -9.9 to 99.9 hours 0.1 °C Other temperature range 1 °C\u003cbr\u003eTemperature measurement accuracy: 0.2% FS\u003cbr\u003eTemperature control accuracy: 0.1 °C\u003cbr\u003eRefresh rate: 2 times \/ sec\u003cbr\u003eInput power: 12V-24V-220V optional (see purchase parameters)\u003cbr\u003eMeasurement input: NTC10K (B3950) 1 meter waterproof sensor\u003cbr\u003eOutput type: relay output, maximum capacity 10A\u003cbr\u003eEnvironmental requirements: -30 ~ 60 ° C humidity 20% - 85%\u003cbr\u003eMachine size: 100*48*28mm\u003cbr\u003eOpening size: 27*22mm\u003c\/span\u003e\u003c\/div\u003e\n\u003cdiv\u003e\u003cspan\u003e\u003cstrong\u003e\u003cspan lang=\"en\"\u003e\u003cspan id=\"result_box\" lang=\"en\"\u003eThe Parameter Function Description:\u003c\/span\u003e\u003c\/span\u003e\u003c\/strong\u003e\u003c\/span\u003e\u003c\/div\u003e\n\u003cdiv\u003e\u003cspan\u003e\u003cspan lang=\"en\"\u003e\u003cspan id=\"result_box\" lang=\"en\"\u003ePress and hold SET for 5 seconds to enter the internal parameter setting, press the up and down keys to switch P0...P8 Press ENT to confirm the return.\u003cimg src=\"https:\/\/pg-cdn-a2.datacaciques.com\/00\/NDAy\/18\/11\/02\/qlrvj98eok4d5t50\/ae2959708795fc37.png\"\u003e\u003c\/span\u003e\u003c\/span\u003e\u003c\/span\u003e\u003c\/div\u003e\n\u003cdiv\u003e\n\u003cdiv id=\"gt-res-content\"\u003e\n\u003cdiv id=\"gt-res-dir-ctr\" dir=\"ltr\"\u003e\u003cspan id=\"result_box\" lang=\"en\"\u003e\u003cspan title=\"P0制冷、加热模式\n\"\u003e\u003cstrong\u003eP0 cooling and heating mode\u003c\/strong\u003e\u003cbr\u003e\u003c\/span\u003e\u003cspan title=\"高温启动为制冷模式请设置为C\n\"\u003eHigh temperature start for cooling mode, please set to C\u003cbr\u003e\u003c\/span\u003e\u003cspan title=\"低温启动为加热模式请设置为H\n\"\u003eLow temperature start for heating mode, please set to H\u003cbr\u003e\u003c\/span\u003e\u003cspan title=\"P1回差设定\n\"\u003e\u003cstrong\u003eP1 hysteresis setting\u003c\/strong\u003e\u003cbr\u003e\u003c\/span\u003e\u003cspan title=\"加热模式(H)下:测量值≤设定值—回差时启动输出加热到设定值停止\n\"\u003eIn heating mode (H): measured value ≤ set value - start output heating to set value stop when returning\u003cbr\u003e\u003c\/span\u003e\u003cspan title=\"制冷模式(C)下,测量值≥设定值+回差时启动输出制冷到设定值停止\n\"\u003eIn cooling mode (C), when the measured value ≥ set value + hysteresis, the output cooling is started to the set value stop.\u003cbr\u003e\u003c\/span\u003e\u003cstrong\u003e\u003cspan title=\"P2限定最高设定值(非控温设定)\n\"\u003eP2 limits the maximum setting (non-temperature setting)\u003cbr\u003e\u003c\/span\u003e\u003cspan title=\"P3限定最低设定值(非控温设定)\n\"\u003eP3 defines the lowest set value (non-temperature control setting)\u003cbr\u003e\u003c\/span\u003e\u003c\/strong\u003e\u003cspan title=\"P4温度校正\n\"\u003e\u003cstrong\u003eP4 temperature correction\u003c\/strong\u003e\u003cbr\u003e\u003c\/span\u003e\u003cspan title=\"当测量温度和标准温度有偏差时,可以使用此功能校正,校正后的温度=校正前的温度+校正值\n\"\u003eWhen the measured temperature deviates from the standard temperature, this function can be used to correct the corrected temperature = temperature before correction + correction value\u003cbr\u003e\u003c\/span\u003e\u003cspan title=\"P5延时启动时间 (单位:分钟)\n\"\u003e\u003cstrong\u003eP5 delay start time (unit: minute)\u003c\/strong\u003e\u003cbr\u003e\u003c\/span\u003e\u003cspan title=\"当控制压缩机设备制冷时,可根据需要设定延时时间,当控制器输出时设备不会立即启动,需要运行完设定的延时时间后启动\n\"\u003eWhen controlling the cooling of the compressor equipment, the delay time can be set as needed. When the controller outputs, the equipment will not start immediately, and it needs to start after the set delay time.\u003cbr\u003e\u003c\/span\u003e\u003cspan title=\"P6高温报警\n\"\u003e\u003cstrong\u003eP6 high temperature alarm\u003c\/strong\u003e\u003cbr\u003e\u003c\/span\u003e\u003cspan title=\"当测量值大于此值屏都显示--并滴演声报警。\"\u003eWhen the measured value is greater than this value, the screen is displayed -- and the sound alarm is dropped.\u003cspan\u003e \u003c\/span\u003e\u003c\/span\u003e\u003cspan title=\"同时强制断开输出\n\"\u003eSimultaneously disconnect the output\u003cbr\u003e\u003c\/span\u003e\u003cspan title=\"P7数据锁功使\n\"\u003e\u003cstrong\u003eP7 data lock function\u003c\/strong\u003e\u003cbr\u003e\u003c\/span\u003e\u003cspan title=\"开启数据锁,可以保持当前设定不被改动,此时设置温度和功能都无效,如需修改,需关闭数据频功能\n\"\u003eTurn on the data lock to keep the current settings from being changed. At this time, the setting temperature and function are invalid. If you need to modify it, you need to turn off the data frequency function.\u003cbr\u003e\u003c\/span\u003e\u003cspan title=\"P8恢复出厂设置\n\"\u003e\u003cstrong\u003eP8 factory reset\u003c\/strong\u003e\u003cbr\u003e\u003c\/span\u003e\u003cspan title=\"长按SET切换到P8,按次SET设置为on,按ENT恢复出厂设置\n\"\u003eLong press SET to switch to P8, press SET to set to on, press ENT to restore factory settings\u003cbr\u003e\u003c\/span\u003e\u003cspan title=\"也可按住+ -键不放开机自检和恢复出厂设定\"\u003eYou can also press and hold the + - button to disable the POST and restore the factory settings.\u003c\/span\u003e\u003cspan title=\"\"\u003e\u003c\/span\u003e\u003c\/span\u003e\u003c\/div\u003e\n\u003cdiv dir=\"ltr\"\u003e\u003cspan lang=\"en\"\u003e\u003cspan title=\"也可按住+ -键不放开机自检和恢复出厂设定\"\u003e \u003c\/span\u003e\u003c\/span\u003e\u003c\/div\u003e\n\u003cdiv dir=\"ltr\"\u003e\u003cspan lang=\"en\"\u003e\u003cspan id=\"result_box\" lang=\"en\"\u003e\u003cstrong\u003eInstructions for using:\u003c\/strong\u003e\u003cbr\u003ePlease connect the power supply according to the parameters and wiring diagram, and connect the cooling or heating equipment to the output.\u003cbr\u003eEnter the internal setting as needed to select the heating (into PO selection H) or cooling (into PO selection C) mode to set the temperature method, press the SET screen once, press the upper and lower to set the desired temperature, press ENT to confirm the OUT indicator of the return panel. Light: Blinking indicates cooling or heating start delay, always on indicates output\u003cbr\u003eDigital tube: Display LLL for sensor open circuit: display HHH is out of measurement range, thermostat will force power off, display --- for high temperature alarm.\u003c\/span\u003e\u003c\/span\u003e\u003c\/div\u003e\n\u003cdiv dir=\"ltr\"\u003e\u003cspan lang=\"en\"\u003e \u003c\/span\u003e\u003c\/div\u003e\n\u003cdiv dir=\"ltr\"\u003e\u003cstrong\u003e\u003cspan lang=\"en\"\u003e\u003cspan id=\"result_box\" lang=\"en\"\u003eSchematic Diagram:\u003c\/span\u003e\u003c\/span\u003e\u003c\/strong\u003e\u003c\/div\u003e\n\u003cdiv dir=\"ltr\"\u003e\u003cspan lang=\"en\"\u003e\u003cstrong\u003e\u003cimg src=\"https:\/\/pg-cdn-a2.datacaciques.com\/00\/NDAy\/19\/01\/12\/b7r74m86z1992b8p\/4f95d4b966b784c7.jpg\" width=\"553\" height=\"553\"\u003e\u003cimg src=\"https:\/\/pg-cdn-a2.datacaciques.com\/00\/NDAy\/19\/01\/12\/b7r74m86z1992b8p\/dbd4729ba3375d9b.jpg\" width=\"547\" height=\"547\"\u003e\u003c\/strong\u003e\u003c\/span\u003e\u003c\/div\u003e\n\u003cdiv dir=\"ltr\"\u003e\n\u003cspan lang=\"en\"\u003e \u003c\/span\u003e\u003cspan lang=\"en\"\u003e\u003cstrong\u003e\u003cimg src=\"https:\/\/pg-cdn-a2.datacaciques.com\/00\/NDAy\/18\/11\/02\/z6f718h9b39hpdqc\/3f00bf7f9405aa12.jpg\" width=\"517\" height=\"519\"\u003e\u003cimg src=\"https:\/\/pg-cdn-a2.datacaciques.com\/00\/NDAy\/19\/04\/01\/3ui760nq9b0r2612\/36e62941144bb7ac.jpg\" caption=\"false\" width=\"487\" height=\"487\"\u003e\u003c\/strong\u003e\u003c\/span\u003e\n\u003c\/div\u003e\n\u003cdiv dir=\"ltr\"\u003e\u003cspan lang=\"en\"\u003e\u003cstrong\u003eNotice:\u003c\/strong\u003e\u003cbr\u003e1. Input terminal is connected to the power supply. +V is the positive GND is the negative pole. Do not exceed the range according to the type of power supply.\u003cbr\u003e2, the output type is relay output, the load needs to be connected in series at the output, the maximum capacity is 10A\u003cbr\u003e3. After connecting the line, you must first set the cooling or heating. When finished, press the SET screen when the temperature is normally displayed. Press the up and down to set the required stop temperature.\u003cbr\u003e4. Before starting the machine, press and hold the power up and down to release the factory to restore the factory settings.\u003c\/span\u003e\u003c\/div\u003e\n\u003c\/div\u003e\n\u003c\/div\u003e\n\u003cdiv\u003e\u003cspan\u003e\u003cstrong\u003e\u003cspan lang=\"en\"\u003ePackage Included:\u003c\/span\u003e\u003c\/strong\u003e\u003cspan lang=\"en\"\u003e1PC*W1308 110V 220V 10A Digital Red+Blue LED Display Thermostat Alarm Controller\u003c\/span\u003e\u003c\/span\u003e\u003c\/div\u003e"}
 -

 Translation missing: en.products.product.regular_price $5.99{"id":4360742797383,"title":"W1308 110V 220V 10A Digital Red+Blue LED Display Thermostat Alarm Controller","handle":"w1308-ac-100-240v-10a-digital-temperature-controller-thermostat","description":"\u003cdiv\u003e\u003cspan id=\"result_box\" lang=\"en\"\u003e\u003cstrong\u003eInstructions\u003c\/strong\u003e\u003cbr\u003e1. Connect the power supply and load according to the instructions. Be careful not to overpressure and overload!\u003cbr\u003e2. Setting mode, long press SET for 5 seconds will display P0 Short press SET to set H (red light) to heating mode C (green light) to cooling mode\u003cbr\u003e3. Set the stop temperature, press the SET screen once. Press the up and down keys to directly set the desired temperature.\u003cbr\u003e4. ENT is the confirmation button. Press and hold this button to realize the function of power on\/off.\u003cbr\u003e\u003cbr\u003e\u003cstrong\u003eTechnical parameters:\u003c\/strong\u003e\u003cbr\u003eTemperature control range: -50 to 120 ° C\u003cbr\u003eResolution: -9.9 to 99.9 hours 0.1 °C Other temperature range 1 °C\u003cbr\u003eTemperature measurement accuracy: 0.2% FS\u003cbr\u003eTemperature control accuracy: 0.1 °C\u003cbr\u003eRefresh rate: 2 times \/ sec\u003cbr\u003eInput power: 12V-24V-220V optional (see purchase parameters)\u003cbr\u003eMeasurement input: NTC10K (B3950) 1 meter waterproof sensor\u003cbr\u003eOutput type: relay output, maximum capacity 10A\u003cbr\u003eEnvironmental requirements: -30 ~ 60 ° C humidity 20% - 85%\u003cbr\u003eMachine size: 100*48*28mm\u003cbr\u003eOpening size: 27*22mm\u003c\/span\u003e\u003c\/div\u003e\n\u003cdiv\u003e\u003cspan\u003e\u003cstrong\u003e\u003cspan lang=\"en\"\u003e\u003cspan id=\"result_box\" lang=\"en\"\u003eThe Parameter Function Description:\u003c\/span\u003e\u003c\/span\u003e\u003c\/strong\u003e\u003c\/span\u003e\u003c\/div\u003e\n\u003cdiv\u003e\u003cspan\u003e\u003cspan lang=\"en\"\u003e\u003cspan id=\"result_box\" lang=\"en\"\u003ePress and hold SET for 5 seconds to enter the internal parameter setting, press the up and down keys to switch P0...P8 Press ENT to confirm the return.\u003cimg src=\"https:\/\/pg-cdn-a2.datacaciques.com\/00\/NDAy\/18\/11\/02\/qlrvj98eok4d5t50\/ae2959708795fc37.png\"\u003e\u003c\/span\u003e\u003c\/span\u003e\u003c\/span\u003e\u003c\/div\u003e\n\u003cdiv\u003e\n\u003cdiv id=\"gt-res-content\"\u003e\n\u003cdiv id=\"gt-res-dir-ctr\" dir=\"ltr\"\u003e\u003cspan id=\"result_box\" lang=\"en\"\u003e\u003cspan title=\"P0制冷、加热模式\n\"\u003e\u003cstrong\u003eP0 cooling and heating mode\u003c\/strong\u003e\u003cbr\u003e\u003c\/span\u003e\u003cspan title=\"高温启动为制冷模式请设置为C\n\"\u003eHigh temperature start for cooling mode, please set to C\u003cbr\u003e\u003c\/span\u003e\u003cspan title=\"低温启动为加热模式请设置为H\n\"\u003eLow temperature start for heating mode, please set to H\u003cbr\u003e\u003c\/span\u003e\u003cspan title=\"P1回差设定\n\"\u003e\u003cstrong\u003eP1 hysteresis setting\u003c\/strong\u003e\u003cbr\u003e\u003c\/span\u003e\u003cspan title=\"加热模式(H)下:测量值≤设定值—回差时启动输出加热到设定值停止\n\"\u003eIn heating mode (H): measured value ≤ set value - start output heating to set value stop when returning\u003cbr\u003e\u003c\/span\u003e\u003cspan title=\"制冷模式(C)下,测量值≥设定值+回差时启动输出制冷到设定值停止\n\"\u003eIn cooling mode (C), when the measured value ≥ set value + hysteresis, the output cooling is started to the set value stop.\u003cbr\u003e\u003c\/span\u003e\u003cstrong\u003e\u003cspan title=\"P2限定最高设定值(非控温设定)\n\"\u003eP2 limits the maximum setting (non-temperature setting)\u003cbr\u003e\u003c\/span\u003e\u003cspan title=\"P3限定最低设定值(非控温设定)\n\"\u003eP3 defines the lowest set value (non-temperature control setting)\u003cbr\u003e\u003c\/span\u003e\u003c\/strong\u003e\u003cspan title=\"P4温度校正\n\"\u003e\u003cstrong\u003eP4 temperature correction\u003c\/strong\u003e\u003cbr\u003e\u003c\/span\u003e\u003cspan title=\"当测量温度和标准温度有偏差时,可以使用此功能校正,校正后的温度=校正前的温度+校正值\n\"\u003eWhen the measured temperature deviates from the standard temperature, this function can be used to correct the corrected temperature = temperature before correction + correction value\u003cbr\u003e\u003c\/span\u003e\u003cspan title=\"P5延时启动时间 (单位:分钟)\n\"\u003e\u003cstrong\u003eP5 delay start time (unit: minute)\u003c\/strong\u003e\u003cbr\u003e\u003c\/span\u003e\u003cspan title=\"当控制压缩机设备制冷时,可根据需要设定延时时间,当控制器输出时设备不会立即启动,需要运行完设定的延时时间后启动\n\"\u003eWhen controlling the cooling of the compressor equipment, the delay time can be set as needed. When the controller outputs, the equipment will not start immediately, and it needs to start after the set delay time.\u003cbr\u003e\u003c\/span\u003e\u003cspan title=\"P6高温报警\n\"\u003e\u003cstrong\u003eP6 high temperature alarm\u003c\/strong\u003e\u003cbr\u003e\u003c\/span\u003e\u003cspan title=\"当测量值大于此值屏都显示--并滴演声报警。\"\u003eWhen the measured value is greater than this value, the screen is displayed -- and the sound alarm is dropped.\u003cspan\u003e \u003c\/span\u003e\u003c\/span\u003e\u003cspan title=\"同时强制断开输出\n\"\u003eSimultaneously disconnect the output\u003cbr\u003e\u003c\/span\u003e\u003cspan title=\"P7数据锁功使\n\"\u003e\u003cstrong\u003eP7 data lock function\u003c\/strong\u003e\u003cbr\u003e\u003c\/span\u003e\u003cspan title=\"开启数据锁,可以保持当前设定不被改动,此时设置温度和功能都无效,如需修改,需关闭数据频功能\n\"\u003eTurn on the data lock to keep the current settings from being changed. At this time, the setting temperature and function are invalid. If you need to modify it, you need to turn off the data frequency function.\u003cbr\u003e\u003c\/span\u003e\u003cspan title=\"P8恢复出厂设置\n\"\u003e\u003cstrong\u003eP8 factory reset\u003c\/strong\u003e\u003cbr\u003e\u003c\/span\u003e\u003cspan title=\"长按SET切换到P8,按次SET设置为on,按ENT恢复出厂设置\n\"\u003eLong press SET to switch to P8, press SET to set to on, press ENT to restore factory settings\u003cbr\u003e\u003c\/span\u003e\u003cspan title=\"也可按住+ -键不放开机自检和恢复出厂设定\"\u003eYou can also press and hold the + - button to disable the POST and restore the factory settings.\u003c\/span\u003e\u003cspan title=\"\"\u003e\u003c\/span\u003e\u003c\/span\u003e\u003c\/div\u003e\n\u003cdiv dir=\"ltr\"\u003e\u003cspan lang=\"en\"\u003e\u003cspan title=\"也可按住+ -键不放开机自检和恢复出厂设定\"\u003e \u003c\/span\u003e\u003c\/span\u003e\u003c\/div\u003e\n\u003cdiv dir=\"ltr\"\u003e\u003cspan lang=\"en\"\u003e\u003cspan id=\"result_box\" lang=\"en\"\u003e\u003cstrong\u003eInstructions for using:\u003c\/strong\u003e\u003cbr\u003ePlease connect the power supply according to the parameters and wiring diagram, and connect the cooling or heating equipment to the output.\u003cbr\u003eEnter the internal setting as needed to select the heating (into PO selection H) or cooling (into PO selection C) mode to set the temperature method, press the SET screen once, press the upper and lower to set the desired temperature, press ENT to confirm the OUT indicator of the return panel. Light: Blinking indicates cooling or heating start delay, always on indicates output\u003cbr\u003eDigital tube: Display LLL for sensor open circuit: display HHH is out of measurement range, thermostat will force power off, display --- for high temperature alarm.\u003c\/span\u003e\u003c\/span\u003e\u003c\/div\u003e\n\u003cdiv dir=\"ltr\"\u003e\u003cspan lang=\"en\"\u003e \u003c\/span\u003e\u003c\/div\u003e\n\u003cdiv dir=\"ltr\"\u003e\u003cstrong\u003e\u003cspan lang=\"en\"\u003e\u003cspan id=\"result_box\" lang=\"en\"\u003eSchematic Diagram:\u003c\/span\u003e\u003c\/span\u003e\u003c\/strong\u003e\u003c\/div\u003e\n\u003cdiv dir=\"ltr\"\u003e\u003cspan lang=\"en\"\u003e\u003cstrong\u003e\u003cimg src=\"https:\/\/pg-cdn-a2.datacaciques.com\/00\/NDAy\/19\/01\/12\/b7r74m86z1992b8p\/4f95d4b966b784c7.jpg\" width=\"553\" height=\"553\"\u003e\u003cimg src=\"https:\/\/pg-cdn-a2.datacaciques.com\/00\/NDAy\/19\/01\/12\/b7r74m86z1992b8p\/dbd4729ba3375d9b.jpg\" width=\"547\" height=\"547\"\u003e\u003c\/strong\u003e\u003c\/span\u003e\u003c\/div\u003e\n\u003cdiv dir=\"ltr\"\u003e\n\u003cspan lang=\"en\"\u003e \u003c\/span\u003e\u003cspan lang=\"en\"\u003e\u003cstrong\u003e\u003cimg src=\"https:\/\/pg-cdn-a2.datacaciques.com\/00\/NDAy\/18\/11\/02\/z6f718h9b39hpdqc\/3f00bf7f9405aa12.jpg\" width=\"517\" height=\"519\"\u003e\u003cimg src=\"https:\/\/pg-cdn-a2.datacaciques.com\/00\/NDAy\/19\/04\/01\/3ui760nq9b0r2612\/36e62941144bb7ac.jpg\" caption=\"false\" width=\"487\" height=\"487\"\u003e\u003c\/strong\u003e\u003c\/span\u003e\n\u003c\/div\u003e\n\u003cdiv dir=\"ltr\"\u003e\u003cspan lang=\"en\"\u003e\u003cstrong\u003eNotice:\u003c\/strong\u003e\u003cbr\u003e1. Input terminal is connected to the power supply. +V is the positive GND is the negative pole. Do not exceed the range according to the type of power supply.\u003cbr\u003e2, the output type is relay output, the load needs to be connected in series at the output, the maximum capacity is 10A\u003cbr\u003e3. After connecting the line, you must first set the cooling or heating. When finished, press the SET screen when the temperature is normally displayed. Press the up and down to set the required stop temperature.\u003cbr\u003e4. Before starting the machine, press and hold the power up and down to release the factory to restore the factory settings.\u003c\/span\u003e\u003c\/div\u003e\n\u003c\/div\u003e\n\u003c\/div\u003e\n\u003cdiv\u003e\u003cspan\u003e\u003cstrong\u003e\u003cspan lang=\"en\"\u003ePackage Included:\u003c\/span\u003e\u003c\/strong\u003e\u003cspan lang=\"en\"\u003e1PC*W1308 110V 220V 10A Digital Red+Blue LED Display Thermostat Alarm Controller\u003c\/span\u003e\u003c\/span\u003e\u003c\/div\u003e","published_at":"2019-11-18T15:54:03+08:00","created_at":"2019-11-18T16:13:14+08:00","vendor":"diymore","type":"Thermostat","tags":[],"price":999,"price_min":999,"price_max":999,"available":true,"price_varies":false,"compare_at_price":null,"compare_at_price_min":0,"compare_at_price_max":0,"compare_at_price_varies":false,"variants":[{"id":31275759534151,"title":"Default Title","option1":"Default Title","option2":null,"option3":null,"sku":"X13327","requires_shipping":true,"taxable":true,"featured_image":null,"available":true,"name":"W1308 110V 220V 10A Digital Red+Blue LED Display Thermostat Alarm Controller","public_title":null,"options":["Default Title"],"price":999,"weight":0,"compare_at_price":null,"inventory_management":null,"barcode":"","requires_selling_plan":false,"selling_plan_allocations":[]}],"images":["\/\/www.diymore.cc\/cdn\/shop\/products\/X13327_4_759.jpg?v=1588668174","\/\/www.diymore.cc\/cdn\/shop\/products\/X13327_7_718.jpg?v=1588668174","\/\/www.diymore.cc\/cdn\/shop\/products\/X13327_1_484.jpg?v=1588668174","\/\/www.diymore.cc\/cdn\/shop\/products\/X13327_5_561.jpg?v=1588668174","\/\/www.diymore.cc\/cdn\/shop\/products\/X13327_10_804.jpg?v=1588668174","\/\/www.diymore.cc\/cdn\/shop\/products\/X13327_14_203.jpg?v=1588668174"],"featured_image":"\/\/www.diymore.cc\/cdn\/shop\/products\/X13327_4_759.jpg?v=1588668174","options":["Title"],"media":[{"alt":"W1308 110V 220V 10A Digital Red+Blue Led Display Thermostat Alarm Controller","id":6679844356167,"position":1,"preview_image":{"aspect_ratio":1.0,"height":1000,"width":1000,"src":"\/\/www.diymore.cc\/cdn\/shop\/products\/X13327_4_759.jpg?v=1588668174"},"aspect_ratio":1.0,"height":1000,"media_type":"image","src":"\/\/www.diymore.cc\/cdn\/shop\/products\/X13327_4_759.jpg?v=1588668174","width":1000},{"alt":"W1308 110V 220V 10A Digital Red+Blue Led Display Thermostat Alarm Controller","id":6679844520007,"position":2,"preview_image":{"aspect_ratio":1.0,"height":1000,"width":1000,"src":"\/\/www.diymore.cc\/cdn\/shop\/products\/X13327_7_718.jpg?v=1588668174"},"aspect_ratio":1.0,"height":1000,"media_type":"image","src":"\/\/www.diymore.cc\/cdn\/shop\/products\/X13327_7_718.jpg?v=1588668174","width":1000},{"alt":"W1308 110V 220V 10A Digital Red+Blue Led Display Thermostat Alarm Controller","id":6679845306439,"position":3,"preview_image":{"aspect_ratio":1.0,"height":1000,"width":1000,"src":"\/\/www.diymore.cc\/cdn\/shop\/products\/X13327_1_484.jpg?v=1588668174"},"aspect_ratio":1.0,"height":1000,"media_type":"image","src":"\/\/www.diymore.cc\/cdn\/shop\/products\/X13327_1_484.jpg?v=1588668174","width":1000},{"alt":"W1308 110V 220V 10A Digital Red+Blue Led Display Thermostat Alarm Controller","id":6679845666887,"position":4,"preview_image":{"aspect_ratio":1.0,"height":1000,"width":1000,"src":"\/\/www.diymore.cc\/cdn\/shop\/products\/X13327_5_561.jpg?v=1588668174"},"aspect_ratio":1.0,"height":1000,"media_type":"image","src":"\/\/www.diymore.cc\/cdn\/shop\/products\/X13327_5_561.jpg?v=1588668174","width":1000},{"alt":"W1308 110V 220V 10A Digital Red+Blue Led Display Thermostat Alarm Controller","id":6679845797959,"position":5,"preview_image":{"aspect_ratio":1.0,"height":1000,"width":1000,"src":"\/\/www.diymore.cc\/cdn\/shop\/products\/X13327_10_804.jpg?v=1588668174"},"aspect_ratio":1.0,"height":1000,"media_type":"image","src":"\/\/www.diymore.cc\/cdn\/shop\/products\/X13327_10_804.jpg?v=1588668174","width":1000},{"alt":"W1308 110V 220V 10A Digital Red+Blue Led Display Thermostat Alarm Controller","id":6679846322247,"position":6,"preview_image":{"aspect_ratio":1.0,"height":1000,"width":1000,"src":"\/\/www.diymore.cc\/cdn\/shop\/products\/X13327_14_203.jpg?v=1588668174"},"aspect_ratio":1.0,"height":1000,"media_type":"image","src":"\/\/www.diymore.cc\/cdn\/shop\/products\/X13327_14_203.jpg?v=1588668174","width":1000}],"requires_selling_plan":false,"selling_plan_groups":[],"content":"\u003cdiv\u003e\u003cspan id=\"result_box\" lang=\"en\"\u003e\u003cstrong\u003eInstructions\u003c\/strong\u003e\u003cbr\u003e1. Connect the power supply and load according to the instructions. Be careful not to overpressure and overload!\u003cbr\u003e2. Setting mode, long press SET for 5 seconds will display P0 Short press SET to set H (red light) to heating mode C (green light) to cooling mode\u003cbr\u003e3. Set the stop temperature, press the SET screen once. Press the up and down keys to directly set the desired temperature.\u003cbr\u003e4. ENT is the confirmation button. Press and hold this button to realize the function of power on\/off.\u003cbr\u003e\u003cbr\u003e\u003cstrong\u003eTechnical parameters:\u003c\/strong\u003e\u003cbr\u003eTemperature control range: -50 to 120 ° C\u003cbr\u003eResolution: -9.9 to 99.9 hours 0.1 °C Other temperature range 1 °C\u003cbr\u003eTemperature measurement accuracy: 0.2% FS\u003cbr\u003eTemperature control accuracy: 0.1 °C\u003cbr\u003eRefresh rate: 2 times \/ sec\u003cbr\u003eInput power: 12V-24V-220V optional (see purchase parameters)\u003cbr\u003eMeasurement input: NTC10K (B3950) 1 meter waterproof sensor\u003cbr\u003eOutput type: relay output, maximum capacity 10A\u003cbr\u003eEnvironmental requirements: -30 ~ 60 ° C humidity 20% - 85%\u003cbr\u003eMachine size: 100*48*28mm\u003cbr\u003eOpening size: 27*22mm\u003c\/span\u003e\u003c\/div\u003e\n\u003cdiv\u003e\u003cspan\u003e\u003cstrong\u003e\u003cspan lang=\"en\"\u003e\u003cspan id=\"result_box\" lang=\"en\"\u003eThe Parameter Function Description:\u003c\/span\u003e\u003c\/span\u003e\u003c\/strong\u003e\u003c\/span\u003e\u003c\/div\u003e\n\u003cdiv\u003e\u003cspan\u003e\u003cspan lang=\"en\"\u003e\u003cspan id=\"result_box\" lang=\"en\"\u003ePress and hold SET for 5 seconds to enter the internal parameter setting, press the up and down keys to switch P0...P8 Press ENT to confirm the return.\u003cimg src=\"https:\/\/pg-cdn-a2.datacaciques.com\/00\/NDAy\/18\/11\/02\/qlrvj98eok4d5t50\/ae2959708795fc37.png\"\u003e\u003c\/span\u003e\u003c\/span\u003e\u003c\/span\u003e\u003c\/div\u003e\n\u003cdiv\u003e\n\u003cdiv id=\"gt-res-content\"\u003e\n\u003cdiv id=\"gt-res-dir-ctr\" dir=\"ltr\"\u003e\u003cspan id=\"result_box\" lang=\"en\"\u003e\u003cspan title=\"P0制冷、加热模式\n\"\u003e\u003cstrong\u003eP0 cooling and heating mode\u003c\/strong\u003e\u003cbr\u003e\u003c\/span\u003e\u003cspan title=\"高温启动为制冷模式请设置为C\n\"\u003eHigh temperature start for cooling mode, please set to C\u003cbr\u003e\u003c\/span\u003e\u003cspan title=\"低温启动为加热模式请设置为H\n\"\u003eLow temperature start for heating mode, please set to H\u003cbr\u003e\u003c\/span\u003e\u003cspan title=\"P1回差设定\n\"\u003e\u003cstrong\u003eP1 hysteresis setting\u003c\/strong\u003e\u003cbr\u003e\u003c\/span\u003e\u003cspan title=\"加热模式(H)下:测量值≤设定值—回差时启动输出加热到设定值停止\n\"\u003eIn heating mode (H): measured value ≤ set value - start output heating to set value stop when returning\u003cbr\u003e\u003c\/span\u003e\u003cspan title=\"制冷模式(C)下,测量值≥设定值+回差时启动输出制冷到设定值停止\n\"\u003eIn cooling mode (C), when the measured value ≥ set value + hysteresis, the output cooling is started to the set value stop.\u003cbr\u003e\u003c\/span\u003e\u003cstrong\u003e\u003cspan title=\"P2限定最高设定值(非控温设定)\n\"\u003eP2 limits the maximum setting (non-temperature setting)\u003cbr\u003e\u003c\/span\u003e\u003cspan title=\"P3限定最低设定值(非控温设定)\n\"\u003eP3 defines the lowest set value (non-temperature control setting)\u003cbr\u003e\u003c\/span\u003e\u003c\/strong\u003e\u003cspan title=\"P4温度校正\n\"\u003e\u003cstrong\u003eP4 temperature correction\u003c\/strong\u003e\u003cbr\u003e\u003c\/span\u003e\u003cspan title=\"当测量温度和标准温度有偏差时,可以使用此功能校正,校正后的温度=校正前的温度+校正值\n\"\u003eWhen the measured temperature deviates from the standard temperature, this function can be used to correct the corrected temperature = temperature before correction + correction value\u003cbr\u003e\u003c\/span\u003e\u003cspan title=\"P5延时启动时间 (单位:分钟)\n\"\u003e\u003cstrong\u003eP5 delay start time (unit: minute)\u003c\/strong\u003e\u003cbr\u003e\u003c\/span\u003e\u003cspan title=\"当控制压缩机设备制冷时,可根据需要设定延时时间,当控制器输出时设备不会立即启动,需要运行完设定的延时时间后启动\n\"\u003eWhen controlling the cooling of the compressor equipment, the delay time can be set as needed. When the controller outputs, the equipment will not start immediately, and it needs to start after the set delay time.\u003cbr\u003e\u003c\/span\u003e\u003cspan title=\"P6高温报警\n\"\u003e\u003cstrong\u003eP6 high temperature alarm\u003c\/strong\u003e\u003cbr\u003e\u003c\/span\u003e\u003cspan title=\"当测量值大于此值屏都显示--并滴演声报警。\"\u003eWhen the measured value is greater than this value, the screen is displayed -- and the sound alarm is dropped.\u003cspan\u003e \u003c\/span\u003e\u003c\/span\u003e\u003cspan title=\"同时强制断开输出\n\"\u003eSimultaneously disconnect the output\u003cbr\u003e\u003c\/span\u003e\u003cspan title=\"P7数据锁功使\n\"\u003e\u003cstrong\u003eP7 data lock function\u003c\/strong\u003e\u003cbr\u003e\u003c\/span\u003e\u003cspan title=\"开启数据锁,可以保持当前设定不被改动,此时设置温度和功能都无效,如需修改,需关闭数据频功能\n\"\u003eTurn on the data lock to keep the current settings from being changed. At this time, the setting temperature and function are invalid. If you need to modify it, you need to turn off the data frequency function.\u003cbr\u003e\u003c\/span\u003e\u003cspan title=\"P8恢复出厂设置\n\"\u003e\u003cstrong\u003eP8 factory reset\u003c\/strong\u003e\u003cbr\u003e\u003c\/span\u003e\u003cspan title=\"长按SET切换到P8,按次SET设置为on,按ENT恢复出厂设置\n\"\u003eLong press SET to switch to P8, press SET to set to on, press ENT to restore factory settings\u003cbr\u003e\u003c\/span\u003e\u003cspan title=\"也可按住+ -键不放开机自检和恢复出厂设定\"\u003eYou can also press and hold the + - button to disable the POST and restore the factory settings.\u003c\/span\u003e\u003cspan title=\"\"\u003e\u003c\/span\u003e\u003c\/span\u003e\u003c\/div\u003e\n\u003cdiv dir=\"ltr\"\u003e\u003cspan lang=\"en\"\u003e\u003cspan title=\"也可按住+ -键不放开机自检和恢复出厂设定\"\u003e \u003c\/span\u003e\u003c\/span\u003e\u003c\/div\u003e\n\u003cdiv dir=\"ltr\"\u003e\u003cspan lang=\"en\"\u003e\u003cspan id=\"result_box\" lang=\"en\"\u003e\u003cstrong\u003eInstructions for using:\u003c\/strong\u003e\u003cbr\u003ePlease connect the power supply according to the parameters and wiring diagram, and connect the cooling or heating equipment to the output.\u003cbr\u003eEnter the internal setting as needed to select the heating (into PO selection H) or cooling (into PO selection C) mode to set the temperature method, press the SET screen once, press the upper and lower to set the desired temperature, press ENT to confirm the OUT indicator of the return panel. Light: Blinking indicates cooling or heating start delay, always on indicates output\u003cbr\u003eDigital tube: Display LLL for sensor open circuit: display HHH is out of measurement range, thermostat will force power off, display --- for high temperature alarm.\u003c\/span\u003e\u003c\/span\u003e\u003c\/div\u003e\n\u003cdiv dir=\"ltr\"\u003e\u003cspan lang=\"en\"\u003e \u003c\/span\u003e\u003c\/div\u003e\n\u003cdiv dir=\"ltr\"\u003e\u003cstrong\u003e\u003cspan lang=\"en\"\u003e\u003cspan id=\"result_box\" lang=\"en\"\u003eSchematic Diagram:\u003c\/span\u003e\u003c\/span\u003e\u003c\/strong\u003e\u003c\/div\u003e\n\u003cdiv dir=\"ltr\"\u003e\u003cspan lang=\"en\"\u003e\u003cstrong\u003e\u003cimg src=\"https:\/\/pg-cdn-a2.datacaciques.com\/00\/NDAy\/19\/01\/12\/b7r74m86z1992b8p\/4f95d4b966b784c7.jpg\" width=\"553\" height=\"553\"\u003e\u003cimg src=\"https:\/\/pg-cdn-a2.datacaciques.com\/00\/NDAy\/19\/01\/12\/b7r74m86z1992b8p\/dbd4729ba3375d9b.jpg\" width=\"547\" height=\"547\"\u003e\u003c\/strong\u003e\u003c\/span\u003e\u003c\/div\u003e\n\u003cdiv dir=\"ltr\"\u003e\n\u003cspan lang=\"en\"\u003e \u003c\/span\u003e\u003cspan lang=\"en\"\u003e\u003cstrong\u003e\u003cimg src=\"https:\/\/pg-cdn-a2.datacaciques.com\/00\/NDAy\/18\/11\/02\/z6f718h9b39hpdqc\/3f00bf7f9405aa12.jpg\" width=\"517\" height=\"519\"\u003e\u003cimg src=\"https:\/\/pg-cdn-a2.datacaciques.com\/00\/NDAy\/19\/04\/01\/3ui760nq9b0r2612\/36e62941144bb7ac.jpg\" caption=\"false\" width=\"487\" height=\"487\"\u003e\u003c\/strong\u003e\u003c\/span\u003e\n\u003c\/div\u003e\n\u003cdiv dir=\"ltr\"\u003e\u003cspan lang=\"en\"\u003e\u003cstrong\u003eNotice:\u003c\/strong\u003e\u003cbr\u003e1. Input terminal is connected to the power supply. +V is the positive GND is the negative pole. Do not exceed the range according to the type of power supply.\u003cbr\u003e2, the output type is relay output, the load needs to be connected in series at the output, the maximum capacity is 10A\u003cbr\u003e3. After connecting the line, you must first set the cooling or heating. When finished, press the SET screen when the temperature is normally displayed. Press the up and down to set the required stop temperature.\u003cbr\u003e4. Before starting the machine, press and hold the power up and down to release the factory to restore the factory settings.\u003c\/span\u003e\u003c\/div\u003e\n\u003c\/div\u003e\n\u003c\/div\u003e\n\u003cdiv\u003e\u003cspan\u003e\u003cstrong\u003e\u003cspan lang=\"en\"\u003ePackage Included:\u003c\/span\u003e\u003c\/strong\u003e\u003cspan lang=\"en\"\u003e1PC*W1308 110V 220V 10A Digital Red+Blue LED Display Thermostat Alarm Controller\u003c\/span\u003e\u003c\/span\u003e\u003c\/div\u003e"}
 -
 Translation missing: en.products.product.regular_price $8.99{"id":4360742797383,"title":"W1308 110V 220V 10A Digital Red+Blue LED Display Thermostat Alarm Controller","handle":"w1308-ac-100-240v-10a-digital-temperature-controller-thermostat","description":"\u003cdiv\u003e\u003cspan id=\"result_box\" lang=\"en\"\u003e\u003cstrong\u003eInstructions\u003c\/strong\u003e\u003cbr\u003e1. Connect the power supply and load according to the instructions. Be careful not to overpressure and overload!\u003cbr\u003e2. Setting mode, long press SET for 5 seconds will display P0 Short press SET to set H (red light) to heating mode C (green light) to cooling mode\u003cbr\u003e3. Set the stop temperature, press the SET screen once. Press the up and down keys to directly set the desired temperature.\u003cbr\u003e4. ENT is the confirmation button. Press and hold this button to realize the function of power on\/off.\u003cbr\u003e\u003cbr\u003e\u003cstrong\u003eTechnical parameters:\u003c\/strong\u003e\u003cbr\u003eTemperature control range: -50 to 120 ° C\u003cbr\u003eResolution: -9.9 to 99.9 hours 0.1 °C Other temperature range 1 °C\u003cbr\u003eTemperature measurement accuracy: 0.2% FS\u003cbr\u003eTemperature control accuracy: 0.1 °C\u003cbr\u003eRefresh rate: 2 times \/ sec\u003cbr\u003eInput power: 12V-24V-220V optional (see purchase parameters)\u003cbr\u003eMeasurement input: NTC10K (B3950) 1 meter waterproof sensor\u003cbr\u003eOutput type: relay output, maximum capacity 10A\u003cbr\u003eEnvironmental requirements: -30 ~ 60 ° C humidity 20% - 85%\u003cbr\u003eMachine size: 100*48*28mm\u003cbr\u003eOpening size: 27*22mm\u003c\/span\u003e\u003c\/div\u003e\n\u003cdiv\u003e\u003cspan\u003e\u003cstrong\u003e\u003cspan lang=\"en\"\u003e\u003cspan id=\"result_box\" lang=\"en\"\u003eThe Parameter Function Description:\u003c\/span\u003e\u003c\/span\u003e\u003c\/strong\u003e\u003c\/span\u003e\u003c\/div\u003e\n\u003cdiv\u003e\u003cspan\u003e\u003cspan lang=\"en\"\u003e\u003cspan id=\"result_box\" lang=\"en\"\u003ePress and hold SET for 5 seconds to enter the internal parameter setting, press the up and down keys to switch P0...P8 Press ENT to confirm the return.\u003cimg src=\"https:\/\/pg-cdn-a2.datacaciques.com\/00\/NDAy\/18\/11\/02\/qlrvj98eok4d5t50\/ae2959708795fc37.png\"\u003e\u003c\/span\u003e\u003c\/span\u003e\u003c\/span\u003e\u003c\/div\u003e\n\u003cdiv\u003e\n\u003cdiv id=\"gt-res-content\"\u003e\n\u003cdiv id=\"gt-res-dir-ctr\" dir=\"ltr\"\u003e\u003cspan id=\"result_box\" lang=\"en\"\u003e\u003cspan title=\"P0制冷、加热模式\n\"\u003e\u003cstrong\u003eP0 cooling and heating mode\u003c\/strong\u003e\u003cbr\u003e\u003c\/span\u003e\u003cspan title=\"高温启动为制冷模式请设置为C\n\"\u003eHigh temperature start for cooling mode, please set to C\u003cbr\u003e\u003c\/span\u003e\u003cspan title=\"低温启动为加热模式请设置为H\n\"\u003eLow temperature start for heating mode, please set to H\u003cbr\u003e\u003c\/span\u003e\u003cspan title=\"P1回差设定\n\"\u003e\u003cstrong\u003eP1 hysteresis setting\u003c\/strong\u003e\u003cbr\u003e\u003c\/span\u003e\u003cspan title=\"加热模式(H)下:测量值≤设定值—回差时启动输出加热到设定值停止\n\"\u003eIn heating mode (H): measured value ≤ set value - start output heating to set value stop when returning\u003cbr\u003e\u003c\/span\u003e\u003cspan title=\"制冷模式(C)下,测量值≥设定值+回差时启动输出制冷到设定值停止\n\"\u003eIn cooling mode (C), when the measured value ≥ set value + hysteresis, the output cooling is started to the set value stop.\u003cbr\u003e\u003c\/span\u003e\u003cstrong\u003e\u003cspan title=\"P2限定最高设定值(非控温设定)\n\"\u003eP2 limits the maximum setting (non-temperature setting)\u003cbr\u003e\u003c\/span\u003e\u003cspan title=\"P3限定最低设定值(非控温设定)\n\"\u003eP3 defines the lowest set value (non-temperature control setting)\u003cbr\u003e\u003c\/span\u003e\u003c\/strong\u003e\u003cspan title=\"P4温度校正\n\"\u003e\u003cstrong\u003eP4 temperature correction\u003c\/strong\u003e\u003cbr\u003e\u003c\/span\u003e\u003cspan title=\"当测量温度和标准温度有偏差时,可以使用此功能校正,校正后的温度=校正前的温度+校正值\n\"\u003eWhen the measured temperature deviates from the standard temperature, this function can be used to correct the corrected temperature = temperature before correction + correction value\u003cbr\u003e\u003c\/span\u003e\u003cspan title=\"P5延时启动时间 (单位:分钟)\n\"\u003e\u003cstrong\u003eP5 delay start time (unit: minute)\u003c\/strong\u003e\u003cbr\u003e\u003c\/span\u003e\u003cspan title=\"当控制压缩机设备制冷时,可根据需要设定延时时间,当控制器输出时设备不会立即启动,需要运行完设定的延时时间后启动\n\"\u003eWhen controlling the cooling of the compressor equipment, the delay time can be set as needed. When the controller outputs, the equipment will not start immediately, and it needs to start after the set delay time.\u003cbr\u003e\u003c\/span\u003e\u003cspan title=\"P6高温报警\n\"\u003e\u003cstrong\u003eP6 high temperature alarm\u003c\/strong\u003e\u003cbr\u003e\u003c\/span\u003e\u003cspan title=\"当测量值大于此值屏都显示--并滴演声报警。\"\u003eWhen the measured value is greater than this value, the screen is displayed -- and the sound alarm is dropped.\u003cspan\u003e \u003c\/span\u003e\u003c\/span\u003e\u003cspan title=\"同时强制断开输出\n\"\u003eSimultaneously disconnect the output\u003cbr\u003e\u003c\/span\u003e\u003cspan title=\"P7数据锁功使\n\"\u003e\u003cstrong\u003eP7 data lock function\u003c\/strong\u003e\u003cbr\u003e\u003c\/span\u003e\u003cspan title=\"开启数据锁,可以保持当前设定不被改动,此时设置温度和功能都无效,如需修改,需关闭数据频功能\n\"\u003eTurn on the data lock to keep the current settings from being changed. At this time, the setting temperature and function are invalid. If you need to modify it, you need to turn off the data frequency function.\u003cbr\u003e\u003c\/span\u003e\u003cspan title=\"P8恢复出厂设置\n\"\u003e\u003cstrong\u003eP8 factory reset\u003c\/strong\u003e\u003cbr\u003e\u003c\/span\u003e\u003cspan title=\"长按SET切换到P8,按次SET设置为on,按ENT恢复出厂设置\n\"\u003eLong press SET to switch to P8, press SET to set to on, press ENT to restore factory settings\u003cbr\u003e\u003c\/span\u003e\u003cspan title=\"也可按住+ -键不放开机自检和恢复出厂设定\"\u003eYou can also press and hold the + - button to disable the POST and restore the factory settings.\u003c\/span\u003e\u003cspan title=\"\"\u003e\u003c\/span\u003e\u003c\/span\u003e\u003c\/div\u003e\n\u003cdiv dir=\"ltr\"\u003e\u003cspan lang=\"en\"\u003e\u003cspan title=\"也可按住+ -键不放开机自检和恢复出厂设定\"\u003e \u003c\/span\u003e\u003c\/span\u003e\u003c\/div\u003e\n\u003cdiv dir=\"ltr\"\u003e\u003cspan lang=\"en\"\u003e\u003cspan id=\"result_box\" lang=\"en\"\u003e\u003cstrong\u003eInstructions for using:\u003c\/strong\u003e\u003cbr\u003ePlease connect the power supply according to the parameters and wiring diagram, and connect the cooling or heating equipment to the output.\u003cbr\u003eEnter the internal setting as needed to select the heating (into PO selection H) or cooling (into PO selection C) mode to set the temperature method, press the SET screen once, press the upper and lower to set the desired temperature, press ENT to confirm the OUT indicator of the return panel. Light: Blinking indicates cooling or heating start delay, always on indicates output\u003cbr\u003eDigital tube: Display LLL for sensor open circuit: display HHH is out of measurement range, thermostat will force power off, display --- for high temperature alarm.\u003c\/span\u003e\u003c\/span\u003e\u003c\/div\u003e\n\u003cdiv dir=\"ltr\"\u003e\u003cspan lang=\"en\"\u003e \u003c\/span\u003e\u003c\/div\u003e\n\u003cdiv dir=\"ltr\"\u003e\u003cstrong\u003e\u003cspan lang=\"en\"\u003e\u003cspan id=\"result_box\" lang=\"en\"\u003eSchematic Diagram:\u003c\/span\u003e\u003c\/span\u003e\u003c\/strong\u003e\u003c\/div\u003e\n\u003cdiv dir=\"ltr\"\u003e\u003cspan lang=\"en\"\u003e\u003cstrong\u003e\u003cimg src=\"https:\/\/pg-cdn-a2.datacaciques.com\/00\/NDAy\/19\/01\/12\/b7r74m86z1992b8p\/4f95d4b966b784c7.jpg\" width=\"553\" height=\"553\"\u003e\u003cimg src=\"https:\/\/pg-cdn-a2.datacaciques.com\/00\/NDAy\/19\/01\/12\/b7r74m86z1992b8p\/dbd4729ba3375d9b.jpg\" width=\"547\" height=\"547\"\u003e\u003c\/strong\u003e\u003c\/span\u003e\u003c\/div\u003e\n\u003cdiv dir=\"ltr\"\u003e\n\u003cspan lang=\"en\"\u003e \u003c\/span\u003e\u003cspan lang=\"en\"\u003e\u003cstrong\u003e\u003cimg src=\"https:\/\/pg-cdn-a2.datacaciques.com\/00\/NDAy\/18\/11\/02\/z6f718h9b39hpdqc\/3f00bf7f9405aa12.jpg\" width=\"517\" height=\"519\"\u003e\u003cimg src=\"https:\/\/pg-cdn-a2.datacaciques.com\/00\/NDAy\/19\/04\/01\/3ui760nq9b0r2612\/36e62941144bb7ac.jpg\" caption=\"false\" width=\"487\" height=\"487\"\u003e\u003c\/strong\u003e\u003c\/span\u003e\n\u003c\/div\u003e\n\u003cdiv dir=\"ltr\"\u003e\u003cspan lang=\"en\"\u003e\u003cstrong\u003eNotice:\u003c\/strong\u003e\u003cbr\u003e1. Input terminal is connected to the power supply. +V is the positive GND is the negative pole. Do not exceed the range according to the type of power supply.\u003cbr\u003e2, the output type is relay output, the load needs to be connected in series at the output, the maximum capacity is 10A\u003cbr\u003e3. After connecting the line, you must first set the cooling or heating. When finished, press the SET screen when the temperature is normally displayed. Press the up and down to set the required stop temperature.\u003cbr\u003e4. Before starting the machine, press and hold the power up and down to release the factory to restore the factory settings.\u003c\/span\u003e\u003c\/div\u003e\n\u003c\/div\u003e\n\u003c\/div\u003e\n\u003cdiv\u003e\u003cspan\u003e\u003cstrong\u003e\u003cspan lang=\"en\"\u003ePackage Included:\u003c\/span\u003e\u003c\/strong\u003e\u003cspan lang=\"en\"\u003e1PC*W1308 110V 220V 10A Digital Red+Blue LED Display Thermostat Alarm Controller\u003c\/span\u003e\u003c\/span\u003e\u003c\/div\u003e","published_at":"2019-11-18T15:54:03+08:00","created_at":"2019-11-18T16:13:14+08:00","vendor":"diymore","type":"Thermostat","tags":[],"price":999,"price_min":999,"price_max":999,"available":true,"price_varies":false,"compare_at_price":null,"compare_at_price_min":0,"compare_at_price_max":0,"compare_at_price_varies":false,"variants":[{"id":31275759534151,"title":"Default Title","option1":"Default Title","option2":null,"option3":null,"sku":"X13327","requires_shipping":true,"taxable":true,"featured_image":null,"available":true,"name":"W1308 110V 220V 10A Digital Red+Blue LED Display Thermostat Alarm Controller","public_title":null,"options":["Default Title"],"price":999,"weight":0,"compare_at_price":null,"inventory_management":null,"barcode":"","requires_selling_plan":false,"selling_plan_allocations":[]}],"images":["\/\/www.diymore.cc\/cdn\/shop\/products\/X13327_4_759.jpg?v=1588668174","\/\/www.diymore.cc\/cdn\/shop\/products\/X13327_7_718.jpg?v=1588668174","\/\/www.diymore.cc\/cdn\/shop\/products\/X13327_1_484.jpg?v=1588668174","\/\/www.diymore.cc\/cdn\/shop\/products\/X13327_5_561.jpg?v=1588668174","\/\/www.diymore.cc\/cdn\/shop\/products\/X13327_10_804.jpg?v=1588668174","\/\/www.diymore.cc\/cdn\/shop\/products\/X13327_14_203.jpg?v=1588668174"],"featured_image":"\/\/www.diymore.cc\/cdn\/shop\/products\/X13327_4_759.jpg?v=1588668174","options":["Title"],"media":[{"alt":"W1308 110V 220V 10A Digital Red+Blue Led Display Thermostat Alarm Controller","id":6679844356167,"position":1,"preview_image":{"aspect_ratio":1.0,"height":1000,"width":1000,"src":"\/\/www.diymore.cc\/cdn\/shop\/products\/X13327_4_759.jpg?v=1588668174"},"aspect_ratio":1.0,"height":1000,"media_type":"image","src":"\/\/www.diymore.cc\/cdn\/shop\/products\/X13327_4_759.jpg?v=1588668174","width":1000},{"alt":"W1308 110V 220V 10A Digital Red+Blue Led Display Thermostat Alarm Controller","id":6679844520007,"position":2,"preview_image":{"aspect_ratio":1.0,"height":1000,"width":1000,"src":"\/\/www.diymore.cc\/cdn\/shop\/products\/X13327_7_718.jpg?v=1588668174"},"aspect_ratio":1.0,"height":1000,"media_type":"image","src":"\/\/www.diymore.cc\/cdn\/shop\/products\/X13327_7_718.jpg?v=1588668174","width":1000},{"alt":"W1308 110V 220V 10A Digital Red+Blue Led Display Thermostat Alarm Controller","id":6679845306439,"position":3,"preview_image":{"aspect_ratio":1.0,"height":1000,"width":1000,"src":"\/\/www.diymore.cc\/cdn\/shop\/products\/X13327_1_484.jpg?v=1588668174"},"aspect_ratio":1.0,"height":1000,"media_type":"image","src":"\/\/www.diymore.cc\/cdn\/shop\/products\/X13327_1_484.jpg?v=1588668174","width":1000},{"alt":"W1308 110V 220V 10A Digital Red+Blue Led Display Thermostat Alarm Controller","id":6679845666887,"position":4,"preview_image":{"aspect_ratio":1.0,"height":1000,"width":1000,"src":"\/\/www.diymore.cc\/cdn\/shop\/products\/X13327_5_561.jpg?v=1588668174"},"aspect_ratio":1.0,"height":1000,"media_type":"image","src":"\/\/www.diymore.cc\/cdn\/shop\/products\/X13327_5_561.jpg?v=1588668174","width":1000},{"alt":"W1308 110V 220V 10A Digital Red+Blue Led Display Thermostat Alarm Controller","id":6679845797959,"position":5,"preview_image":{"aspect_ratio":1.0,"height":1000,"width":1000,"src":"\/\/www.diymore.cc\/cdn\/shop\/products\/X13327_10_804.jpg?v=1588668174"},"aspect_ratio":1.0,"height":1000,"media_type":"image","src":"\/\/www.diymore.cc\/cdn\/shop\/products\/X13327_10_804.jpg?v=1588668174","width":1000},{"alt":"W1308 110V 220V 10A Digital Red+Blue Led Display Thermostat Alarm Controller","id":6679846322247,"position":6,"preview_image":{"aspect_ratio":1.0,"height":1000,"width":1000,"src":"\/\/www.diymore.cc\/cdn\/shop\/products\/X13327_14_203.jpg?v=1588668174"},"aspect_ratio":1.0,"height":1000,"media_type":"image","src":"\/\/www.diymore.cc\/cdn\/shop\/products\/X13327_14_203.jpg?v=1588668174","width":1000}],"requires_selling_plan":false,"selling_plan_groups":[],"content":"\u003cdiv\u003e\u003cspan id=\"result_box\" lang=\"en\"\u003e\u003cstrong\u003eInstructions\u003c\/strong\u003e\u003cbr\u003e1. Connect the power supply and load according to the instructions. Be careful not to overpressure and overload!\u003cbr\u003e2. Setting mode, long press SET for 5 seconds will display P0 Short press SET to set H (red light) to heating mode C (green light) to cooling mode\u003cbr\u003e3. Set the stop temperature, press the SET screen once. Press the up and down keys to directly set the desired temperature.\u003cbr\u003e4. ENT is the confirmation button. Press and hold this button to realize the function of power on\/off.\u003cbr\u003e\u003cbr\u003e\u003cstrong\u003eTechnical parameters:\u003c\/strong\u003e\u003cbr\u003eTemperature control range: -50 to 120 ° C\u003cbr\u003eResolution: -9.9 to 99.9 hours 0.1 °C Other temperature range 1 °C\u003cbr\u003eTemperature measurement accuracy: 0.2% FS\u003cbr\u003eTemperature control accuracy: 0.1 °C\u003cbr\u003eRefresh rate: 2 times \/ sec\u003cbr\u003eInput power: 12V-24V-220V optional (see purchase parameters)\u003cbr\u003eMeasurement input: NTC10K (B3950) 1 meter waterproof sensor\u003cbr\u003eOutput type: relay output, maximum capacity 10A\u003cbr\u003eEnvironmental requirements: -30 ~ 60 ° C humidity 20% - 85%\u003cbr\u003eMachine size: 100*48*28mm\u003cbr\u003eOpening size: 27*22mm\u003c\/span\u003e\u003c\/div\u003e\n\u003cdiv\u003e\u003cspan\u003e\u003cstrong\u003e\u003cspan lang=\"en\"\u003e\u003cspan id=\"result_box\" lang=\"en\"\u003eThe Parameter Function Description:\u003c\/span\u003e\u003c\/span\u003e\u003c\/strong\u003e\u003c\/span\u003e\u003c\/div\u003e\n\u003cdiv\u003e\u003cspan\u003e\u003cspan lang=\"en\"\u003e\u003cspan id=\"result_box\" lang=\"en\"\u003ePress and hold SET for 5 seconds to enter the internal parameter setting, press the up and down keys to switch P0...P8 Press ENT to confirm the return.\u003cimg src=\"https:\/\/pg-cdn-a2.datacaciques.com\/00\/NDAy\/18\/11\/02\/qlrvj98eok4d5t50\/ae2959708795fc37.png\"\u003e\u003c\/span\u003e\u003c\/span\u003e\u003c\/span\u003e\u003c\/div\u003e\n\u003cdiv\u003e\n\u003cdiv id=\"gt-res-content\"\u003e\n\u003cdiv id=\"gt-res-dir-ctr\" dir=\"ltr\"\u003e\u003cspan id=\"result_box\" lang=\"en\"\u003e\u003cspan title=\"P0制冷、加热模式\n\"\u003e\u003cstrong\u003eP0 cooling and heating mode\u003c\/strong\u003e\u003cbr\u003e\u003c\/span\u003e\u003cspan title=\"高温启动为制冷模式请设置为C\n\"\u003eHigh temperature start for cooling mode, please set to C\u003cbr\u003e\u003c\/span\u003e\u003cspan title=\"低温启动为加热模式请设置为H\n\"\u003eLow temperature start for heating mode, please set to H\u003cbr\u003e\u003c\/span\u003e\u003cspan title=\"P1回差设定\n\"\u003e\u003cstrong\u003eP1 hysteresis setting\u003c\/strong\u003e\u003cbr\u003e\u003c\/span\u003e\u003cspan title=\"加热模式(H)下:测量值≤设定值—回差时启动输出加热到设定值停止\n\"\u003eIn heating mode (H): measured value ≤ set value - start output heating to set value stop when returning\u003cbr\u003e\u003c\/span\u003e\u003cspan title=\"制冷模式(C)下,测量值≥设定值+回差时启动输出制冷到设定值停止\n\"\u003eIn cooling mode (C), when the measured value ≥ set value + hysteresis, the output cooling is started to the set value stop.\u003cbr\u003e\u003c\/span\u003e\u003cstrong\u003e\u003cspan title=\"P2限定最高设定值(非控温设定)\n\"\u003eP2 limits the maximum setting (non-temperature setting)\u003cbr\u003e\u003c\/span\u003e\u003cspan title=\"P3限定最低设定值(非控温设定)\n\"\u003eP3 defines the lowest set value (non-temperature control setting)\u003cbr\u003e\u003c\/span\u003e\u003c\/strong\u003e\u003cspan title=\"P4温度校正\n\"\u003e\u003cstrong\u003eP4 temperature correction\u003c\/strong\u003e\u003cbr\u003e\u003c\/span\u003e\u003cspan title=\"当测量温度和标准温度有偏差时,可以使用此功能校正,校正后的温度=校正前的温度+校正值\n\"\u003eWhen the measured temperature deviates from the standard temperature, this function can be used to correct the corrected temperature = temperature before correction + correction value\u003cbr\u003e\u003c\/span\u003e\u003cspan title=\"P5延时启动时间 (单位:分钟)\n\"\u003e\u003cstrong\u003eP5 delay start time (unit: minute)\u003c\/strong\u003e\u003cbr\u003e\u003c\/span\u003e\u003cspan title=\"当控制压缩机设备制冷时,可根据需要设定延时时间,当控制器输出时设备不会立即启动,需要运行完设定的延时时间后启动\n\"\u003eWhen controlling the cooling of the compressor equipment, the delay time can be set as needed. When the controller outputs, the equipment will not start immediately, and it needs to start after the set delay time.\u003cbr\u003e\u003c\/span\u003e\u003cspan title=\"P6高温报警\n\"\u003e\u003cstrong\u003eP6 high temperature alarm\u003c\/strong\u003e\u003cbr\u003e\u003c\/span\u003e\u003cspan title=\"当测量值大于此值屏都显示--并滴演声报警。\"\u003eWhen the measured value is greater than this value, the screen is displayed -- and the sound alarm is dropped.\u003cspan\u003e \u003c\/span\u003e\u003c\/span\u003e\u003cspan title=\"同时强制断开输出\n\"\u003eSimultaneously disconnect the output\u003cbr\u003e\u003c\/span\u003e\u003cspan title=\"P7数据锁功使\n\"\u003e\u003cstrong\u003eP7 data lock function\u003c\/strong\u003e\u003cbr\u003e\u003c\/span\u003e\u003cspan title=\"开启数据锁,可以保持当前设定不被改动,此时设置温度和功能都无效,如需修改,需关闭数据频功能\n\"\u003eTurn on the data lock to keep the current settings from being changed. At this time, the setting temperature and function are invalid. If you need to modify it, you need to turn off the data frequency function.\u003cbr\u003e\u003c\/span\u003e\u003cspan title=\"P8恢复出厂设置\n\"\u003e\u003cstrong\u003eP8 factory reset\u003c\/strong\u003e\u003cbr\u003e\u003c\/span\u003e\u003cspan title=\"长按SET切换到P8,按次SET设置为on,按ENT恢复出厂设置\n\"\u003eLong press SET to switch to P8, press SET to set to on, press ENT to restore factory settings\u003cbr\u003e\u003c\/span\u003e\u003cspan title=\"也可按住+ -键不放开机自检和恢复出厂设定\"\u003eYou can also press and hold the + - button to disable the POST and restore the factory settings.\u003c\/span\u003e\u003cspan title=\"\"\u003e\u003c\/span\u003e\u003c\/span\u003e\u003c\/div\u003e\n\u003cdiv dir=\"ltr\"\u003e\u003cspan lang=\"en\"\u003e\u003cspan title=\"也可按住+ -键不放开机自检和恢复出厂设定\"\u003e \u003c\/span\u003e\u003c\/span\u003e\u003c\/div\u003e\n\u003cdiv dir=\"ltr\"\u003e\u003cspan lang=\"en\"\u003e\u003cspan id=\"result_box\" lang=\"en\"\u003e\u003cstrong\u003eInstructions for using:\u003c\/strong\u003e\u003cbr\u003ePlease connect the power supply according to the parameters and wiring diagram, and connect the cooling or heating equipment to the output.\u003cbr\u003eEnter the internal setting as needed to select the heating (into PO selection H) or cooling (into PO selection C) mode to set the temperature method, press the SET screen once, press the upper and lower to set the desired temperature, press ENT to confirm the OUT indicator of the return panel. Light: Blinking indicates cooling or heating start delay, always on indicates output\u003cbr\u003eDigital tube: Display LLL for sensor open circuit: display HHH is out of measurement range, thermostat will force power off, display --- for high temperature alarm.\u003c\/span\u003e\u003c\/span\u003e\u003c\/div\u003e\n\u003cdiv dir=\"ltr\"\u003e\u003cspan lang=\"en\"\u003e \u003c\/span\u003e\u003c\/div\u003e\n\u003cdiv dir=\"ltr\"\u003e\u003cstrong\u003e\u003cspan lang=\"en\"\u003e\u003cspan id=\"result_box\" lang=\"en\"\u003eSchematic Diagram:\u003c\/span\u003e\u003c\/span\u003e\u003c\/strong\u003e\u003c\/div\u003e\n\u003cdiv dir=\"ltr\"\u003e\u003cspan lang=\"en\"\u003e\u003cstrong\u003e\u003cimg src=\"https:\/\/pg-cdn-a2.datacaciques.com\/00\/NDAy\/19\/01\/12\/b7r74m86z1992b8p\/4f95d4b966b784c7.jpg\" width=\"553\" height=\"553\"\u003e\u003cimg src=\"https:\/\/pg-cdn-a2.datacaciques.com\/00\/NDAy\/19\/01\/12\/b7r74m86z1992b8p\/dbd4729ba3375d9b.jpg\" width=\"547\" height=\"547\"\u003e\u003c\/strong\u003e\u003c\/span\u003e\u003c\/div\u003e\n\u003cdiv dir=\"ltr\"\u003e\n\u003cspan lang=\"en\"\u003e \u003c\/span\u003e\u003cspan lang=\"en\"\u003e\u003cstrong\u003e\u003cimg src=\"https:\/\/pg-cdn-a2.datacaciques.com\/00\/NDAy\/18\/11\/02\/z6f718h9b39hpdqc\/3f00bf7f9405aa12.jpg\" width=\"517\" height=\"519\"\u003e\u003cimg src=\"https:\/\/pg-cdn-a2.datacaciques.com\/00\/NDAy\/19\/04\/01\/3ui760nq9b0r2612\/36e62941144bb7ac.jpg\" caption=\"false\" width=\"487\" height=\"487\"\u003e\u003c\/strong\u003e\u003c\/span\u003e\n\u003c\/div\u003e\n\u003cdiv dir=\"ltr\"\u003e\u003cspan lang=\"en\"\u003e\u003cstrong\u003eNotice:\u003c\/strong\u003e\u003cbr\u003e1. Input terminal is connected to the power supply. +V is the positive GND is the negative pole. Do not exceed the range according to the type of power supply.\u003cbr\u003e2, the output type is relay output, the load needs to be connected in series at the output, the maximum capacity is 10A\u003cbr\u003e3. After connecting the line, you must first set the cooling or heating. When finished, press the SET screen when the temperature is normally displayed. Press the up and down to set the required stop temperature.\u003cbr\u003e4. Before starting the machine, press and hold the power up and down to release the factory to restore the factory settings.\u003c\/span\u003e\u003c\/div\u003e\n\u003c\/div\u003e\n\u003c\/div\u003e\n\u003cdiv\u003e\u003cspan\u003e\u003cstrong\u003e\u003cspan lang=\"en\"\u003ePackage Included:\u003c\/span\u003e\u003c\/strong\u003e\u003cspan lang=\"en\"\u003e1PC*W1308 110V 220V 10A Digital Red+Blue LED Display Thermostat Alarm Controller\u003c\/span\u003e\u003c\/span\u003e\u003c\/div\u003e"}
 -
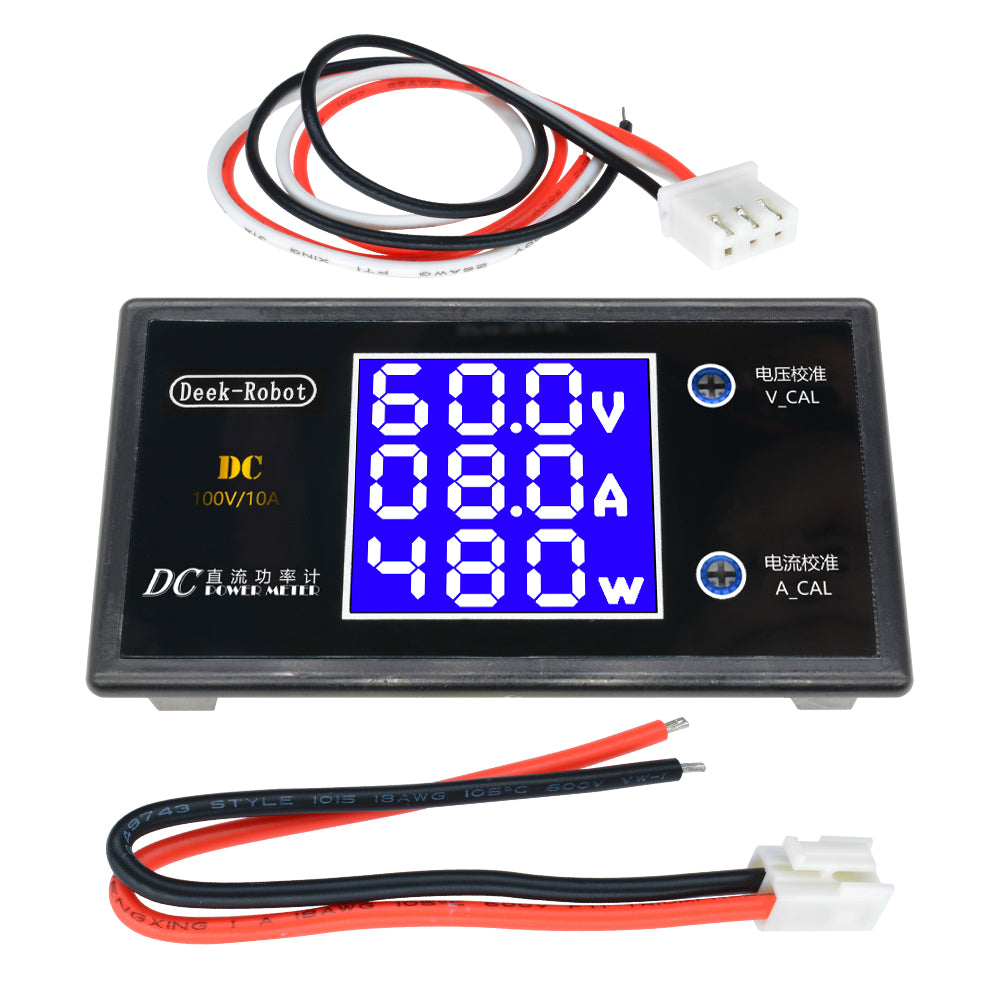
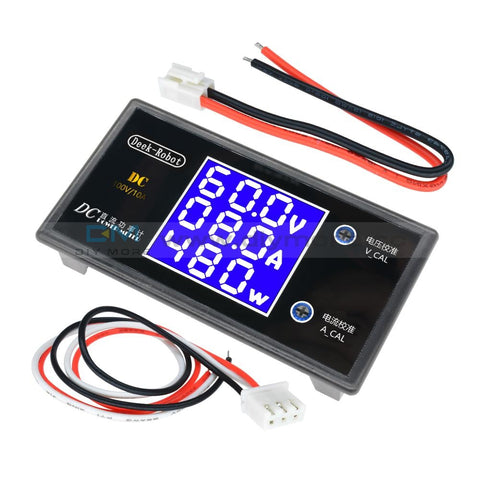 Translation missing: en.products.product.regular_price $7.99{"id":4360742797383,"title":"W1308 110V 220V 10A Digital Red+Blue LED Display Thermostat Alarm Controller","handle":"w1308-ac-100-240v-10a-digital-temperature-controller-thermostat","description":"\u003cdiv\u003e\u003cspan id=\"result_box\" lang=\"en\"\u003e\u003cstrong\u003eInstructions\u003c\/strong\u003e\u003cbr\u003e1. Connect the power supply and load according to the instructions. Be careful not to overpressure and overload!\u003cbr\u003e2. Setting mode, long press SET for 5 seconds will display P0 Short press SET to set H (red light) to heating mode C (green light) to cooling mode\u003cbr\u003e3. Set the stop temperature, press the SET screen once. Press the up and down keys to directly set the desired temperature.\u003cbr\u003e4. ENT is the confirmation button. Press and hold this button to realize the function of power on\/off.\u003cbr\u003e\u003cbr\u003e\u003cstrong\u003eTechnical parameters:\u003c\/strong\u003e\u003cbr\u003eTemperature control range: -50 to 120 ° C\u003cbr\u003eResolution: -9.9 to 99.9 hours 0.1 °C Other temperature range 1 °C\u003cbr\u003eTemperature measurement accuracy: 0.2% FS\u003cbr\u003eTemperature control accuracy: 0.1 °C\u003cbr\u003eRefresh rate: 2 times \/ sec\u003cbr\u003eInput power: 12V-24V-220V optional (see purchase parameters)\u003cbr\u003eMeasurement input: NTC10K (B3950) 1 meter waterproof sensor\u003cbr\u003eOutput type: relay output, maximum capacity 10A\u003cbr\u003eEnvironmental requirements: -30 ~ 60 ° C humidity 20% - 85%\u003cbr\u003eMachine size: 100*48*28mm\u003cbr\u003eOpening size: 27*22mm\u003c\/span\u003e\u003c\/div\u003e\n\u003cdiv\u003e\u003cspan\u003e\u003cstrong\u003e\u003cspan lang=\"en\"\u003e\u003cspan id=\"result_box\" lang=\"en\"\u003eThe Parameter Function Description:\u003c\/span\u003e\u003c\/span\u003e\u003c\/strong\u003e\u003c\/span\u003e\u003c\/div\u003e\n\u003cdiv\u003e\u003cspan\u003e\u003cspan lang=\"en\"\u003e\u003cspan id=\"result_box\" lang=\"en\"\u003ePress and hold SET for 5 seconds to enter the internal parameter setting, press the up and down keys to switch P0...P8 Press ENT to confirm the return.\u003cimg src=\"https:\/\/pg-cdn-a2.datacaciques.com\/00\/NDAy\/18\/11\/02\/qlrvj98eok4d5t50\/ae2959708795fc37.png\"\u003e\u003c\/span\u003e\u003c\/span\u003e\u003c\/span\u003e\u003c\/div\u003e\n\u003cdiv\u003e\n\u003cdiv id=\"gt-res-content\"\u003e\n\u003cdiv id=\"gt-res-dir-ctr\" dir=\"ltr\"\u003e\u003cspan id=\"result_box\" lang=\"en\"\u003e\u003cspan title=\"P0制冷、加热模式\n\"\u003e\u003cstrong\u003eP0 cooling and heating mode\u003c\/strong\u003e\u003cbr\u003e\u003c\/span\u003e\u003cspan title=\"高温启动为制冷模式请设置为C\n\"\u003eHigh temperature start for cooling mode, please set to C\u003cbr\u003e\u003c\/span\u003e\u003cspan title=\"低温启动为加热模式请设置为H\n\"\u003eLow temperature start for heating mode, please set to H\u003cbr\u003e\u003c\/span\u003e\u003cspan title=\"P1回差设定\n\"\u003e\u003cstrong\u003eP1 hysteresis setting\u003c\/strong\u003e\u003cbr\u003e\u003c\/span\u003e\u003cspan title=\"加热模式(H)下:测量值≤设定值—回差时启动输出加热到设定值停止\n\"\u003eIn heating mode (H): measured value ≤ set value - start output heating to set value stop when returning\u003cbr\u003e\u003c\/span\u003e\u003cspan title=\"制冷模式(C)下,测量值≥设定值+回差时启动输出制冷到设定值停止\n\"\u003eIn cooling mode (C), when the measured value ≥ set value + hysteresis, the output cooling is started to the set value stop.\u003cbr\u003e\u003c\/span\u003e\u003cstrong\u003e\u003cspan title=\"P2限定最高设定值(非控温设定)\n\"\u003eP2 limits the maximum setting (non-temperature setting)\u003cbr\u003e\u003c\/span\u003e\u003cspan title=\"P3限定最低设定值(非控温设定)\n\"\u003eP3 defines the lowest set value (non-temperature control setting)\u003cbr\u003e\u003c\/span\u003e\u003c\/strong\u003e\u003cspan title=\"P4温度校正\n\"\u003e\u003cstrong\u003eP4 temperature correction\u003c\/strong\u003e\u003cbr\u003e\u003c\/span\u003e\u003cspan title=\"当测量温度和标准温度有偏差时,可以使用此功能校正,校正后的温度=校正前的温度+校正值\n\"\u003eWhen the measured temperature deviates from the standard temperature, this function can be used to correct the corrected temperature = temperature before correction + correction value\u003cbr\u003e\u003c\/span\u003e\u003cspan title=\"P5延时启动时间 (单位:分钟)\n\"\u003e\u003cstrong\u003eP5 delay start time (unit: minute)\u003c\/strong\u003e\u003cbr\u003e\u003c\/span\u003e\u003cspan title=\"当控制压缩机设备制冷时,可根据需要设定延时时间,当控制器输出时设备不会立即启动,需要运行完设定的延时时间后启动\n\"\u003eWhen controlling the cooling of the compressor equipment, the delay time can be set as needed. When the controller outputs, the equipment will not start immediately, and it needs to start after the set delay time.\u003cbr\u003e\u003c\/span\u003e\u003cspan title=\"P6高温报警\n\"\u003e\u003cstrong\u003eP6 high temperature alarm\u003c\/strong\u003e\u003cbr\u003e\u003c\/span\u003e\u003cspan title=\"当测量值大于此值屏都显示--并滴演声报警。\"\u003eWhen the measured value is greater than this value, the screen is displayed -- and the sound alarm is dropped.\u003cspan\u003e \u003c\/span\u003e\u003c\/span\u003e\u003cspan title=\"同时强制断开输出\n\"\u003eSimultaneously disconnect the output\u003cbr\u003e\u003c\/span\u003e\u003cspan title=\"P7数据锁功使\n\"\u003e\u003cstrong\u003eP7 data lock function\u003c\/strong\u003e\u003cbr\u003e\u003c\/span\u003e\u003cspan title=\"开启数据锁,可以保持当前设定不被改动,此时设置温度和功能都无效,如需修改,需关闭数据频功能\n\"\u003eTurn on the data lock to keep the current settings from being changed. At this time, the setting temperature and function are invalid. If you need to modify it, you need to turn off the data frequency function.\u003cbr\u003e\u003c\/span\u003e\u003cspan title=\"P8恢复出厂设置\n\"\u003e\u003cstrong\u003eP8 factory reset\u003c\/strong\u003e\u003cbr\u003e\u003c\/span\u003e\u003cspan title=\"长按SET切换到P8,按次SET设置为on,按ENT恢复出厂设置\n\"\u003eLong press SET to switch to P8, press SET to set to on, press ENT to restore factory settings\u003cbr\u003e\u003c\/span\u003e\u003cspan title=\"也可按住+ -键不放开机自检和恢复出厂设定\"\u003eYou can also press and hold the + - button to disable the POST and restore the factory settings.\u003c\/span\u003e\u003cspan title=\"\"\u003e\u003c\/span\u003e\u003c\/span\u003e\u003c\/div\u003e\n\u003cdiv dir=\"ltr\"\u003e\u003cspan lang=\"en\"\u003e\u003cspan title=\"也可按住+ -键不放开机自检和恢复出厂设定\"\u003e \u003c\/span\u003e\u003c\/span\u003e\u003c\/div\u003e\n\u003cdiv dir=\"ltr\"\u003e\u003cspan lang=\"en\"\u003e\u003cspan id=\"result_box\" lang=\"en\"\u003e\u003cstrong\u003eInstructions for using:\u003c\/strong\u003e\u003cbr\u003ePlease connect the power supply according to the parameters and wiring diagram, and connect the cooling or heating equipment to the output.\u003cbr\u003eEnter the internal setting as needed to select the heating (into PO selection H) or cooling (into PO selection C) mode to set the temperature method, press the SET screen once, press the upper and lower to set the desired temperature, press ENT to confirm the OUT indicator of the return panel. Light: Blinking indicates cooling or heating start delay, always on indicates output\u003cbr\u003eDigital tube: Display LLL for sensor open circuit: display HHH is out of measurement range, thermostat will force power off, display --- for high temperature alarm.\u003c\/span\u003e\u003c\/span\u003e\u003c\/div\u003e\n\u003cdiv dir=\"ltr\"\u003e\u003cspan lang=\"en\"\u003e \u003c\/span\u003e\u003c\/div\u003e\n\u003cdiv dir=\"ltr\"\u003e\u003cstrong\u003e\u003cspan lang=\"en\"\u003e\u003cspan id=\"result_box\" lang=\"en\"\u003eSchematic Diagram:\u003c\/span\u003e\u003c\/span\u003e\u003c\/strong\u003e\u003c\/div\u003e\n\u003cdiv dir=\"ltr\"\u003e\u003cspan lang=\"en\"\u003e\u003cstrong\u003e\u003cimg src=\"https:\/\/pg-cdn-a2.datacaciques.com\/00\/NDAy\/19\/01\/12\/b7r74m86z1992b8p\/4f95d4b966b784c7.jpg\" width=\"553\" height=\"553\"\u003e\u003cimg src=\"https:\/\/pg-cdn-a2.datacaciques.com\/00\/NDAy\/19\/01\/12\/b7r74m86z1992b8p\/dbd4729ba3375d9b.jpg\" width=\"547\" height=\"547\"\u003e\u003c\/strong\u003e\u003c\/span\u003e\u003c\/div\u003e\n\u003cdiv dir=\"ltr\"\u003e\n\u003cspan lang=\"en\"\u003e \u003c\/span\u003e\u003cspan lang=\"en\"\u003e\u003cstrong\u003e\u003cimg src=\"https:\/\/pg-cdn-a2.datacaciques.com\/00\/NDAy\/18\/11\/02\/z6f718h9b39hpdqc\/3f00bf7f9405aa12.jpg\" width=\"517\" height=\"519\"\u003e\u003cimg src=\"https:\/\/pg-cdn-a2.datacaciques.com\/00\/NDAy\/19\/04\/01\/3ui760nq9b0r2612\/36e62941144bb7ac.jpg\" caption=\"false\" width=\"487\" height=\"487\"\u003e\u003c\/strong\u003e\u003c\/span\u003e\n\u003c\/div\u003e\n\u003cdiv dir=\"ltr\"\u003e\u003cspan lang=\"en\"\u003e\u003cstrong\u003eNotice:\u003c\/strong\u003e\u003cbr\u003e1. Input terminal is connected to the power supply. +V is the positive GND is the negative pole. Do not exceed the range according to the type of power supply.\u003cbr\u003e2, the output type is relay output, the load needs to be connected in series at the output, the maximum capacity is 10A\u003cbr\u003e3. After connecting the line, you must first set the cooling or heating. When finished, press the SET screen when the temperature is normally displayed. Press the up and down to set the required stop temperature.\u003cbr\u003e4. Before starting the machine, press and hold the power up and down to release the factory to restore the factory settings.\u003c\/span\u003e\u003c\/div\u003e\n\u003c\/div\u003e\n\u003c\/div\u003e\n\u003cdiv\u003e\u003cspan\u003e\u003cstrong\u003e\u003cspan lang=\"en\"\u003ePackage Included:\u003c\/span\u003e\u003c\/strong\u003e\u003cspan lang=\"en\"\u003e1PC*W1308 110V 220V 10A Digital Red+Blue LED Display Thermostat Alarm Controller\u003c\/span\u003e\u003c\/span\u003e\u003c\/div\u003e","published_at":"2019-11-18T15:54:03+08:00","created_at":"2019-11-18T16:13:14+08:00","vendor":"diymore","type":"Thermostat","tags":[],"price":999,"price_min":999,"price_max":999,"available":true,"price_varies":false,"compare_at_price":null,"compare_at_price_min":0,"compare_at_price_max":0,"compare_at_price_varies":false,"variants":[{"id":31275759534151,"title":"Default Title","option1":"Default Title","option2":null,"option3":null,"sku":"X13327","requires_shipping":true,"taxable":true,"featured_image":null,"available":true,"name":"W1308 110V 220V 10A Digital Red+Blue LED Display Thermostat Alarm Controller","public_title":null,"options":["Default Title"],"price":999,"weight":0,"compare_at_price":null,"inventory_management":null,"barcode":"","requires_selling_plan":false,"selling_plan_allocations":[]}],"images":["\/\/www.diymore.cc\/cdn\/shop\/products\/X13327_4_759.jpg?v=1588668174","\/\/www.diymore.cc\/cdn\/shop\/products\/X13327_7_718.jpg?v=1588668174","\/\/www.diymore.cc\/cdn\/shop\/products\/X13327_1_484.jpg?v=1588668174","\/\/www.diymore.cc\/cdn\/shop\/products\/X13327_5_561.jpg?v=1588668174","\/\/www.diymore.cc\/cdn\/shop\/products\/X13327_10_804.jpg?v=1588668174","\/\/www.diymore.cc\/cdn\/shop\/products\/X13327_14_203.jpg?v=1588668174"],"featured_image":"\/\/www.diymore.cc\/cdn\/shop\/products\/X13327_4_759.jpg?v=1588668174","options":["Title"],"media":[{"alt":"W1308 110V 220V 10A Digital Red+Blue Led Display Thermostat Alarm Controller","id":6679844356167,"position":1,"preview_image":{"aspect_ratio":1.0,"height":1000,"width":1000,"src":"\/\/www.diymore.cc\/cdn\/shop\/products\/X13327_4_759.jpg?v=1588668174"},"aspect_ratio":1.0,"height":1000,"media_type":"image","src":"\/\/www.diymore.cc\/cdn\/shop\/products\/X13327_4_759.jpg?v=1588668174","width":1000},{"alt":"W1308 110V 220V 10A Digital Red+Blue Led Display Thermostat Alarm Controller","id":6679844520007,"position":2,"preview_image":{"aspect_ratio":1.0,"height":1000,"width":1000,"src":"\/\/www.diymore.cc\/cdn\/shop\/products\/X13327_7_718.jpg?v=1588668174"},"aspect_ratio":1.0,"height":1000,"media_type":"image","src":"\/\/www.diymore.cc\/cdn\/shop\/products\/X13327_7_718.jpg?v=1588668174","width":1000},{"alt":"W1308 110V 220V 10A Digital Red+Blue Led Display Thermostat Alarm Controller","id":6679845306439,"position":3,"preview_image":{"aspect_ratio":1.0,"height":1000,"width":1000,"src":"\/\/www.diymore.cc\/cdn\/shop\/products\/X13327_1_484.jpg?v=1588668174"},"aspect_ratio":1.0,"height":1000,"media_type":"image","src":"\/\/www.diymore.cc\/cdn\/shop\/products\/X13327_1_484.jpg?v=1588668174","width":1000},{"alt":"W1308 110V 220V 10A Digital Red+Blue Led Display Thermostat Alarm Controller","id":6679845666887,"position":4,"preview_image":{"aspect_ratio":1.0,"height":1000,"width":1000,"src":"\/\/www.diymore.cc\/cdn\/shop\/products\/X13327_5_561.jpg?v=1588668174"},"aspect_ratio":1.0,"height":1000,"media_type":"image","src":"\/\/www.diymore.cc\/cdn\/shop\/products\/X13327_5_561.jpg?v=1588668174","width":1000},{"alt":"W1308 110V 220V 10A Digital Red+Blue Led Display Thermostat Alarm Controller","id":6679845797959,"position":5,"preview_image":{"aspect_ratio":1.0,"height":1000,"width":1000,"src":"\/\/www.diymore.cc\/cdn\/shop\/products\/X13327_10_804.jpg?v=1588668174"},"aspect_ratio":1.0,"height":1000,"media_type":"image","src":"\/\/www.diymore.cc\/cdn\/shop\/products\/X13327_10_804.jpg?v=1588668174","width":1000},{"alt":"W1308 110V 220V 10A Digital Red+Blue Led Display Thermostat Alarm Controller","id":6679846322247,"position":6,"preview_image":{"aspect_ratio":1.0,"height":1000,"width":1000,"src":"\/\/www.diymore.cc\/cdn\/shop\/products\/X13327_14_203.jpg?v=1588668174"},"aspect_ratio":1.0,"height":1000,"media_type":"image","src":"\/\/www.diymore.cc\/cdn\/shop\/products\/X13327_14_203.jpg?v=1588668174","width":1000}],"requires_selling_plan":false,"selling_plan_groups":[],"content":"\u003cdiv\u003e\u003cspan id=\"result_box\" lang=\"en\"\u003e\u003cstrong\u003eInstructions\u003c\/strong\u003e\u003cbr\u003e1. Connect the power supply and load according to the instructions. Be careful not to overpressure and overload!\u003cbr\u003e2. Setting mode, long press SET for 5 seconds will display P0 Short press SET to set H (red light) to heating mode C (green light) to cooling mode\u003cbr\u003e3. Set the stop temperature, press the SET screen once. Press the up and down keys to directly set the desired temperature.\u003cbr\u003e4. ENT is the confirmation button. Press and hold this button to realize the function of power on\/off.\u003cbr\u003e\u003cbr\u003e\u003cstrong\u003eTechnical parameters:\u003c\/strong\u003e\u003cbr\u003eTemperature control range: -50 to 120 ° C\u003cbr\u003eResolution: -9.9 to 99.9 hours 0.1 °C Other temperature range 1 °C\u003cbr\u003eTemperature measurement accuracy: 0.2% FS\u003cbr\u003eTemperature control accuracy: 0.1 °C\u003cbr\u003eRefresh rate: 2 times \/ sec\u003cbr\u003eInput power: 12V-24V-220V optional (see purchase parameters)\u003cbr\u003eMeasurement input: NTC10K (B3950) 1 meter waterproof sensor\u003cbr\u003eOutput type: relay output, maximum capacity 10A\u003cbr\u003eEnvironmental requirements: -30 ~ 60 ° C humidity 20% - 85%\u003cbr\u003eMachine size: 100*48*28mm\u003cbr\u003eOpening size: 27*22mm\u003c\/span\u003e\u003c\/div\u003e\n\u003cdiv\u003e\u003cspan\u003e\u003cstrong\u003e\u003cspan lang=\"en\"\u003e\u003cspan id=\"result_box\" lang=\"en\"\u003eThe Parameter Function Description:\u003c\/span\u003e\u003c\/span\u003e\u003c\/strong\u003e\u003c\/span\u003e\u003c\/div\u003e\n\u003cdiv\u003e\u003cspan\u003e\u003cspan lang=\"en\"\u003e\u003cspan id=\"result_box\" lang=\"en\"\u003ePress and hold SET for 5 seconds to enter the internal parameter setting, press the up and down keys to switch P0...P8 Press ENT to confirm the return.\u003cimg src=\"https:\/\/pg-cdn-a2.datacaciques.com\/00\/NDAy\/18\/11\/02\/qlrvj98eok4d5t50\/ae2959708795fc37.png\"\u003e\u003c\/span\u003e\u003c\/span\u003e\u003c\/span\u003e\u003c\/div\u003e\n\u003cdiv\u003e\n\u003cdiv id=\"gt-res-content\"\u003e\n\u003cdiv id=\"gt-res-dir-ctr\" dir=\"ltr\"\u003e\u003cspan id=\"result_box\" lang=\"en\"\u003e\u003cspan title=\"P0制冷、加热模式\n\"\u003e\u003cstrong\u003eP0 cooling and heating mode\u003c\/strong\u003e\u003cbr\u003e\u003c\/span\u003e\u003cspan title=\"高温启动为制冷模式请设置为C\n\"\u003eHigh temperature start for cooling mode, please set to C\u003cbr\u003e\u003c\/span\u003e\u003cspan title=\"低温启动为加热模式请设置为H\n\"\u003eLow temperature start for heating mode, please set to H\u003cbr\u003e\u003c\/span\u003e\u003cspan title=\"P1回差设定\n\"\u003e\u003cstrong\u003eP1 hysteresis setting\u003c\/strong\u003e\u003cbr\u003e\u003c\/span\u003e\u003cspan title=\"加热模式(H)下:测量值≤设定值—回差时启动输出加热到设定值停止\n\"\u003eIn heating mode (H): measured value ≤ set value - start output heating to set value stop when returning\u003cbr\u003e\u003c\/span\u003e\u003cspan title=\"制冷模式(C)下,测量值≥设定值+回差时启动输出制冷到设定值停止\n\"\u003eIn cooling mode (C), when the measured value ≥ set value + hysteresis, the output cooling is started to the set value stop.\u003cbr\u003e\u003c\/span\u003e\u003cstrong\u003e\u003cspan title=\"P2限定最高设定值(非控温设定)\n\"\u003eP2 limits the maximum setting (non-temperature setting)\u003cbr\u003e\u003c\/span\u003e\u003cspan title=\"P3限定最低设定值(非控温设定)\n\"\u003eP3 defines the lowest set value (non-temperature control setting)\u003cbr\u003e\u003c\/span\u003e\u003c\/strong\u003e\u003cspan title=\"P4温度校正\n\"\u003e\u003cstrong\u003eP4 temperature correction\u003c\/strong\u003e\u003cbr\u003e\u003c\/span\u003e\u003cspan title=\"当测量温度和标准温度有偏差时,可以使用此功能校正,校正后的温度=校正前的温度+校正值\n\"\u003eWhen the measured temperature deviates from the standard temperature, this function can be used to correct the corrected temperature = temperature before correction + correction value\u003cbr\u003e\u003c\/span\u003e\u003cspan title=\"P5延时启动时间 (单位:分钟)\n\"\u003e\u003cstrong\u003eP5 delay start time (unit: minute)\u003c\/strong\u003e\u003cbr\u003e\u003c\/span\u003e\u003cspan title=\"当控制压缩机设备制冷时,可根据需要设定延时时间,当控制器输出时设备不会立即启动,需要运行完设定的延时时间后启动\n\"\u003eWhen controlling the cooling of the compressor equipment, the delay time can be set as needed. When the controller outputs, the equipment will not start immediately, and it needs to start after the set delay time.\u003cbr\u003e\u003c\/span\u003e\u003cspan title=\"P6高温报警\n\"\u003e\u003cstrong\u003eP6 high temperature alarm\u003c\/strong\u003e\u003cbr\u003e\u003c\/span\u003e\u003cspan title=\"当测量值大于此值屏都显示--并滴演声报警。\"\u003eWhen the measured value is greater than this value, the screen is displayed -- and the sound alarm is dropped.\u003cspan\u003e \u003c\/span\u003e\u003c\/span\u003e\u003cspan title=\"同时强制断开输出\n\"\u003eSimultaneously disconnect the output\u003cbr\u003e\u003c\/span\u003e\u003cspan title=\"P7数据锁功使\n\"\u003e\u003cstrong\u003eP7 data lock function\u003c\/strong\u003e\u003cbr\u003e\u003c\/span\u003e\u003cspan title=\"开启数据锁,可以保持当前设定不被改动,此时设置温度和功能都无效,如需修改,需关闭数据频功能\n\"\u003eTurn on the data lock to keep the current settings from being changed. At this time, the setting temperature and function are invalid. If you need to modify it, you need to turn off the data frequency function.\u003cbr\u003e\u003c\/span\u003e\u003cspan title=\"P8恢复出厂设置\n\"\u003e\u003cstrong\u003eP8 factory reset\u003c\/strong\u003e\u003cbr\u003e\u003c\/span\u003e\u003cspan title=\"长按SET切换到P8,按次SET设置为on,按ENT恢复出厂设置\n\"\u003eLong press SET to switch to P8, press SET to set to on, press ENT to restore factory settings\u003cbr\u003e\u003c\/span\u003e\u003cspan title=\"也可按住+ -键不放开机自检和恢复出厂设定\"\u003eYou can also press and hold the + - button to disable the POST and restore the factory settings.\u003c\/span\u003e\u003cspan title=\"\"\u003e\u003c\/span\u003e\u003c\/span\u003e\u003c\/div\u003e\n\u003cdiv dir=\"ltr\"\u003e\u003cspan lang=\"en\"\u003e\u003cspan title=\"也可按住+ -键不放开机自检和恢复出厂设定\"\u003e \u003c\/span\u003e\u003c\/span\u003e\u003c\/div\u003e\n\u003cdiv dir=\"ltr\"\u003e\u003cspan lang=\"en\"\u003e\u003cspan id=\"result_box\" lang=\"en\"\u003e\u003cstrong\u003eInstructions for using:\u003c\/strong\u003e\u003cbr\u003ePlease connect the power supply according to the parameters and wiring diagram, and connect the cooling or heating equipment to the output.\u003cbr\u003eEnter the internal setting as needed to select the heating (into PO selection H) or cooling (into PO selection C) mode to set the temperature method, press the SET screen once, press the upper and lower to set the desired temperature, press ENT to confirm the OUT indicator of the return panel. Light: Blinking indicates cooling or heating start delay, always on indicates output\u003cbr\u003eDigital tube: Display LLL for sensor open circuit: display HHH is out of measurement range, thermostat will force power off, display --- for high temperature alarm.\u003c\/span\u003e\u003c\/span\u003e\u003c\/div\u003e\n\u003cdiv dir=\"ltr\"\u003e\u003cspan lang=\"en\"\u003e \u003c\/span\u003e\u003c\/div\u003e\n\u003cdiv dir=\"ltr\"\u003e\u003cstrong\u003e\u003cspan lang=\"en\"\u003e\u003cspan id=\"result_box\" lang=\"en\"\u003eSchematic Diagram:\u003c\/span\u003e\u003c\/span\u003e\u003c\/strong\u003e\u003c\/div\u003e\n\u003cdiv dir=\"ltr\"\u003e\u003cspan lang=\"en\"\u003e\u003cstrong\u003e\u003cimg src=\"https:\/\/pg-cdn-a2.datacaciques.com\/00\/NDAy\/19\/01\/12\/b7r74m86z1992b8p\/4f95d4b966b784c7.jpg\" width=\"553\" height=\"553\"\u003e\u003cimg src=\"https:\/\/pg-cdn-a2.datacaciques.com\/00\/NDAy\/19\/01\/12\/b7r74m86z1992b8p\/dbd4729ba3375d9b.jpg\" width=\"547\" height=\"547\"\u003e\u003c\/strong\u003e\u003c\/span\u003e\u003c\/div\u003e\n\u003cdiv dir=\"ltr\"\u003e\n\u003cspan lang=\"en\"\u003e \u003c\/span\u003e\u003cspan lang=\"en\"\u003e\u003cstrong\u003e\u003cimg src=\"https:\/\/pg-cdn-a2.datacaciques.com\/00\/NDAy\/18\/11\/02\/z6f718h9b39hpdqc\/3f00bf7f9405aa12.jpg\" width=\"517\" height=\"519\"\u003e\u003cimg src=\"https:\/\/pg-cdn-a2.datacaciques.com\/00\/NDAy\/19\/04\/01\/3ui760nq9b0r2612\/36e62941144bb7ac.jpg\" caption=\"false\" width=\"487\" height=\"487\"\u003e\u003c\/strong\u003e\u003c\/span\u003e\n\u003c\/div\u003e\n\u003cdiv dir=\"ltr\"\u003e\u003cspan lang=\"en\"\u003e\u003cstrong\u003eNotice:\u003c\/strong\u003e\u003cbr\u003e1. Input terminal is connected to the power supply. +V is the positive GND is the negative pole. Do not exceed the range according to the type of power supply.\u003cbr\u003e2, the output type is relay output, the load needs to be connected in series at the output, the maximum capacity is 10A\u003cbr\u003e3. After connecting the line, you must first set the cooling or heating. When finished, press the SET screen when the temperature is normally displayed. Press the up and down to set the required stop temperature.\u003cbr\u003e4. Before starting the machine, press and hold the power up and down to release the factory to restore the factory settings.\u003c\/span\u003e\u003c\/div\u003e\n\u003c\/div\u003e\n\u003c\/div\u003e\n\u003cdiv\u003e\u003cspan\u003e\u003cstrong\u003e\u003cspan lang=\"en\"\u003ePackage Included:\u003c\/span\u003e\u003c\/strong\u003e\u003cspan lang=\"en\"\u003e1PC*W1308 110V 220V 10A Digital Red+Blue LED Display Thermostat Alarm Controller\u003c\/span\u003e\u003c\/span\u003e\u003c\/div\u003e"}