
5A CC/CV LED Drive Step down Lithium charger Power USB Voltmeter Module CASE CA


5A CC/CV LED Drive Step down Lithium charger Power USB Voltmeter Module CASE CA
SKU:010725
Regular price
$11.99
![]()
- guaranteeQuality checked
- Special gift cardsSpecial gift cards
- Free return Within 60 days
- Consultancy86-0755-85201155
Highlights :
- Module with crystal shell,safer and more beautiful.
- Contains the voltmeter, ammeter, power meter, USB interfacefor charging the digital products.
Note:
- When you use the product, the module inputs and outputs to be isolated from ground.
- USB output voltage is consistent with the module, not a fixed 5V output.
- When charging for digital equipment, make sure USB output voltage is 5V.
- Some customers report: “The module can not adjust the output voltage is always equal to the input voltage.”
- When you encounter this problem, please counterclockwise rotation of the “voltage potentiometer” 10 laps or more,
- then use the module you can adjust the output voltage. Because the factory default output voltage of about 20V.
- 4.Shell assembly is very simple, but "left""right""front" panel are directional, you must pay attention during assembly!
Specifications
- Input voltage range:5-36VDC(Input voltagehigher than 6.2V, constant function will be effective)
- Output voltage range:1.25-32VDC adjustable(Output voltage higher than 6.2V, constant function will be effective)
- Output current: 0-5A
- Output power: 75W
- High efficiency up to 96%
- Built in thermal shutdown function
- Built in current limit function
- Built in output short protection function
- Input reverse polarity protection: None (if required, high current diode in series with the input).
- Bare board size:L x W x H =68.2×38.8×15mm
- Weight:73g
Application
Use as a step-down modules with overcurrent protection
Usage:
- Adjust the right button so that “OUT” LED lighted, Digital meter shows the value of output voltage ,adjust the “voltage potentiometer” so that the output voltage reaches the value you want.
- Adjust the right button so that Digital meter shows the value of output current;Wire shorted output terminal, then adjust the “current potentiometer” so that the output current reaches a predetermined overcurrent protection value. (For example, the Digital meter displays the current value of 4A, then you can use the module to a maximum current of 4A)
- Connected to the load.
Use as a battery charger
Usage:
- Make sure you need to charge the battery float voltage and charging current;
- (if lithium parameters 3.7V/2200mAh, then the float voltage is 4.2V, the maximum charging current 1C, ie 2200mA)
- Under no-load conditions, adjust the “Voltage potentiometer” so that the output voltage reaches the float voltage;
- (if to 3.7V rechargeable lithium battery, the output voltage can be adjusted to 4.2V)
- Adjust the right button so that Digital meter shows the value of output current;Wire shorted output terminal, then adjust the “current potentiometer” so that the output current reaches a predetermined Charging current value.
- Charge turn lamp current factory default is 0.1 times the charging current;
- (Battery during charging current is gradually reduced, if the charge current setting is 1A, then when the charge current is less than 0.1A, blue lights turned off, the green light is on, which means that the battery is fully charged)
- connected to the battery charge.
(1,2,3,4 steps as: Output is unloaded, do not connect the battery)
Use as a LED constant current driver module
Usage:
- Adjust the “voltage potentiometer” so that the output voltage reaches the value you want.
- Adjust the right button so that Digital meter shows the value of output current;Wire shorted output terminal, then adjust the “current potentiometer” so that the output current reaches a predetermined LED operating current.
- Connect LED, work.
- (1,2 steps as: Output is unloaded, do not connect LED)
- Voltmeter and ammeter calibration method:
- Module with manual calibration function can correct display precision voltage and current, if you think the current voltage and current accuracy to meet the requirements, do not perform the following operations.
Output voltage calibration steps
- Step 1, adjust the right button so that “OUT” LED lighted, Digital meter shows the value of output voltage; Press the right button for more than 2 seconds, release, Digital meter and “OUT” LED flashes in synchronization so that you enter the output voltage calibration mode.
- Step 2, press the right button (normal speed), the voltage value is adding up a unit; Press the left button, minus a unit; Due to a unit is less than 0.1V, the minimum voltage display to 0.1V, so you need to continuously press 1-5 times to see the voltmeter change 0.1V, how many times voltmeter change 0.1V by pressing the key, depending on the current display voltage, the higher the voltage, the fewer the number of press.
- Step 3, press the right button for more than 2 seconds, release, to exit the output voltage calibration mode. All parameters set to automatically power down to save.
Input voltage calibration steps
- Step 1, adjust the right button so that “IN” LED lighted, Digital meter shows the value of input voltage; press the right button for more than 2 seconds, release,Digital meter and “IN” LED flashes in synchronization so that you enter the input voltage calibration mode.
- Steps 2 and 3, consistent with the output voltage calibration method.
Output current calibration steps
- Step 1, adjust the right button so that Digital meter shows the value of output Current. Press the right button for more than 2 seconds, release, Digital meter flashes in synchronization so that you enter the output current calibration mode.
- Step 2,Connected to the load, ammeter in series, adjust the right and left button to change the display of digital meter, so that is consistent with the ammeter display .
Package included:
- 1PCS x 5A CC/CV LED Drive Lithium charger Power Step-down Module USB Voltmeter +Case
Purchasing & Delivery
Before you make your purchase, it’s helpful to know the measurements of the area you plan to place the furniture. You should also measure any doorways and hallways through which the furniture will pass to get to its final destination.Picking up at the store
Shopify Shop requires that all products are properly inspected BEFORE you take it home to insure there are no surprises. Our team is happy to open all packages and will assist in the inspection process. We will then reseal packages for safe transport. We encourage all customers to bring furniture pads or blankets to protect the items during transport as well as rope or tie downs. Shopify Shop will not be responsible for damage that occurs after leaving the store or during transit. It is the purchaser’s responsibility to make sure the correct items are picked up and in good condition.Delivery
Customers are able to pick the next available delivery day that best fits their schedule. However, to route stops as efficiently as possible, Shopify Shop will provide the time frame. Customers will not be able to choose a time. You will be notified in advance of your scheduled time frame. Please make sure that a responsible adult (18 years or older) will be home at that time.In preparation for your delivery, please remove existing furniture, pictures, mirrors, accessories, etc. to prevent damages. Also insure that the area where you would like your furniture placed is clear of any old furniture and any other items that may obstruct the passageway of the delivery team. Shopify Shop will deliver, assemble, and set-up your new furniture purchase and remove all packing materials from your home. Our delivery crews are not permitted to move your existing furniture or other household items. Delivery personnel will attempt to deliver the purchased items in a safe and controlled manner but will not attempt to place furniture if they feel it will result in damage to the product or your home. Delivery personnel are unable to remove doors, hoist furniture or carry furniture up more than 3 flights of stairs. An elevator must be available for deliveries to the 4th floor and above.
Other Customers also buy:
-

 Translation missing: en.products.product.regular_price $15.90{"id":6090415669448,"title":"5A CC\/CV LED Drive Step down Lithium charger Power USB Voltmeter Module CASE CA","handle":"5a-cc-cv-led-drive-step-down-lithium-charger-power-usb-voltmeter-module-case-ca","description":"\u003cdiv data-mce-fragment=\"1\"\u003e\n\u003cspan data-mce-fragment=\"1\"\u003e\u003cstrong data-mce-fragment=\"1\"\u003e\u003c\/strong\u003e\u003c\/span\u003e\u003cspan data-mce-fragment=\"1\"\u003e\u003c\/span\u003e\n\u003cp data-mce-fragment=\"1\"\u003e\u003cspan data-mce-fragment=\"1\"\u003e\u003cstrong data-mce-fragment=\"1\"\u003eHighlights :\u003c\/strong\u003e\u003c\/span\u003e\u003c\/p\u003e\n\u003cul\u003e\n\u003cli\u003e\u003cspan data-mce-fragment=\"1\"\u003eModule with crystal shell,safer and more beautiful.\u003c\/span\u003e\u003c\/li\u003e\n\u003cli\u003e\u003cspan data-mce-fragment=\"1\"\u003eContains the voltmeter, ammeter, power meter, USB interfacefor charging the digital products.\u003c\/span\u003e\u003c\/li\u003e\n\u003c\/ul\u003e\n\u003cp data-mce-fragment=\"1\"\u003e\u003cspan data-mce-fragment=\"1\"\u003e\u003cstrong data-mce-fragment=\"1\"\u003eNote:\u003c\/strong\u003e\u003c\/span\u003e\u003c\/p\u003e\n\u003cul\u003e\n\u003cli\u003e\u003cspan data-mce-fragment=\"1\"\u003eWhen you use the product, the module inputs and outputs to be isolated from ground.\u003c\/span\u003e\u003c\/li\u003e\n\u003cli\u003e\u003cspan data-mce-fragment=\"1\"\u003eUSB output voltage is consistent with the module, not a fixed 5V output. \u003c\/span\u003e\u003c\/li\u003e\n\u003cli\u003e\u003cspan data-mce-fragment=\"1\"\u003eWhen charging for digital equipment, make sure USB output voltage is 5V.\u003c\/span\u003e\u003c\/li\u003e\n\u003cli\u003e\u003cspan data-mce-fragment=\"1\"\u003eSome customers report: “The module can not adjust the output voltage is always equal to the input voltage.”\u003c\/span\u003e\u003c\/li\u003e\n\u003cli\u003e\u003cspan data-mce-fragment=\"1\"\u003e When you encounter this problem, please counterclockwise rotation of the “voltage potentiometer” 10 laps or more, \u003c\/span\u003e\u003c\/li\u003e\n\u003cli\u003e\u003cspan data-mce-fragment=\"1\"\u003ethen use the module you can adjust the output voltage. Because the factory default output voltage of about 20V.\u003c\/span\u003e\u003c\/li\u003e\n\u003cli\u003e\u003cspan data-mce-fragment=\"1\"\u003e4.Shell assembly is very simple, but \"left\"\"right\"\"front\" panel are directional, you must pay attention during assembly!\u003c\/span\u003e\u003c\/li\u003e\n\u003c\/ul\u003e\n\u003cdiv data-mce-fragment=\"1\"\u003e\u003cspan data-mce-fragment=\"1\"\u003e\u003cstrong data-mce-fragment=\"1\"\u003eSpecifications\u003c\/strong\u003e\u003c\/span\u003e\u003c\/div\u003e\n\u003cul\u003e\n\u003cli\u003e\u003cspan data-mce-fragment=\"1\"\u003eInput voltage range:5-36VDC(Input voltagehigher than 6.2V, constant function will be effective)\u003c\/span\u003e\u003c\/li\u003e\n\u003cli\u003e\u003cspan data-mce-fragment=\"1\"\u003eOutput voltage range:1.25-32VDC adjustable(Output voltage higher than 6.2V, constant function will be effective)\u003c\/span\u003e\u003c\/li\u003e\n\u003cli\u003e\u003cspan data-mce-fragment=\"1\"\u003eOutput current: 0-5A\u003c\/span\u003e\u003c\/li\u003e\n\u003cli\u003e\u003cspan data-mce-fragment=\"1\"\u003eOutput power: 75W\u003c\/span\u003e\u003c\/li\u003e\n\u003cli\u003e\u003cspan data-mce-fragment=\"1\"\u003eHigh efficiency up to 96%\u003c\/span\u003e\u003c\/li\u003e\n\u003cli\u003e\u003cspan data-mce-fragment=\"1\"\u003eBuilt in thermal shutdown function\u003c\/span\u003e\u003c\/li\u003e\n\u003cli\u003e\u003cspan data-mce-fragment=\"1\"\u003eBuilt in current limit function\u003c\/span\u003e\u003c\/li\u003e\n\u003cli\u003e\u003cspan data-mce-fragment=\"1\"\u003eBuilt in output short protection function\u003c\/span\u003e\u003c\/li\u003e\n\u003cli\u003e\u003cspan data-mce-fragment=\"1\"\u003eInput reverse polarity protection: None (if required, high current diode in series with the input).\u003c\/span\u003e\u003c\/li\u003e\n\u003cli\u003e\u003cspan data-mce-fragment=\"1\"\u003eBare board size:L x W x H =68.2×38.8×15mm\u003c\/span\u003e\u003c\/li\u003e\n\u003cli\u003e\u003cspan data-mce-fragment=\"1\"\u003eWeight:73g\u003c\/span\u003e\u003c\/li\u003e\n\u003c\/ul\u003e\n\u003cp data-mce-fragment=\"1\"\u003e\u003cspan data-mce-fragment=\"1\"\u003e\u003cstrong data-mce-fragment=\"1\"\u003eApplication\u003c\/strong\u003e\u003c\/span\u003e\u003c\/p\u003e\n\u003cp data-mce-fragment=\"1\"\u003e\u003cspan data-mce-fragment=\"1\"\u003e\u003cstrong data-mce-fragment=\"1\"\u003eUse as a step-down modules with overcurrent protection \u003c\/strong\u003e\u003c\/span\u003e\u003c\/p\u003e\n\u003cp data-mce-fragment=\"1\"\u003e\u003cstrong\u003eUsage:\u003c\/strong\u003e\u003c\/p\u003e\n\u003cul\u003e\n\u003cli\u003e\u003cspan data-mce-fragment=\"1\"\u003eAdjust the right button so that “OUT” LED lighted, Digital meter shows the value of output voltage ,adjust the “voltage potentiometer” so that the output voltage reaches the value you want. \u003c\/span\u003e\u003c\/li\u003e\n\u003cli\u003e\u003cspan data-mce-fragment=\"1\"\u003eAdjust the right button so that Digital meter shows the value of output current;Wire shorted output terminal, then adjust the “current potentiometer” so that the output current reaches a predetermined overcurrent protection value. (For example, the Digital meter displays the current value of 4A, then you can use the module to a maximum current of 4A)\u003c\/span\u003e\u003c\/li\u003e\n\u003cli\u003e\u003cspan data-mce-fragment=\"1\"\u003eConnected to the load.\u003c\/span\u003e\u003c\/li\u003e\n\u003c\/ul\u003e\n\u003cp data-mce-fragment=\"1\"\u003e\u003cspan data-mce-fragment=\"1\"\u003e\u003cstrong data-mce-fragment=\"1\"\u003eUse as a battery charger\u003c\/strong\u003e\u003c\/span\u003e\u003c\/p\u003e\n\u003cp data-mce-fragment=\"1\"\u003e\u003cstrong\u003eUsage:\u003c\/strong\u003e\u003c\/p\u003e\n\u003cul\u003e\n\u003cli\u003e\u003cspan data-mce-fragment=\"1\"\u003eMake sure you need to charge the battery float voltage and charging current; \u003c\/span\u003e\u003c\/li\u003e\n\u003cli\u003e\u003cspan data-mce-fragment=\"1\"\u003e(if lithium parameters 3.7V\/2200mAh, then the float voltage is 4.2V, the maximum charging current 1C, ie 2200mA)\u003c\/span\u003e\u003c\/li\u003e\n\u003cli\u003e\u003cspan data-mce-fragment=\"1\"\u003eUnder no-load conditions, adjust the “Voltage potentiometer” so that the output voltage reaches the float voltage; \u003c\/span\u003e\u003c\/li\u003e\n\u003cli\u003e\u003cspan data-mce-fragment=\"1\"\u003e(if to 3.7V rechargeable lithium battery, the output voltage can be adjusted to 4.2V)\u003c\/span\u003e\u003c\/li\u003e\n\u003cli\u003e\u003cspan data-mce-fragment=\"1\"\u003eAdjust the right button so that Digital meter shows the value of output current;Wire shorted output terminal, then adjust the “current potentiometer” so that the output current reaches a predetermined Charging current value.\u003c\/span\u003e\u003c\/li\u003e\n\u003cli\u003e\u003cspan data-mce-fragment=\"1\"\u003eCharge turn lamp current factory default is 0.1 times the charging current; \u003c\/span\u003e\u003c\/li\u003e\n\u003cli\u003e\u003cspan data-mce-fragment=\"1\"\u003e(Battery during charging current is gradually reduced, if the charge current setting is 1A, then when the charge current is less than 0.1A, blue lights turned off, the green light is on, which means that the battery is fully charged)\u003c\/span\u003e\u003c\/li\u003e\n\u003cli\u003e\u003cspan data-mce-fragment=\"1\"\u003econnected to the battery charge.\u003c\/span\u003e\u003c\/li\u003e\n\u003c\/ul\u003e\n\u003cp data-mce-fragment=\"1\"\u003e\u003cspan data-mce-fragment=\"1\"\u003e(1,2,3,4 steps as: Output is unloaded, do not connect the battery)\u003c\/span\u003e\u003c\/p\u003e\n\u003cp data-mce-fragment=\"1\"\u003e\u003cspan data-mce-fragment=\"1\"\u003e\u003cstrong data-mce-fragment=\"1\"\u003eUse as a LED constant current driver module\u003c\/strong\u003e\u003c\/span\u003e\u003c\/p\u003e\n\u003cp data-mce-fragment=\"1\"\u003e\u003cstrong\u003eUsage:\u003c\/strong\u003e\u003c\/p\u003e\n\u003cul\u003e\n\u003cli\u003e\u003cspan data-mce-fragment=\"1\"\u003eAdjust the “voltage potentiometer” so that the output voltage reaches the value you want. \u003c\/span\u003e\u003c\/li\u003e\n\u003cli\u003e\u003cspan data-mce-fragment=\"1\"\u003eAdjust the right button so that Digital meter shows the value of output current;Wire shorted output terminal, then adjust the “current potentiometer” so that the output current reaches a predetermined LED operating current.\u003c\/span\u003e\u003c\/li\u003e\n\u003cli\u003e\u003cspan data-mce-fragment=\"1\"\u003eConnect LED, work.\u003c\/span\u003e\u003c\/li\u003e\n\u003cli\u003e\u003cspan data-mce-fragment=\"1\"\u003e(1,2 steps as: Output is unloaded, do not connect LED)\u003c\/span\u003e\u003c\/li\u003e\n\u003cli\u003e\u003cspan data-mce-fragment=\"1\"\u003eVoltmeter and ammeter calibration method:\u003c\/span\u003e\u003c\/li\u003e\n\u003cli\u003e\u003cspan data-mce-fragment=\"1\"\u003eModule with manual calibration function can correct display precision voltage and current, if you think the current voltage and current accuracy to meet the requirements, do not perform the following operations.\u003c\/span\u003e\u003c\/li\u003e\n\u003c\/ul\u003e\n\u003cdiv data-mce-fragment=\"1\"\u003e\u003cspan data-mce-fragment=\"1\"\u003e\u003cstrong data-mce-fragment=\"1\"\u003eOutput voltage calibration steps\u003c\/strong\u003e\u003c\/span\u003e\u003c\/div\u003e\n\u003cul\u003e\n\u003cli\u003e\u003cspan data-mce-fragment=\"1\"\u003eStep 1, adjust the right button so that “OUT” LED lighted, Digital meter shows the value of output voltage; Press the right button for more than 2 seconds, release, Digital meter and “OUT” LED flashes in synchronization so that you enter the output voltage calibration mode.\u003c\/span\u003e\u003c\/li\u003e\n\u003cli\u003e\u003cspan data-mce-fragment=\"1\"\u003eStep 2, press the right button (normal speed), the voltage value is adding up a unit; Press the left button, minus a unit; Due to a unit is less than 0.1V, the minimum voltage display to 0.1V, so you need to continuously press 1-5 times to see the voltmeter change 0.1V, how many times voltmeter change 0.1V by pressing the key, depending on the current display voltage, the higher the voltage, the fewer the number of press.\u003c\/span\u003e\u003c\/li\u003e\n\u003cli\u003e\u003cspan data-mce-fragment=\"1\"\u003eStep 3, press the right button for more than 2 seconds, release, to exit the output voltage calibration mode. All parameters set to automatically power down to save.\u003c\/span\u003e\u003c\/li\u003e\n\u003c\/ul\u003e\n\u003cp data-mce-fragment=\"1\"\u003e\u003cspan data-mce-fragment=\"1\"\u003e\u003cstrong data-mce-fragment=\"1\"\u003e Input voltage calibration steps\u003c\/strong\u003e\u003c\/span\u003e\u003c\/p\u003e\n\u003cul\u003e\n\u003cli\u003e\u003cspan data-mce-fragment=\"1\"\u003eStep 1, adjust the right button so that “IN” LED lighted, Digital meter shows the value of input voltage; press the right button for more than 2 seconds, release,Digital meter and “IN” LED flashes in synchronization so that you enter the input voltage calibration mode.\u003c\/span\u003e\u003c\/li\u003e\n\u003cli\u003e\u003cspan data-mce-fragment=\"1\"\u003eSteps 2 and 3, consistent with the output voltage calibration method.\u003c\/span\u003e\u003c\/li\u003e\n\u003c\/ul\u003e\n\u003cdiv data-mce-fragment=\"1\"\u003e\n\u003cspan data-mce-fragment=\"1\"\u003e \u003c\/span\u003e\u003cspan data-mce-fragment=\"1\"\u003e\u003cstrong data-mce-fragment=\"1\"\u003eOutput current calibration steps\u003c\/strong\u003e\u003c\/span\u003e\n\u003c\/div\u003e\n\u003cul\u003e\n\u003cli\u003e\u003cspan data-mce-fragment=\"1\"\u003eStep 1, adjust the right button so that Digital meter shows the value of output Current. Press the right button for more than 2 seconds, release, Digital meter flashes in synchronization so that you enter the output current calibration mode.\u003c\/span\u003e\u003c\/li\u003e\n\u003cli\u003e\u003cspan data-mce-fragment=\"1\"\u003eStep 2,Connected to the load, ammeter in series, adjust the right and left button to change the display of digital meter, so that is consistent with the ammeter display .\u003c\/span\u003e\u003c\/li\u003e\n\u003c\/ul\u003e\n\u003cdiv id=\"pastingspan1\" data-mce-fragment=\"1\"\u003e\n\u003cspan data-mce-fragment=\"1\"\u003e\u003c\/span\u003e\u003cspan data-mce-fragment=\"1\"\u003e\u003c\/span\u003e\u003cspan data-mce-fragment=\"1\"\u003e\u003cstrong data-mce-fragment=\"1\"\u003ePackage included:\u003c\/strong\u003e\u003c\/span\u003e\n\u003c\/div\u003e\n\u003c\/div\u003e\n\u003cdiv data-mce-fragment=\"1\"\u003e\n\u003cul\u003e\n\u003cli\u003e\n\u003cspan data-mce-fragment=\"1\"\u003e \u003c\/span\u003e\u003cspan data-mce-fragment=\"1\"\u003e1PCS x 5A CC\/CV LED Drive Lithium charger Power Step-down Module USB Voltmeter +Case\u003c\/span\u003e\n\u003c\/li\u003e\n\u003c\/ul\u003e\n\u003c\/div\u003e\n\u003cspan data-mce-fragment=\"1\"\u003e \u003c\/span\u003e","published_at":"2020-11-19T14:45:58+08:00","created_at":"2020-11-19T14:45:57+08:00","vendor":"DIYMORE","type":"","tags":[],"price":1199,"price_min":1199,"price_max":1199,"available":true,"price_varies":false,"compare_at_price":null,"compare_at_price_min":0,"compare_at_price_max":0,"compare_at_price_varies":false,"variants":[{"id":37554047877320,"title":"Default Title","option1":"Default Title","option2":null,"option3":null,"sku":"010725","requires_shipping":true,"taxable":false,"featured_image":null,"available":true,"name":"5A CC\/CV LED Drive Step down Lithium charger Power USB Voltmeter Module CASE CA","public_title":null,"options":["Default Title"],"price":1199,"weight":0,"compare_at_price":null,"inventory_management":"shopify","barcode":null,"requires_selling_plan":false,"selling_plan_allocations":[],"quantity_rule":{"min":1,"max":null,"increment":1}}],"images":["\/\/www.diymore.cc\/cdn\/shop\/products\/010725_1.jpg?v=1605768361","\/\/www.diymore.cc\/cdn\/shop\/products\/010725_4.jpg?v=1605768361","\/\/www.diymore.cc\/cdn\/shop\/products\/010725_5.jpg?v=1605768361","\/\/www.diymore.cc\/cdn\/shop\/products\/010725_6.jpg?v=1605768362","\/\/www.diymore.cc\/cdn\/shop\/products\/010725_13.jpg?v=1605768362","\/\/www.diymore.cc\/cdn\/shop\/products\/010725_19.jpg?v=1605768362","\/\/www.diymore.cc\/cdn\/shop\/products\/010725faa.jpg?v=1605768362"],"featured_image":"\/\/www.diymore.cc\/cdn\/shop\/products\/010725_1.jpg?v=1605768361","options":["Title"],"media":[{"alt":null,"id":14987519951048,"position":1,"preview_image":{"aspect_ratio":1.0,"height":1000,"width":1000,"src":"\/\/www.diymore.cc\/cdn\/shop\/products\/010725_1.jpg?v=1605768361"},"aspect_ratio":1.0,"height":1000,"media_type":"image","src":"\/\/www.diymore.cc\/cdn\/shop\/products\/010725_1.jpg?v=1605768361","width":1000},{"alt":null,"id":14987519983816,"position":2,"preview_image":{"aspect_ratio":1.0,"height":1000,"width":1000,"src":"\/\/www.diymore.cc\/cdn\/shop\/products\/010725_4.jpg?v=1605768361"},"aspect_ratio":1.0,"height":1000,"media_type":"image","src":"\/\/www.diymore.cc\/cdn\/shop\/products\/010725_4.jpg?v=1605768361","width":1000},{"alt":null,"id":14987520016584,"position":3,"preview_image":{"aspect_ratio":1.0,"height":1000,"width":1000,"src":"\/\/www.diymore.cc\/cdn\/shop\/products\/010725_5.jpg?v=1605768361"},"aspect_ratio":1.0,"height":1000,"media_type":"image","src":"\/\/www.diymore.cc\/cdn\/shop\/products\/010725_5.jpg?v=1605768361","width":1000},{"alt":null,"id":14987520049352,"position":4,"preview_image":{"aspect_ratio":1.0,"height":1000,"width":1000,"src":"\/\/www.diymore.cc\/cdn\/shop\/products\/010725_6.jpg?v=1605768362"},"aspect_ratio":1.0,"height":1000,"media_type":"image","src":"\/\/www.diymore.cc\/cdn\/shop\/products\/010725_6.jpg?v=1605768362","width":1000},{"alt":null,"id":14987520082120,"position":5,"preview_image":{"aspect_ratio":1.0,"height":1000,"width":1000,"src":"\/\/www.diymore.cc\/cdn\/shop\/products\/010725_13.jpg?v=1605768362"},"aspect_ratio":1.0,"height":1000,"media_type":"image","src":"\/\/www.diymore.cc\/cdn\/shop\/products\/010725_13.jpg?v=1605768362","width":1000},{"alt":null,"id":14987520114888,"position":6,"preview_image":{"aspect_ratio":1.0,"height":1000,"width":1000,"src":"\/\/www.diymore.cc\/cdn\/shop\/products\/010725_19.jpg?v=1605768362"},"aspect_ratio":1.0,"height":1000,"media_type":"image","src":"\/\/www.diymore.cc\/cdn\/shop\/products\/010725_19.jpg?v=1605768362","width":1000},{"alt":null,"id":14987520147656,"position":7,"preview_image":{"aspect_ratio":1.414,"height":495,"width":700,"src":"\/\/www.diymore.cc\/cdn\/shop\/products\/010725faa.jpg?v=1605768362"},"aspect_ratio":1.414,"height":495,"media_type":"image","src":"\/\/www.diymore.cc\/cdn\/shop\/products\/010725faa.jpg?v=1605768362","width":700}],"requires_selling_plan":false,"selling_plan_groups":[],"content":"\u003cdiv data-mce-fragment=\"1\"\u003e\n\u003cspan data-mce-fragment=\"1\"\u003e\u003cstrong data-mce-fragment=\"1\"\u003e\u003c\/strong\u003e\u003c\/span\u003e\u003cspan data-mce-fragment=\"1\"\u003e\u003c\/span\u003e\n\u003cp data-mce-fragment=\"1\"\u003e\u003cspan data-mce-fragment=\"1\"\u003e\u003cstrong data-mce-fragment=\"1\"\u003eHighlights :\u003c\/strong\u003e\u003c\/span\u003e\u003c\/p\u003e\n\u003cul\u003e\n\u003cli\u003e\u003cspan data-mce-fragment=\"1\"\u003eModule with crystal shell,safer and more beautiful.\u003c\/span\u003e\u003c\/li\u003e\n\u003cli\u003e\u003cspan data-mce-fragment=\"1\"\u003eContains the voltmeter, ammeter, power meter, USB interfacefor charging the digital products.\u003c\/span\u003e\u003c\/li\u003e\n\u003c\/ul\u003e\n\u003cp data-mce-fragment=\"1\"\u003e\u003cspan data-mce-fragment=\"1\"\u003e\u003cstrong data-mce-fragment=\"1\"\u003eNote:\u003c\/strong\u003e\u003c\/span\u003e\u003c\/p\u003e\n\u003cul\u003e\n\u003cli\u003e\u003cspan data-mce-fragment=\"1\"\u003eWhen you use the product, the module inputs and outputs to be isolated from ground.\u003c\/span\u003e\u003c\/li\u003e\n\u003cli\u003e\u003cspan data-mce-fragment=\"1\"\u003eUSB output voltage is consistent with the module, not a fixed 5V output. \u003c\/span\u003e\u003c\/li\u003e\n\u003cli\u003e\u003cspan data-mce-fragment=\"1\"\u003eWhen charging for digital equipment, make sure USB output voltage is 5V.\u003c\/span\u003e\u003c\/li\u003e\n\u003cli\u003e\u003cspan data-mce-fragment=\"1\"\u003eSome customers report: “The module can not adjust the output voltage is always equal to the input voltage.”\u003c\/span\u003e\u003c\/li\u003e\n\u003cli\u003e\u003cspan data-mce-fragment=\"1\"\u003e When you encounter this problem, please counterclockwise rotation of the “voltage potentiometer” 10 laps or more, \u003c\/span\u003e\u003c\/li\u003e\n\u003cli\u003e\u003cspan data-mce-fragment=\"1\"\u003ethen use the module you can adjust the output voltage. Because the factory default output voltage of about 20V.\u003c\/span\u003e\u003c\/li\u003e\n\u003cli\u003e\u003cspan data-mce-fragment=\"1\"\u003e4.Shell assembly is very simple, but \"left\"\"right\"\"front\" panel are directional, you must pay attention during assembly!\u003c\/span\u003e\u003c\/li\u003e\n\u003c\/ul\u003e\n\u003cdiv data-mce-fragment=\"1\"\u003e\u003cspan data-mce-fragment=\"1\"\u003e\u003cstrong data-mce-fragment=\"1\"\u003eSpecifications\u003c\/strong\u003e\u003c\/span\u003e\u003c\/div\u003e\n\u003cul\u003e\n\u003cli\u003e\u003cspan data-mce-fragment=\"1\"\u003eInput voltage range:5-36VDC(Input voltagehigher than 6.2V, constant function will be effective)\u003c\/span\u003e\u003c\/li\u003e\n\u003cli\u003e\u003cspan data-mce-fragment=\"1\"\u003eOutput voltage range:1.25-32VDC adjustable(Output voltage higher than 6.2V, constant function will be effective)\u003c\/span\u003e\u003c\/li\u003e\n\u003cli\u003e\u003cspan data-mce-fragment=\"1\"\u003eOutput current: 0-5A\u003c\/span\u003e\u003c\/li\u003e\n\u003cli\u003e\u003cspan data-mce-fragment=\"1\"\u003eOutput power: 75W\u003c\/span\u003e\u003c\/li\u003e\n\u003cli\u003e\u003cspan data-mce-fragment=\"1\"\u003eHigh efficiency up to 96%\u003c\/span\u003e\u003c\/li\u003e\n\u003cli\u003e\u003cspan data-mce-fragment=\"1\"\u003eBuilt in thermal shutdown function\u003c\/span\u003e\u003c\/li\u003e\n\u003cli\u003e\u003cspan data-mce-fragment=\"1\"\u003eBuilt in current limit function\u003c\/span\u003e\u003c\/li\u003e\n\u003cli\u003e\u003cspan data-mce-fragment=\"1\"\u003eBuilt in output short protection function\u003c\/span\u003e\u003c\/li\u003e\n\u003cli\u003e\u003cspan data-mce-fragment=\"1\"\u003eInput reverse polarity protection: None (if required, high current diode in series with the input).\u003c\/span\u003e\u003c\/li\u003e\n\u003cli\u003e\u003cspan data-mce-fragment=\"1\"\u003eBare board size:L x W x H =68.2×38.8×15mm\u003c\/span\u003e\u003c\/li\u003e\n\u003cli\u003e\u003cspan data-mce-fragment=\"1\"\u003eWeight:73g\u003c\/span\u003e\u003c\/li\u003e\n\u003c\/ul\u003e\n\u003cp data-mce-fragment=\"1\"\u003e\u003cspan data-mce-fragment=\"1\"\u003e\u003cstrong data-mce-fragment=\"1\"\u003eApplication\u003c\/strong\u003e\u003c\/span\u003e\u003c\/p\u003e\n\u003cp data-mce-fragment=\"1\"\u003e\u003cspan data-mce-fragment=\"1\"\u003e\u003cstrong data-mce-fragment=\"1\"\u003eUse as a step-down modules with overcurrent protection \u003c\/strong\u003e\u003c\/span\u003e\u003c\/p\u003e\n\u003cp data-mce-fragment=\"1\"\u003e\u003cstrong\u003eUsage:\u003c\/strong\u003e\u003c\/p\u003e\n\u003cul\u003e\n\u003cli\u003e\u003cspan data-mce-fragment=\"1\"\u003eAdjust the right button so that “OUT” LED lighted, Digital meter shows the value of output voltage ,adjust the “voltage potentiometer” so that the output voltage reaches the value you want. \u003c\/span\u003e\u003c\/li\u003e\n\u003cli\u003e\u003cspan data-mce-fragment=\"1\"\u003eAdjust the right button so that Digital meter shows the value of output current;Wire shorted output terminal, then adjust the “current potentiometer” so that the output current reaches a predetermined overcurrent protection value. (For example, the Digital meter displays the current value of 4A, then you can use the module to a maximum current of 4A)\u003c\/span\u003e\u003c\/li\u003e\n\u003cli\u003e\u003cspan data-mce-fragment=\"1\"\u003eConnected to the load.\u003c\/span\u003e\u003c\/li\u003e\n\u003c\/ul\u003e\n\u003cp data-mce-fragment=\"1\"\u003e\u003cspan data-mce-fragment=\"1\"\u003e\u003cstrong data-mce-fragment=\"1\"\u003eUse as a battery charger\u003c\/strong\u003e\u003c\/span\u003e\u003c\/p\u003e\n\u003cp data-mce-fragment=\"1\"\u003e\u003cstrong\u003eUsage:\u003c\/strong\u003e\u003c\/p\u003e\n\u003cul\u003e\n\u003cli\u003e\u003cspan data-mce-fragment=\"1\"\u003eMake sure you need to charge the battery float voltage and charging current; \u003c\/span\u003e\u003c\/li\u003e\n\u003cli\u003e\u003cspan data-mce-fragment=\"1\"\u003e(if lithium parameters 3.7V\/2200mAh, then the float voltage is 4.2V, the maximum charging current 1C, ie 2200mA)\u003c\/span\u003e\u003c\/li\u003e\n\u003cli\u003e\u003cspan data-mce-fragment=\"1\"\u003eUnder no-load conditions, adjust the “Voltage potentiometer” so that the output voltage reaches the float voltage; \u003c\/span\u003e\u003c\/li\u003e\n\u003cli\u003e\u003cspan data-mce-fragment=\"1\"\u003e(if to 3.7V rechargeable lithium battery, the output voltage can be adjusted to 4.2V)\u003c\/span\u003e\u003c\/li\u003e\n\u003cli\u003e\u003cspan data-mce-fragment=\"1\"\u003eAdjust the right button so that Digital meter shows the value of output current;Wire shorted output terminal, then adjust the “current potentiometer” so that the output current reaches a predetermined Charging current value.\u003c\/span\u003e\u003c\/li\u003e\n\u003cli\u003e\u003cspan data-mce-fragment=\"1\"\u003eCharge turn lamp current factory default is 0.1 times the charging current; \u003c\/span\u003e\u003c\/li\u003e\n\u003cli\u003e\u003cspan data-mce-fragment=\"1\"\u003e(Battery during charging current is gradually reduced, if the charge current setting is 1A, then when the charge current is less than 0.1A, blue lights turned off, the green light is on, which means that the battery is fully charged)\u003c\/span\u003e\u003c\/li\u003e\n\u003cli\u003e\u003cspan data-mce-fragment=\"1\"\u003econnected to the battery charge.\u003c\/span\u003e\u003c\/li\u003e\n\u003c\/ul\u003e\n\u003cp data-mce-fragment=\"1\"\u003e\u003cspan data-mce-fragment=\"1\"\u003e(1,2,3,4 steps as: Output is unloaded, do not connect the battery)\u003c\/span\u003e\u003c\/p\u003e\n\u003cp data-mce-fragment=\"1\"\u003e\u003cspan data-mce-fragment=\"1\"\u003e\u003cstrong data-mce-fragment=\"1\"\u003eUse as a LED constant current driver module\u003c\/strong\u003e\u003c\/span\u003e\u003c\/p\u003e\n\u003cp data-mce-fragment=\"1\"\u003e\u003cstrong\u003eUsage:\u003c\/strong\u003e\u003c\/p\u003e\n\u003cul\u003e\n\u003cli\u003e\u003cspan data-mce-fragment=\"1\"\u003eAdjust the “voltage potentiometer” so that the output voltage reaches the value you want. \u003c\/span\u003e\u003c\/li\u003e\n\u003cli\u003e\u003cspan data-mce-fragment=\"1\"\u003eAdjust the right button so that Digital meter shows the value of output current;Wire shorted output terminal, then adjust the “current potentiometer” so that the output current reaches a predetermined LED operating current.\u003c\/span\u003e\u003c\/li\u003e\n\u003cli\u003e\u003cspan data-mce-fragment=\"1\"\u003eConnect LED, work.\u003c\/span\u003e\u003c\/li\u003e\n\u003cli\u003e\u003cspan data-mce-fragment=\"1\"\u003e(1,2 steps as: Output is unloaded, do not connect LED)\u003c\/span\u003e\u003c\/li\u003e\n\u003cli\u003e\u003cspan data-mce-fragment=\"1\"\u003eVoltmeter and ammeter calibration method:\u003c\/span\u003e\u003c\/li\u003e\n\u003cli\u003e\u003cspan data-mce-fragment=\"1\"\u003eModule with manual calibration function can correct display precision voltage and current, if you think the current voltage and current accuracy to meet the requirements, do not perform the following operations.\u003c\/span\u003e\u003c\/li\u003e\n\u003c\/ul\u003e\n\u003cdiv data-mce-fragment=\"1\"\u003e\u003cspan data-mce-fragment=\"1\"\u003e\u003cstrong data-mce-fragment=\"1\"\u003eOutput voltage calibration steps\u003c\/strong\u003e\u003c\/span\u003e\u003c\/div\u003e\n\u003cul\u003e\n\u003cli\u003e\u003cspan data-mce-fragment=\"1\"\u003eStep 1, adjust the right button so that “OUT” LED lighted, Digital meter shows the value of output voltage; Press the right button for more than 2 seconds, release, Digital meter and “OUT” LED flashes in synchronization so that you enter the output voltage calibration mode.\u003c\/span\u003e\u003c\/li\u003e\n\u003cli\u003e\u003cspan data-mce-fragment=\"1\"\u003eStep 2, press the right button (normal speed), the voltage value is adding up a unit; Press the left button, minus a unit; Due to a unit is less than 0.1V, the minimum voltage display to 0.1V, so you need to continuously press 1-5 times to see the voltmeter change 0.1V, how many times voltmeter change 0.1V by pressing the key, depending on the current display voltage, the higher the voltage, the fewer the number of press.\u003c\/span\u003e\u003c\/li\u003e\n\u003cli\u003e\u003cspan data-mce-fragment=\"1\"\u003eStep 3, press the right button for more than 2 seconds, release, to exit the output voltage calibration mode. All parameters set to automatically power down to save.\u003c\/span\u003e\u003c\/li\u003e\n\u003c\/ul\u003e\n\u003cp data-mce-fragment=\"1\"\u003e\u003cspan data-mce-fragment=\"1\"\u003e\u003cstrong data-mce-fragment=\"1\"\u003e Input voltage calibration steps\u003c\/strong\u003e\u003c\/span\u003e\u003c\/p\u003e\n\u003cul\u003e\n\u003cli\u003e\u003cspan data-mce-fragment=\"1\"\u003eStep 1, adjust the right button so that “IN” LED lighted, Digital meter shows the value of input voltage; press the right button for more than 2 seconds, release,Digital meter and “IN” LED flashes in synchronization so that you enter the input voltage calibration mode.\u003c\/span\u003e\u003c\/li\u003e\n\u003cli\u003e\u003cspan data-mce-fragment=\"1\"\u003eSteps 2 and 3, consistent with the output voltage calibration method.\u003c\/span\u003e\u003c\/li\u003e\n\u003c\/ul\u003e\n\u003cdiv data-mce-fragment=\"1\"\u003e\n\u003cspan data-mce-fragment=\"1\"\u003e \u003c\/span\u003e\u003cspan data-mce-fragment=\"1\"\u003e\u003cstrong data-mce-fragment=\"1\"\u003eOutput current calibration steps\u003c\/strong\u003e\u003c\/span\u003e\n\u003c\/div\u003e\n\u003cul\u003e\n\u003cli\u003e\u003cspan data-mce-fragment=\"1\"\u003eStep 1, adjust the right button so that Digital meter shows the value of output Current. Press the right button for more than 2 seconds, release, Digital meter flashes in synchronization so that you enter the output current calibration mode.\u003c\/span\u003e\u003c\/li\u003e\n\u003cli\u003e\u003cspan data-mce-fragment=\"1\"\u003eStep 2,Connected to the load, ammeter in series, adjust the right and left button to change the display of digital meter, so that is consistent with the ammeter display .\u003c\/span\u003e\u003c\/li\u003e\n\u003c\/ul\u003e\n\u003cdiv id=\"pastingspan1\" data-mce-fragment=\"1\"\u003e\n\u003cspan data-mce-fragment=\"1\"\u003e\u003c\/span\u003e\u003cspan data-mce-fragment=\"1\"\u003e\u003c\/span\u003e\u003cspan data-mce-fragment=\"1\"\u003e\u003cstrong data-mce-fragment=\"1\"\u003ePackage included:\u003c\/strong\u003e\u003c\/span\u003e\n\u003c\/div\u003e\n\u003c\/div\u003e\n\u003cdiv data-mce-fragment=\"1\"\u003e\n\u003cul\u003e\n\u003cli\u003e\n\u003cspan data-mce-fragment=\"1\"\u003e \u003c\/span\u003e\u003cspan data-mce-fragment=\"1\"\u003e1PCS x 5A CC\/CV LED Drive Lithium charger Power Step-down Module USB Voltmeter +Case\u003c\/span\u003e\n\u003c\/li\u003e\n\u003c\/ul\u003e\n\u003c\/div\u003e\n\u003cspan data-mce-fragment=\"1\"\u003e \u003c\/span\u003e"}
 -
 Translation missing: en.products.product.regular_price $8.10{"id":6090415669448,"title":"5A CC\/CV LED Drive Step down Lithium charger Power USB Voltmeter Module CASE CA","handle":"5a-cc-cv-led-drive-step-down-lithium-charger-power-usb-voltmeter-module-case-ca","description":"\u003cdiv data-mce-fragment=\"1\"\u003e\n\u003cspan data-mce-fragment=\"1\"\u003e\u003cstrong data-mce-fragment=\"1\"\u003e\u003c\/strong\u003e\u003c\/span\u003e\u003cspan data-mce-fragment=\"1\"\u003e\u003c\/span\u003e\n\u003cp data-mce-fragment=\"1\"\u003e\u003cspan data-mce-fragment=\"1\"\u003e\u003cstrong data-mce-fragment=\"1\"\u003eHighlights :\u003c\/strong\u003e\u003c\/span\u003e\u003c\/p\u003e\n\u003cul\u003e\n\u003cli\u003e\u003cspan data-mce-fragment=\"1\"\u003eModule with crystal shell,safer and more beautiful.\u003c\/span\u003e\u003c\/li\u003e\n\u003cli\u003e\u003cspan data-mce-fragment=\"1\"\u003eContains the voltmeter, ammeter, power meter, USB interfacefor charging the digital products.\u003c\/span\u003e\u003c\/li\u003e\n\u003c\/ul\u003e\n\u003cp data-mce-fragment=\"1\"\u003e\u003cspan data-mce-fragment=\"1\"\u003e\u003cstrong data-mce-fragment=\"1\"\u003eNote:\u003c\/strong\u003e\u003c\/span\u003e\u003c\/p\u003e\n\u003cul\u003e\n\u003cli\u003e\u003cspan data-mce-fragment=\"1\"\u003eWhen you use the product, the module inputs and outputs to be isolated from ground.\u003c\/span\u003e\u003c\/li\u003e\n\u003cli\u003e\u003cspan data-mce-fragment=\"1\"\u003eUSB output voltage is consistent with the module, not a fixed 5V output. \u003c\/span\u003e\u003c\/li\u003e\n\u003cli\u003e\u003cspan data-mce-fragment=\"1\"\u003eWhen charging for digital equipment, make sure USB output voltage is 5V.\u003c\/span\u003e\u003c\/li\u003e\n\u003cli\u003e\u003cspan data-mce-fragment=\"1\"\u003eSome customers report: “The module can not adjust the output voltage is always equal to the input voltage.”\u003c\/span\u003e\u003c\/li\u003e\n\u003cli\u003e\u003cspan data-mce-fragment=\"1\"\u003e When you encounter this problem, please counterclockwise rotation of the “voltage potentiometer” 10 laps or more, \u003c\/span\u003e\u003c\/li\u003e\n\u003cli\u003e\u003cspan data-mce-fragment=\"1\"\u003ethen use the module you can adjust the output voltage. Because the factory default output voltage of about 20V.\u003c\/span\u003e\u003c\/li\u003e\n\u003cli\u003e\u003cspan data-mce-fragment=\"1\"\u003e4.Shell assembly is very simple, but \"left\"\"right\"\"front\" panel are directional, you must pay attention during assembly!\u003c\/span\u003e\u003c\/li\u003e\n\u003c\/ul\u003e\n\u003cdiv data-mce-fragment=\"1\"\u003e\u003cspan data-mce-fragment=\"1\"\u003e\u003cstrong data-mce-fragment=\"1\"\u003eSpecifications\u003c\/strong\u003e\u003c\/span\u003e\u003c\/div\u003e\n\u003cul\u003e\n\u003cli\u003e\u003cspan data-mce-fragment=\"1\"\u003eInput voltage range:5-36VDC(Input voltagehigher than 6.2V, constant function will be effective)\u003c\/span\u003e\u003c\/li\u003e\n\u003cli\u003e\u003cspan data-mce-fragment=\"1\"\u003eOutput voltage range:1.25-32VDC adjustable(Output voltage higher than 6.2V, constant function will be effective)\u003c\/span\u003e\u003c\/li\u003e\n\u003cli\u003e\u003cspan data-mce-fragment=\"1\"\u003eOutput current: 0-5A\u003c\/span\u003e\u003c\/li\u003e\n\u003cli\u003e\u003cspan data-mce-fragment=\"1\"\u003eOutput power: 75W\u003c\/span\u003e\u003c\/li\u003e\n\u003cli\u003e\u003cspan data-mce-fragment=\"1\"\u003eHigh efficiency up to 96%\u003c\/span\u003e\u003c\/li\u003e\n\u003cli\u003e\u003cspan data-mce-fragment=\"1\"\u003eBuilt in thermal shutdown function\u003c\/span\u003e\u003c\/li\u003e\n\u003cli\u003e\u003cspan data-mce-fragment=\"1\"\u003eBuilt in current limit function\u003c\/span\u003e\u003c\/li\u003e\n\u003cli\u003e\u003cspan data-mce-fragment=\"1\"\u003eBuilt in output short protection function\u003c\/span\u003e\u003c\/li\u003e\n\u003cli\u003e\u003cspan data-mce-fragment=\"1\"\u003eInput reverse polarity protection: None (if required, high current diode in series with the input).\u003c\/span\u003e\u003c\/li\u003e\n\u003cli\u003e\u003cspan data-mce-fragment=\"1\"\u003eBare board size:L x W x H =68.2×38.8×15mm\u003c\/span\u003e\u003c\/li\u003e\n\u003cli\u003e\u003cspan data-mce-fragment=\"1\"\u003eWeight:73g\u003c\/span\u003e\u003c\/li\u003e\n\u003c\/ul\u003e\n\u003cp data-mce-fragment=\"1\"\u003e\u003cspan data-mce-fragment=\"1\"\u003e\u003cstrong data-mce-fragment=\"1\"\u003eApplication\u003c\/strong\u003e\u003c\/span\u003e\u003c\/p\u003e\n\u003cp data-mce-fragment=\"1\"\u003e\u003cspan data-mce-fragment=\"1\"\u003e\u003cstrong data-mce-fragment=\"1\"\u003eUse as a step-down modules with overcurrent protection \u003c\/strong\u003e\u003c\/span\u003e\u003c\/p\u003e\n\u003cp data-mce-fragment=\"1\"\u003e\u003cstrong\u003eUsage:\u003c\/strong\u003e\u003c\/p\u003e\n\u003cul\u003e\n\u003cli\u003e\u003cspan data-mce-fragment=\"1\"\u003eAdjust the right button so that “OUT” LED lighted, Digital meter shows the value of output voltage ,adjust the “voltage potentiometer” so that the output voltage reaches the value you want. \u003c\/span\u003e\u003c\/li\u003e\n\u003cli\u003e\u003cspan data-mce-fragment=\"1\"\u003eAdjust the right button so that Digital meter shows the value of output current;Wire shorted output terminal, then adjust the “current potentiometer” so that the output current reaches a predetermined overcurrent protection value. (For example, the Digital meter displays the current value of 4A, then you can use the module to a maximum current of 4A)\u003c\/span\u003e\u003c\/li\u003e\n\u003cli\u003e\u003cspan data-mce-fragment=\"1\"\u003eConnected to the load.\u003c\/span\u003e\u003c\/li\u003e\n\u003c\/ul\u003e\n\u003cp data-mce-fragment=\"1\"\u003e\u003cspan data-mce-fragment=\"1\"\u003e\u003cstrong data-mce-fragment=\"1\"\u003eUse as a battery charger\u003c\/strong\u003e\u003c\/span\u003e\u003c\/p\u003e\n\u003cp data-mce-fragment=\"1\"\u003e\u003cstrong\u003eUsage:\u003c\/strong\u003e\u003c\/p\u003e\n\u003cul\u003e\n\u003cli\u003e\u003cspan data-mce-fragment=\"1\"\u003eMake sure you need to charge the battery float voltage and charging current; \u003c\/span\u003e\u003c\/li\u003e\n\u003cli\u003e\u003cspan data-mce-fragment=\"1\"\u003e(if lithium parameters 3.7V\/2200mAh, then the float voltage is 4.2V, the maximum charging current 1C, ie 2200mA)\u003c\/span\u003e\u003c\/li\u003e\n\u003cli\u003e\u003cspan data-mce-fragment=\"1\"\u003eUnder no-load conditions, adjust the “Voltage potentiometer” so that the output voltage reaches the float voltage; \u003c\/span\u003e\u003c\/li\u003e\n\u003cli\u003e\u003cspan data-mce-fragment=\"1\"\u003e(if to 3.7V rechargeable lithium battery, the output voltage can be adjusted to 4.2V)\u003c\/span\u003e\u003c\/li\u003e\n\u003cli\u003e\u003cspan data-mce-fragment=\"1\"\u003eAdjust the right button so that Digital meter shows the value of output current;Wire shorted output terminal, then adjust the “current potentiometer” so that the output current reaches a predetermined Charging current value.\u003c\/span\u003e\u003c\/li\u003e\n\u003cli\u003e\u003cspan data-mce-fragment=\"1\"\u003eCharge turn lamp current factory default is 0.1 times the charging current; \u003c\/span\u003e\u003c\/li\u003e\n\u003cli\u003e\u003cspan data-mce-fragment=\"1\"\u003e(Battery during charging current is gradually reduced, if the charge current setting is 1A, then when the charge current is less than 0.1A, blue lights turned off, the green light is on, which means that the battery is fully charged)\u003c\/span\u003e\u003c\/li\u003e\n\u003cli\u003e\u003cspan data-mce-fragment=\"1\"\u003econnected to the battery charge.\u003c\/span\u003e\u003c\/li\u003e\n\u003c\/ul\u003e\n\u003cp data-mce-fragment=\"1\"\u003e\u003cspan data-mce-fragment=\"1\"\u003e(1,2,3,4 steps as: Output is unloaded, do not connect the battery)\u003c\/span\u003e\u003c\/p\u003e\n\u003cp data-mce-fragment=\"1\"\u003e\u003cspan data-mce-fragment=\"1\"\u003e\u003cstrong data-mce-fragment=\"1\"\u003eUse as a LED constant current driver module\u003c\/strong\u003e\u003c\/span\u003e\u003c\/p\u003e\n\u003cp data-mce-fragment=\"1\"\u003e\u003cstrong\u003eUsage:\u003c\/strong\u003e\u003c\/p\u003e\n\u003cul\u003e\n\u003cli\u003e\u003cspan data-mce-fragment=\"1\"\u003eAdjust the “voltage potentiometer” so that the output voltage reaches the value you want. \u003c\/span\u003e\u003c\/li\u003e\n\u003cli\u003e\u003cspan data-mce-fragment=\"1\"\u003eAdjust the right button so that Digital meter shows the value of output current;Wire shorted output terminal, then adjust the “current potentiometer” so that the output current reaches a predetermined LED operating current.\u003c\/span\u003e\u003c\/li\u003e\n\u003cli\u003e\u003cspan data-mce-fragment=\"1\"\u003eConnect LED, work.\u003c\/span\u003e\u003c\/li\u003e\n\u003cli\u003e\u003cspan data-mce-fragment=\"1\"\u003e(1,2 steps as: Output is unloaded, do not connect LED)\u003c\/span\u003e\u003c\/li\u003e\n\u003cli\u003e\u003cspan data-mce-fragment=\"1\"\u003eVoltmeter and ammeter calibration method:\u003c\/span\u003e\u003c\/li\u003e\n\u003cli\u003e\u003cspan data-mce-fragment=\"1\"\u003eModule with manual calibration function can correct display precision voltage and current, if you think the current voltage and current accuracy to meet the requirements, do not perform the following operations.\u003c\/span\u003e\u003c\/li\u003e\n\u003c\/ul\u003e\n\u003cdiv data-mce-fragment=\"1\"\u003e\u003cspan data-mce-fragment=\"1\"\u003e\u003cstrong data-mce-fragment=\"1\"\u003eOutput voltage calibration steps\u003c\/strong\u003e\u003c\/span\u003e\u003c\/div\u003e\n\u003cul\u003e\n\u003cli\u003e\u003cspan data-mce-fragment=\"1\"\u003eStep 1, adjust the right button so that “OUT” LED lighted, Digital meter shows the value of output voltage; Press the right button for more than 2 seconds, release, Digital meter and “OUT” LED flashes in synchronization so that you enter the output voltage calibration mode.\u003c\/span\u003e\u003c\/li\u003e\n\u003cli\u003e\u003cspan data-mce-fragment=\"1\"\u003eStep 2, press the right button (normal speed), the voltage value is adding up a unit; Press the left button, minus a unit; Due to a unit is less than 0.1V, the minimum voltage display to 0.1V, so you need to continuously press 1-5 times to see the voltmeter change 0.1V, how many times voltmeter change 0.1V by pressing the key, depending on the current display voltage, the higher the voltage, the fewer the number of press.\u003c\/span\u003e\u003c\/li\u003e\n\u003cli\u003e\u003cspan data-mce-fragment=\"1\"\u003eStep 3, press the right button for more than 2 seconds, release, to exit the output voltage calibration mode. All parameters set to automatically power down to save.\u003c\/span\u003e\u003c\/li\u003e\n\u003c\/ul\u003e\n\u003cp data-mce-fragment=\"1\"\u003e\u003cspan data-mce-fragment=\"1\"\u003e\u003cstrong data-mce-fragment=\"1\"\u003e Input voltage calibration steps\u003c\/strong\u003e\u003c\/span\u003e\u003c\/p\u003e\n\u003cul\u003e\n\u003cli\u003e\u003cspan data-mce-fragment=\"1\"\u003eStep 1, adjust the right button so that “IN” LED lighted, Digital meter shows the value of input voltage; press the right button for more than 2 seconds, release,Digital meter and “IN” LED flashes in synchronization so that you enter the input voltage calibration mode.\u003c\/span\u003e\u003c\/li\u003e\n\u003cli\u003e\u003cspan data-mce-fragment=\"1\"\u003eSteps 2 and 3, consistent with the output voltage calibration method.\u003c\/span\u003e\u003c\/li\u003e\n\u003c\/ul\u003e\n\u003cdiv data-mce-fragment=\"1\"\u003e\n\u003cspan data-mce-fragment=\"1\"\u003e \u003c\/span\u003e\u003cspan data-mce-fragment=\"1\"\u003e\u003cstrong data-mce-fragment=\"1\"\u003eOutput current calibration steps\u003c\/strong\u003e\u003c\/span\u003e\n\u003c\/div\u003e\n\u003cul\u003e\n\u003cli\u003e\u003cspan data-mce-fragment=\"1\"\u003eStep 1, adjust the right button so that Digital meter shows the value of output Current. Press the right button for more than 2 seconds, release, Digital meter flashes in synchronization so that you enter the output current calibration mode.\u003c\/span\u003e\u003c\/li\u003e\n\u003cli\u003e\u003cspan data-mce-fragment=\"1\"\u003eStep 2,Connected to the load, ammeter in series, adjust the right and left button to change the display of digital meter, so that is consistent with the ammeter display .\u003c\/span\u003e\u003c\/li\u003e\n\u003c\/ul\u003e\n\u003cdiv id=\"pastingspan1\" data-mce-fragment=\"1\"\u003e\n\u003cspan data-mce-fragment=\"1\"\u003e\u003c\/span\u003e\u003cspan data-mce-fragment=\"1\"\u003e\u003c\/span\u003e\u003cspan data-mce-fragment=\"1\"\u003e\u003cstrong data-mce-fragment=\"1\"\u003ePackage included:\u003c\/strong\u003e\u003c\/span\u003e\n\u003c\/div\u003e\n\u003c\/div\u003e\n\u003cdiv data-mce-fragment=\"1\"\u003e\n\u003cul\u003e\n\u003cli\u003e\n\u003cspan data-mce-fragment=\"1\"\u003e \u003c\/span\u003e\u003cspan data-mce-fragment=\"1\"\u003e1PCS x 5A CC\/CV LED Drive Lithium charger Power Step-down Module USB Voltmeter +Case\u003c\/span\u003e\n\u003c\/li\u003e\n\u003c\/ul\u003e\n\u003c\/div\u003e\n\u003cspan data-mce-fragment=\"1\"\u003e \u003c\/span\u003e","published_at":"2020-11-19T14:45:58+08:00","created_at":"2020-11-19T14:45:57+08:00","vendor":"DIYMORE","type":"","tags":[],"price":1199,"price_min":1199,"price_max":1199,"available":true,"price_varies":false,"compare_at_price":null,"compare_at_price_min":0,"compare_at_price_max":0,"compare_at_price_varies":false,"variants":[{"id":37554047877320,"title":"Default Title","option1":"Default Title","option2":null,"option3":null,"sku":"010725","requires_shipping":true,"taxable":false,"featured_image":null,"available":true,"name":"5A CC\/CV LED Drive Step down Lithium charger Power USB Voltmeter Module CASE CA","public_title":null,"options":["Default Title"],"price":1199,"weight":0,"compare_at_price":null,"inventory_management":"shopify","barcode":null,"requires_selling_plan":false,"selling_plan_allocations":[],"quantity_rule":{"min":1,"max":null,"increment":1}}],"images":["\/\/www.diymore.cc\/cdn\/shop\/products\/010725_1.jpg?v=1605768361","\/\/www.diymore.cc\/cdn\/shop\/products\/010725_4.jpg?v=1605768361","\/\/www.diymore.cc\/cdn\/shop\/products\/010725_5.jpg?v=1605768361","\/\/www.diymore.cc\/cdn\/shop\/products\/010725_6.jpg?v=1605768362","\/\/www.diymore.cc\/cdn\/shop\/products\/010725_13.jpg?v=1605768362","\/\/www.diymore.cc\/cdn\/shop\/products\/010725_19.jpg?v=1605768362","\/\/www.diymore.cc\/cdn\/shop\/products\/010725faa.jpg?v=1605768362"],"featured_image":"\/\/www.diymore.cc\/cdn\/shop\/products\/010725_1.jpg?v=1605768361","options":["Title"],"media":[{"alt":null,"id":14987519951048,"position":1,"preview_image":{"aspect_ratio":1.0,"height":1000,"width":1000,"src":"\/\/www.diymore.cc\/cdn\/shop\/products\/010725_1.jpg?v=1605768361"},"aspect_ratio":1.0,"height":1000,"media_type":"image","src":"\/\/www.diymore.cc\/cdn\/shop\/products\/010725_1.jpg?v=1605768361","width":1000},{"alt":null,"id":14987519983816,"position":2,"preview_image":{"aspect_ratio":1.0,"height":1000,"width":1000,"src":"\/\/www.diymore.cc\/cdn\/shop\/products\/010725_4.jpg?v=1605768361"},"aspect_ratio":1.0,"height":1000,"media_type":"image","src":"\/\/www.diymore.cc\/cdn\/shop\/products\/010725_4.jpg?v=1605768361","width":1000},{"alt":null,"id":14987520016584,"position":3,"preview_image":{"aspect_ratio":1.0,"height":1000,"width":1000,"src":"\/\/www.diymore.cc\/cdn\/shop\/products\/010725_5.jpg?v=1605768361"},"aspect_ratio":1.0,"height":1000,"media_type":"image","src":"\/\/www.diymore.cc\/cdn\/shop\/products\/010725_5.jpg?v=1605768361","width":1000},{"alt":null,"id":14987520049352,"position":4,"preview_image":{"aspect_ratio":1.0,"height":1000,"width":1000,"src":"\/\/www.diymore.cc\/cdn\/shop\/products\/010725_6.jpg?v=1605768362"},"aspect_ratio":1.0,"height":1000,"media_type":"image","src":"\/\/www.diymore.cc\/cdn\/shop\/products\/010725_6.jpg?v=1605768362","width":1000},{"alt":null,"id":14987520082120,"position":5,"preview_image":{"aspect_ratio":1.0,"height":1000,"width":1000,"src":"\/\/www.diymore.cc\/cdn\/shop\/products\/010725_13.jpg?v=1605768362"},"aspect_ratio":1.0,"height":1000,"media_type":"image","src":"\/\/www.diymore.cc\/cdn\/shop\/products\/010725_13.jpg?v=1605768362","width":1000},{"alt":null,"id":14987520114888,"position":6,"preview_image":{"aspect_ratio":1.0,"height":1000,"width":1000,"src":"\/\/www.diymore.cc\/cdn\/shop\/products\/010725_19.jpg?v=1605768362"},"aspect_ratio":1.0,"height":1000,"media_type":"image","src":"\/\/www.diymore.cc\/cdn\/shop\/products\/010725_19.jpg?v=1605768362","width":1000},{"alt":null,"id":14987520147656,"position":7,"preview_image":{"aspect_ratio":1.414,"height":495,"width":700,"src":"\/\/www.diymore.cc\/cdn\/shop\/products\/010725faa.jpg?v=1605768362"},"aspect_ratio":1.414,"height":495,"media_type":"image","src":"\/\/www.diymore.cc\/cdn\/shop\/products\/010725faa.jpg?v=1605768362","width":700}],"requires_selling_plan":false,"selling_plan_groups":[],"content":"\u003cdiv data-mce-fragment=\"1\"\u003e\n\u003cspan data-mce-fragment=\"1\"\u003e\u003cstrong data-mce-fragment=\"1\"\u003e\u003c\/strong\u003e\u003c\/span\u003e\u003cspan data-mce-fragment=\"1\"\u003e\u003c\/span\u003e\n\u003cp data-mce-fragment=\"1\"\u003e\u003cspan data-mce-fragment=\"1\"\u003e\u003cstrong data-mce-fragment=\"1\"\u003eHighlights :\u003c\/strong\u003e\u003c\/span\u003e\u003c\/p\u003e\n\u003cul\u003e\n\u003cli\u003e\u003cspan data-mce-fragment=\"1\"\u003eModule with crystal shell,safer and more beautiful.\u003c\/span\u003e\u003c\/li\u003e\n\u003cli\u003e\u003cspan data-mce-fragment=\"1\"\u003eContains the voltmeter, ammeter, power meter, USB interfacefor charging the digital products.\u003c\/span\u003e\u003c\/li\u003e\n\u003c\/ul\u003e\n\u003cp data-mce-fragment=\"1\"\u003e\u003cspan data-mce-fragment=\"1\"\u003e\u003cstrong data-mce-fragment=\"1\"\u003eNote:\u003c\/strong\u003e\u003c\/span\u003e\u003c\/p\u003e\n\u003cul\u003e\n\u003cli\u003e\u003cspan data-mce-fragment=\"1\"\u003eWhen you use the product, the module inputs and outputs to be isolated from ground.\u003c\/span\u003e\u003c\/li\u003e\n\u003cli\u003e\u003cspan data-mce-fragment=\"1\"\u003eUSB output voltage is consistent with the module, not a fixed 5V output. \u003c\/span\u003e\u003c\/li\u003e\n\u003cli\u003e\u003cspan data-mce-fragment=\"1\"\u003eWhen charging for digital equipment, make sure USB output voltage is 5V.\u003c\/span\u003e\u003c\/li\u003e\n\u003cli\u003e\u003cspan data-mce-fragment=\"1\"\u003eSome customers report: “The module can not adjust the output voltage is always equal to the input voltage.”\u003c\/span\u003e\u003c\/li\u003e\n\u003cli\u003e\u003cspan data-mce-fragment=\"1\"\u003e When you encounter this problem, please counterclockwise rotation of the “voltage potentiometer” 10 laps or more, \u003c\/span\u003e\u003c\/li\u003e\n\u003cli\u003e\u003cspan data-mce-fragment=\"1\"\u003ethen use the module you can adjust the output voltage. Because the factory default output voltage of about 20V.\u003c\/span\u003e\u003c\/li\u003e\n\u003cli\u003e\u003cspan data-mce-fragment=\"1\"\u003e4.Shell assembly is very simple, but \"left\"\"right\"\"front\" panel are directional, you must pay attention during assembly!\u003c\/span\u003e\u003c\/li\u003e\n\u003c\/ul\u003e\n\u003cdiv data-mce-fragment=\"1\"\u003e\u003cspan data-mce-fragment=\"1\"\u003e\u003cstrong data-mce-fragment=\"1\"\u003eSpecifications\u003c\/strong\u003e\u003c\/span\u003e\u003c\/div\u003e\n\u003cul\u003e\n\u003cli\u003e\u003cspan data-mce-fragment=\"1\"\u003eInput voltage range:5-36VDC(Input voltagehigher than 6.2V, constant function will be effective)\u003c\/span\u003e\u003c\/li\u003e\n\u003cli\u003e\u003cspan data-mce-fragment=\"1\"\u003eOutput voltage range:1.25-32VDC adjustable(Output voltage higher than 6.2V, constant function will be effective)\u003c\/span\u003e\u003c\/li\u003e\n\u003cli\u003e\u003cspan data-mce-fragment=\"1\"\u003eOutput current: 0-5A\u003c\/span\u003e\u003c\/li\u003e\n\u003cli\u003e\u003cspan data-mce-fragment=\"1\"\u003eOutput power: 75W\u003c\/span\u003e\u003c\/li\u003e\n\u003cli\u003e\u003cspan data-mce-fragment=\"1\"\u003eHigh efficiency up to 96%\u003c\/span\u003e\u003c\/li\u003e\n\u003cli\u003e\u003cspan data-mce-fragment=\"1\"\u003eBuilt in thermal shutdown function\u003c\/span\u003e\u003c\/li\u003e\n\u003cli\u003e\u003cspan data-mce-fragment=\"1\"\u003eBuilt in current limit function\u003c\/span\u003e\u003c\/li\u003e\n\u003cli\u003e\u003cspan data-mce-fragment=\"1\"\u003eBuilt in output short protection function\u003c\/span\u003e\u003c\/li\u003e\n\u003cli\u003e\u003cspan data-mce-fragment=\"1\"\u003eInput reverse polarity protection: None (if required, high current diode in series with the input).\u003c\/span\u003e\u003c\/li\u003e\n\u003cli\u003e\u003cspan data-mce-fragment=\"1\"\u003eBare board size:L x W x H =68.2×38.8×15mm\u003c\/span\u003e\u003c\/li\u003e\n\u003cli\u003e\u003cspan data-mce-fragment=\"1\"\u003eWeight:73g\u003c\/span\u003e\u003c\/li\u003e\n\u003c\/ul\u003e\n\u003cp data-mce-fragment=\"1\"\u003e\u003cspan data-mce-fragment=\"1\"\u003e\u003cstrong data-mce-fragment=\"1\"\u003eApplication\u003c\/strong\u003e\u003c\/span\u003e\u003c\/p\u003e\n\u003cp data-mce-fragment=\"1\"\u003e\u003cspan data-mce-fragment=\"1\"\u003e\u003cstrong data-mce-fragment=\"1\"\u003eUse as a step-down modules with overcurrent protection \u003c\/strong\u003e\u003c\/span\u003e\u003c\/p\u003e\n\u003cp data-mce-fragment=\"1\"\u003e\u003cstrong\u003eUsage:\u003c\/strong\u003e\u003c\/p\u003e\n\u003cul\u003e\n\u003cli\u003e\u003cspan data-mce-fragment=\"1\"\u003eAdjust the right button so that “OUT” LED lighted, Digital meter shows the value of output voltage ,adjust the “voltage potentiometer” so that the output voltage reaches the value you want. \u003c\/span\u003e\u003c\/li\u003e\n\u003cli\u003e\u003cspan data-mce-fragment=\"1\"\u003eAdjust the right button so that Digital meter shows the value of output current;Wire shorted output terminal, then adjust the “current potentiometer” so that the output current reaches a predetermined overcurrent protection value. (For example, the Digital meter displays the current value of 4A, then you can use the module to a maximum current of 4A)\u003c\/span\u003e\u003c\/li\u003e\n\u003cli\u003e\u003cspan data-mce-fragment=\"1\"\u003eConnected to the load.\u003c\/span\u003e\u003c\/li\u003e\n\u003c\/ul\u003e\n\u003cp data-mce-fragment=\"1\"\u003e\u003cspan data-mce-fragment=\"1\"\u003e\u003cstrong data-mce-fragment=\"1\"\u003eUse as a battery charger\u003c\/strong\u003e\u003c\/span\u003e\u003c\/p\u003e\n\u003cp data-mce-fragment=\"1\"\u003e\u003cstrong\u003eUsage:\u003c\/strong\u003e\u003c\/p\u003e\n\u003cul\u003e\n\u003cli\u003e\u003cspan data-mce-fragment=\"1\"\u003eMake sure you need to charge the battery float voltage and charging current; \u003c\/span\u003e\u003c\/li\u003e\n\u003cli\u003e\u003cspan data-mce-fragment=\"1\"\u003e(if lithium parameters 3.7V\/2200mAh, then the float voltage is 4.2V, the maximum charging current 1C, ie 2200mA)\u003c\/span\u003e\u003c\/li\u003e\n\u003cli\u003e\u003cspan data-mce-fragment=\"1\"\u003eUnder no-load conditions, adjust the “Voltage potentiometer” so that the output voltage reaches the float voltage; \u003c\/span\u003e\u003c\/li\u003e\n\u003cli\u003e\u003cspan data-mce-fragment=\"1\"\u003e(if to 3.7V rechargeable lithium battery, the output voltage can be adjusted to 4.2V)\u003c\/span\u003e\u003c\/li\u003e\n\u003cli\u003e\u003cspan data-mce-fragment=\"1\"\u003eAdjust the right button so that Digital meter shows the value of output current;Wire shorted output terminal, then adjust the “current potentiometer” so that the output current reaches a predetermined Charging current value.\u003c\/span\u003e\u003c\/li\u003e\n\u003cli\u003e\u003cspan data-mce-fragment=\"1\"\u003eCharge turn lamp current factory default is 0.1 times the charging current; \u003c\/span\u003e\u003c\/li\u003e\n\u003cli\u003e\u003cspan data-mce-fragment=\"1\"\u003e(Battery during charging current is gradually reduced, if the charge current setting is 1A, then when the charge current is less than 0.1A, blue lights turned off, the green light is on, which means that the battery is fully charged)\u003c\/span\u003e\u003c\/li\u003e\n\u003cli\u003e\u003cspan data-mce-fragment=\"1\"\u003econnected to the battery charge.\u003c\/span\u003e\u003c\/li\u003e\n\u003c\/ul\u003e\n\u003cp data-mce-fragment=\"1\"\u003e\u003cspan data-mce-fragment=\"1\"\u003e(1,2,3,4 steps as: Output is unloaded, do not connect the battery)\u003c\/span\u003e\u003c\/p\u003e\n\u003cp data-mce-fragment=\"1\"\u003e\u003cspan data-mce-fragment=\"1\"\u003e\u003cstrong data-mce-fragment=\"1\"\u003eUse as a LED constant current driver module\u003c\/strong\u003e\u003c\/span\u003e\u003c\/p\u003e\n\u003cp data-mce-fragment=\"1\"\u003e\u003cstrong\u003eUsage:\u003c\/strong\u003e\u003c\/p\u003e\n\u003cul\u003e\n\u003cli\u003e\u003cspan data-mce-fragment=\"1\"\u003eAdjust the “voltage potentiometer” so that the output voltage reaches the value you want. \u003c\/span\u003e\u003c\/li\u003e\n\u003cli\u003e\u003cspan data-mce-fragment=\"1\"\u003eAdjust the right button so that Digital meter shows the value of output current;Wire shorted output terminal, then adjust the “current potentiometer” so that the output current reaches a predetermined LED operating current.\u003c\/span\u003e\u003c\/li\u003e\n\u003cli\u003e\u003cspan data-mce-fragment=\"1\"\u003eConnect LED, work.\u003c\/span\u003e\u003c\/li\u003e\n\u003cli\u003e\u003cspan data-mce-fragment=\"1\"\u003e(1,2 steps as: Output is unloaded, do not connect LED)\u003c\/span\u003e\u003c\/li\u003e\n\u003cli\u003e\u003cspan data-mce-fragment=\"1\"\u003eVoltmeter and ammeter calibration method:\u003c\/span\u003e\u003c\/li\u003e\n\u003cli\u003e\u003cspan data-mce-fragment=\"1\"\u003eModule with manual calibration function can correct display precision voltage and current, if you think the current voltage and current accuracy to meet the requirements, do not perform the following operations.\u003c\/span\u003e\u003c\/li\u003e\n\u003c\/ul\u003e\n\u003cdiv data-mce-fragment=\"1\"\u003e\u003cspan data-mce-fragment=\"1\"\u003e\u003cstrong data-mce-fragment=\"1\"\u003eOutput voltage calibration steps\u003c\/strong\u003e\u003c\/span\u003e\u003c\/div\u003e\n\u003cul\u003e\n\u003cli\u003e\u003cspan data-mce-fragment=\"1\"\u003eStep 1, adjust the right button so that “OUT” LED lighted, Digital meter shows the value of output voltage; Press the right button for more than 2 seconds, release, Digital meter and “OUT” LED flashes in synchronization so that you enter the output voltage calibration mode.\u003c\/span\u003e\u003c\/li\u003e\n\u003cli\u003e\u003cspan data-mce-fragment=\"1\"\u003eStep 2, press the right button (normal speed), the voltage value is adding up a unit; Press the left button, minus a unit; Due to a unit is less than 0.1V, the minimum voltage display to 0.1V, so you need to continuously press 1-5 times to see the voltmeter change 0.1V, how many times voltmeter change 0.1V by pressing the key, depending on the current display voltage, the higher the voltage, the fewer the number of press.\u003c\/span\u003e\u003c\/li\u003e\n\u003cli\u003e\u003cspan data-mce-fragment=\"1\"\u003eStep 3, press the right button for more than 2 seconds, release, to exit the output voltage calibration mode. All parameters set to automatically power down to save.\u003c\/span\u003e\u003c\/li\u003e\n\u003c\/ul\u003e\n\u003cp data-mce-fragment=\"1\"\u003e\u003cspan data-mce-fragment=\"1\"\u003e\u003cstrong data-mce-fragment=\"1\"\u003e Input voltage calibration steps\u003c\/strong\u003e\u003c\/span\u003e\u003c\/p\u003e\n\u003cul\u003e\n\u003cli\u003e\u003cspan data-mce-fragment=\"1\"\u003eStep 1, adjust the right button so that “IN” LED lighted, Digital meter shows the value of input voltage; press the right button for more than 2 seconds, release,Digital meter and “IN” LED flashes in synchronization so that you enter the input voltage calibration mode.\u003c\/span\u003e\u003c\/li\u003e\n\u003cli\u003e\u003cspan data-mce-fragment=\"1\"\u003eSteps 2 and 3, consistent with the output voltage calibration method.\u003c\/span\u003e\u003c\/li\u003e\n\u003c\/ul\u003e\n\u003cdiv data-mce-fragment=\"1\"\u003e\n\u003cspan data-mce-fragment=\"1\"\u003e \u003c\/span\u003e\u003cspan data-mce-fragment=\"1\"\u003e\u003cstrong data-mce-fragment=\"1\"\u003eOutput current calibration steps\u003c\/strong\u003e\u003c\/span\u003e\n\u003c\/div\u003e\n\u003cul\u003e\n\u003cli\u003e\u003cspan data-mce-fragment=\"1\"\u003eStep 1, adjust the right button so that Digital meter shows the value of output Current. Press the right button for more than 2 seconds, release, Digital meter flashes in synchronization so that you enter the output current calibration mode.\u003c\/span\u003e\u003c\/li\u003e\n\u003cli\u003e\u003cspan data-mce-fragment=\"1\"\u003eStep 2,Connected to the load, ammeter in series, adjust the right and left button to change the display of digital meter, so that is consistent with the ammeter display .\u003c\/span\u003e\u003c\/li\u003e\n\u003c\/ul\u003e\n\u003cdiv id=\"pastingspan1\" data-mce-fragment=\"1\"\u003e\n\u003cspan data-mce-fragment=\"1\"\u003e\u003c\/span\u003e\u003cspan data-mce-fragment=\"1\"\u003e\u003c\/span\u003e\u003cspan data-mce-fragment=\"1\"\u003e\u003cstrong data-mce-fragment=\"1\"\u003ePackage included:\u003c\/strong\u003e\u003c\/span\u003e\n\u003c\/div\u003e\n\u003c\/div\u003e\n\u003cdiv data-mce-fragment=\"1\"\u003e\n\u003cul\u003e\n\u003cli\u003e\n\u003cspan data-mce-fragment=\"1\"\u003e \u003c\/span\u003e\u003cspan data-mce-fragment=\"1\"\u003e1PCS x 5A CC\/CV LED Drive Lithium charger Power Step-down Module USB Voltmeter +Case\u003c\/span\u003e\n\u003c\/li\u003e\n\u003c\/ul\u003e\n\u003c\/div\u003e\n\u003cspan data-mce-fragment=\"1\"\u003e \u003c\/span\u003e"}
 -
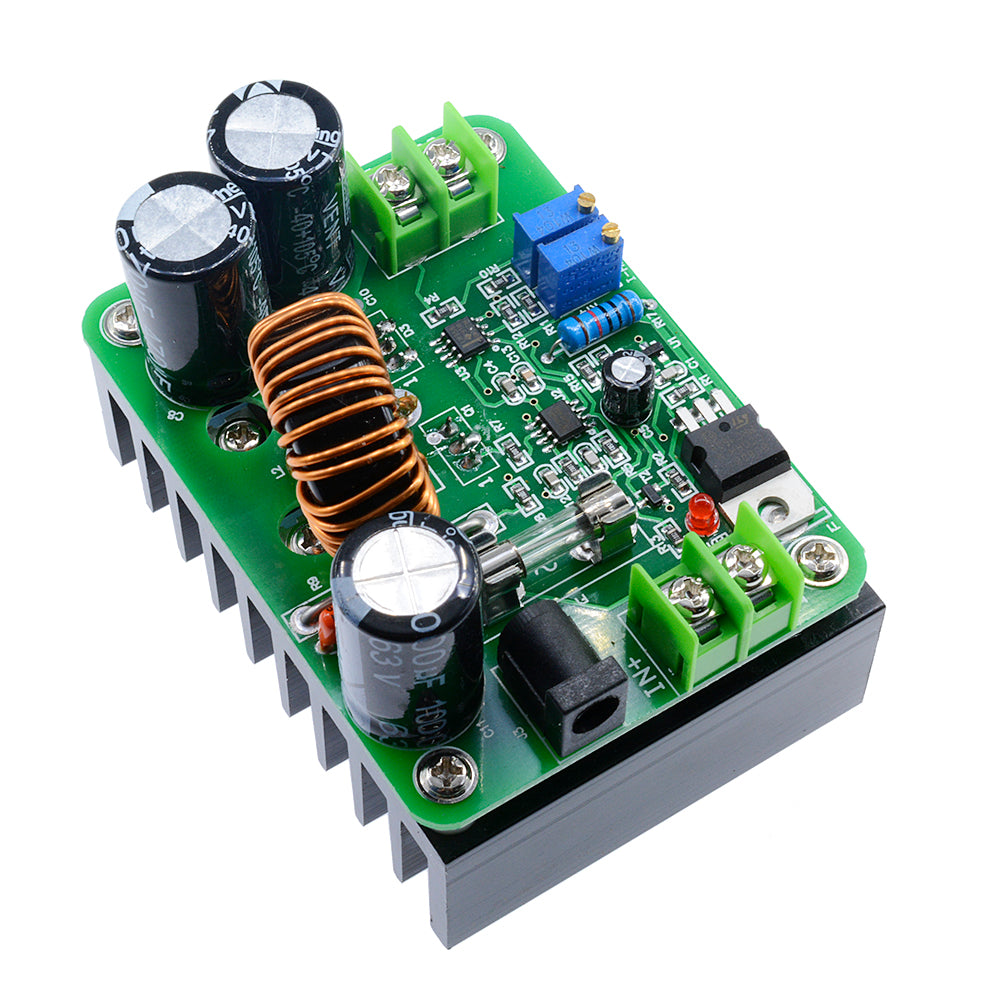
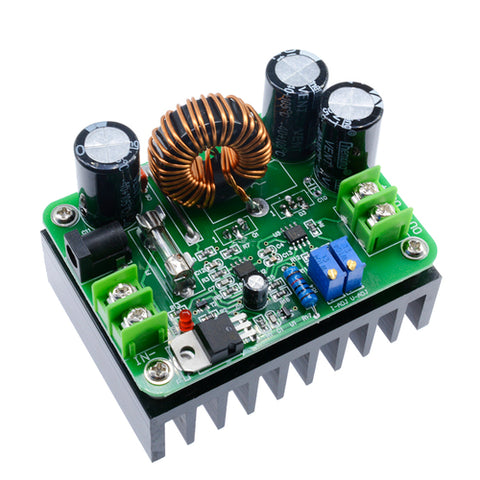 Translation missing: en.products.product.regular_price $8.00{"id":6090415669448,"title":"5A CC\/CV LED Drive Step down Lithium charger Power USB Voltmeter Module CASE CA","handle":"5a-cc-cv-led-drive-step-down-lithium-charger-power-usb-voltmeter-module-case-ca","description":"\u003cdiv data-mce-fragment=\"1\"\u003e\n\u003cspan data-mce-fragment=\"1\"\u003e\u003cstrong data-mce-fragment=\"1\"\u003e\u003c\/strong\u003e\u003c\/span\u003e\u003cspan data-mce-fragment=\"1\"\u003e\u003c\/span\u003e\n\u003cp data-mce-fragment=\"1\"\u003e\u003cspan data-mce-fragment=\"1\"\u003e\u003cstrong data-mce-fragment=\"1\"\u003eHighlights :\u003c\/strong\u003e\u003c\/span\u003e\u003c\/p\u003e\n\u003cul\u003e\n\u003cli\u003e\u003cspan data-mce-fragment=\"1\"\u003eModule with crystal shell,safer and more beautiful.\u003c\/span\u003e\u003c\/li\u003e\n\u003cli\u003e\u003cspan data-mce-fragment=\"1\"\u003eContains the voltmeter, ammeter, power meter, USB interfacefor charging the digital products.\u003c\/span\u003e\u003c\/li\u003e\n\u003c\/ul\u003e\n\u003cp data-mce-fragment=\"1\"\u003e\u003cspan data-mce-fragment=\"1\"\u003e\u003cstrong data-mce-fragment=\"1\"\u003eNote:\u003c\/strong\u003e\u003c\/span\u003e\u003c\/p\u003e\n\u003cul\u003e\n\u003cli\u003e\u003cspan data-mce-fragment=\"1\"\u003eWhen you use the product, the module inputs and outputs to be isolated from ground.\u003c\/span\u003e\u003c\/li\u003e\n\u003cli\u003e\u003cspan data-mce-fragment=\"1\"\u003eUSB output voltage is consistent with the module, not a fixed 5V output. \u003c\/span\u003e\u003c\/li\u003e\n\u003cli\u003e\u003cspan data-mce-fragment=\"1\"\u003eWhen charging for digital equipment, make sure USB output voltage is 5V.\u003c\/span\u003e\u003c\/li\u003e\n\u003cli\u003e\u003cspan data-mce-fragment=\"1\"\u003eSome customers report: “The module can not adjust the output voltage is always equal to the input voltage.”\u003c\/span\u003e\u003c\/li\u003e\n\u003cli\u003e\u003cspan data-mce-fragment=\"1\"\u003e When you encounter this problem, please counterclockwise rotation of the “voltage potentiometer” 10 laps or more, \u003c\/span\u003e\u003c\/li\u003e\n\u003cli\u003e\u003cspan data-mce-fragment=\"1\"\u003ethen use the module you can adjust the output voltage. Because the factory default output voltage of about 20V.\u003c\/span\u003e\u003c\/li\u003e\n\u003cli\u003e\u003cspan data-mce-fragment=\"1\"\u003e4.Shell assembly is very simple, but \"left\"\"right\"\"front\" panel are directional, you must pay attention during assembly!\u003c\/span\u003e\u003c\/li\u003e\n\u003c\/ul\u003e\n\u003cdiv data-mce-fragment=\"1\"\u003e\u003cspan data-mce-fragment=\"1\"\u003e\u003cstrong data-mce-fragment=\"1\"\u003eSpecifications\u003c\/strong\u003e\u003c\/span\u003e\u003c\/div\u003e\n\u003cul\u003e\n\u003cli\u003e\u003cspan data-mce-fragment=\"1\"\u003eInput voltage range:5-36VDC(Input voltagehigher than 6.2V, constant function will be effective)\u003c\/span\u003e\u003c\/li\u003e\n\u003cli\u003e\u003cspan data-mce-fragment=\"1\"\u003eOutput voltage range:1.25-32VDC adjustable(Output voltage higher than 6.2V, constant function will be effective)\u003c\/span\u003e\u003c\/li\u003e\n\u003cli\u003e\u003cspan data-mce-fragment=\"1\"\u003eOutput current: 0-5A\u003c\/span\u003e\u003c\/li\u003e\n\u003cli\u003e\u003cspan data-mce-fragment=\"1\"\u003eOutput power: 75W\u003c\/span\u003e\u003c\/li\u003e\n\u003cli\u003e\u003cspan data-mce-fragment=\"1\"\u003eHigh efficiency up to 96%\u003c\/span\u003e\u003c\/li\u003e\n\u003cli\u003e\u003cspan data-mce-fragment=\"1\"\u003eBuilt in thermal shutdown function\u003c\/span\u003e\u003c\/li\u003e\n\u003cli\u003e\u003cspan data-mce-fragment=\"1\"\u003eBuilt in current limit function\u003c\/span\u003e\u003c\/li\u003e\n\u003cli\u003e\u003cspan data-mce-fragment=\"1\"\u003eBuilt in output short protection function\u003c\/span\u003e\u003c\/li\u003e\n\u003cli\u003e\u003cspan data-mce-fragment=\"1\"\u003eInput reverse polarity protection: None (if required, high current diode in series with the input).\u003c\/span\u003e\u003c\/li\u003e\n\u003cli\u003e\u003cspan data-mce-fragment=\"1\"\u003eBare board size:L x W x H =68.2×38.8×15mm\u003c\/span\u003e\u003c\/li\u003e\n\u003cli\u003e\u003cspan data-mce-fragment=\"1\"\u003eWeight:73g\u003c\/span\u003e\u003c\/li\u003e\n\u003c\/ul\u003e\n\u003cp data-mce-fragment=\"1\"\u003e\u003cspan data-mce-fragment=\"1\"\u003e\u003cstrong data-mce-fragment=\"1\"\u003eApplication\u003c\/strong\u003e\u003c\/span\u003e\u003c\/p\u003e\n\u003cp data-mce-fragment=\"1\"\u003e\u003cspan data-mce-fragment=\"1\"\u003e\u003cstrong data-mce-fragment=\"1\"\u003eUse as a step-down modules with overcurrent protection \u003c\/strong\u003e\u003c\/span\u003e\u003c\/p\u003e\n\u003cp data-mce-fragment=\"1\"\u003e\u003cstrong\u003eUsage:\u003c\/strong\u003e\u003c\/p\u003e\n\u003cul\u003e\n\u003cli\u003e\u003cspan data-mce-fragment=\"1\"\u003eAdjust the right button so that “OUT” LED lighted, Digital meter shows the value of output voltage ,adjust the “voltage potentiometer” so that the output voltage reaches the value you want. \u003c\/span\u003e\u003c\/li\u003e\n\u003cli\u003e\u003cspan data-mce-fragment=\"1\"\u003eAdjust the right button so that Digital meter shows the value of output current;Wire shorted output terminal, then adjust the “current potentiometer” so that the output current reaches a predetermined overcurrent protection value. (For example, the Digital meter displays the current value of 4A, then you can use the module to a maximum current of 4A)\u003c\/span\u003e\u003c\/li\u003e\n\u003cli\u003e\u003cspan data-mce-fragment=\"1\"\u003eConnected to the load.\u003c\/span\u003e\u003c\/li\u003e\n\u003c\/ul\u003e\n\u003cp data-mce-fragment=\"1\"\u003e\u003cspan data-mce-fragment=\"1\"\u003e\u003cstrong data-mce-fragment=\"1\"\u003eUse as a battery charger\u003c\/strong\u003e\u003c\/span\u003e\u003c\/p\u003e\n\u003cp data-mce-fragment=\"1\"\u003e\u003cstrong\u003eUsage:\u003c\/strong\u003e\u003c\/p\u003e\n\u003cul\u003e\n\u003cli\u003e\u003cspan data-mce-fragment=\"1\"\u003eMake sure you need to charge the battery float voltage and charging current; \u003c\/span\u003e\u003c\/li\u003e\n\u003cli\u003e\u003cspan data-mce-fragment=\"1\"\u003e(if lithium parameters 3.7V\/2200mAh, then the float voltage is 4.2V, the maximum charging current 1C, ie 2200mA)\u003c\/span\u003e\u003c\/li\u003e\n\u003cli\u003e\u003cspan data-mce-fragment=\"1\"\u003eUnder no-load conditions, adjust the “Voltage potentiometer” so that the output voltage reaches the float voltage; \u003c\/span\u003e\u003c\/li\u003e\n\u003cli\u003e\u003cspan data-mce-fragment=\"1\"\u003e(if to 3.7V rechargeable lithium battery, the output voltage can be adjusted to 4.2V)\u003c\/span\u003e\u003c\/li\u003e\n\u003cli\u003e\u003cspan data-mce-fragment=\"1\"\u003eAdjust the right button so that Digital meter shows the value of output current;Wire shorted output terminal, then adjust the “current potentiometer” so that the output current reaches a predetermined Charging current value.\u003c\/span\u003e\u003c\/li\u003e\n\u003cli\u003e\u003cspan data-mce-fragment=\"1\"\u003eCharge turn lamp current factory default is 0.1 times the charging current; \u003c\/span\u003e\u003c\/li\u003e\n\u003cli\u003e\u003cspan data-mce-fragment=\"1\"\u003e(Battery during charging current is gradually reduced, if the charge current setting is 1A, then when the charge current is less than 0.1A, blue lights turned off, the green light is on, which means that the battery is fully charged)\u003c\/span\u003e\u003c\/li\u003e\n\u003cli\u003e\u003cspan data-mce-fragment=\"1\"\u003econnected to the battery charge.\u003c\/span\u003e\u003c\/li\u003e\n\u003c\/ul\u003e\n\u003cp data-mce-fragment=\"1\"\u003e\u003cspan data-mce-fragment=\"1\"\u003e(1,2,3,4 steps as: Output is unloaded, do not connect the battery)\u003c\/span\u003e\u003c\/p\u003e\n\u003cp data-mce-fragment=\"1\"\u003e\u003cspan data-mce-fragment=\"1\"\u003e\u003cstrong data-mce-fragment=\"1\"\u003eUse as a LED constant current driver module\u003c\/strong\u003e\u003c\/span\u003e\u003c\/p\u003e\n\u003cp data-mce-fragment=\"1\"\u003e\u003cstrong\u003eUsage:\u003c\/strong\u003e\u003c\/p\u003e\n\u003cul\u003e\n\u003cli\u003e\u003cspan data-mce-fragment=\"1\"\u003eAdjust the “voltage potentiometer” so that the output voltage reaches the value you want. \u003c\/span\u003e\u003c\/li\u003e\n\u003cli\u003e\u003cspan data-mce-fragment=\"1\"\u003eAdjust the right button so that Digital meter shows the value of output current;Wire shorted output terminal, then adjust the “current potentiometer” so that the output current reaches a predetermined LED operating current.\u003c\/span\u003e\u003c\/li\u003e\n\u003cli\u003e\u003cspan data-mce-fragment=\"1\"\u003eConnect LED, work.\u003c\/span\u003e\u003c\/li\u003e\n\u003cli\u003e\u003cspan data-mce-fragment=\"1\"\u003e(1,2 steps as: Output is unloaded, do not connect LED)\u003c\/span\u003e\u003c\/li\u003e\n\u003cli\u003e\u003cspan data-mce-fragment=\"1\"\u003eVoltmeter and ammeter calibration method:\u003c\/span\u003e\u003c\/li\u003e\n\u003cli\u003e\u003cspan data-mce-fragment=\"1\"\u003eModule with manual calibration function can correct display precision voltage and current, if you think the current voltage and current accuracy to meet the requirements, do not perform the following operations.\u003c\/span\u003e\u003c\/li\u003e\n\u003c\/ul\u003e\n\u003cdiv data-mce-fragment=\"1\"\u003e\u003cspan data-mce-fragment=\"1\"\u003e\u003cstrong data-mce-fragment=\"1\"\u003eOutput voltage calibration steps\u003c\/strong\u003e\u003c\/span\u003e\u003c\/div\u003e\n\u003cul\u003e\n\u003cli\u003e\u003cspan data-mce-fragment=\"1\"\u003eStep 1, adjust the right button so that “OUT” LED lighted, Digital meter shows the value of output voltage; Press the right button for more than 2 seconds, release, Digital meter and “OUT” LED flashes in synchronization so that you enter the output voltage calibration mode.\u003c\/span\u003e\u003c\/li\u003e\n\u003cli\u003e\u003cspan data-mce-fragment=\"1\"\u003eStep 2, press the right button (normal speed), the voltage value is adding up a unit; Press the left button, minus a unit; Due to a unit is less than 0.1V, the minimum voltage display to 0.1V, so you need to continuously press 1-5 times to see the voltmeter change 0.1V, how many times voltmeter change 0.1V by pressing the key, depending on the current display voltage, the higher the voltage, the fewer the number of press.\u003c\/span\u003e\u003c\/li\u003e\n\u003cli\u003e\u003cspan data-mce-fragment=\"1\"\u003eStep 3, press the right button for more than 2 seconds, release, to exit the output voltage calibration mode. All parameters set to automatically power down to save.\u003c\/span\u003e\u003c\/li\u003e\n\u003c\/ul\u003e\n\u003cp data-mce-fragment=\"1\"\u003e\u003cspan data-mce-fragment=\"1\"\u003e\u003cstrong data-mce-fragment=\"1\"\u003e Input voltage calibration steps\u003c\/strong\u003e\u003c\/span\u003e\u003c\/p\u003e\n\u003cul\u003e\n\u003cli\u003e\u003cspan data-mce-fragment=\"1\"\u003eStep 1, adjust the right button so that “IN” LED lighted, Digital meter shows the value of input voltage; press the right button for more than 2 seconds, release,Digital meter and “IN” LED flashes in synchronization so that you enter the input voltage calibration mode.\u003c\/span\u003e\u003c\/li\u003e\n\u003cli\u003e\u003cspan data-mce-fragment=\"1\"\u003eSteps 2 and 3, consistent with the output voltage calibration method.\u003c\/span\u003e\u003c\/li\u003e\n\u003c\/ul\u003e\n\u003cdiv data-mce-fragment=\"1\"\u003e\n\u003cspan data-mce-fragment=\"1\"\u003e \u003c\/span\u003e\u003cspan data-mce-fragment=\"1\"\u003e\u003cstrong data-mce-fragment=\"1\"\u003eOutput current calibration steps\u003c\/strong\u003e\u003c\/span\u003e\n\u003c\/div\u003e\n\u003cul\u003e\n\u003cli\u003e\u003cspan data-mce-fragment=\"1\"\u003eStep 1, adjust the right button so that Digital meter shows the value of output Current. Press the right button for more than 2 seconds, release, Digital meter flashes in synchronization so that you enter the output current calibration mode.\u003c\/span\u003e\u003c\/li\u003e\n\u003cli\u003e\u003cspan data-mce-fragment=\"1\"\u003eStep 2,Connected to the load, ammeter in series, adjust the right and left button to change the display of digital meter, so that is consistent with the ammeter display .\u003c\/span\u003e\u003c\/li\u003e\n\u003c\/ul\u003e\n\u003cdiv id=\"pastingspan1\" data-mce-fragment=\"1\"\u003e\n\u003cspan data-mce-fragment=\"1\"\u003e\u003c\/span\u003e\u003cspan data-mce-fragment=\"1\"\u003e\u003c\/span\u003e\u003cspan data-mce-fragment=\"1\"\u003e\u003cstrong data-mce-fragment=\"1\"\u003ePackage included:\u003c\/strong\u003e\u003c\/span\u003e\n\u003c\/div\u003e\n\u003c\/div\u003e\n\u003cdiv data-mce-fragment=\"1\"\u003e\n\u003cul\u003e\n\u003cli\u003e\n\u003cspan data-mce-fragment=\"1\"\u003e \u003c\/span\u003e\u003cspan data-mce-fragment=\"1\"\u003e1PCS x 5A CC\/CV LED Drive Lithium charger Power Step-down Module USB Voltmeter +Case\u003c\/span\u003e\n\u003c\/li\u003e\n\u003c\/ul\u003e\n\u003c\/div\u003e\n\u003cspan data-mce-fragment=\"1\"\u003e \u003c\/span\u003e","published_at":"2020-11-19T14:45:58+08:00","created_at":"2020-11-19T14:45:57+08:00","vendor":"DIYMORE","type":"","tags":[],"price":1199,"price_min":1199,"price_max":1199,"available":true,"price_varies":false,"compare_at_price":null,"compare_at_price_min":0,"compare_at_price_max":0,"compare_at_price_varies":false,"variants":[{"id":37554047877320,"title":"Default Title","option1":"Default Title","option2":null,"option3":null,"sku":"010725","requires_shipping":true,"taxable":false,"featured_image":null,"available":true,"name":"5A CC\/CV LED Drive Step down Lithium charger Power USB Voltmeter Module CASE CA","public_title":null,"options":["Default Title"],"price":1199,"weight":0,"compare_at_price":null,"inventory_management":"shopify","barcode":null,"requires_selling_plan":false,"selling_plan_allocations":[],"quantity_rule":{"min":1,"max":null,"increment":1}}],"images":["\/\/www.diymore.cc\/cdn\/shop\/products\/010725_1.jpg?v=1605768361","\/\/www.diymore.cc\/cdn\/shop\/products\/010725_4.jpg?v=1605768361","\/\/www.diymore.cc\/cdn\/shop\/products\/010725_5.jpg?v=1605768361","\/\/www.diymore.cc\/cdn\/shop\/products\/010725_6.jpg?v=1605768362","\/\/www.diymore.cc\/cdn\/shop\/products\/010725_13.jpg?v=1605768362","\/\/www.diymore.cc\/cdn\/shop\/products\/010725_19.jpg?v=1605768362","\/\/www.diymore.cc\/cdn\/shop\/products\/010725faa.jpg?v=1605768362"],"featured_image":"\/\/www.diymore.cc\/cdn\/shop\/products\/010725_1.jpg?v=1605768361","options":["Title"],"media":[{"alt":null,"id":14987519951048,"position":1,"preview_image":{"aspect_ratio":1.0,"height":1000,"width":1000,"src":"\/\/www.diymore.cc\/cdn\/shop\/products\/010725_1.jpg?v=1605768361"},"aspect_ratio":1.0,"height":1000,"media_type":"image","src":"\/\/www.diymore.cc\/cdn\/shop\/products\/010725_1.jpg?v=1605768361","width":1000},{"alt":null,"id":14987519983816,"position":2,"preview_image":{"aspect_ratio":1.0,"height":1000,"width":1000,"src":"\/\/www.diymore.cc\/cdn\/shop\/products\/010725_4.jpg?v=1605768361"},"aspect_ratio":1.0,"height":1000,"media_type":"image","src":"\/\/www.diymore.cc\/cdn\/shop\/products\/010725_4.jpg?v=1605768361","width":1000},{"alt":null,"id":14987520016584,"position":3,"preview_image":{"aspect_ratio":1.0,"height":1000,"width":1000,"src":"\/\/www.diymore.cc\/cdn\/shop\/products\/010725_5.jpg?v=1605768361"},"aspect_ratio":1.0,"height":1000,"media_type":"image","src":"\/\/www.diymore.cc\/cdn\/shop\/products\/010725_5.jpg?v=1605768361","width":1000},{"alt":null,"id":14987520049352,"position":4,"preview_image":{"aspect_ratio":1.0,"height":1000,"width":1000,"src":"\/\/www.diymore.cc\/cdn\/shop\/products\/010725_6.jpg?v=1605768362"},"aspect_ratio":1.0,"height":1000,"media_type":"image","src":"\/\/www.diymore.cc\/cdn\/shop\/products\/010725_6.jpg?v=1605768362","width":1000},{"alt":null,"id":14987520082120,"position":5,"preview_image":{"aspect_ratio":1.0,"height":1000,"width":1000,"src":"\/\/www.diymore.cc\/cdn\/shop\/products\/010725_13.jpg?v=1605768362"},"aspect_ratio":1.0,"height":1000,"media_type":"image","src":"\/\/www.diymore.cc\/cdn\/shop\/products\/010725_13.jpg?v=1605768362","width":1000},{"alt":null,"id":14987520114888,"position":6,"preview_image":{"aspect_ratio":1.0,"height":1000,"width":1000,"src":"\/\/www.diymore.cc\/cdn\/shop\/products\/010725_19.jpg?v=1605768362"},"aspect_ratio":1.0,"height":1000,"media_type":"image","src":"\/\/www.diymore.cc\/cdn\/shop\/products\/010725_19.jpg?v=1605768362","width":1000},{"alt":null,"id":14987520147656,"position":7,"preview_image":{"aspect_ratio":1.414,"height":495,"width":700,"src":"\/\/www.diymore.cc\/cdn\/shop\/products\/010725faa.jpg?v=1605768362"},"aspect_ratio":1.414,"height":495,"media_type":"image","src":"\/\/www.diymore.cc\/cdn\/shop\/products\/010725faa.jpg?v=1605768362","width":700}],"requires_selling_plan":false,"selling_plan_groups":[],"content":"\u003cdiv data-mce-fragment=\"1\"\u003e\n\u003cspan data-mce-fragment=\"1\"\u003e\u003cstrong data-mce-fragment=\"1\"\u003e\u003c\/strong\u003e\u003c\/span\u003e\u003cspan data-mce-fragment=\"1\"\u003e\u003c\/span\u003e\n\u003cp data-mce-fragment=\"1\"\u003e\u003cspan data-mce-fragment=\"1\"\u003e\u003cstrong data-mce-fragment=\"1\"\u003eHighlights :\u003c\/strong\u003e\u003c\/span\u003e\u003c\/p\u003e\n\u003cul\u003e\n\u003cli\u003e\u003cspan data-mce-fragment=\"1\"\u003eModule with crystal shell,safer and more beautiful.\u003c\/span\u003e\u003c\/li\u003e\n\u003cli\u003e\u003cspan data-mce-fragment=\"1\"\u003eContains the voltmeter, ammeter, power meter, USB interfacefor charging the digital products.\u003c\/span\u003e\u003c\/li\u003e\n\u003c\/ul\u003e\n\u003cp data-mce-fragment=\"1\"\u003e\u003cspan data-mce-fragment=\"1\"\u003e\u003cstrong data-mce-fragment=\"1\"\u003eNote:\u003c\/strong\u003e\u003c\/span\u003e\u003c\/p\u003e\n\u003cul\u003e\n\u003cli\u003e\u003cspan data-mce-fragment=\"1\"\u003eWhen you use the product, the module inputs and outputs to be isolated from ground.\u003c\/span\u003e\u003c\/li\u003e\n\u003cli\u003e\u003cspan data-mce-fragment=\"1\"\u003eUSB output voltage is consistent with the module, not a fixed 5V output. \u003c\/span\u003e\u003c\/li\u003e\n\u003cli\u003e\u003cspan data-mce-fragment=\"1\"\u003eWhen charging for digital equipment, make sure USB output voltage is 5V.\u003c\/span\u003e\u003c\/li\u003e\n\u003cli\u003e\u003cspan data-mce-fragment=\"1\"\u003eSome customers report: “The module can not adjust the output voltage is always equal to the input voltage.”\u003c\/span\u003e\u003c\/li\u003e\n\u003cli\u003e\u003cspan data-mce-fragment=\"1\"\u003e When you encounter this problem, please counterclockwise rotation of the “voltage potentiometer” 10 laps or more, \u003c\/span\u003e\u003c\/li\u003e\n\u003cli\u003e\u003cspan data-mce-fragment=\"1\"\u003ethen use the module you can adjust the output voltage. Because the factory default output voltage of about 20V.\u003c\/span\u003e\u003c\/li\u003e\n\u003cli\u003e\u003cspan data-mce-fragment=\"1\"\u003e4.Shell assembly is very simple, but \"left\"\"right\"\"front\" panel are directional, you must pay attention during assembly!\u003c\/span\u003e\u003c\/li\u003e\n\u003c\/ul\u003e\n\u003cdiv data-mce-fragment=\"1\"\u003e\u003cspan data-mce-fragment=\"1\"\u003e\u003cstrong data-mce-fragment=\"1\"\u003eSpecifications\u003c\/strong\u003e\u003c\/span\u003e\u003c\/div\u003e\n\u003cul\u003e\n\u003cli\u003e\u003cspan data-mce-fragment=\"1\"\u003eInput voltage range:5-36VDC(Input voltagehigher than 6.2V, constant function will be effective)\u003c\/span\u003e\u003c\/li\u003e\n\u003cli\u003e\u003cspan data-mce-fragment=\"1\"\u003eOutput voltage range:1.25-32VDC adjustable(Output voltage higher than 6.2V, constant function will be effective)\u003c\/span\u003e\u003c\/li\u003e\n\u003cli\u003e\u003cspan data-mce-fragment=\"1\"\u003eOutput current: 0-5A\u003c\/span\u003e\u003c\/li\u003e\n\u003cli\u003e\u003cspan data-mce-fragment=\"1\"\u003eOutput power: 75W\u003c\/span\u003e\u003c\/li\u003e\n\u003cli\u003e\u003cspan data-mce-fragment=\"1\"\u003eHigh efficiency up to 96%\u003c\/span\u003e\u003c\/li\u003e\n\u003cli\u003e\u003cspan data-mce-fragment=\"1\"\u003eBuilt in thermal shutdown function\u003c\/span\u003e\u003c\/li\u003e\n\u003cli\u003e\u003cspan data-mce-fragment=\"1\"\u003eBuilt in current limit function\u003c\/span\u003e\u003c\/li\u003e\n\u003cli\u003e\u003cspan data-mce-fragment=\"1\"\u003eBuilt in output short protection function\u003c\/span\u003e\u003c\/li\u003e\n\u003cli\u003e\u003cspan data-mce-fragment=\"1\"\u003eInput reverse polarity protection: None (if required, high current diode in series with the input).\u003c\/span\u003e\u003c\/li\u003e\n\u003cli\u003e\u003cspan data-mce-fragment=\"1\"\u003eBare board size:L x W x H =68.2×38.8×15mm\u003c\/span\u003e\u003c\/li\u003e\n\u003cli\u003e\u003cspan data-mce-fragment=\"1\"\u003eWeight:73g\u003c\/span\u003e\u003c\/li\u003e\n\u003c\/ul\u003e\n\u003cp data-mce-fragment=\"1\"\u003e\u003cspan data-mce-fragment=\"1\"\u003e\u003cstrong data-mce-fragment=\"1\"\u003eApplication\u003c\/strong\u003e\u003c\/span\u003e\u003c\/p\u003e\n\u003cp data-mce-fragment=\"1\"\u003e\u003cspan data-mce-fragment=\"1\"\u003e\u003cstrong data-mce-fragment=\"1\"\u003eUse as a step-down modules with overcurrent protection \u003c\/strong\u003e\u003c\/span\u003e\u003c\/p\u003e\n\u003cp data-mce-fragment=\"1\"\u003e\u003cstrong\u003eUsage:\u003c\/strong\u003e\u003c\/p\u003e\n\u003cul\u003e\n\u003cli\u003e\u003cspan data-mce-fragment=\"1\"\u003eAdjust the right button so that “OUT” LED lighted, Digital meter shows the value of output voltage ,adjust the “voltage potentiometer” so that the output voltage reaches the value you want. \u003c\/span\u003e\u003c\/li\u003e\n\u003cli\u003e\u003cspan data-mce-fragment=\"1\"\u003eAdjust the right button so that Digital meter shows the value of output current;Wire shorted output terminal, then adjust the “current potentiometer” so that the output current reaches a predetermined overcurrent protection value. (For example, the Digital meter displays the current value of 4A, then you can use the module to a maximum current of 4A)\u003c\/span\u003e\u003c\/li\u003e\n\u003cli\u003e\u003cspan data-mce-fragment=\"1\"\u003eConnected to the load.\u003c\/span\u003e\u003c\/li\u003e\n\u003c\/ul\u003e\n\u003cp data-mce-fragment=\"1\"\u003e\u003cspan data-mce-fragment=\"1\"\u003e\u003cstrong data-mce-fragment=\"1\"\u003eUse as a battery charger\u003c\/strong\u003e\u003c\/span\u003e\u003c\/p\u003e\n\u003cp data-mce-fragment=\"1\"\u003e\u003cstrong\u003eUsage:\u003c\/strong\u003e\u003c\/p\u003e\n\u003cul\u003e\n\u003cli\u003e\u003cspan data-mce-fragment=\"1\"\u003eMake sure you need to charge the battery float voltage and charging current; \u003c\/span\u003e\u003c\/li\u003e\n\u003cli\u003e\u003cspan data-mce-fragment=\"1\"\u003e(if lithium parameters 3.7V\/2200mAh, then the float voltage is 4.2V, the maximum charging current 1C, ie 2200mA)\u003c\/span\u003e\u003c\/li\u003e\n\u003cli\u003e\u003cspan data-mce-fragment=\"1\"\u003eUnder no-load conditions, adjust the “Voltage potentiometer” so that the output voltage reaches the float voltage; \u003c\/span\u003e\u003c\/li\u003e\n\u003cli\u003e\u003cspan data-mce-fragment=\"1\"\u003e(if to 3.7V rechargeable lithium battery, the output voltage can be adjusted to 4.2V)\u003c\/span\u003e\u003c\/li\u003e\n\u003cli\u003e\u003cspan data-mce-fragment=\"1\"\u003eAdjust the right button so that Digital meter shows the value of output current;Wire shorted output terminal, then adjust the “current potentiometer” so that the output current reaches a predetermined Charging current value.\u003c\/span\u003e\u003c\/li\u003e\n\u003cli\u003e\u003cspan data-mce-fragment=\"1\"\u003eCharge turn lamp current factory default is 0.1 times the charging current; \u003c\/span\u003e\u003c\/li\u003e\n\u003cli\u003e\u003cspan data-mce-fragment=\"1\"\u003e(Battery during charging current is gradually reduced, if the charge current setting is 1A, then when the charge current is less than 0.1A, blue lights turned off, the green light is on, which means that the battery is fully charged)\u003c\/span\u003e\u003c\/li\u003e\n\u003cli\u003e\u003cspan data-mce-fragment=\"1\"\u003econnected to the battery charge.\u003c\/span\u003e\u003c\/li\u003e\n\u003c\/ul\u003e\n\u003cp data-mce-fragment=\"1\"\u003e\u003cspan data-mce-fragment=\"1\"\u003e(1,2,3,4 steps as: Output is unloaded, do not connect the battery)\u003c\/span\u003e\u003c\/p\u003e\n\u003cp data-mce-fragment=\"1\"\u003e\u003cspan data-mce-fragment=\"1\"\u003e\u003cstrong data-mce-fragment=\"1\"\u003eUse as a LED constant current driver module\u003c\/strong\u003e\u003c\/span\u003e\u003c\/p\u003e\n\u003cp data-mce-fragment=\"1\"\u003e\u003cstrong\u003eUsage:\u003c\/strong\u003e\u003c\/p\u003e\n\u003cul\u003e\n\u003cli\u003e\u003cspan data-mce-fragment=\"1\"\u003eAdjust the “voltage potentiometer” so that the output voltage reaches the value you want. \u003c\/span\u003e\u003c\/li\u003e\n\u003cli\u003e\u003cspan data-mce-fragment=\"1\"\u003eAdjust the right button so that Digital meter shows the value of output current;Wire shorted output terminal, then adjust the “current potentiometer” so that the output current reaches a predetermined LED operating current.\u003c\/span\u003e\u003c\/li\u003e\n\u003cli\u003e\u003cspan data-mce-fragment=\"1\"\u003eConnect LED, work.\u003c\/span\u003e\u003c\/li\u003e\n\u003cli\u003e\u003cspan data-mce-fragment=\"1\"\u003e(1,2 steps as: Output is unloaded, do not connect LED)\u003c\/span\u003e\u003c\/li\u003e\n\u003cli\u003e\u003cspan data-mce-fragment=\"1\"\u003eVoltmeter and ammeter calibration method:\u003c\/span\u003e\u003c\/li\u003e\n\u003cli\u003e\u003cspan data-mce-fragment=\"1\"\u003eModule with manual calibration function can correct display precision voltage and current, if you think the current voltage and current accuracy to meet the requirements, do not perform the following operations.\u003c\/span\u003e\u003c\/li\u003e\n\u003c\/ul\u003e\n\u003cdiv data-mce-fragment=\"1\"\u003e\u003cspan data-mce-fragment=\"1\"\u003e\u003cstrong data-mce-fragment=\"1\"\u003eOutput voltage calibration steps\u003c\/strong\u003e\u003c\/span\u003e\u003c\/div\u003e\n\u003cul\u003e\n\u003cli\u003e\u003cspan data-mce-fragment=\"1\"\u003eStep 1, adjust the right button so that “OUT” LED lighted, Digital meter shows the value of output voltage; Press the right button for more than 2 seconds, release, Digital meter and “OUT” LED flashes in synchronization so that you enter the output voltage calibration mode.\u003c\/span\u003e\u003c\/li\u003e\n\u003cli\u003e\u003cspan data-mce-fragment=\"1\"\u003eStep 2, press the right button (normal speed), the voltage value is adding up a unit; Press the left button, minus a unit; Due to a unit is less than 0.1V, the minimum voltage display to 0.1V, so you need to continuously press 1-5 times to see the voltmeter change 0.1V, how many times voltmeter change 0.1V by pressing the key, depending on the current display voltage, the higher the voltage, the fewer the number of press.\u003c\/span\u003e\u003c\/li\u003e\n\u003cli\u003e\u003cspan data-mce-fragment=\"1\"\u003eStep 3, press the right button for more than 2 seconds, release, to exit the output voltage calibration mode. All parameters set to automatically power down to save.\u003c\/span\u003e\u003c\/li\u003e\n\u003c\/ul\u003e\n\u003cp data-mce-fragment=\"1\"\u003e\u003cspan data-mce-fragment=\"1\"\u003e\u003cstrong data-mce-fragment=\"1\"\u003e Input voltage calibration steps\u003c\/strong\u003e\u003c\/span\u003e\u003c\/p\u003e\n\u003cul\u003e\n\u003cli\u003e\u003cspan data-mce-fragment=\"1\"\u003eStep 1, adjust the right button so that “IN” LED lighted, Digital meter shows the value of input voltage; press the right button for more than 2 seconds, release,Digital meter and “IN” LED flashes in synchronization so that you enter the input voltage calibration mode.\u003c\/span\u003e\u003c\/li\u003e\n\u003cli\u003e\u003cspan data-mce-fragment=\"1\"\u003eSteps 2 and 3, consistent with the output voltage calibration method.\u003c\/span\u003e\u003c\/li\u003e\n\u003c\/ul\u003e\n\u003cdiv data-mce-fragment=\"1\"\u003e\n\u003cspan data-mce-fragment=\"1\"\u003e \u003c\/span\u003e\u003cspan data-mce-fragment=\"1\"\u003e\u003cstrong data-mce-fragment=\"1\"\u003eOutput current calibration steps\u003c\/strong\u003e\u003c\/span\u003e\n\u003c\/div\u003e\n\u003cul\u003e\n\u003cli\u003e\u003cspan data-mce-fragment=\"1\"\u003eStep 1, adjust the right button so that Digital meter shows the value of output Current. Press the right button for more than 2 seconds, release, Digital meter flashes in synchronization so that you enter the output current calibration mode.\u003c\/span\u003e\u003c\/li\u003e\n\u003cli\u003e\u003cspan data-mce-fragment=\"1\"\u003eStep 2,Connected to the load, ammeter in series, adjust the right and left button to change the display of digital meter, so that is consistent with the ammeter display .\u003c\/span\u003e\u003c\/li\u003e\n\u003c\/ul\u003e\n\u003cdiv id=\"pastingspan1\" data-mce-fragment=\"1\"\u003e\n\u003cspan data-mce-fragment=\"1\"\u003e\u003c\/span\u003e\u003cspan data-mce-fragment=\"1\"\u003e\u003c\/span\u003e\u003cspan data-mce-fragment=\"1\"\u003e\u003cstrong data-mce-fragment=\"1\"\u003ePackage included:\u003c\/strong\u003e\u003c\/span\u003e\n\u003c\/div\u003e\n\u003c\/div\u003e\n\u003cdiv data-mce-fragment=\"1\"\u003e\n\u003cul\u003e\n\u003cli\u003e\n\u003cspan data-mce-fragment=\"1\"\u003e \u003c\/span\u003e\u003cspan data-mce-fragment=\"1\"\u003e1PCS x 5A CC\/CV LED Drive Lithium charger Power Step-down Module USB Voltmeter +Case\u003c\/span\u003e\n\u003c\/li\u003e\n\u003c\/ul\u003e\n\u003c\/div\u003e\n\u003cspan data-mce-fragment=\"1\"\u003e \u003c\/span\u003e"}
 -
 Translation missing: en.products.product.regular_price $9.99{"id":6090415669448,"title":"5A CC\/CV LED Drive Step down Lithium charger Power USB Voltmeter Module CASE CA","handle":"5a-cc-cv-led-drive-step-down-lithium-charger-power-usb-voltmeter-module-case-ca","description":"\u003cdiv data-mce-fragment=\"1\"\u003e\n\u003cspan data-mce-fragment=\"1\"\u003e\u003cstrong data-mce-fragment=\"1\"\u003e\u003c\/strong\u003e\u003c\/span\u003e\u003cspan data-mce-fragment=\"1\"\u003e\u003c\/span\u003e\n\u003cp data-mce-fragment=\"1\"\u003e\u003cspan data-mce-fragment=\"1\"\u003e\u003cstrong data-mce-fragment=\"1\"\u003eHighlights :\u003c\/strong\u003e\u003c\/span\u003e\u003c\/p\u003e\n\u003cul\u003e\n\u003cli\u003e\u003cspan data-mce-fragment=\"1\"\u003eModule with crystal shell,safer and more beautiful.\u003c\/span\u003e\u003c\/li\u003e\n\u003cli\u003e\u003cspan data-mce-fragment=\"1\"\u003eContains the voltmeter, ammeter, power meter, USB interfacefor charging the digital products.\u003c\/span\u003e\u003c\/li\u003e\n\u003c\/ul\u003e\n\u003cp data-mce-fragment=\"1\"\u003e\u003cspan data-mce-fragment=\"1\"\u003e\u003cstrong data-mce-fragment=\"1\"\u003eNote:\u003c\/strong\u003e\u003c\/span\u003e\u003c\/p\u003e\n\u003cul\u003e\n\u003cli\u003e\u003cspan data-mce-fragment=\"1\"\u003eWhen you use the product, the module inputs and outputs to be isolated from ground.\u003c\/span\u003e\u003c\/li\u003e\n\u003cli\u003e\u003cspan data-mce-fragment=\"1\"\u003eUSB output voltage is consistent with the module, not a fixed 5V output. \u003c\/span\u003e\u003c\/li\u003e\n\u003cli\u003e\u003cspan data-mce-fragment=\"1\"\u003eWhen charging for digital equipment, make sure USB output voltage is 5V.\u003c\/span\u003e\u003c\/li\u003e\n\u003cli\u003e\u003cspan data-mce-fragment=\"1\"\u003eSome customers report: “The module can not adjust the output voltage is always equal to the input voltage.”\u003c\/span\u003e\u003c\/li\u003e\n\u003cli\u003e\u003cspan data-mce-fragment=\"1\"\u003e When you encounter this problem, please counterclockwise rotation of the “voltage potentiometer” 10 laps or more, \u003c\/span\u003e\u003c\/li\u003e\n\u003cli\u003e\u003cspan data-mce-fragment=\"1\"\u003ethen use the module you can adjust the output voltage. Because the factory default output voltage of about 20V.\u003c\/span\u003e\u003c\/li\u003e\n\u003cli\u003e\u003cspan data-mce-fragment=\"1\"\u003e4.Shell assembly is very simple, but \"left\"\"right\"\"front\" panel are directional, you must pay attention during assembly!\u003c\/span\u003e\u003c\/li\u003e\n\u003c\/ul\u003e\n\u003cdiv data-mce-fragment=\"1\"\u003e\u003cspan data-mce-fragment=\"1\"\u003e\u003cstrong data-mce-fragment=\"1\"\u003eSpecifications\u003c\/strong\u003e\u003c\/span\u003e\u003c\/div\u003e\n\u003cul\u003e\n\u003cli\u003e\u003cspan data-mce-fragment=\"1\"\u003eInput voltage range:5-36VDC(Input voltagehigher than 6.2V, constant function will be effective)\u003c\/span\u003e\u003c\/li\u003e\n\u003cli\u003e\u003cspan data-mce-fragment=\"1\"\u003eOutput voltage range:1.25-32VDC adjustable(Output voltage higher than 6.2V, constant function will be effective)\u003c\/span\u003e\u003c\/li\u003e\n\u003cli\u003e\u003cspan data-mce-fragment=\"1\"\u003eOutput current: 0-5A\u003c\/span\u003e\u003c\/li\u003e\n\u003cli\u003e\u003cspan data-mce-fragment=\"1\"\u003eOutput power: 75W\u003c\/span\u003e\u003c\/li\u003e\n\u003cli\u003e\u003cspan data-mce-fragment=\"1\"\u003eHigh efficiency up to 96%\u003c\/span\u003e\u003c\/li\u003e\n\u003cli\u003e\u003cspan data-mce-fragment=\"1\"\u003eBuilt in thermal shutdown function\u003c\/span\u003e\u003c\/li\u003e\n\u003cli\u003e\u003cspan data-mce-fragment=\"1\"\u003eBuilt in current limit function\u003c\/span\u003e\u003c\/li\u003e\n\u003cli\u003e\u003cspan data-mce-fragment=\"1\"\u003eBuilt in output short protection function\u003c\/span\u003e\u003c\/li\u003e\n\u003cli\u003e\u003cspan data-mce-fragment=\"1\"\u003eInput reverse polarity protection: None (if required, high current diode in series with the input).\u003c\/span\u003e\u003c\/li\u003e\n\u003cli\u003e\u003cspan data-mce-fragment=\"1\"\u003eBare board size:L x W x H =68.2×38.8×15mm\u003c\/span\u003e\u003c\/li\u003e\n\u003cli\u003e\u003cspan data-mce-fragment=\"1\"\u003eWeight:73g\u003c\/span\u003e\u003c\/li\u003e\n\u003c\/ul\u003e\n\u003cp data-mce-fragment=\"1\"\u003e\u003cspan data-mce-fragment=\"1\"\u003e\u003cstrong data-mce-fragment=\"1\"\u003eApplication\u003c\/strong\u003e\u003c\/span\u003e\u003c\/p\u003e\n\u003cp data-mce-fragment=\"1\"\u003e\u003cspan data-mce-fragment=\"1\"\u003e\u003cstrong data-mce-fragment=\"1\"\u003eUse as a step-down modules with overcurrent protection \u003c\/strong\u003e\u003c\/span\u003e\u003c\/p\u003e\n\u003cp data-mce-fragment=\"1\"\u003e\u003cstrong\u003eUsage:\u003c\/strong\u003e\u003c\/p\u003e\n\u003cul\u003e\n\u003cli\u003e\u003cspan data-mce-fragment=\"1\"\u003eAdjust the right button so that “OUT” LED lighted, Digital meter shows the value of output voltage ,adjust the “voltage potentiometer” so that the output voltage reaches the value you want. \u003c\/span\u003e\u003c\/li\u003e\n\u003cli\u003e\u003cspan data-mce-fragment=\"1\"\u003eAdjust the right button so that Digital meter shows the value of output current;Wire shorted output terminal, then adjust the “current potentiometer” so that the output current reaches a predetermined overcurrent protection value. (For example, the Digital meter displays the current value of 4A, then you can use the module to a maximum current of 4A)\u003c\/span\u003e\u003c\/li\u003e\n\u003cli\u003e\u003cspan data-mce-fragment=\"1\"\u003eConnected to the load.\u003c\/span\u003e\u003c\/li\u003e\n\u003c\/ul\u003e\n\u003cp data-mce-fragment=\"1\"\u003e\u003cspan data-mce-fragment=\"1\"\u003e\u003cstrong data-mce-fragment=\"1\"\u003eUse as a battery charger\u003c\/strong\u003e\u003c\/span\u003e\u003c\/p\u003e\n\u003cp data-mce-fragment=\"1\"\u003e\u003cstrong\u003eUsage:\u003c\/strong\u003e\u003c\/p\u003e\n\u003cul\u003e\n\u003cli\u003e\u003cspan data-mce-fragment=\"1\"\u003eMake sure you need to charge the battery float voltage and charging current; \u003c\/span\u003e\u003c\/li\u003e\n\u003cli\u003e\u003cspan data-mce-fragment=\"1\"\u003e(if lithium parameters 3.7V\/2200mAh, then the float voltage is 4.2V, the maximum charging current 1C, ie 2200mA)\u003c\/span\u003e\u003c\/li\u003e\n\u003cli\u003e\u003cspan data-mce-fragment=\"1\"\u003eUnder no-load conditions, adjust the “Voltage potentiometer” so that the output voltage reaches the float voltage; \u003c\/span\u003e\u003c\/li\u003e\n\u003cli\u003e\u003cspan data-mce-fragment=\"1\"\u003e(if to 3.7V rechargeable lithium battery, the output voltage can be adjusted to 4.2V)\u003c\/span\u003e\u003c\/li\u003e\n\u003cli\u003e\u003cspan data-mce-fragment=\"1\"\u003eAdjust the right button so that Digital meter shows the value of output current;Wire shorted output terminal, then adjust the “current potentiometer” so that the output current reaches a predetermined Charging current value.\u003c\/span\u003e\u003c\/li\u003e\n\u003cli\u003e\u003cspan data-mce-fragment=\"1\"\u003eCharge turn lamp current factory default is 0.1 times the charging current; \u003c\/span\u003e\u003c\/li\u003e\n\u003cli\u003e\u003cspan data-mce-fragment=\"1\"\u003e(Battery during charging current is gradually reduced, if the charge current setting is 1A, then when the charge current is less than 0.1A, blue lights turned off, the green light is on, which means that the battery is fully charged)\u003c\/span\u003e\u003c\/li\u003e\n\u003cli\u003e\u003cspan data-mce-fragment=\"1\"\u003econnected to the battery charge.\u003c\/span\u003e\u003c\/li\u003e\n\u003c\/ul\u003e\n\u003cp data-mce-fragment=\"1\"\u003e\u003cspan data-mce-fragment=\"1\"\u003e(1,2,3,4 steps as: Output is unloaded, do not connect the battery)\u003c\/span\u003e\u003c\/p\u003e\n\u003cp data-mce-fragment=\"1\"\u003e\u003cspan data-mce-fragment=\"1\"\u003e\u003cstrong data-mce-fragment=\"1\"\u003eUse as a LED constant current driver module\u003c\/strong\u003e\u003c\/span\u003e\u003c\/p\u003e\n\u003cp data-mce-fragment=\"1\"\u003e\u003cstrong\u003eUsage:\u003c\/strong\u003e\u003c\/p\u003e\n\u003cul\u003e\n\u003cli\u003e\u003cspan data-mce-fragment=\"1\"\u003eAdjust the “voltage potentiometer” so that the output voltage reaches the value you want. \u003c\/span\u003e\u003c\/li\u003e\n\u003cli\u003e\u003cspan data-mce-fragment=\"1\"\u003eAdjust the right button so that Digital meter shows the value of output current;Wire shorted output terminal, then adjust the “current potentiometer” so that the output current reaches a predetermined LED operating current.\u003c\/span\u003e\u003c\/li\u003e\n\u003cli\u003e\u003cspan data-mce-fragment=\"1\"\u003eConnect LED, work.\u003c\/span\u003e\u003c\/li\u003e\n\u003cli\u003e\u003cspan data-mce-fragment=\"1\"\u003e(1,2 steps as: Output is unloaded, do not connect LED)\u003c\/span\u003e\u003c\/li\u003e\n\u003cli\u003e\u003cspan data-mce-fragment=\"1\"\u003eVoltmeter and ammeter calibration method:\u003c\/span\u003e\u003c\/li\u003e\n\u003cli\u003e\u003cspan data-mce-fragment=\"1\"\u003eModule with manual calibration function can correct display precision voltage and current, if you think the current voltage and current accuracy to meet the requirements, do not perform the following operations.\u003c\/span\u003e\u003c\/li\u003e\n\u003c\/ul\u003e\n\u003cdiv data-mce-fragment=\"1\"\u003e\u003cspan data-mce-fragment=\"1\"\u003e\u003cstrong data-mce-fragment=\"1\"\u003eOutput voltage calibration steps\u003c\/strong\u003e\u003c\/span\u003e\u003c\/div\u003e\n\u003cul\u003e\n\u003cli\u003e\u003cspan data-mce-fragment=\"1\"\u003eStep 1, adjust the right button so that “OUT” LED lighted, Digital meter shows the value of output voltage; Press the right button for more than 2 seconds, release, Digital meter and “OUT” LED flashes in synchronization so that you enter the output voltage calibration mode.\u003c\/span\u003e\u003c\/li\u003e\n\u003cli\u003e\u003cspan data-mce-fragment=\"1\"\u003eStep 2, press the right button (normal speed), the voltage value is adding up a unit; Press the left button, minus a unit; Due to a unit is less than 0.1V, the minimum voltage display to 0.1V, so you need to continuously press 1-5 times to see the voltmeter change 0.1V, how many times voltmeter change 0.1V by pressing the key, depending on the current display voltage, the higher the voltage, the fewer the number of press.\u003c\/span\u003e\u003c\/li\u003e\n\u003cli\u003e\u003cspan data-mce-fragment=\"1\"\u003eStep 3, press the right button for more than 2 seconds, release, to exit the output voltage calibration mode. All parameters set to automatically power down to save.\u003c\/span\u003e\u003c\/li\u003e\n\u003c\/ul\u003e\n\u003cp data-mce-fragment=\"1\"\u003e\u003cspan data-mce-fragment=\"1\"\u003e\u003cstrong data-mce-fragment=\"1\"\u003e Input voltage calibration steps\u003c\/strong\u003e\u003c\/span\u003e\u003c\/p\u003e\n\u003cul\u003e\n\u003cli\u003e\u003cspan data-mce-fragment=\"1\"\u003eStep 1, adjust the right button so that “IN” LED lighted, Digital meter shows the value of input voltage; press the right button for more than 2 seconds, release,Digital meter and “IN” LED flashes in synchronization so that you enter the input voltage calibration mode.\u003c\/span\u003e\u003c\/li\u003e\n\u003cli\u003e\u003cspan data-mce-fragment=\"1\"\u003eSteps 2 and 3, consistent with the output voltage calibration method.\u003c\/span\u003e\u003c\/li\u003e\n\u003c\/ul\u003e\n\u003cdiv data-mce-fragment=\"1\"\u003e\n\u003cspan data-mce-fragment=\"1\"\u003e \u003c\/span\u003e\u003cspan data-mce-fragment=\"1\"\u003e\u003cstrong data-mce-fragment=\"1\"\u003eOutput current calibration steps\u003c\/strong\u003e\u003c\/span\u003e\n\u003c\/div\u003e\n\u003cul\u003e\n\u003cli\u003e\u003cspan data-mce-fragment=\"1\"\u003eStep 1, adjust the right button so that Digital meter shows the value of output Current. Press the right button for more than 2 seconds, release, Digital meter flashes in synchronization so that you enter the output current calibration mode.\u003c\/span\u003e\u003c\/li\u003e\n\u003cli\u003e\u003cspan data-mce-fragment=\"1\"\u003eStep 2,Connected to the load, ammeter in series, adjust the right and left button to change the display of digital meter, so that is consistent with the ammeter display .\u003c\/span\u003e\u003c\/li\u003e\n\u003c\/ul\u003e\n\u003cdiv id=\"pastingspan1\" data-mce-fragment=\"1\"\u003e\n\u003cspan data-mce-fragment=\"1\"\u003e\u003c\/span\u003e\u003cspan data-mce-fragment=\"1\"\u003e\u003c\/span\u003e\u003cspan data-mce-fragment=\"1\"\u003e\u003cstrong data-mce-fragment=\"1\"\u003ePackage included:\u003c\/strong\u003e\u003c\/span\u003e\n\u003c\/div\u003e\n\u003c\/div\u003e\n\u003cdiv data-mce-fragment=\"1\"\u003e\n\u003cul\u003e\n\u003cli\u003e\n\u003cspan data-mce-fragment=\"1\"\u003e \u003c\/span\u003e\u003cspan data-mce-fragment=\"1\"\u003e1PCS x 5A CC\/CV LED Drive Lithium charger Power Step-down Module USB Voltmeter +Case\u003c\/span\u003e\n\u003c\/li\u003e\n\u003c\/ul\u003e\n\u003c\/div\u003e\n\u003cspan data-mce-fragment=\"1\"\u003e \u003c\/span\u003e","published_at":"2020-11-19T14:45:58+08:00","created_at":"2020-11-19T14:45:57+08:00","vendor":"DIYMORE","type":"","tags":[],"price":1199,"price_min":1199,"price_max":1199,"available":true,"price_varies":false,"compare_at_price":null,"compare_at_price_min":0,"compare_at_price_max":0,"compare_at_price_varies":false,"variants":[{"id":37554047877320,"title":"Default Title","option1":"Default Title","option2":null,"option3":null,"sku":"010725","requires_shipping":true,"taxable":false,"featured_image":null,"available":true,"name":"5A CC\/CV LED Drive Step down Lithium charger Power USB Voltmeter Module CASE CA","public_title":null,"options":["Default Title"],"price":1199,"weight":0,"compare_at_price":null,"inventory_management":"shopify","barcode":null,"requires_selling_plan":false,"selling_plan_allocations":[],"quantity_rule":{"min":1,"max":null,"increment":1}}],"images":["\/\/www.diymore.cc\/cdn\/shop\/products\/010725_1.jpg?v=1605768361","\/\/www.diymore.cc\/cdn\/shop\/products\/010725_4.jpg?v=1605768361","\/\/www.diymore.cc\/cdn\/shop\/products\/010725_5.jpg?v=1605768361","\/\/www.diymore.cc\/cdn\/shop\/products\/010725_6.jpg?v=1605768362","\/\/www.diymore.cc\/cdn\/shop\/products\/010725_13.jpg?v=1605768362","\/\/www.diymore.cc\/cdn\/shop\/products\/010725_19.jpg?v=1605768362","\/\/www.diymore.cc\/cdn\/shop\/products\/010725faa.jpg?v=1605768362"],"featured_image":"\/\/www.diymore.cc\/cdn\/shop\/products\/010725_1.jpg?v=1605768361","options":["Title"],"media":[{"alt":null,"id":14987519951048,"position":1,"preview_image":{"aspect_ratio":1.0,"height":1000,"width":1000,"src":"\/\/www.diymore.cc\/cdn\/shop\/products\/010725_1.jpg?v=1605768361"},"aspect_ratio":1.0,"height":1000,"media_type":"image","src":"\/\/www.diymore.cc\/cdn\/shop\/products\/010725_1.jpg?v=1605768361","width":1000},{"alt":null,"id":14987519983816,"position":2,"preview_image":{"aspect_ratio":1.0,"height":1000,"width":1000,"src":"\/\/www.diymore.cc\/cdn\/shop\/products\/010725_4.jpg?v=1605768361"},"aspect_ratio":1.0,"height":1000,"media_type":"image","src":"\/\/www.diymore.cc\/cdn\/shop\/products\/010725_4.jpg?v=1605768361","width":1000},{"alt":null,"id":14987520016584,"position":3,"preview_image":{"aspect_ratio":1.0,"height":1000,"width":1000,"src":"\/\/www.diymore.cc\/cdn\/shop\/products\/010725_5.jpg?v=1605768361"},"aspect_ratio":1.0,"height":1000,"media_type":"image","src":"\/\/www.diymore.cc\/cdn\/shop\/products\/010725_5.jpg?v=1605768361","width":1000},{"alt":null,"id":14987520049352,"position":4,"preview_image":{"aspect_ratio":1.0,"height":1000,"width":1000,"src":"\/\/www.diymore.cc\/cdn\/shop\/products\/010725_6.jpg?v=1605768362"},"aspect_ratio":1.0,"height":1000,"media_type":"image","src":"\/\/www.diymore.cc\/cdn\/shop\/products\/010725_6.jpg?v=1605768362","width":1000},{"alt":null,"id":14987520082120,"position":5,"preview_image":{"aspect_ratio":1.0,"height":1000,"width":1000,"src":"\/\/www.diymore.cc\/cdn\/shop\/products\/010725_13.jpg?v=1605768362"},"aspect_ratio":1.0,"height":1000,"media_type":"image","src":"\/\/www.diymore.cc\/cdn\/shop\/products\/010725_13.jpg?v=1605768362","width":1000},{"alt":null,"id":14987520114888,"position":6,"preview_image":{"aspect_ratio":1.0,"height":1000,"width":1000,"src":"\/\/www.diymore.cc\/cdn\/shop\/products\/010725_19.jpg?v=1605768362"},"aspect_ratio":1.0,"height":1000,"media_type":"image","src":"\/\/www.diymore.cc\/cdn\/shop\/products\/010725_19.jpg?v=1605768362","width":1000},{"alt":null,"id":14987520147656,"position":7,"preview_image":{"aspect_ratio":1.414,"height":495,"width":700,"src":"\/\/www.diymore.cc\/cdn\/shop\/products\/010725faa.jpg?v=1605768362"},"aspect_ratio":1.414,"height":495,"media_type":"image","src":"\/\/www.diymore.cc\/cdn\/shop\/products\/010725faa.jpg?v=1605768362","width":700}],"requires_selling_plan":false,"selling_plan_groups":[],"content":"\u003cdiv data-mce-fragment=\"1\"\u003e\n\u003cspan data-mce-fragment=\"1\"\u003e\u003cstrong data-mce-fragment=\"1\"\u003e\u003c\/strong\u003e\u003c\/span\u003e\u003cspan data-mce-fragment=\"1\"\u003e\u003c\/span\u003e\n\u003cp data-mce-fragment=\"1\"\u003e\u003cspan data-mce-fragment=\"1\"\u003e\u003cstrong data-mce-fragment=\"1\"\u003eHighlights :\u003c\/strong\u003e\u003c\/span\u003e\u003c\/p\u003e\n\u003cul\u003e\n\u003cli\u003e\u003cspan data-mce-fragment=\"1\"\u003eModule with crystal shell,safer and more beautiful.\u003c\/span\u003e\u003c\/li\u003e\n\u003cli\u003e\u003cspan data-mce-fragment=\"1\"\u003eContains the voltmeter, ammeter, power meter, USB interfacefor charging the digital products.\u003c\/span\u003e\u003c\/li\u003e\n\u003c\/ul\u003e\n\u003cp data-mce-fragment=\"1\"\u003e\u003cspan data-mce-fragment=\"1\"\u003e\u003cstrong data-mce-fragment=\"1\"\u003eNote:\u003c\/strong\u003e\u003c\/span\u003e\u003c\/p\u003e\n\u003cul\u003e\n\u003cli\u003e\u003cspan data-mce-fragment=\"1\"\u003eWhen you use the product, the module inputs and outputs to be isolated from ground.\u003c\/span\u003e\u003c\/li\u003e\n\u003cli\u003e\u003cspan data-mce-fragment=\"1\"\u003eUSB output voltage is consistent with the module, not a fixed 5V output. \u003c\/span\u003e\u003c\/li\u003e\n\u003cli\u003e\u003cspan data-mce-fragment=\"1\"\u003eWhen charging for digital equipment, make sure USB output voltage is 5V.\u003c\/span\u003e\u003c\/li\u003e\n\u003cli\u003e\u003cspan data-mce-fragment=\"1\"\u003eSome customers report: “The module can not adjust the output voltage is always equal to the input voltage.”\u003c\/span\u003e\u003c\/li\u003e\n\u003cli\u003e\u003cspan data-mce-fragment=\"1\"\u003e When you encounter this problem, please counterclockwise rotation of the “voltage potentiometer” 10 laps or more, \u003c\/span\u003e\u003c\/li\u003e\n\u003cli\u003e\u003cspan data-mce-fragment=\"1\"\u003ethen use the module you can adjust the output voltage. Because the factory default output voltage of about 20V.\u003c\/span\u003e\u003c\/li\u003e\n\u003cli\u003e\u003cspan data-mce-fragment=\"1\"\u003e4.Shell assembly is very simple, but \"left\"\"right\"\"front\" panel are directional, you must pay attention during assembly!\u003c\/span\u003e\u003c\/li\u003e\n\u003c\/ul\u003e\n\u003cdiv data-mce-fragment=\"1\"\u003e\u003cspan data-mce-fragment=\"1\"\u003e\u003cstrong data-mce-fragment=\"1\"\u003eSpecifications\u003c\/strong\u003e\u003c\/span\u003e\u003c\/div\u003e\n\u003cul\u003e\n\u003cli\u003e\u003cspan data-mce-fragment=\"1\"\u003eInput voltage range:5-36VDC(Input voltagehigher than 6.2V, constant function will be effective)\u003c\/span\u003e\u003c\/li\u003e\n\u003cli\u003e\u003cspan data-mce-fragment=\"1\"\u003eOutput voltage range:1.25-32VDC adjustable(Output voltage higher than 6.2V, constant function will be effective)\u003c\/span\u003e\u003c\/li\u003e\n\u003cli\u003e\u003cspan data-mce-fragment=\"1\"\u003eOutput current: 0-5A\u003c\/span\u003e\u003c\/li\u003e\n\u003cli\u003e\u003cspan data-mce-fragment=\"1\"\u003eOutput power: 75W\u003c\/span\u003e\u003c\/li\u003e\n\u003cli\u003e\u003cspan data-mce-fragment=\"1\"\u003eHigh efficiency up to 96%\u003c\/span\u003e\u003c\/li\u003e\n\u003cli\u003e\u003cspan data-mce-fragment=\"1\"\u003eBuilt in thermal shutdown function\u003c\/span\u003e\u003c\/li\u003e\n\u003cli\u003e\u003cspan data-mce-fragment=\"1\"\u003eBuilt in current limit function\u003c\/span\u003e\u003c\/li\u003e\n\u003cli\u003e\u003cspan data-mce-fragment=\"1\"\u003eBuilt in output short protection function\u003c\/span\u003e\u003c\/li\u003e\n\u003cli\u003e\u003cspan data-mce-fragment=\"1\"\u003eInput reverse polarity protection: None (if required, high current diode in series with the input).\u003c\/span\u003e\u003c\/li\u003e\n\u003cli\u003e\u003cspan data-mce-fragment=\"1\"\u003eBare board size:L x W x H =68.2×38.8×15mm\u003c\/span\u003e\u003c\/li\u003e\n\u003cli\u003e\u003cspan data-mce-fragment=\"1\"\u003eWeight:73g\u003c\/span\u003e\u003c\/li\u003e\n\u003c\/ul\u003e\n\u003cp data-mce-fragment=\"1\"\u003e\u003cspan data-mce-fragment=\"1\"\u003e\u003cstrong data-mce-fragment=\"1\"\u003eApplication\u003c\/strong\u003e\u003c\/span\u003e\u003c\/p\u003e\n\u003cp data-mce-fragment=\"1\"\u003e\u003cspan data-mce-fragment=\"1\"\u003e\u003cstrong data-mce-fragment=\"1\"\u003eUse as a step-down modules with overcurrent protection \u003c\/strong\u003e\u003c\/span\u003e\u003c\/p\u003e\n\u003cp data-mce-fragment=\"1\"\u003e\u003cstrong\u003eUsage:\u003c\/strong\u003e\u003c\/p\u003e\n\u003cul\u003e\n\u003cli\u003e\u003cspan data-mce-fragment=\"1\"\u003eAdjust the right button so that “OUT” LED lighted, Digital meter shows the value of output voltage ,adjust the “voltage potentiometer” so that the output voltage reaches the value you want. \u003c\/span\u003e\u003c\/li\u003e\n\u003cli\u003e\u003cspan data-mce-fragment=\"1\"\u003eAdjust the right button so that Digital meter shows the value of output current;Wire shorted output terminal, then adjust the “current potentiometer” so that the output current reaches a predetermined overcurrent protection value. (For example, the Digital meter displays the current value of 4A, then you can use the module to a maximum current of 4A)\u003c\/span\u003e\u003c\/li\u003e\n\u003cli\u003e\u003cspan data-mce-fragment=\"1\"\u003eConnected to the load.\u003c\/span\u003e\u003c\/li\u003e\n\u003c\/ul\u003e\n\u003cp data-mce-fragment=\"1\"\u003e\u003cspan data-mce-fragment=\"1\"\u003e\u003cstrong data-mce-fragment=\"1\"\u003eUse as a battery charger\u003c\/strong\u003e\u003c\/span\u003e\u003c\/p\u003e\n\u003cp data-mce-fragment=\"1\"\u003e\u003cstrong\u003eUsage:\u003c\/strong\u003e\u003c\/p\u003e\n\u003cul\u003e\n\u003cli\u003e\u003cspan data-mce-fragment=\"1\"\u003eMake sure you need to charge the battery float voltage and charging current; \u003c\/span\u003e\u003c\/li\u003e\n\u003cli\u003e\u003cspan data-mce-fragment=\"1\"\u003e(if lithium parameters 3.7V\/2200mAh, then the float voltage is 4.2V, the maximum charging current 1C, ie 2200mA)\u003c\/span\u003e\u003c\/li\u003e\n\u003cli\u003e\u003cspan data-mce-fragment=\"1\"\u003eUnder no-load conditions, adjust the “Voltage potentiometer” so that the output voltage reaches the float voltage; \u003c\/span\u003e\u003c\/li\u003e\n\u003cli\u003e\u003cspan data-mce-fragment=\"1\"\u003e(if to 3.7V rechargeable lithium battery, the output voltage can be adjusted to 4.2V)\u003c\/span\u003e\u003c\/li\u003e\n\u003cli\u003e\u003cspan data-mce-fragment=\"1\"\u003eAdjust the right button so that Digital meter shows the value of output current;Wire shorted output terminal, then adjust the “current potentiometer” so that the output current reaches a predetermined Charging current value.\u003c\/span\u003e\u003c\/li\u003e\n\u003cli\u003e\u003cspan data-mce-fragment=\"1\"\u003eCharge turn lamp current factory default is 0.1 times the charging current; \u003c\/span\u003e\u003c\/li\u003e\n\u003cli\u003e\u003cspan data-mce-fragment=\"1\"\u003e(Battery during charging current is gradually reduced, if the charge current setting is 1A, then when the charge current is less than 0.1A, blue lights turned off, the green light is on, which means that the battery is fully charged)\u003c\/span\u003e\u003c\/li\u003e\n\u003cli\u003e\u003cspan data-mce-fragment=\"1\"\u003econnected to the battery charge.\u003c\/span\u003e\u003c\/li\u003e\n\u003c\/ul\u003e\n\u003cp data-mce-fragment=\"1\"\u003e\u003cspan data-mce-fragment=\"1\"\u003e(1,2,3,4 steps as: Output is unloaded, do not connect the battery)\u003c\/span\u003e\u003c\/p\u003e\n\u003cp data-mce-fragment=\"1\"\u003e\u003cspan data-mce-fragment=\"1\"\u003e\u003cstrong data-mce-fragment=\"1\"\u003eUse as a LED constant current driver module\u003c\/strong\u003e\u003c\/span\u003e\u003c\/p\u003e\n\u003cp data-mce-fragment=\"1\"\u003e\u003cstrong\u003eUsage:\u003c\/strong\u003e\u003c\/p\u003e\n\u003cul\u003e\n\u003cli\u003e\u003cspan data-mce-fragment=\"1\"\u003eAdjust the “voltage potentiometer” so that the output voltage reaches the value you want. \u003c\/span\u003e\u003c\/li\u003e\n\u003cli\u003e\u003cspan data-mce-fragment=\"1\"\u003eAdjust the right button so that Digital meter shows the value of output current;Wire shorted output terminal, then adjust the “current potentiometer” so that the output current reaches a predetermined LED operating current.\u003c\/span\u003e\u003c\/li\u003e\n\u003cli\u003e\u003cspan data-mce-fragment=\"1\"\u003eConnect LED, work.\u003c\/span\u003e\u003c\/li\u003e\n\u003cli\u003e\u003cspan data-mce-fragment=\"1\"\u003e(1,2 steps as: Output is unloaded, do not connect LED)\u003c\/span\u003e\u003c\/li\u003e\n\u003cli\u003e\u003cspan data-mce-fragment=\"1\"\u003eVoltmeter and ammeter calibration method:\u003c\/span\u003e\u003c\/li\u003e\n\u003cli\u003e\u003cspan data-mce-fragment=\"1\"\u003eModule with manual calibration function can correct display precision voltage and current, if you think the current voltage and current accuracy to meet the requirements, do not perform the following operations.\u003c\/span\u003e\u003c\/li\u003e\n\u003c\/ul\u003e\n\u003cdiv data-mce-fragment=\"1\"\u003e\u003cspan data-mce-fragment=\"1\"\u003e\u003cstrong data-mce-fragment=\"1\"\u003eOutput voltage calibration steps\u003c\/strong\u003e\u003c\/span\u003e\u003c\/div\u003e\n\u003cul\u003e\n\u003cli\u003e\u003cspan data-mce-fragment=\"1\"\u003eStep 1, adjust the right button so that “OUT” LED lighted, Digital meter shows the value of output voltage; Press the right button for more than 2 seconds, release, Digital meter and “OUT” LED flashes in synchronization so that you enter the output voltage calibration mode.\u003c\/span\u003e\u003c\/li\u003e\n\u003cli\u003e\u003cspan data-mce-fragment=\"1\"\u003eStep 2, press the right button (normal speed), the voltage value is adding up a unit; Press the left button, minus a unit; Due to a unit is less than 0.1V, the minimum voltage display to 0.1V, so you need to continuously press 1-5 times to see the voltmeter change 0.1V, how many times voltmeter change 0.1V by pressing the key, depending on the current display voltage, the higher the voltage, the fewer the number of press.\u003c\/span\u003e\u003c\/li\u003e\n\u003cli\u003e\u003cspan data-mce-fragment=\"1\"\u003eStep 3, press the right button for more than 2 seconds, release, to exit the output voltage calibration mode. All parameters set to automatically power down to save.\u003c\/span\u003e\u003c\/li\u003e\n\u003c\/ul\u003e\n\u003cp data-mce-fragment=\"1\"\u003e\u003cspan data-mce-fragment=\"1\"\u003e\u003cstrong data-mce-fragment=\"1\"\u003e Input voltage calibration steps\u003c\/strong\u003e\u003c\/span\u003e\u003c\/p\u003e\n\u003cul\u003e\n\u003cli\u003e\u003cspan data-mce-fragment=\"1\"\u003eStep 1, adjust the right button so that “IN” LED lighted, Digital meter shows the value of input voltage; press the right button for more than 2 seconds, release,Digital meter and “IN” LED flashes in synchronization so that you enter the input voltage calibration mode.\u003c\/span\u003e\u003c\/li\u003e\n\u003cli\u003e\u003cspan data-mce-fragment=\"1\"\u003eSteps 2 and 3, consistent with the output voltage calibration method.\u003c\/span\u003e\u003c\/li\u003e\n\u003c\/ul\u003e\n\u003cdiv data-mce-fragment=\"1\"\u003e\n\u003cspan data-mce-fragment=\"1\"\u003e \u003c\/span\u003e\u003cspan data-mce-fragment=\"1\"\u003e\u003cstrong data-mce-fragment=\"1\"\u003eOutput current calibration steps\u003c\/strong\u003e\u003c\/span\u003e\n\u003c\/div\u003e\n\u003cul\u003e\n\u003cli\u003e\u003cspan data-mce-fragment=\"1\"\u003eStep 1, adjust the right button so that Digital meter shows the value of output Current. Press the right button for more than 2 seconds, release, Digital meter flashes in synchronization so that you enter the output current calibration mode.\u003c\/span\u003e\u003c\/li\u003e\n\u003cli\u003e\u003cspan data-mce-fragment=\"1\"\u003eStep 2,Connected to the load, ammeter in series, adjust the right and left button to change the display of digital meter, so that is consistent with the ammeter display .\u003c\/span\u003e\u003c\/li\u003e\n\u003c\/ul\u003e\n\u003cdiv id=\"pastingspan1\" data-mce-fragment=\"1\"\u003e\n\u003cspan data-mce-fragment=\"1\"\u003e\u003c\/span\u003e\u003cspan data-mce-fragment=\"1\"\u003e\u003c\/span\u003e\u003cspan data-mce-fragment=\"1\"\u003e\u003cstrong data-mce-fragment=\"1\"\u003ePackage included:\u003c\/strong\u003e\u003c\/span\u003e\n\u003c\/div\u003e\n\u003c\/div\u003e\n\u003cdiv data-mce-fragment=\"1\"\u003e\n\u003cul\u003e\n\u003cli\u003e\n\u003cspan data-mce-fragment=\"1\"\u003e \u003c\/span\u003e\u003cspan data-mce-fragment=\"1\"\u003e1PCS x 5A CC\/CV LED Drive Lithium charger Power Step-down Module USB Voltmeter +Case\u003c\/span\u003e\n\u003c\/li\u003e\n\u003c\/ul\u003e\n\u003c\/div\u003e\n\u003cspan data-mce-fragment=\"1\"\u003e \u003c\/span\u003e"}
 -
 Translation missing: en.products.product.regular_price $7.99{"id":6090415669448,"title":"5A CC\/CV LED Drive Step down Lithium charger Power USB Voltmeter Module CASE CA","handle":"5a-cc-cv-led-drive-step-down-lithium-charger-power-usb-voltmeter-module-case-ca","description":"\u003cdiv data-mce-fragment=\"1\"\u003e\n\u003cspan data-mce-fragment=\"1\"\u003e\u003cstrong data-mce-fragment=\"1\"\u003e\u003c\/strong\u003e\u003c\/span\u003e\u003cspan data-mce-fragment=\"1\"\u003e\u003c\/span\u003e\n\u003cp data-mce-fragment=\"1\"\u003e\u003cspan data-mce-fragment=\"1\"\u003e\u003cstrong data-mce-fragment=\"1\"\u003eHighlights :\u003c\/strong\u003e\u003c\/span\u003e\u003c\/p\u003e\n\u003cul\u003e\n\u003cli\u003e\u003cspan data-mce-fragment=\"1\"\u003eModule with crystal shell,safer and more beautiful.\u003c\/span\u003e\u003c\/li\u003e\n\u003cli\u003e\u003cspan data-mce-fragment=\"1\"\u003eContains the voltmeter, ammeter, power meter, USB interfacefor charging the digital products.\u003c\/span\u003e\u003c\/li\u003e\n\u003c\/ul\u003e\n\u003cp data-mce-fragment=\"1\"\u003e\u003cspan data-mce-fragment=\"1\"\u003e\u003cstrong data-mce-fragment=\"1\"\u003eNote:\u003c\/strong\u003e\u003c\/span\u003e\u003c\/p\u003e\n\u003cul\u003e\n\u003cli\u003e\u003cspan data-mce-fragment=\"1\"\u003eWhen you use the product, the module inputs and outputs to be isolated from ground.\u003c\/span\u003e\u003c\/li\u003e\n\u003cli\u003e\u003cspan data-mce-fragment=\"1\"\u003eUSB output voltage is consistent with the module, not a fixed 5V output. \u003c\/span\u003e\u003c\/li\u003e\n\u003cli\u003e\u003cspan data-mce-fragment=\"1\"\u003eWhen charging for digital equipment, make sure USB output voltage is 5V.\u003c\/span\u003e\u003c\/li\u003e\n\u003cli\u003e\u003cspan data-mce-fragment=\"1\"\u003eSome customers report: “The module can not adjust the output voltage is always equal to the input voltage.”\u003c\/span\u003e\u003c\/li\u003e\n\u003cli\u003e\u003cspan data-mce-fragment=\"1\"\u003e When you encounter this problem, please counterclockwise rotation of the “voltage potentiometer” 10 laps or more, \u003c\/span\u003e\u003c\/li\u003e\n\u003cli\u003e\u003cspan data-mce-fragment=\"1\"\u003ethen use the module you can adjust the output voltage. Because the factory default output voltage of about 20V.\u003c\/span\u003e\u003c\/li\u003e\n\u003cli\u003e\u003cspan data-mce-fragment=\"1\"\u003e4.Shell assembly is very simple, but \"left\"\"right\"\"front\" panel are directional, you must pay attention during assembly!\u003c\/span\u003e\u003c\/li\u003e\n\u003c\/ul\u003e\n\u003cdiv data-mce-fragment=\"1\"\u003e\u003cspan data-mce-fragment=\"1\"\u003e\u003cstrong data-mce-fragment=\"1\"\u003eSpecifications\u003c\/strong\u003e\u003c\/span\u003e\u003c\/div\u003e\n\u003cul\u003e\n\u003cli\u003e\u003cspan data-mce-fragment=\"1\"\u003eInput voltage range:5-36VDC(Input voltagehigher than 6.2V, constant function will be effective)\u003c\/span\u003e\u003c\/li\u003e\n\u003cli\u003e\u003cspan data-mce-fragment=\"1\"\u003eOutput voltage range:1.25-32VDC adjustable(Output voltage higher than 6.2V, constant function will be effective)\u003c\/span\u003e\u003c\/li\u003e\n\u003cli\u003e\u003cspan data-mce-fragment=\"1\"\u003eOutput current: 0-5A\u003c\/span\u003e\u003c\/li\u003e\n\u003cli\u003e\u003cspan data-mce-fragment=\"1\"\u003eOutput power: 75W\u003c\/span\u003e\u003c\/li\u003e\n\u003cli\u003e\u003cspan data-mce-fragment=\"1\"\u003eHigh efficiency up to 96%\u003c\/span\u003e\u003c\/li\u003e\n\u003cli\u003e\u003cspan data-mce-fragment=\"1\"\u003eBuilt in thermal shutdown function\u003c\/span\u003e\u003c\/li\u003e\n\u003cli\u003e\u003cspan data-mce-fragment=\"1\"\u003eBuilt in current limit function\u003c\/span\u003e\u003c\/li\u003e\n\u003cli\u003e\u003cspan data-mce-fragment=\"1\"\u003eBuilt in output short protection function\u003c\/span\u003e\u003c\/li\u003e\n\u003cli\u003e\u003cspan data-mce-fragment=\"1\"\u003eInput reverse polarity protection: None (if required, high current diode in series with the input).\u003c\/span\u003e\u003c\/li\u003e\n\u003cli\u003e\u003cspan data-mce-fragment=\"1\"\u003eBare board size:L x W x H =68.2×38.8×15mm\u003c\/span\u003e\u003c\/li\u003e\n\u003cli\u003e\u003cspan data-mce-fragment=\"1\"\u003eWeight:73g\u003c\/span\u003e\u003c\/li\u003e\n\u003c\/ul\u003e\n\u003cp data-mce-fragment=\"1\"\u003e\u003cspan data-mce-fragment=\"1\"\u003e\u003cstrong data-mce-fragment=\"1\"\u003eApplication\u003c\/strong\u003e\u003c\/span\u003e\u003c\/p\u003e\n\u003cp data-mce-fragment=\"1\"\u003e\u003cspan data-mce-fragment=\"1\"\u003e\u003cstrong data-mce-fragment=\"1\"\u003eUse as a step-down modules with overcurrent protection \u003c\/strong\u003e\u003c\/span\u003e\u003c\/p\u003e\n\u003cp data-mce-fragment=\"1\"\u003e\u003cstrong\u003eUsage:\u003c\/strong\u003e\u003c\/p\u003e\n\u003cul\u003e\n\u003cli\u003e\u003cspan data-mce-fragment=\"1\"\u003eAdjust the right button so that “OUT” LED lighted, Digital meter shows the value of output voltage ,adjust the “voltage potentiometer” so that the output voltage reaches the value you want. \u003c\/span\u003e\u003c\/li\u003e\n\u003cli\u003e\u003cspan data-mce-fragment=\"1\"\u003eAdjust the right button so that Digital meter shows the value of output current;Wire shorted output terminal, then adjust the “current potentiometer” so that the output current reaches a predetermined overcurrent protection value. (For example, the Digital meter displays the current value of 4A, then you can use the module to a maximum current of 4A)\u003c\/span\u003e\u003c\/li\u003e\n\u003cli\u003e\u003cspan data-mce-fragment=\"1\"\u003eConnected to the load.\u003c\/span\u003e\u003c\/li\u003e\n\u003c\/ul\u003e\n\u003cp data-mce-fragment=\"1\"\u003e\u003cspan data-mce-fragment=\"1\"\u003e\u003cstrong data-mce-fragment=\"1\"\u003eUse as a battery charger\u003c\/strong\u003e\u003c\/span\u003e\u003c\/p\u003e\n\u003cp data-mce-fragment=\"1\"\u003e\u003cstrong\u003eUsage:\u003c\/strong\u003e\u003c\/p\u003e\n\u003cul\u003e\n\u003cli\u003e\u003cspan data-mce-fragment=\"1\"\u003eMake sure you need to charge the battery float voltage and charging current; \u003c\/span\u003e\u003c\/li\u003e\n\u003cli\u003e\u003cspan data-mce-fragment=\"1\"\u003e(if lithium parameters 3.7V\/2200mAh, then the float voltage is 4.2V, the maximum charging current 1C, ie 2200mA)\u003c\/span\u003e\u003c\/li\u003e\n\u003cli\u003e\u003cspan data-mce-fragment=\"1\"\u003eUnder no-load conditions, adjust the “Voltage potentiometer” so that the output voltage reaches the float voltage; \u003c\/span\u003e\u003c\/li\u003e\n\u003cli\u003e\u003cspan data-mce-fragment=\"1\"\u003e(if to 3.7V rechargeable lithium battery, the output voltage can be adjusted to 4.2V)\u003c\/span\u003e\u003c\/li\u003e\n\u003cli\u003e\u003cspan data-mce-fragment=\"1\"\u003eAdjust the right button so that Digital meter shows the value of output current;Wire shorted output terminal, then adjust the “current potentiometer” so that the output current reaches a predetermined Charging current value.\u003c\/span\u003e\u003c\/li\u003e\n\u003cli\u003e\u003cspan data-mce-fragment=\"1\"\u003eCharge turn lamp current factory default is 0.1 times the charging current; \u003c\/span\u003e\u003c\/li\u003e\n\u003cli\u003e\u003cspan data-mce-fragment=\"1\"\u003e(Battery during charging current is gradually reduced, if the charge current setting is 1A, then when the charge current is less than 0.1A, blue lights turned off, the green light is on, which means that the battery is fully charged)\u003c\/span\u003e\u003c\/li\u003e\n\u003cli\u003e\u003cspan data-mce-fragment=\"1\"\u003econnected to the battery charge.\u003c\/span\u003e\u003c\/li\u003e\n\u003c\/ul\u003e\n\u003cp data-mce-fragment=\"1\"\u003e\u003cspan data-mce-fragment=\"1\"\u003e(1,2,3,4 steps as: Output is unloaded, do not connect the battery)\u003c\/span\u003e\u003c\/p\u003e\n\u003cp data-mce-fragment=\"1\"\u003e\u003cspan data-mce-fragment=\"1\"\u003e\u003cstrong data-mce-fragment=\"1\"\u003eUse as a LED constant current driver module\u003c\/strong\u003e\u003c\/span\u003e\u003c\/p\u003e\n\u003cp data-mce-fragment=\"1\"\u003e\u003cstrong\u003eUsage:\u003c\/strong\u003e\u003c\/p\u003e\n\u003cul\u003e\n\u003cli\u003e\u003cspan data-mce-fragment=\"1\"\u003eAdjust the “voltage potentiometer” so that the output voltage reaches the value you want. \u003c\/span\u003e\u003c\/li\u003e\n\u003cli\u003e\u003cspan data-mce-fragment=\"1\"\u003eAdjust the right button so that Digital meter shows the value of output current;Wire shorted output terminal, then adjust the “current potentiometer” so that the output current reaches a predetermined LED operating current.\u003c\/span\u003e\u003c\/li\u003e\n\u003cli\u003e\u003cspan data-mce-fragment=\"1\"\u003eConnect LED, work.\u003c\/span\u003e\u003c\/li\u003e\n\u003cli\u003e\u003cspan data-mce-fragment=\"1\"\u003e(1,2 steps as: Output is unloaded, do not connect LED)\u003c\/span\u003e\u003c\/li\u003e\n\u003cli\u003e\u003cspan data-mce-fragment=\"1\"\u003eVoltmeter and ammeter calibration method:\u003c\/span\u003e\u003c\/li\u003e\n\u003cli\u003e\u003cspan data-mce-fragment=\"1\"\u003eModule with manual calibration function can correct display precision voltage and current, if you think the current voltage and current accuracy to meet the requirements, do not perform the following operations.\u003c\/span\u003e\u003c\/li\u003e\n\u003c\/ul\u003e\n\u003cdiv data-mce-fragment=\"1\"\u003e\u003cspan data-mce-fragment=\"1\"\u003e\u003cstrong data-mce-fragment=\"1\"\u003eOutput voltage calibration steps\u003c\/strong\u003e\u003c\/span\u003e\u003c\/div\u003e\n\u003cul\u003e\n\u003cli\u003e\u003cspan data-mce-fragment=\"1\"\u003eStep 1, adjust the right button so that “OUT” LED lighted, Digital meter shows the value of output voltage; Press the right button for more than 2 seconds, release, Digital meter and “OUT” LED flashes in synchronization so that you enter the output voltage calibration mode.\u003c\/span\u003e\u003c\/li\u003e\n\u003cli\u003e\u003cspan data-mce-fragment=\"1\"\u003eStep 2, press the right button (normal speed), the voltage value is adding up a unit; Press the left button, minus a unit; Due to a unit is less than 0.1V, the minimum voltage display to 0.1V, so you need to continuously press 1-5 times to see the voltmeter change 0.1V, how many times voltmeter change 0.1V by pressing the key, depending on the current display voltage, the higher the voltage, the fewer the number of press.\u003c\/span\u003e\u003c\/li\u003e\n\u003cli\u003e\u003cspan data-mce-fragment=\"1\"\u003eStep 3, press the right button for more than 2 seconds, release, to exit the output voltage calibration mode. All parameters set to automatically power down to save.\u003c\/span\u003e\u003c\/li\u003e\n\u003c\/ul\u003e\n\u003cp data-mce-fragment=\"1\"\u003e\u003cspan data-mce-fragment=\"1\"\u003e\u003cstrong data-mce-fragment=\"1\"\u003e Input voltage calibration steps\u003c\/strong\u003e\u003c\/span\u003e\u003c\/p\u003e\n\u003cul\u003e\n\u003cli\u003e\u003cspan data-mce-fragment=\"1\"\u003eStep 1, adjust the right button so that “IN” LED lighted, Digital meter shows the value of input voltage; press the right button for more than 2 seconds, release,Digital meter and “IN” LED flashes in synchronization so that you enter the input voltage calibration mode.\u003c\/span\u003e\u003c\/li\u003e\n\u003cli\u003e\u003cspan data-mce-fragment=\"1\"\u003eSteps 2 and 3, consistent with the output voltage calibration method.\u003c\/span\u003e\u003c\/li\u003e\n\u003c\/ul\u003e\n\u003cdiv data-mce-fragment=\"1\"\u003e\n\u003cspan data-mce-fragment=\"1\"\u003e \u003c\/span\u003e\u003cspan data-mce-fragment=\"1\"\u003e\u003cstrong data-mce-fragment=\"1\"\u003eOutput current calibration steps\u003c\/strong\u003e\u003c\/span\u003e\n\u003c\/div\u003e\n\u003cul\u003e\n\u003cli\u003e\u003cspan data-mce-fragment=\"1\"\u003eStep 1, adjust the right button so that Digital meter shows the value of output Current. Press the right button for more than 2 seconds, release, Digital meter flashes in synchronization so that you enter the output current calibration mode.\u003c\/span\u003e\u003c\/li\u003e\n\u003cli\u003e\u003cspan data-mce-fragment=\"1\"\u003eStep 2,Connected to the load, ammeter in series, adjust the right and left button to change the display of digital meter, so that is consistent with the ammeter display .\u003c\/span\u003e\u003c\/li\u003e\n\u003c\/ul\u003e\n\u003cdiv id=\"pastingspan1\" data-mce-fragment=\"1\"\u003e\n\u003cspan data-mce-fragment=\"1\"\u003e\u003c\/span\u003e\u003cspan data-mce-fragment=\"1\"\u003e\u003c\/span\u003e\u003cspan data-mce-fragment=\"1\"\u003e\u003cstrong data-mce-fragment=\"1\"\u003ePackage included:\u003c\/strong\u003e\u003c\/span\u003e\n\u003c\/div\u003e\n\u003c\/div\u003e\n\u003cdiv data-mce-fragment=\"1\"\u003e\n\u003cul\u003e\n\u003cli\u003e\n\u003cspan data-mce-fragment=\"1\"\u003e \u003c\/span\u003e\u003cspan data-mce-fragment=\"1\"\u003e1PCS x 5A CC\/CV LED Drive Lithium charger Power Step-down Module USB Voltmeter +Case\u003c\/span\u003e\n\u003c\/li\u003e\n\u003c\/ul\u003e\n\u003c\/div\u003e\n\u003cspan data-mce-fragment=\"1\"\u003e \u003c\/span\u003e","published_at":"2020-11-19T14:45:58+08:00","created_at":"2020-11-19T14:45:57+08:00","vendor":"DIYMORE","type":"","tags":[],"price":1199,"price_min":1199,"price_max":1199,"available":true,"price_varies":false,"compare_at_price":null,"compare_at_price_min":0,"compare_at_price_max":0,"compare_at_price_varies":false,"variants":[{"id":37554047877320,"title":"Default Title","option1":"Default Title","option2":null,"option3":null,"sku":"010725","requires_shipping":true,"taxable":false,"featured_image":null,"available":true,"name":"5A CC\/CV LED Drive Step down Lithium charger Power USB Voltmeter Module CASE CA","public_title":null,"options":["Default Title"],"price":1199,"weight":0,"compare_at_price":null,"inventory_management":"shopify","barcode":null,"requires_selling_plan":false,"selling_plan_allocations":[],"quantity_rule":{"min":1,"max":null,"increment":1}}],"images":["\/\/www.diymore.cc\/cdn\/shop\/products\/010725_1.jpg?v=1605768361","\/\/www.diymore.cc\/cdn\/shop\/products\/010725_4.jpg?v=1605768361","\/\/www.diymore.cc\/cdn\/shop\/products\/010725_5.jpg?v=1605768361","\/\/www.diymore.cc\/cdn\/shop\/products\/010725_6.jpg?v=1605768362","\/\/www.diymore.cc\/cdn\/shop\/products\/010725_13.jpg?v=1605768362","\/\/www.diymore.cc\/cdn\/shop\/products\/010725_19.jpg?v=1605768362","\/\/www.diymore.cc\/cdn\/shop\/products\/010725faa.jpg?v=1605768362"],"featured_image":"\/\/www.diymore.cc\/cdn\/shop\/products\/010725_1.jpg?v=1605768361","options":["Title"],"media":[{"alt":null,"id":14987519951048,"position":1,"preview_image":{"aspect_ratio":1.0,"height":1000,"width":1000,"src":"\/\/www.diymore.cc\/cdn\/shop\/products\/010725_1.jpg?v=1605768361"},"aspect_ratio":1.0,"height":1000,"media_type":"image","src":"\/\/www.diymore.cc\/cdn\/shop\/products\/010725_1.jpg?v=1605768361","width":1000},{"alt":null,"id":14987519983816,"position":2,"preview_image":{"aspect_ratio":1.0,"height":1000,"width":1000,"src":"\/\/www.diymore.cc\/cdn\/shop\/products\/010725_4.jpg?v=1605768361"},"aspect_ratio":1.0,"height":1000,"media_type":"image","src":"\/\/www.diymore.cc\/cdn\/shop\/products\/010725_4.jpg?v=1605768361","width":1000},{"alt":null,"id":14987520016584,"position":3,"preview_image":{"aspect_ratio":1.0,"height":1000,"width":1000,"src":"\/\/www.diymore.cc\/cdn\/shop\/products\/010725_5.jpg?v=1605768361"},"aspect_ratio":1.0,"height":1000,"media_type":"image","src":"\/\/www.diymore.cc\/cdn\/shop\/products\/010725_5.jpg?v=1605768361","width":1000},{"alt":null,"id":14987520049352,"position":4,"preview_image":{"aspect_ratio":1.0,"height":1000,"width":1000,"src":"\/\/www.diymore.cc\/cdn\/shop\/products\/010725_6.jpg?v=1605768362"},"aspect_ratio":1.0,"height":1000,"media_type":"image","src":"\/\/www.diymore.cc\/cdn\/shop\/products\/010725_6.jpg?v=1605768362","width":1000},{"alt":null,"id":14987520082120,"position":5,"preview_image":{"aspect_ratio":1.0,"height":1000,"width":1000,"src":"\/\/www.diymore.cc\/cdn\/shop\/products\/010725_13.jpg?v=1605768362"},"aspect_ratio":1.0,"height":1000,"media_type":"image","src":"\/\/www.diymore.cc\/cdn\/shop\/products\/010725_13.jpg?v=1605768362","width":1000},{"alt":null,"id":14987520114888,"position":6,"preview_image":{"aspect_ratio":1.0,"height":1000,"width":1000,"src":"\/\/www.diymore.cc\/cdn\/shop\/products\/010725_19.jpg?v=1605768362"},"aspect_ratio":1.0,"height":1000,"media_type":"image","src":"\/\/www.diymore.cc\/cdn\/shop\/products\/010725_19.jpg?v=1605768362","width":1000},{"alt":null,"id":14987520147656,"position":7,"preview_image":{"aspect_ratio":1.414,"height":495,"width":700,"src":"\/\/www.diymore.cc\/cdn\/shop\/products\/010725faa.jpg?v=1605768362"},"aspect_ratio":1.414,"height":495,"media_type":"image","src":"\/\/www.diymore.cc\/cdn\/shop\/products\/010725faa.jpg?v=1605768362","width":700}],"requires_selling_plan":false,"selling_plan_groups":[],"content":"\u003cdiv data-mce-fragment=\"1\"\u003e\n\u003cspan data-mce-fragment=\"1\"\u003e\u003cstrong data-mce-fragment=\"1\"\u003e\u003c\/strong\u003e\u003c\/span\u003e\u003cspan data-mce-fragment=\"1\"\u003e\u003c\/span\u003e\n\u003cp data-mce-fragment=\"1\"\u003e\u003cspan data-mce-fragment=\"1\"\u003e\u003cstrong data-mce-fragment=\"1\"\u003eHighlights :\u003c\/strong\u003e\u003c\/span\u003e\u003c\/p\u003e\n\u003cul\u003e\n\u003cli\u003e\u003cspan data-mce-fragment=\"1\"\u003eModule with crystal shell,safer and more beautiful.\u003c\/span\u003e\u003c\/li\u003e\n\u003cli\u003e\u003cspan data-mce-fragment=\"1\"\u003eContains the voltmeter, ammeter, power meter, USB interfacefor charging the digital products.\u003c\/span\u003e\u003c\/li\u003e\n\u003c\/ul\u003e\n\u003cp data-mce-fragment=\"1\"\u003e\u003cspan data-mce-fragment=\"1\"\u003e\u003cstrong data-mce-fragment=\"1\"\u003eNote:\u003c\/strong\u003e\u003c\/span\u003e\u003c\/p\u003e\n\u003cul\u003e\n\u003cli\u003e\u003cspan data-mce-fragment=\"1\"\u003eWhen you use the product, the module inputs and outputs to be isolated from ground.\u003c\/span\u003e\u003c\/li\u003e\n\u003cli\u003e\u003cspan data-mce-fragment=\"1\"\u003eUSB output voltage is consistent with the module, not a fixed 5V output. \u003c\/span\u003e\u003c\/li\u003e\n\u003cli\u003e\u003cspan data-mce-fragment=\"1\"\u003eWhen charging for digital equipment, make sure USB output voltage is 5V.\u003c\/span\u003e\u003c\/li\u003e\n\u003cli\u003e\u003cspan data-mce-fragment=\"1\"\u003eSome customers report: “The module can not adjust the output voltage is always equal to the input voltage.”\u003c\/span\u003e\u003c\/li\u003e\n\u003cli\u003e\u003cspan data-mce-fragment=\"1\"\u003e When you encounter this problem, please counterclockwise rotation of the “voltage potentiometer” 10 laps or more, \u003c\/span\u003e\u003c\/li\u003e\n\u003cli\u003e\u003cspan data-mce-fragment=\"1\"\u003ethen use the module you can adjust the output voltage. Because the factory default output voltage of about 20V.\u003c\/span\u003e\u003c\/li\u003e\n\u003cli\u003e\u003cspan data-mce-fragment=\"1\"\u003e4.Shell assembly is very simple, but \"left\"\"right\"\"front\" panel are directional, you must pay attention during assembly!\u003c\/span\u003e\u003c\/li\u003e\n\u003c\/ul\u003e\n\u003cdiv data-mce-fragment=\"1\"\u003e\u003cspan data-mce-fragment=\"1\"\u003e\u003cstrong data-mce-fragment=\"1\"\u003eSpecifications\u003c\/strong\u003e\u003c\/span\u003e\u003c\/div\u003e\n\u003cul\u003e\n\u003cli\u003e\u003cspan data-mce-fragment=\"1\"\u003eInput voltage range:5-36VDC(Input voltagehigher than 6.2V, constant function will be effective)\u003c\/span\u003e\u003c\/li\u003e\n\u003cli\u003e\u003cspan data-mce-fragment=\"1\"\u003eOutput voltage range:1.25-32VDC adjustable(Output voltage higher than 6.2V, constant function will be effective)\u003c\/span\u003e\u003c\/li\u003e\n\u003cli\u003e\u003cspan data-mce-fragment=\"1\"\u003eOutput current: 0-5A\u003c\/span\u003e\u003c\/li\u003e\n\u003cli\u003e\u003cspan data-mce-fragment=\"1\"\u003eOutput power: 75W\u003c\/span\u003e\u003c\/li\u003e\n\u003cli\u003e\u003cspan data-mce-fragment=\"1\"\u003eHigh efficiency up to 96%\u003c\/span\u003e\u003c\/li\u003e\n\u003cli\u003e\u003cspan data-mce-fragment=\"1\"\u003eBuilt in thermal shutdown function\u003c\/span\u003e\u003c\/li\u003e\n\u003cli\u003e\u003cspan data-mce-fragment=\"1\"\u003eBuilt in current limit function\u003c\/span\u003e\u003c\/li\u003e\n\u003cli\u003e\u003cspan data-mce-fragment=\"1\"\u003eBuilt in output short protection function\u003c\/span\u003e\u003c\/li\u003e\n\u003cli\u003e\u003cspan data-mce-fragment=\"1\"\u003eInput reverse polarity protection: None (if required, high current diode in series with the input).\u003c\/span\u003e\u003c\/li\u003e\n\u003cli\u003e\u003cspan data-mce-fragment=\"1\"\u003eBare board size:L x W x H =68.2×38.8×15mm\u003c\/span\u003e\u003c\/li\u003e\n\u003cli\u003e\u003cspan data-mce-fragment=\"1\"\u003eWeight:73g\u003c\/span\u003e\u003c\/li\u003e\n\u003c\/ul\u003e\n\u003cp data-mce-fragment=\"1\"\u003e\u003cspan data-mce-fragment=\"1\"\u003e\u003cstrong data-mce-fragment=\"1\"\u003eApplication\u003c\/strong\u003e\u003c\/span\u003e\u003c\/p\u003e\n\u003cp data-mce-fragment=\"1\"\u003e\u003cspan data-mce-fragment=\"1\"\u003e\u003cstrong data-mce-fragment=\"1\"\u003eUse as a step-down modules with overcurrent protection \u003c\/strong\u003e\u003c\/span\u003e\u003c\/p\u003e\n\u003cp data-mce-fragment=\"1\"\u003e\u003cstrong\u003eUsage:\u003c\/strong\u003e\u003c\/p\u003e\n\u003cul\u003e\n\u003cli\u003e\u003cspan data-mce-fragment=\"1\"\u003eAdjust the right button so that “OUT” LED lighted, Digital meter shows the value of output voltage ,adjust the “voltage potentiometer” so that the output voltage reaches the value you want. \u003c\/span\u003e\u003c\/li\u003e\n\u003cli\u003e\u003cspan data-mce-fragment=\"1\"\u003eAdjust the right button so that Digital meter shows the value of output current;Wire shorted output terminal, then adjust the “current potentiometer” so that the output current reaches a predetermined overcurrent protection value. (For example, the Digital meter displays the current value of 4A, then you can use the module to a maximum current of 4A)\u003c\/span\u003e\u003c\/li\u003e\n\u003cli\u003e\u003cspan data-mce-fragment=\"1\"\u003eConnected to the load.\u003c\/span\u003e\u003c\/li\u003e\n\u003c\/ul\u003e\n\u003cp data-mce-fragment=\"1\"\u003e\u003cspan data-mce-fragment=\"1\"\u003e\u003cstrong data-mce-fragment=\"1\"\u003eUse as a battery charger\u003c\/strong\u003e\u003c\/span\u003e\u003c\/p\u003e\n\u003cp data-mce-fragment=\"1\"\u003e\u003cstrong\u003eUsage:\u003c\/strong\u003e\u003c\/p\u003e\n\u003cul\u003e\n\u003cli\u003e\u003cspan data-mce-fragment=\"1\"\u003eMake sure you need to charge the battery float voltage and charging current; \u003c\/span\u003e\u003c\/li\u003e\n\u003cli\u003e\u003cspan data-mce-fragment=\"1\"\u003e(if lithium parameters 3.7V\/2200mAh, then the float voltage is 4.2V, the maximum charging current 1C, ie 2200mA)\u003c\/span\u003e\u003c\/li\u003e\n\u003cli\u003e\u003cspan data-mce-fragment=\"1\"\u003eUnder no-load conditions, adjust the “Voltage potentiometer” so that the output voltage reaches the float voltage; \u003c\/span\u003e\u003c\/li\u003e\n\u003cli\u003e\u003cspan data-mce-fragment=\"1\"\u003e(if to 3.7V rechargeable lithium battery, the output voltage can be adjusted to 4.2V)\u003c\/span\u003e\u003c\/li\u003e\n\u003cli\u003e\u003cspan data-mce-fragment=\"1\"\u003eAdjust the right button so that Digital meter shows the value of output current;Wire shorted output terminal, then adjust the “current potentiometer” so that the output current reaches a predetermined Charging current value.\u003c\/span\u003e\u003c\/li\u003e\n\u003cli\u003e\u003cspan data-mce-fragment=\"1\"\u003eCharge turn lamp current factory default is 0.1 times the charging current; \u003c\/span\u003e\u003c\/li\u003e\n\u003cli\u003e\u003cspan data-mce-fragment=\"1\"\u003e(Battery during charging current is gradually reduced, if the charge current setting is 1A, then when the charge current is less than 0.1A, blue lights turned off, the green light is on, which means that the battery is fully charged)\u003c\/span\u003e\u003c\/li\u003e\n\u003cli\u003e\u003cspan data-mce-fragment=\"1\"\u003econnected to the battery charge.\u003c\/span\u003e\u003c\/li\u003e\n\u003c\/ul\u003e\n\u003cp data-mce-fragment=\"1\"\u003e\u003cspan data-mce-fragment=\"1\"\u003e(1,2,3,4 steps as: Output is unloaded, do not connect the battery)\u003c\/span\u003e\u003c\/p\u003e\n\u003cp data-mce-fragment=\"1\"\u003e\u003cspan data-mce-fragment=\"1\"\u003e\u003cstrong data-mce-fragment=\"1\"\u003eUse as a LED constant current driver module\u003c\/strong\u003e\u003c\/span\u003e\u003c\/p\u003e\n\u003cp data-mce-fragment=\"1\"\u003e\u003cstrong\u003eUsage:\u003c\/strong\u003e\u003c\/p\u003e\n\u003cul\u003e\n\u003cli\u003e\u003cspan data-mce-fragment=\"1\"\u003eAdjust the “voltage potentiometer” so that the output voltage reaches the value you want. \u003c\/span\u003e\u003c\/li\u003e\n\u003cli\u003e\u003cspan data-mce-fragment=\"1\"\u003eAdjust the right button so that Digital meter shows the value of output current;Wire shorted output terminal, then adjust the “current potentiometer” so that the output current reaches a predetermined LED operating current.\u003c\/span\u003e\u003c\/li\u003e\n\u003cli\u003e\u003cspan data-mce-fragment=\"1\"\u003eConnect LED, work.\u003c\/span\u003e\u003c\/li\u003e\n\u003cli\u003e\u003cspan data-mce-fragment=\"1\"\u003e(1,2 steps as: Output is unloaded, do not connect LED)\u003c\/span\u003e\u003c\/li\u003e\n\u003cli\u003e\u003cspan data-mce-fragment=\"1\"\u003eVoltmeter and ammeter calibration method:\u003c\/span\u003e\u003c\/li\u003e\n\u003cli\u003e\u003cspan data-mce-fragment=\"1\"\u003eModule with manual calibration function can correct display precision voltage and current, if you think the current voltage and current accuracy to meet the requirements, do not perform the following operations.\u003c\/span\u003e\u003c\/li\u003e\n\u003c\/ul\u003e\n\u003cdiv data-mce-fragment=\"1\"\u003e\u003cspan data-mce-fragment=\"1\"\u003e\u003cstrong data-mce-fragment=\"1\"\u003eOutput voltage calibration steps\u003c\/strong\u003e\u003c\/span\u003e\u003c\/div\u003e\n\u003cul\u003e\n\u003cli\u003e\u003cspan data-mce-fragment=\"1\"\u003eStep 1, adjust the right button so that “OUT” LED lighted, Digital meter shows the value of output voltage; Press the right button for more than 2 seconds, release, Digital meter and “OUT” LED flashes in synchronization so that you enter the output voltage calibration mode.\u003c\/span\u003e\u003c\/li\u003e\n\u003cli\u003e\u003cspan data-mce-fragment=\"1\"\u003eStep 2, press the right button (normal speed), the voltage value is adding up a unit; Press the left button, minus a unit; Due to a unit is less than 0.1V, the minimum voltage display to 0.1V, so you need to continuously press 1-5 times to see the voltmeter change 0.1V, how many times voltmeter change 0.1V by pressing the key, depending on the current display voltage, the higher the voltage, the fewer the number of press.\u003c\/span\u003e\u003c\/li\u003e\n\u003cli\u003e\u003cspan data-mce-fragment=\"1\"\u003eStep 3, press the right button for more than 2 seconds, release, to exit the output voltage calibration mode. All parameters set to automatically power down to save.\u003c\/span\u003e\u003c\/li\u003e\n\u003c\/ul\u003e\n\u003cp data-mce-fragment=\"1\"\u003e\u003cspan data-mce-fragment=\"1\"\u003e\u003cstrong data-mce-fragment=\"1\"\u003e Input voltage calibration steps\u003c\/strong\u003e\u003c\/span\u003e\u003c\/p\u003e\n\u003cul\u003e\n\u003cli\u003e\u003cspan data-mce-fragment=\"1\"\u003eStep 1, adjust the right button so that “IN” LED lighted, Digital meter shows the value of input voltage; press the right button for more than 2 seconds, release,Digital meter and “IN” LED flashes in synchronization so that you enter the input voltage calibration mode.\u003c\/span\u003e\u003c\/li\u003e\n\u003cli\u003e\u003cspan data-mce-fragment=\"1\"\u003eSteps 2 and 3, consistent with the output voltage calibration method.\u003c\/span\u003e\u003c\/li\u003e\n\u003c\/ul\u003e\n\u003cdiv data-mce-fragment=\"1\"\u003e\n\u003cspan data-mce-fragment=\"1\"\u003e \u003c\/span\u003e\u003cspan data-mce-fragment=\"1\"\u003e\u003cstrong data-mce-fragment=\"1\"\u003eOutput current calibration steps\u003c\/strong\u003e\u003c\/span\u003e\n\u003c\/div\u003e\n\u003cul\u003e\n\u003cli\u003e\u003cspan data-mce-fragment=\"1\"\u003eStep 1, adjust the right button so that Digital meter shows the value of output Current. Press the right button for more than 2 seconds, release, Digital meter flashes in synchronization so that you enter the output current calibration mode.\u003c\/span\u003e\u003c\/li\u003e\n\u003cli\u003e\u003cspan data-mce-fragment=\"1\"\u003eStep 2,Connected to the load, ammeter in series, adjust the right and left button to change the display of digital meter, so that is consistent with the ammeter display .\u003c\/span\u003e\u003c\/li\u003e\n\u003c\/ul\u003e\n\u003cdiv id=\"pastingspan1\" data-mce-fragment=\"1\"\u003e\n\u003cspan data-mce-fragment=\"1\"\u003e\u003c\/span\u003e\u003cspan data-mce-fragment=\"1\"\u003e\u003c\/span\u003e\u003cspan data-mce-fragment=\"1\"\u003e\u003cstrong data-mce-fragment=\"1\"\u003ePackage included:\u003c\/strong\u003e\u003c\/span\u003e\n\u003c\/div\u003e\n\u003c\/div\u003e\n\u003cdiv data-mce-fragment=\"1\"\u003e\n\u003cul\u003e\n\u003cli\u003e\n\u003cspan data-mce-fragment=\"1\"\u003e \u003c\/span\u003e\u003cspan data-mce-fragment=\"1\"\u003e1PCS x 5A CC\/CV LED Drive Lithium charger Power Step-down Module USB Voltmeter +Case\u003c\/span\u003e\n\u003c\/li\u003e\n\u003c\/ul\u003e\n\u003c\/div\u003e\n\u003cspan data-mce-fragment=\"1\"\u003e \u003c\/span\u003e"}
 -
 Translation missing: en.products.product.regular_price $11.99{"id":6090415669448,"title":"5A CC\/CV LED Drive Step down Lithium charger Power USB Voltmeter Module CASE CA","handle":"5a-cc-cv-led-drive-step-down-lithium-charger-power-usb-voltmeter-module-case-ca","description":"\u003cdiv data-mce-fragment=\"1\"\u003e\n\u003cspan data-mce-fragment=\"1\"\u003e\u003cstrong data-mce-fragment=\"1\"\u003e\u003c\/strong\u003e\u003c\/span\u003e\u003cspan data-mce-fragment=\"1\"\u003e\u003c\/span\u003e\n\u003cp data-mce-fragment=\"1\"\u003e\u003cspan data-mce-fragment=\"1\"\u003e\u003cstrong data-mce-fragment=\"1\"\u003eHighlights :\u003c\/strong\u003e\u003c\/span\u003e\u003c\/p\u003e\n\u003cul\u003e\n\u003cli\u003e\u003cspan data-mce-fragment=\"1\"\u003eModule with crystal shell,safer and more beautiful.\u003c\/span\u003e\u003c\/li\u003e\n\u003cli\u003e\u003cspan data-mce-fragment=\"1\"\u003eContains the voltmeter, ammeter, power meter, USB interfacefor charging the digital products.\u003c\/span\u003e\u003c\/li\u003e\n\u003c\/ul\u003e\n\u003cp data-mce-fragment=\"1\"\u003e\u003cspan data-mce-fragment=\"1\"\u003e\u003cstrong data-mce-fragment=\"1\"\u003eNote:\u003c\/strong\u003e\u003c\/span\u003e\u003c\/p\u003e\n\u003cul\u003e\n\u003cli\u003e\u003cspan data-mce-fragment=\"1\"\u003eWhen you use the product, the module inputs and outputs to be isolated from ground.\u003c\/span\u003e\u003c\/li\u003e\n\u003cli\u003e\u003cspan data-mce-fragment=\"1\"\u003eUSB output voltage is consistent with the module, not a fixed 5V output. \u003c\/span\u003e\u003c\/li\u003e\n\u003cli\u003e\u003cspan data-mce-fragment=\"1\"\u003eWhen charging for digital equipment, make sure USB output voltage is 5V.\u003c\/span\u003e\u003c\/li\u003e\n\u003cli\u003e\u003cspan data-mce-fragment=\"1\"\u003eSome customers report: “The module can not adjust the output voltage is always equal to the input voltage.”\u003c\/span\u003e\u003c\/li\u003e\n\u003cli\u003e\u003cspan data-mce-fragment=\"1\"\u003e When you encounter this problem, please counterclockwise rotation of the “voltage potentiometer” 10 laps or more, \u003c\/span\u003e\u003c\/li\u003e\n\u003cli\u003e\u003cspan data-mce-fragment=\"1\"\u003ethen use the module you can adjust the output voltage. Because the factory default output voltage of about 20V.\u003c\/span\u003e\u003c\/li\u003e\n\u003cli\u003e\u003cspan data-mce-fragment=\"1\"\u003e4.Shell assembly is very simple, but \"left\"\"right\"\"front\" panel are directional, you must pay attention during assembly!\u003c\/span\u003e\u003c\/li\u003e\n\u003c\/ul\u003e\n\u003cdiv data-mce-fragment=\"1\"\u003e\u003cspan data-mce-fragment=\"1\"\u003e\u003cstrong data-mce-fragment=\"1\"\u003eSpecifications\u003c\/strong\u003e\u003c\/span\u003e\u003c\/div\u003e\n\u003cul\u003e\n\u003cli\u003e\u003cspan data-mce-fragment=\"1\"\u003eInput voltage range:5-36VDC(Input voltagehigher than 6.2V, constant function will be effective)\u003c\/span\u003e\u003c\/li\u003e\n\u003cli\u003e\u003cspan data-mce-fragment=\"1\"\u003eOutput voltage range:1.25-32VDC adjustable(Output voltage higher than 6.2V, constant function will be effective)\u003c\/span\u003e\u003c\/li\u003e\n\u003cli\u003e\u003cspan data-mce-fragment=\"1\"\u003eOutput current: 0-5A\u003c\/span\u003e\u003c\/li\u003e\n\u003cli\u003e\u003cspan data-mce-fragment=\"1\"\u003eOutput power: 75W\u003c\/span\u003e\u003c\/li\u003e\n\u003cli\u003e\u003cspan data-mce-fragment=\"1\"\u003eHigh efficiency up to 96%\u003c\/span\u003e\u003c\/li\u003e\n\u003cli\u003e\u003cspan data-mce-fragment=\"1\"\u003eBuilt in thermal shutdown function\u003c\/span\u003e\u003c\/li\u003e\n\u003cli\u003e\u003cspan data-mce-fragment=\"1\"\u003eBuilt in current limit function\u003c\/span\u003e\u003c\/li\u003e\n\u003cli\u003e\u003cspan data-mce-fragment=\"1\"\u003eBuilt in output short protection function\u003c\/span\u003e\u003c\/li\u003e\n\u003cli\u003e\u003cspan data-mce-fragment=\"1\"\u003eInput reverse polarity protection: None (if required, high current diode in series with the input).\u003c\/span\u003e\u003c\/li\u003e\n\u003cli\u003e\u003cspan data-mce-fragment=\"1\"\u003eBare board size:L x W x H =68.2×38.8×15mm\u003c\/span\u003e\u003c\/li\u003e\n\u003cli\u003e\u003cspan data-mce-fragment=\"1\"\u003eWeight:73g\u003c\/span\u003e\u003c\/li\u003e\n\u003c\/ul\u003e\n\u003cp data-mce-fragment=\"1\"\u003e\u003cspan data-mce-fragment=\"1\"\u003e\u003cstrong data-mce-fragment=\"1\"\u003eApplication\u003c\/strong\u003e\u003c\/span\u003e\u003c\/p\u003e\n\u003cp data-mce-fragment=\"1\"\u003e\u003cspan data-mce-fragment=\"1\"\u003e\u003cstrong data-mce-fragment=\"1\"\u003eUse as a step-down modules with overcurrent protection \u003c\/strong\u003e\u003c\/span\u003e\u003c\/p\u003e\n\u003cp data-mce-fragment=\"1\"\u003e\u003cstrong\u003eUsage:\u003c\/strong\u003e\u003c\/p\u003e\n\u003cul\u003e\n\u003cli\u003e\u003cspan data-mce-fragment=\"1\"\u003eAdjust the right button so that “OUT” LED lighted, Digital meter shows the value of output voltage ,adjust the “voltage potentiometer” so that the output voltage reaches the value you want. \u003c\/span\u003e\u003c\/li\u003e\n\u003cli\u003e\u003cspan data-mce-fragment=\"1\"\u003eAdjust the right button so that Digital meter shows the value of output current;Wire shorted output terminal, then adjust the “current potentiometer” so that the output current reaches a predetermined overcurrent protection value. (For example, the Digital meter displays the current value of 4A, then you can use the module to a maximum current of 4A)\u003c\/span\u003e\u003c\/li\u003e\n\u003cli\u003e\u003cspan data-mce-fragment=\"1\"\u003eConnected to the load.\u003c\/span\u003e\u003c\/li\u003e\n\u003c\/ul\u003e\n\u003cp data-mce-fragment=\"1\"\u003e\u003cspan data-mce-fragment=\"1\"\u003e\u003cstrong data-mce-fragment=\"1\"\u003eUse as a battery charger\u003c\/strong\u003e\u003c\/span\u003e\u003c\/p\u003e\n\u003cp data-mce-fragment=\"1\"\u003e\u003cstrong\u003eUsage:\u003c\/strong\u003e\u003c\/p\u003e\n\u003cul\u003e\n\u003cli\u003e\u003cspan data-mce-fragment=\"1\"\u003eMake sure you need to charge the battery float voltage and charging current; \u003c\/span\u003e\u003c\/li\u003e\n\u003cli\u003e\u003cspan data-mce-fragment=\"1\"\u003e(if lithium parameters 3.7V\/2200mAh, then the float voltage is 4.2V, the maximum charging current 1C, ie 2200mA)\u003c\/span\u003e\u003c\/li\u003e\n\u003cli\u003e\u003cspan data-mce-fragment=\"1\"\u003eUnder no-load conditions, adjust the “Voltage potentiometer” so that the output voltage reaches the float voltage; \u003c\/span\u003e\u003c\/li\u003e\n\u003cli\u003e\u003cspan data-mce-fragment=\"1\"\u003e(if to 3.7V rechargeable lithium battery, the output voltage can be adjusted to 4.2V)\u003c\/span\u003e\u003c\/li\u003e\n\u003cli\u003e\u003cspan data-mce-fragment=\"1\"\u003eAdjust the right button so that Digital meter shows the value of output current;Wire shorted output terminal, then adjust the “current potentiometer” so that the output current reaches a predetermined Charging current value.\u003c\/span\u003e\u003c\/li\u003e\n\u003cli\u003e\u003cspan data-mce-fragment=\"1\"\u003eCharge turn lamp current factory default is 0.1 times the charging current; \u003c\/span\u003e\u003c\/li\u003e\n\u003cli\u003e\u003cspan data-mce-fragment=\"1\"\u003e(Battery during charging current is gradually reduced, if the charge current setting is 1A, then when the charge current is less than 0.1A, blue lights turned off, the green light is on, which means that the battery is fully charged)\u003c\/span\u003e\u003c\/li\u003e\n\u003cli\u003e\u003cspan data-mce-fragment=\"1\"\u003econnected to the battery charge.\u003c\/span\u003e\u003c\/li\u003e\n\u003c\/ul\u003e\n\u003cp data-mce-fragment=\"1\"\u003e\u003cspan data-mce-fragment=\"1\"\u003e(1,2,3,4 steps as: Output is unloaded, do not connect the battery)\u003c\/span\u003e\u003c\/p\u003e\n\u003cp data-mce-fragment=\"1\"\u003e\u003cspan data-mce-fragment=\"1\"\u003e\u003cstrong data-mce-fragment=\"1\"\u003eUse as a LED constant current driver module\u003c\/strong\u003e\u003c\/span\u003e\u003c\/p\u003e\n\u003cp data-mce-fragment=\"1\"\u003e\u003cstrong\u003eUsage:\u003c\/strong\u003e\u003c\/p\u003e\n\u003cul\u003e\n\u003cli\u003e\u003cspan data-mce-fragment=\"1\"\u003eAdjust the “voltage potentiometer” so that the output voltage reaches the value you want. \u003c\/span\u003e\u003c\/li\u003e\n\u003cli\u003e\u003cspan data-mce-fragment=\"1\"\u003eAdjust the right button so that Digital meter shows the value of output current;Wire shorted output terminal, then adjust the “current potentiometer” so that the output current reaches a predetermined LED operating current.\u003c\/span\u003e\u003c\/li\u003e\n\u003cli\u003e\u003cspan data-mce-fragment=\"1\"\u003eConnect LED, work.\u003c\/span\u003e\u003c\/li\u003e\n\u003cli\u003e\u003cspan data-mce-fragment=\"1\"\u003e(1,2 steps as: Output is unloaded, do not connect LED)\u003c\/span\u003e\u003c\/li\u003e\n\u003cli\u003e\u003cspan data-mce-fragment=\"1\"\u003eVoltmeter and ammeter calibration method:\u003c\/span\u003e\u003c\/li\u003e\n\u003cli\u003e\u003cspan data-mce-fragment=\"1\"\u003eModule with manual calibration function can correct display precision voltage and current, if you think the current voltage and current accuracy to meet the requirements, do not perform the following operations.\u003c\/span\u003e\u003c\/li\u003e\n\u003c\/ul\u003e\n\u003cdiv data-mce-fragment=\"1\"\u003e\u003cspan data-mce-fragment=\"1\"\u003e\u003cstrong data-mce-fragment=\"1\"\u003eOutput voltage calibration steps\u003c\/strong\u003e\u003c\/span\u003e\u003c\/div\u003e\n\u003cul\u003e\n\u003cli\u003e\u003cspan data-mce-fragment=\"1\"\u003eStep 1, adjust the right button so that “OUT” LED lighted, Digital meter shows the value of output voltage; Press the right button for more than 2 seconds, release, Digital meter and “OUT” LED flashes in synchronization so that you enter the output voltage calibration mode.\u003c\/span\u003e\u003c\/li\u003e\n\u003cli\u003e\u003cspan data-mce-fragment=\"1\"\u003eStep 2, press the right button (normal speed), the voltage value is adding up a unit; Press the left button, minus a unit; Due to a unit is less than 0.1V, the minimum voltage display to 0.1V, so you need to continuously press 1-5 times to see the voltmeter change 0.1V, how many times voltmeter change 0.1V by pressing the key, depending on the current display voltage, the higher the voltage, the fewer the number of press.\u003c\/span\u003e\u003c\/li\u003e\n\u003cli\u003e\u003cspan data-mce-fragment=\"1\"\u003eStep 3, press the right button for more than 2 seconds, release, to exit the output voltage calibration mode. All parameters set to automatically power down to save.\u003c\/span\u003e\u003c\/li\u003e\n\u003c\/ul\u003e\n\u003cp data-mce-fragment=\"1\"\u003e\u003cspan data-mce-fragment=\"1\"\u003e\u003cstrong data-mce-fragment=\"1\"\u003e Input voltage calibration steps\u003c\/strong\u003e\u003c\/span\u003e\u003c\/p\u003e\n\u003cul\u003e\n\u003cli\u003e\u003cspan data-mce-fragment=\"1\"\u003eStep 1, adjust the right button so that “IN” LED lighted, Digital meter shows the value of input voltage; press the right button for more than 2 seconds, release,Digital meter and “IN” LED flashes in synchronization so that you enter the input voltage calibration mode.\u003c\/span\u003e\u003c\/li\u003e\n\u003cli\u003e\u003cspan data-mce-fragment=\"1\"\u003eSteps 2 and 3, consistent with the output voltage calibration method.\u003c\/span\u003e\u003c\/li\u003e\n\u003c\/ul\u003e\n\u003cdiv data-mce-fragment=\"1\"\u003e\n\u003cspan data-mce-fragment=\"1\"\u003e \u003c\/span\u003e\u003cspan data-mce-fragment=\"1\"\u003e\u003cstrong data-mce-fragment=\"1\"\u003eOutput current calibration steps\u003c\/strong\u003e\u003c\/span\u003e\n\u003c\/div\u003e\n\u003cul\u003e\n\u003cli\u003e\u003cspan data-mce-fragment=\"1\"\u003eStep 1, adjust the right button so that Digital meter shows the value of output Current. Press the right button for more than 2 seconds, release, Digital meter flashes in synchronization so that you enter the output current calibration mode.\u003c\/span\u003e\u003c\/li\u003e\n\u003cli\u003e\u003cspan data-mce-fragment=\"1\"\u003eStep 2,Connected to the load, ammeter in series, adjust the right and left button to change the display of digital meter, so that is consistent with the ammeter display .\u003c\/span\u003e\u003c\/li\u003e\n\u003c\/ul\u003e\n\u003cdiv id=\"pastingspan1\" data-mce-fragment=\"1\"\u003e\n\u003cspan data-mce-fragment=\"1\"\u003e\u003c\/span\u003e\u003cspan data-mce-fragment=\"1\"\u003e\u003c\/span\u003e\u003cspan data-mce-fragment=\"1\"\u003e\u003cstrong data-mce-fragment=\"1\"\u003ePackage included:\u003c\/strong\u003e\u003c\/span\u003e\n\u003c\/div\u003e\n\u003c\/div\u003e\n\u003cdiv data-mce-fragment=\"1\"\u003e\n\u003cul\u003e\n\u003cli\u003e\n\u003cspan data-mce-fragment=\"1\"\u003e \u003c\/span\u003e\u003cspan data-mce-fragment=\"1\"\u003e1PCS x 5A CC\/CV LED Drive Lithium charger Power Step-down Module USB Voltmeter +Case\u003c\/span\u003e\n\u003c\/li\u003e\n\u003c\/ul\u003e\n\u003c\/div\u003e\n\u003cspan data-mce-fragment=\"1\"\u003e \u003c\/span\u003e","published_at":"2020-11-19T14:45:58+08:00","created_at":"2020-11-19T14:45:57+08:00","vendor":"DIYMORE","type":"","tags":[],"price":1199,"price_min":1199,"price_max":1199,"available":true,"price_varies":false,"compare_at_price":null,"compare_at_price_min":0,"compare_at_price_max":0,"compare_at_price_varies":false,"variants":[{"id":37554047877320,"title":"Default Title","option1":"Default Title","option2":null,"option3":null,"sku":"010725","requires_shipping":true,"taxable":false,"featured_image":null,"available":true,"name":"5A CC\/CV LED Drive Step down Lithium charger Power USB Voltmeter Module CASE CA","public_title":null,"options":["Default Title"],"price":1199,"weight":0,"compare_at_price":null,"inventory_management":"shopify","barcode":null,"requires_selling_plan":false,"selling_plan_allocations":[],"quantity_rule":{"min":1,"max":null,"increment":1}}],"images":["\/\/www.diymore.cc\/cdn\/shop\/products\/010725_1.jpg?v=1605768361","\/\/www.diymore.cc\/cdn\/shop\/products\/010725_4.jpg?v=1605768361","\/\/www.diymore.cc\/cdn\/shop\/products\/010725_5.jpg?v=1605768361","\/\/www.diymore.cc\/cdn\/shop\/products\/010725_6.jpg?v=1605768362","\/\/www.diymore.cc\/cdn\/shop\/products\/010725_13.jpg?v=1605768362","\/\/www.diymore.cc\/cdn\/shop\/products\/010725_19.jpg?v=1605768362","\/\/www.diymore.cc\/cdn\/shop\/products\/010725faa.jpg?v=1605768362"],"featured_image":"\/\/www.diymore.cc\/cdn\/shop\/products\/010725_1.jpg?v=1605768361","options":["Title"],"media":[{"alt":null,"id":14987519951048,"position":1,"preview_image":{"aspect_ratio":1.0,"height":1000,"width":1000,"src":"\/\/www.diymore.cc\/cdn\/shop\/products\/010725_1.jpg?v=1605768361"},"aspect_ratio":1.0,"height":1000,"media_type":"image","src":"\/\/www.diymore.cc\/cdn\/shop\/products\/010725_1.jpg?v=1605768361","width":1000},{"alt":null,"id":14987519983816,"position":2,"preview_image":{"aspect_ratio":1.0,"height":1000,"width":1000,"src":"\/\/www.diymore.cc\/cdn\/shop\/products\/010725_4.jpg?v=1605768361"},"aspect_ratio":1.0,"height":1000,"media_type":"image","src":"\/\/www.diymore.cc\/cdn\/shop\/products\/010725_4.jpg?v=1605768361","width":1000},{"alt":null,"id":14987520016584,"position":3,"preview_image":{"aspect_ratio":1.0,"height":1000,"width":1000,"src":"\/\/www.diymore.cc\/cdn\/shop\/products\/010725_5.jpg?v=1605768361"},"aspect_ratio":1.0,"height":1000,"media_type":"image","src":"\/\/www.diymore.cc\/cdn\/shop\/products\/010725_5.jpg?v=1605768361","width":1000},{"alt":null,"id":14987520049352,"position":4,"preview_image":{"aspect_ratio":1.0,"height":1000,"width":1000,"src":"\/\/www.diymore.cc\/cdn\/shop\/products\/010725_6.jpg?v=1605768362"},"aspect_ratio":1.0,"height":1000,"media_type":"image","src":"\/\/www.diymore.cc\/cdn\/shop\/products\/010725_6.jpg?v=1605768362","width":1000},{"alt":null,"id":14987520082120,"position":5,"preview_image":{"aspect_ratio":1.0,"height":1000,"width":1000,"src":"\/\/www.diymore.cc\/cdn\/shop\/products\/010725_13.jpg?v=1605768362"},"aspect_ratio":1.0,"height":1000,"media_type":"image","src":"\/\/www.diymore.cc\/cdn\/shop\/products\/010725_13.jpg?v=1605768362","width":1000},{"alt":null,"id":14987520114888,"position":6,"preview_image":{"aspect_ratio":1.0,"height":1000,"width":1000,"src":"\/\/www.diymore.cc\/cdn\/shop\/products\/010725_19.jpg?v=1605768362"},"aspect_ratio":1.0,"height":1000,"media_type":"image","src":"\/\/www.diymore.cc\/cdn\/shop\/products\/010725_19.jpg?v=1605768362","width":1000},{"alt":null,"id":14987520147656,"position":7,"preview_image":{"aspect_ratio":1.414,"height":495,"width":700,"src":"\/\/www.diymore.cc\/cdn\/shop\/products\/010725faa.jpg?v=1605768362"},"aspect_ratio":1.414,"height":495,"media_type":"image","src":"\/\/www.diymore.cc\/cdn\/shop\/products\/010725faa.jpg?v=1605768362","width":700}],"requires_selling_plan":false,"selling_plan_groups":[],"content":"\u003cdiv data-mce-fragment=\"1\"\u003e\n\u003cspan data-mce-fragment=\"1\"\u003e\u003cstrong data-mce-fragment=\"1\"\u003e\u003c\/strong\u003e\u003c\/span\u003e\u003cspan data-mce-fragment=\"1\"\u003e\u003c\/span\u003e\n\u003cp data-mce-fragment=\"1\"\u003e\u003cspan data-mce-fragment=\"1\"\u003e\u003cstrong data-mce-fragment=\"1\"\u003eHighlights :\u003c\/strong\u003e\u003c\/span\u003e\u003c\/p\u003e\n\u003cul\u003e\n\u003cli\u003e\u003cspan data-mce-fragment=\"1\"\u003eModule with crystal shell,safer and more beautiful.\u003c\/span\u003e\u003c\/li\u003e\n\u003cli\u003e\u003cspan data-mce-fragment=\"1\"\u003eContains the voltmeter, ammeter, power meter, USB interfacefor charging the digital products.\u003c\/span\u003e\u003c\/li\u003e\n\u003c\/ul\u003e\n\u003cp data-mce-fragment=\"1\"\u003e\u003cspan data-mce-fragment=\"1\"\u003e\u003cstrong data-mce-fragment=\"1\"\u003eNote:\u003c\/strong\u003e\u003c\/span\u003e\u003c\/p\u003e\n\u003cul\u003e\n\u003cli\u003e\u003cspan data-mce-fragment=\"1\"\u003eWhen you use the product, the module inputs and outputs to be isolated from ground.\u003c\/span\u003e\u003c\/li\u003e\n\u003cli\u003e\u003cspan data-mce-fragment=\"1\"\u003eUSB output voltage is consistent with the module, not a fixed 5V output. \u003c\/span\u003e\u003c\/li\u003e\n\u003cli\u003e\u003cspan data-mce-fragment=\"1\"\u003eWhen charging for digital equipment, make sure USB output voltage is 5V.\u003c\/span\u003e\u003c\/li\u003e\n\u003cli\u003e\u003cspan data-mce-fragment=\"1\"\u003eSome customers report: “The module can not adjust the output voltage is always equal to the input voltage.”\u003c\/span\u003e\u003c\/li\u003e\n\u003cli\u003e\u003cspan data-mce-fragment=\"1\"\u003e When you encounter this problem, please counterclockwise rotation of the “voltage potentiometer” 10 laps or more, \u003c\/span\u003e\u003c\/li\u003e\n\u003cli\u003e\u003cspan data-mce-fragment=\"1\"\u003ethen use the module you can adjust the output voltage. Because the factory default output voltage of about 20V.\u003c\/span\u003e\u003c\/li\u003e\n\u003cli\u003e\u003cspan data-mce-fragment=\"1\"\u003e4.Shell assembly is very simple, but \"left\"\"right\"\"front\" panel are directional, you must pay attention during assembly!\u003c\/span\u003e\u003c\/li\u003e\n\u003c\/ul\u003e\n\u003cdiv data-mce-fragment=\"1\"\u003e\u003cspan data-mce-fragment=\"1\"\u003e\u003cstrong data-mce-fragment=\"1\"\u003eSpecifications\u003c\/strong\u003e\u003c\/span\u003e\u003c\/div\u003e\n\u003cul\u003e\n\u003cli\u003e\u003cspan data-mce-fragment=\"1\"\u003eInput voltage range:5-36VDC(Input voltagehigher than 6.2V, constant function will be effective)\u003c\/span\u003e\u003c\/li\u003e\n\u003cli\u003e\u003cspan data-mce-fragment=\"1\"\u003eOutput voltage range:1.25-32VDC adjustable(Output voltage higher than 6.2V, constant function will be effective)\u003c\/span\u003e\u003c\/li\u003e\n\u003cli\u003e\u003cspan data-mce-fragment=\"1\"\u003eOutput current: 0-5A\u003c\/span\u003e\u003c\/li\u003e\n\u003cli\u003e\u003cspan data-mce-fragment=\"1\"\u003eOutput power: 75W\u003c\/span\u003e\u003c\/li\u003e\n\u003cli\u003e\u003cspan data-mce-fragment=\"1\"\u003eHigh efficiency up to 96%\u003c\/span\u003e\u003c\/li\u003e\n\u003cli\u003e\u003cspan data-mce-fragment=\"1\"\u003eBuilt in thermal shutdown function\u003c\/span\u003e\u003c\/li\u003e\n\u003cli\u003e\u003cspan data-mce-fragment=\"1\"\u003eBuilt in current limit function\u003c\/span\u003e\u003c\/li\u003e\n\u003cli\u003e\u003cspan data-mce-fragment=\"1\"\u003eBuilt in output short protection function\u003c\/span\u003e\u003c\/li\u003e\n\u003cli\u003e\u003cspan data-mce-fragment=\"1\"\u003eInput reverse polarity protection: None (if required, high current diode in series with the input).\u003c\/span\u003e\u003c\/li\u003e\n\u003cli\u003e\u003cspan data-mce-fragment=\"1\"\u003eBare board size:L x W x H =68.2×38.8×15mm\u003c\/span\u003e\u003c\/li\u003e\n\u003cli\u003e\u003cspan data-mce-fragment=\"1\"\u003eWeight:73g\u003c\/span\u003e\u003c\/li\u003e\n\u003c\/ul\u003e\n\u003cp data-mce-fragment=\"1\"\u003e\u003cspan data-mce-fragment=\"1\"\u003e\u003cstrong data-mce-fragment=\"1\"\u003eApplication\u003c\/strong\u003e\u003c\/span\u003e\u003c\/p\u003e\n\u003cp data-mce-fragment=\"1\"\u003e\u003cspan data-mce-fragment=\"1\"\u003e\u003cstrong data-mce-fragment=\"1\"\u003eUse as a step-down modules with overcurrent protection \u003c\/strong\u003e\u003c\/span\u003e\u003c\/p\u003e\n\u003cp data-mce-fragment=\"1\"\u003e\u003cstrong\u003eUsage:\u003c\/strong\u003e\u003c\/p\u003e\n\u003cul\u003e\n\u003cli\u003e\u003cspan data-mce-fragment=\"1\"\u003eAdjust the right button so that “OUT” LED lighted, Digital meter shows the value of output voltage ,adjust the “voltage potentiometer” so that the output voltage reaches the value you want. \u003c\/span\u003e\u003c\/li\u003e\n\u003cli\u003e\u003cspan data-mce-fragment=\"1\"\u003eAdjust the right button so that Digital meter shows the value of output current;Wire shorted output terminal, then adjust the “current potentiometer” so that the output current reaches a predetermined overcurrent protection value. (For example, the Digital meter displays the current value of 4A, then you can use the module to a maximum current of 4A)\u003c\/span\u003e\u003c\/li\u003e\n\u003cli\u003e\u003cspan data-mce-fragment=\"1\"\u003eConnected to the load.\u003c\/span\u003e\u003c\/li\u003e\n\u003c\/ul\u003e\n\u003cp data-mce-fragment=\"1\"\u003e\u003cspan data-mce-fragment=\"1\"\u003e\u003cstrong data-mce-fragment=\"1\"\u003eUse as a battery charger\u003c\/strong\u003e\u003c\/span\u003e\u003c\/p\u003e\n\u003cp data-mce-fragment=\"1\"\u003e\u003cstrong\u003eUsage:\u003c\/strong\u003e\u003c\/p\u003e\n\u003cul\u003e\n\u003cli\u003e\u003cspan data-mce-fragment=\"1\"\u003eMake sure you need to charge the battery float voltage and charging current; \u003c\/span\u003e\u003c\/li\u003e\n\u003cli\u003e\u003cspan data-mce-fragment=\"1\"\u003e(if lithium parameters 3.7V\/2200mAh, then the float voltage is 4.2V, the maximum charging current 1C, ie 2200mA)\u003c\/span\u003e\u003c\/li\u003e\n\u003cli\u003e\u003cspan data-mce-fragment=\"1\"\u003eUnder no-load conditions, adjust the “Voltage potentiometer” so that the output voltage reaches the float voltage; \u003c\/span\u003e\u003c\/li\u003e\n\u003cli\u003e\u003cspan data-mce-fragment=\"1\"\u003e(if to 3.7V rechargeable lithium battery, the output voltage can be adjusted to 4.2V)\u003c\/span\u003e\u003c\/li\u003e\n\u003cli\u003e\u003cspan data-mce-fragment=\"1\"\u003eAdjust the right button so that Digital meter shows the value of output current;Wire shorted output terminal, then adjust the “current potentiometer” so that the output current reaches a predetermined Charging current value.\u003c\/span\u003e\u003c\/li\u003e\n\u003cli\u003e\u003cspan data-mce-fragment=\"1\"\u003eCharge turn lamp current factory default is 0.1 times the charging current; \u003c\/span\u003e\u003c\/li\u003e\n\u003cli\u003e\u003cspan data-mce-fragment=\"1\"\u003e(Battery during charging current is gradually reduced, if the charge current setting is 1A, then when the charge current is less than 0.1A, blue lights turned off, the green light is on, which means that the battery is fully charged)\u003c\/span\u003e\u003c\/li\u003e\n\u003cli\u003e\u003cspan data-mce-fragment=\"1\"\u003econnected to the battery charge.\u003c\/span\u003e\u003c\/li\u003e\n\u003c\/ul\u003e\n\u003cp data-mce-fragment=\"1\"\u003e\u003cspan data-mce-fragment=\"1\"\u003e(1,2,3,4 steps as: Output is unloaded, do not connect the battery)\u003c\/span\u003e\u003c\/p\u003e\n\u003cp data-mce-fragment=\"1\"\u003e\u003cspan data-mce-fragment=\"1\"\u003e\u003cstrong data-mce-fragment=\"1\"\u003eUse as a LED constant current driver module\u003c\/strong\u003e\u003c\/span\u003e\u003c\/p\u003e\n\u003cp data-mce-fragment=\"1\"\u003e\u003cstrong\u003eUsage:\u003c\/strong\u003e\u003c\/p\u003e\n\u003cul\u003e\n\u003cli\u003e\u003cspan data-mce-fragment=\"1\"\u003eAdjust the “voltage potentiometer” so that the output voltage reaches the value you want. \u003c\/span\u003e\u003c\/li\u003e\n\u003cli\u003e\u003cspan data-mce-fragment=\"1\"\u003eAdjust the right button so that Digital meter shows the value of output current;Wire shorted output terminal, then adjust the “current potentiometer” so that the output current reaches a predetermined LED operating current.\u003c\/span\u003e\u003c\/li\u003e\n\u003cli\u003e\u003cspan data-mce-fragment=\"1\"\u003eConnect LED, work.\u003c\/span\u003e\u003c\/li\u003e\n\u003cli\u003e\u003cspan data-mce-fragment=\"1\"\u003e(1,2 steps as: Output is unloaded, do not connect LED)\u003c\/span\u003e\u003c\/li\u003e\n\u003cli\u003e\u003cspan data-mce-fragment=\"1\"\u003eVoltmeter and ammeter calibration method:\u003c\/span\u003e\u003c\/li\u003e\n\u003cli\u003e\u003cspan data-mce-fragment=\"1\"\u003eModule with manual calibration function can correct display precision voltage and current, if you think the current voltage and current accuracy to meet the requirements, do not perform the following operations.\u003c\/span\u003e\u003c\/li\u003e\n\u003c\/ul\u003e\n\u003cdiv data-mce-fragment=\"1\"\u003e\u003cspan data-mce-fragment=\"1\"\u003e\u003cstrong data-mce-fragment=\"1\"\u003eOutput voltage calibration steps\u003c\/strong\u003e\u003c\/span\u003e\u003c\/div\u003e\n\u003cul\u003e\n\u003cli\u003e\u003cspan data-mce-fragment=\"1\"\u003eStep 1, adjust the right button so that “OUT” LED lighted, Digital meter shows the value of output voltage; Press the right button for more than 2 seconds, release, Digital meter and “OUT” LED flashes in synchronization so that you enter the output voltage calibration mode.\u003c\/span\u003e\u003c\/li\u003e\n\u003cli\u003e\u003cspan data-mce-fragment=\"1\"\u003eStep 2, press the right button (normal speed), the voltage value is adding up a unit; Press the left button, minus a unit; Due to a unit is less than 0.1V, the minimum voltage display to 0.1V, so you need to continuously press 1-5 times to see the voltmeter change 0.1V, how many times voltmeter change 0.1V by pressing the key, depending on the current display voltage, the higher the voltage, the fewer the number of press.\u003c\/span\u003e\u003c\/li\u003e\n\u003cli\u003e\u003cspan data-mce-fragment=\"1\"\u003eStep 3, press the right button for more than 2 seconds, release, to exit the output voltage calibration mode. All parameters set to automatically power down to save.\u003c\/span\u003e\u003c\/li\u003e\n\u003c\/ul\u003e\n\u003cp data-mce-fragment=\"1\"\u003e\u003cspan data-mce-fragment=\"1\"\u003e\u003cstrong data-mce-fragment=\"1\"\u003e Input voltage calibration steps\u003c\/strong\u003e\u003c\/span\u003e\u003c\/p\u003e\n\u003cul\u003e\n\u003cli\u003e\u003cspan data-mce-fragment=\"1\"\u003eStep 1, adjust the right button so that “IN” LED lighted, Digital meter shows the value of input voltage; press the right button for more than 2 seconds, release,Digital meter and “IN” LED flashes in synchronization so that you enter the input voltage calibration mode.\u003c\/span\u003e\u003c\/li\u003e\n\u003cli\u003e\u003cspan data-mce-fragment=\"1\"\u003eSteps 2 and 3, consistent with the output voltage calibration method.\u003c\/span\u003e\u003c\/li\u003e\n\u003c\/ul\u003e\n\u003cdiv data-mce-fragment=\"1\"\u003e\n\u003cspan data-mce-fragment=\"1\"\u003e \u003c\/span\u003e\u003cspan data-mce-fragment=\"1\"\u003e\u003cstrong data-mce-fragment=\"1\"\u003eOutput current calibration steps\u003c\/strong\u003e\u003c\/span\u003e\n\u003c\/div\u003e\n\u003cul\u003e\n\u003cli\u003e\u003cspan data-mce-fragment=\"1\"\u003eStep 1, adjust the right button so that Digital meter shows the value of output Current. Press the right button for more than 2 seconds, release, Digital meter flashes in synchronization so that you enter the output current calibration mode.\u003c\/span\u003e\u003c\/li\u003e\n\u003cli\u003e\u003cspan data-mce-fragment=\"1\"\u003eStep 2,Connected to the load, ammeter in series, adjust the right and left button to change the display of digital meter, so that is consistent with the ammeter display .\u003c\/span\u003e\u003c\/li\u003e\n\u003c\/ul\u003e\n\u003cdiv id=\"pastingspan1\" data-mce-fragment=\"1\"\u003e\n\u003cspan data-mce-fragment=\"1\"\u003e\u003c\/span\u003e\u003cspan data-mce-fragment=\"1\"\u003e\u003c\/span\u003e\u003cspan data-mce-fragment=\"1\"\u003e\u003cstrong data-mce-fragment=\"1\"\u003ePackage included:\u003c\/strong\u003e\u003c\/span\u003e\n\u003c\/div\u003e\n\u003c\/div\u003e\n\u003cdiv data-mce-fragment=\"1\"\u003e\n\u003cul\u003e\n\u003cli\u003e\n\u003cspan data-mce-fragment=\"1\"\u003e \u003c\/span\u003e\u003cspan data-mce-fragment=\"1\"\u003e1PCS x 5A CC\/CV LED Drive Lithium charger Power Step-down Module USB Voltmeter +Case\u003c\/span\u003e\n\u003c\/li\u003e\n\u003c\/ul\u003e\n\u003c\/div\u003e\n\u003cspan data-mce-fragment=\"1\"\u003e \u003c\/span\u003e"}